n8n Tutorial for Beginners: Build Your First AI Automation in 45 Minutes (From Scratch)

n8n is a workflow automation tool.
So, before learning n8n, it is important that you understand what a workflow truly means.
So, what is a workflow?
A workflow is a set of steps you follow to complete a digital task from start to finish.
If a task needs more than one step to get done, it's usually called a workflow.
Think of it like following a recipe.
Each step leads to the next, and together, they help you achieve the final result.
For example, imagine you're posting a photo on Instagram.
To achieve it, you would follow a simple workflow like:
- Choose a photo
- Log in to Instagram and upload the photo
- Write a caption
- Add #hashtags
- Share the Photo
Another quick example: Imagine you're posting an AI-generated article to your website.
To achieve it, you would follow a simple workflow like:
- Choose a topic
- Prepare table of contents
- Expand the table of contents into an article
- Publish the article
And, if you are performing these workflows repeatedly, like daily, weekly, or multiple times a month, you should consider automating them.
And this is where n8n comes in.
What is n8n?
n8n is a software that helps you automate digital workflows.
It helps business owners, digital marketers, agency owners, CEOs, and many other professionals automate tasks that are manual, time-consuming, and repetitive.
For example, it helps automate tasks like:
- Responding to Google My Business Profile Reviews.
- Appointment booking management
- Calling the lead for qualification after a form is filled
- Generating articles for the website and social media channels like LinkedIn.
- AI and RAG-based customer support for a business that faces a lot of queries from customers
- Enriching the social media data related to the leads before sending them cold-outreach emails
- Ufff...The list is big.
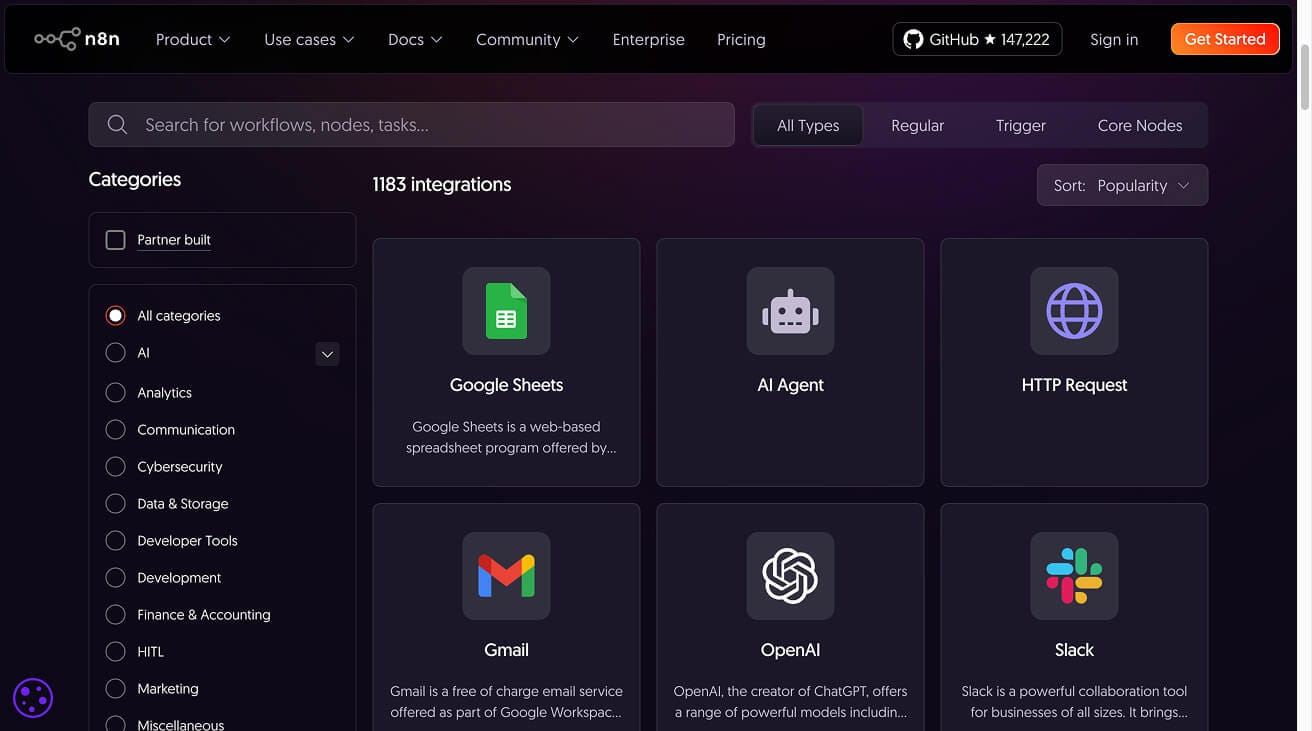
n8n ships with 1000+ integrations
If you notice any digital workflow, it involves working with multiple services.
For example, for the AI-generated article workflow, we need to work with:
- Perplexity AI for generating a table of contents
- Claude AI for writing the article
- And a content management system for publishing the article
And because n8n is a workflow automation tool, it supports integration with 1000+ services like WhatsApp, Perplexity AI, etc.
The concept of integrations will become clearer when you start building automations involving multiple services.
For now, let's understand...
Anatomy of a workflow and n8n
Automating a workflow with n8n becomes easier only when you understand its anatomy.
A workflow will always consist of a certain number of steps.
So, when you try to automate a workflow inside an automation tool like n8n, you'll build it in steps, too.
For example, the workflow for writing an article involves four steps:
- Choose a topic for the article
- Prepare table of contents
- Expand the table of contents into an article
- Publish the article
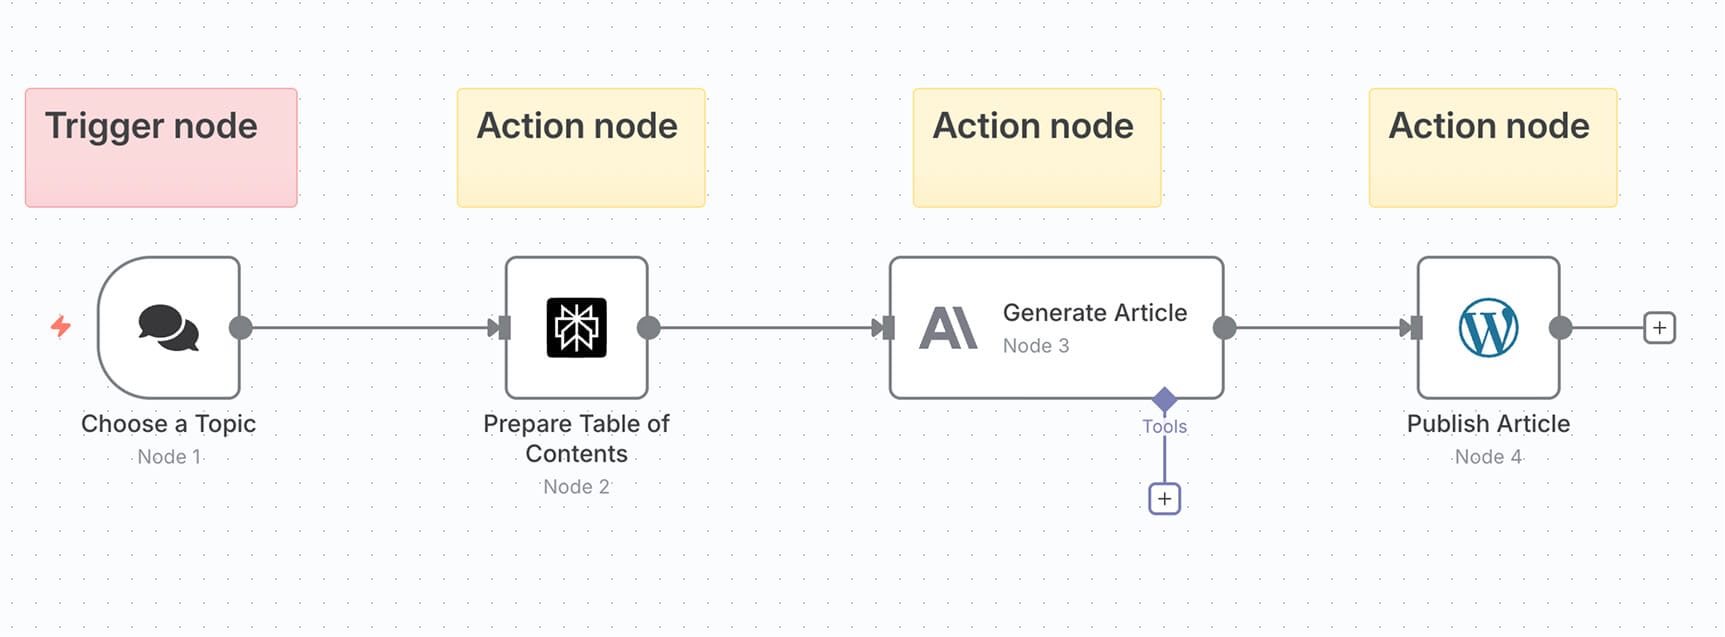
And when you automate this workflow inside n8n, it involves four steps or more:
We should provide input data to get the desired output
A workflow always begins with some kind of input data.
The input data we provide in the first step of the workflow will help us collect the desired output in the last step of the workflow.
For example, the workflow for writing an article always begins with choosing a topic (input data) and it ends with a publishable article (desired output).
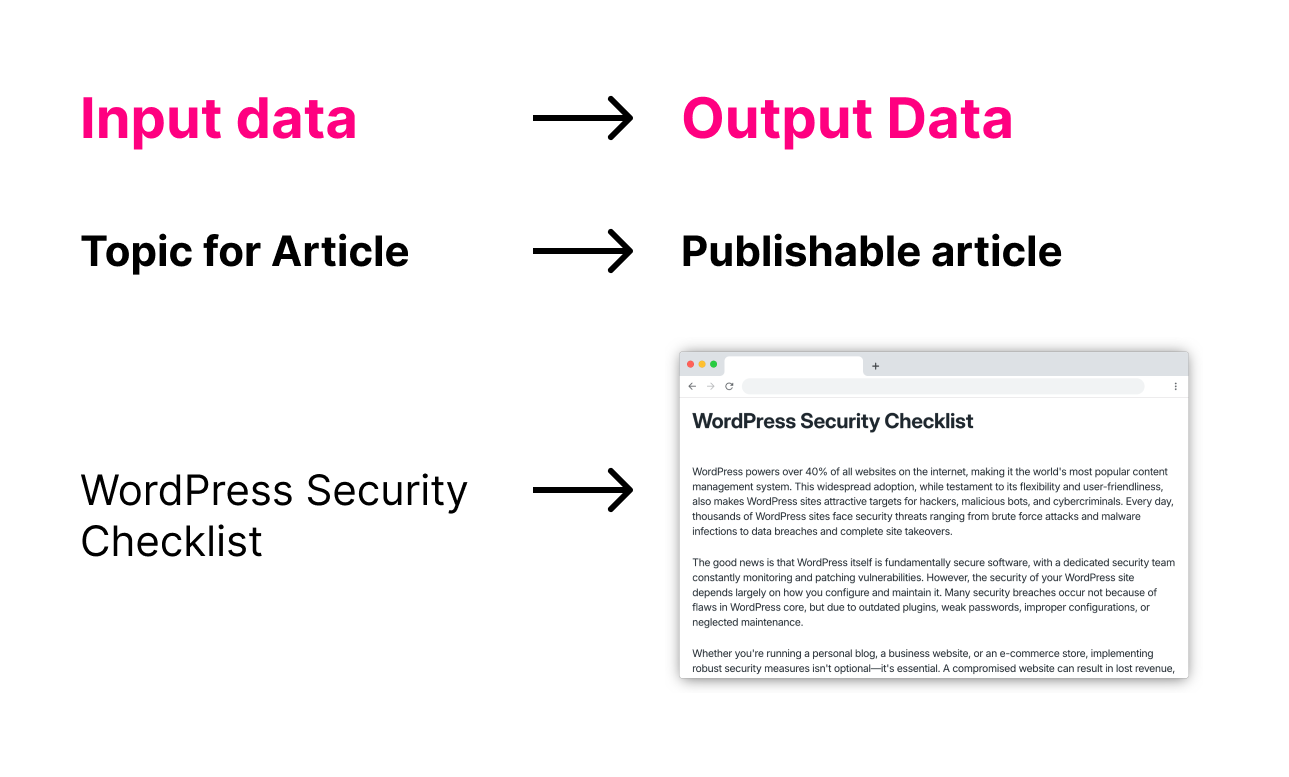
This also means that when automating this workflow inside n8n, it is important that we provide input data to our automation so that it spits out the output data:

Each step of the workflow builds on the previous step
In other words, each step depends on the output of the previously executed steps.

For example, the table of contents (TOC) for an article can be generated only after we choose a topic, and an effective article can be written only once we finalize the table of contents.

And to ensure this dependency, n8n automatically connects each step with its previous step.
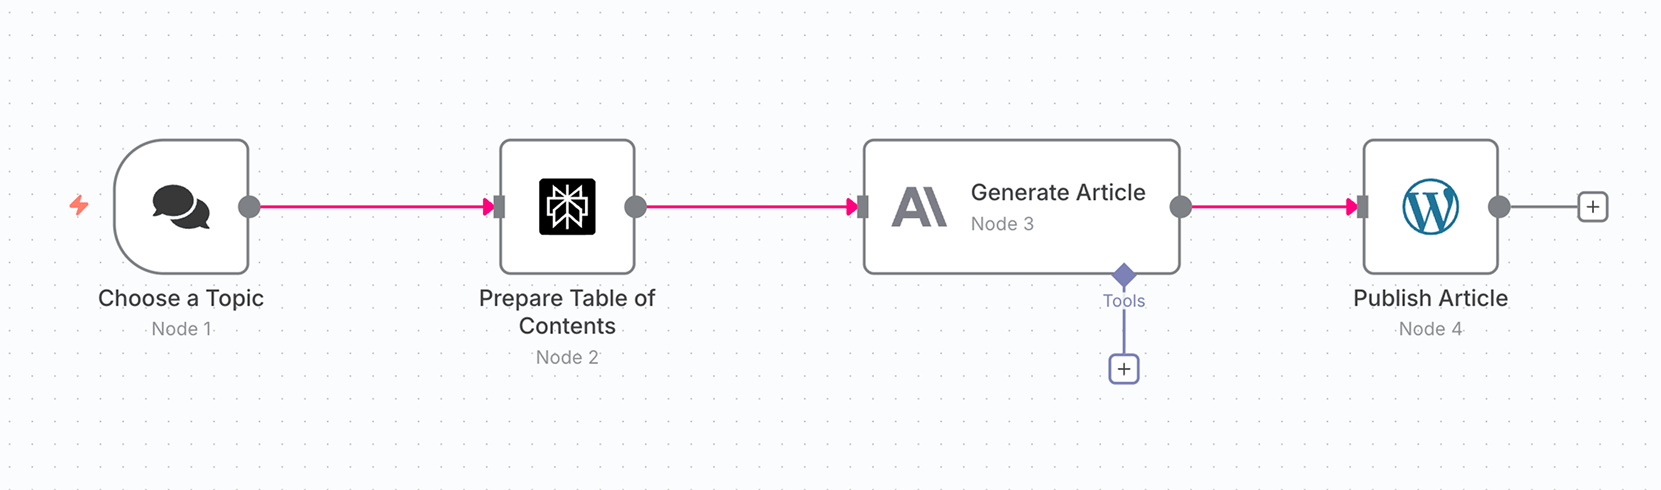
If you notice the above image, the connections between steps are indicated with pink color for demonstration purposes.
And it is this connection between the steps that will help pass input data from one step to the next and eventually produce the desired output.
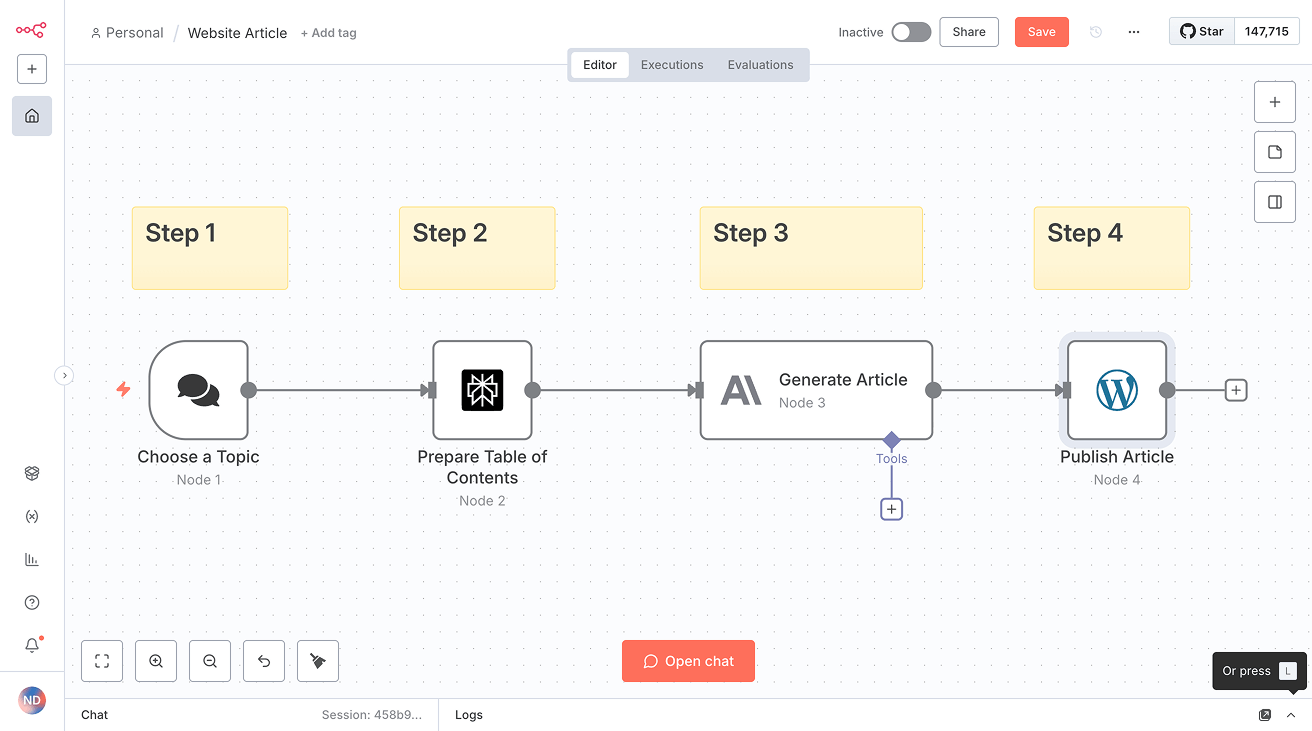
Inside n8n, each step of a workflow is performed by adding a node to the automation pipeline
For example, the article workflow has four steps.
So, when I automated the workflow inside n8n, I had to add four or more nodes to the automation pipeline:
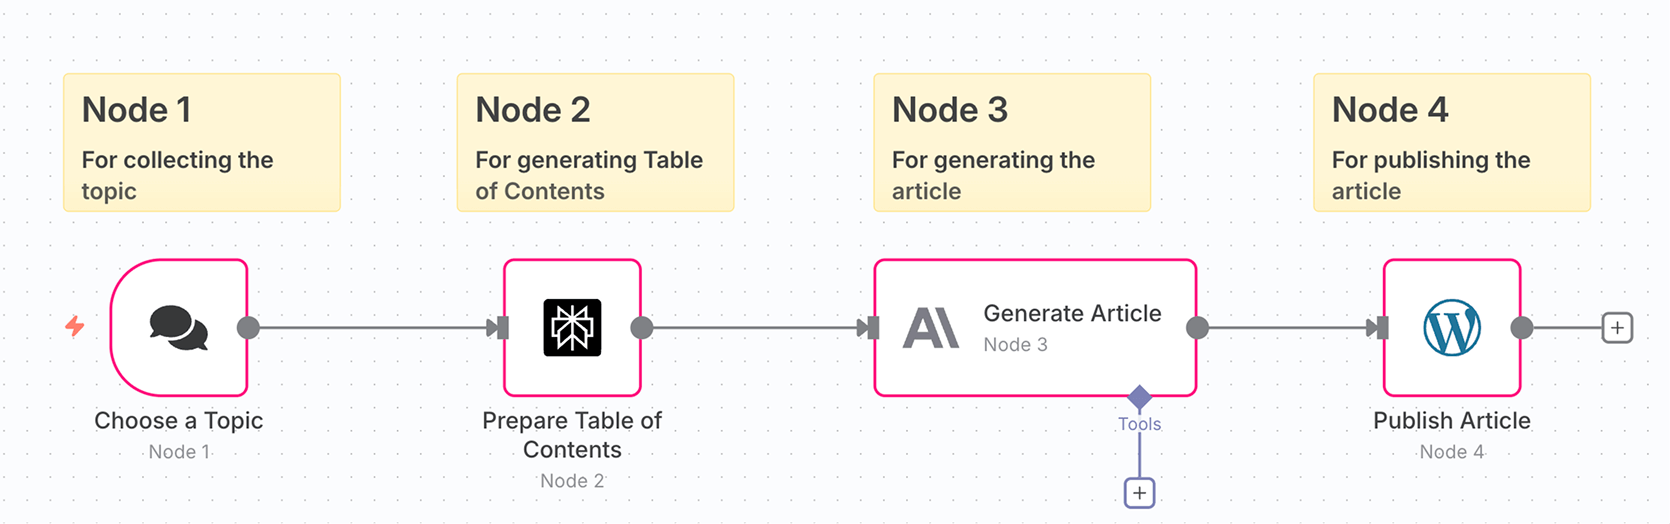
Each node is responsible for performing a single step of the workflow.
Sometimes, we might need to add multiple nodes to perform a single step.
You can think of nodes as building blocks of your automation.
They connect together to run your workflow automatically, in sequence, without you having to do each step manually.
This also means that data from one node gets automatically passed to the subsequent nodes in the pipeline.
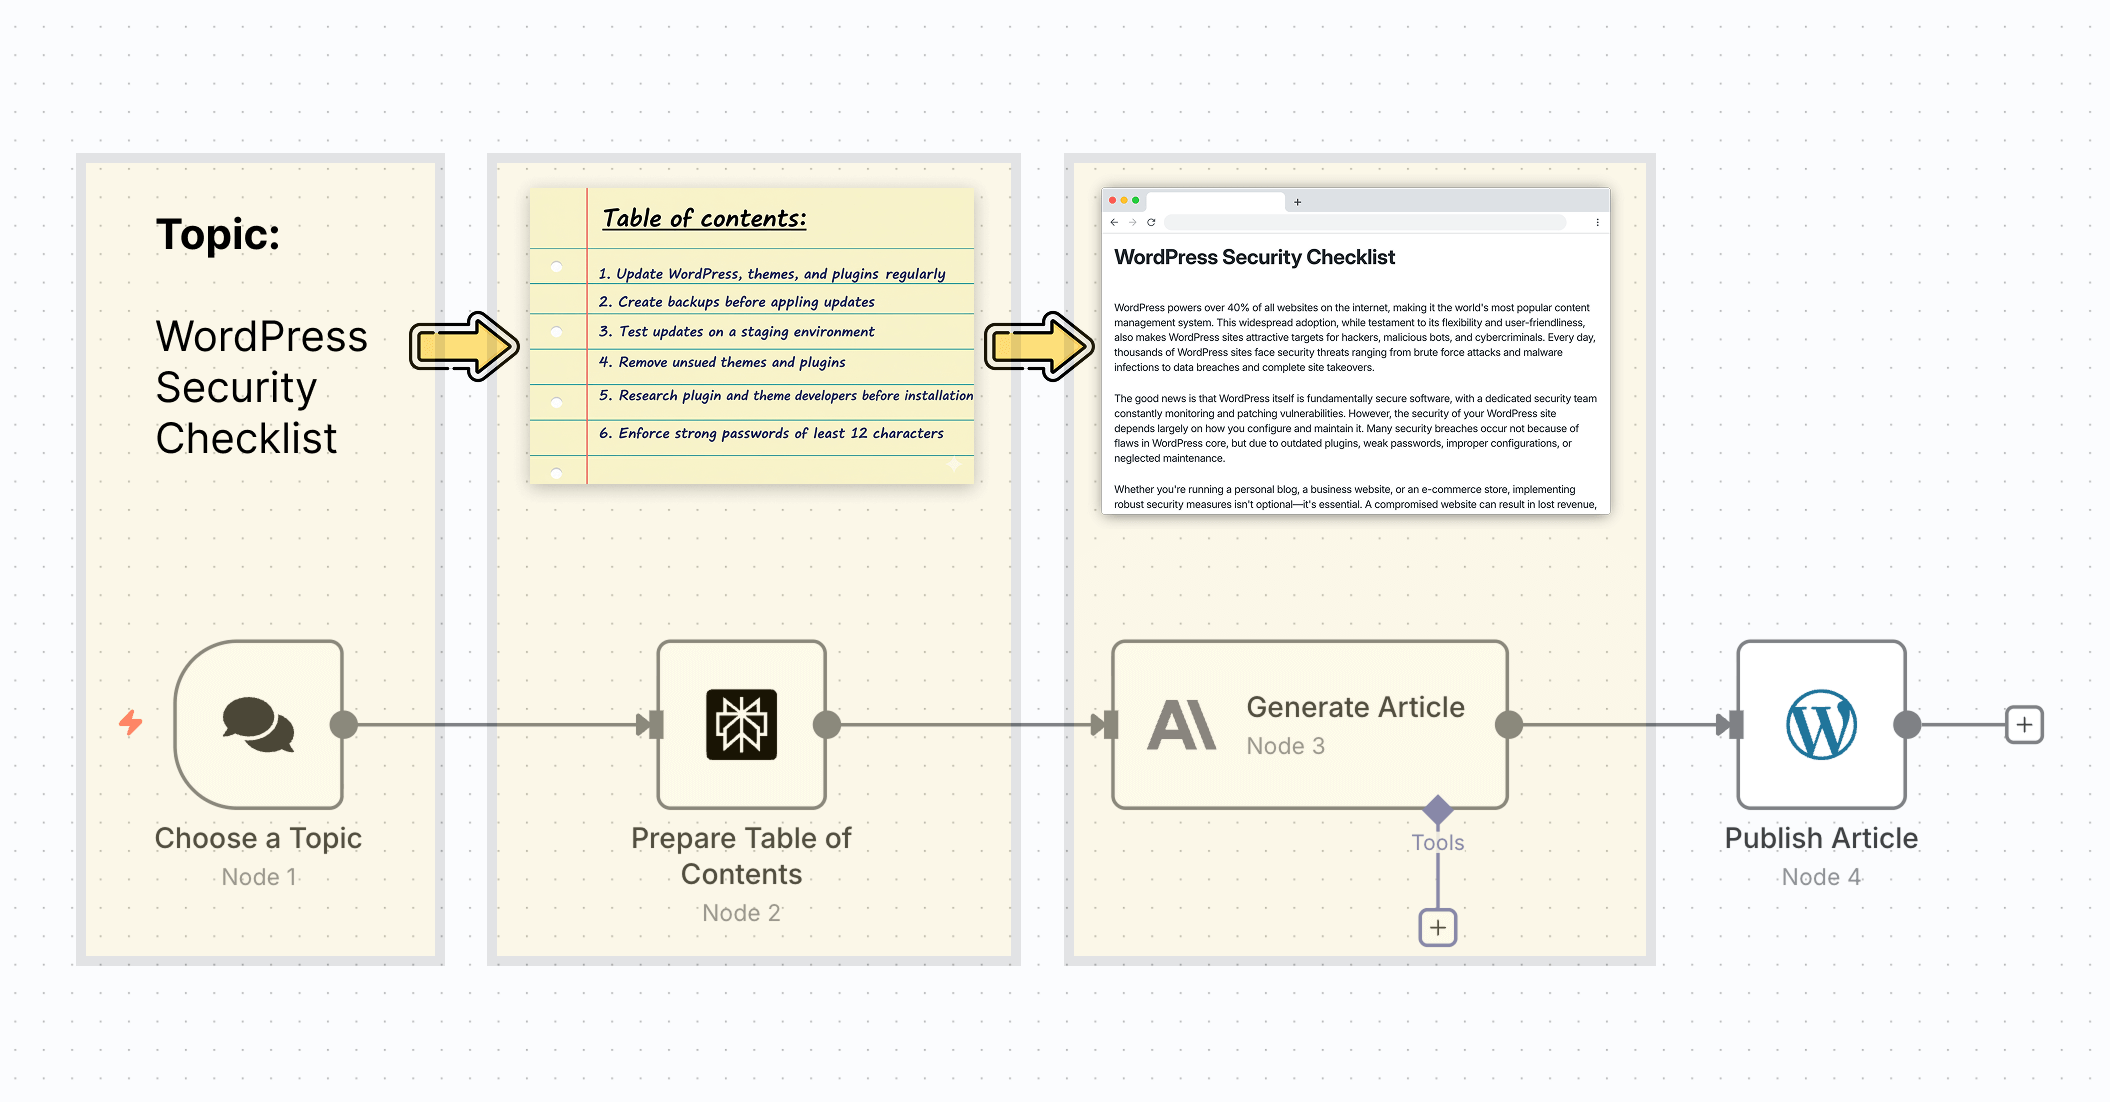
For example, for the article workflow, once we choose a topic and provide it to node 1:
- Node 1 passes the topic to node 2, where the table of contents for the given topic is generated.
- Next, the topic from node 1 and the table of contents from node 2 are sent to node 3, where it generates the article based on these inputs.
- Finally, the topic from node 1, the table of contents from node 2, and article from node 3 are sent to node 4 where we will publish the article to a CMS.
We will talk about APIs in less than 5 minutes from now.
Next, let's understand n8n nodes further because our automations depend on them.
Types of nodes in an n8n automation
There are two types of nodes in n8n:
- Trigger nodes - They are responsible for triggering or starting the automation and collecting the input data required for the automation to be useful.
- Action nodes - They work with the input data by performing individual actions of the workflow. The last action node in the pipeline produces the desired output.
Let me elaborate.
What is a "Trigger" node, and how to choose the right trigger node for your automation
As the name suggests, a "Trigger" node is responsible for triggering or starting the automation. So an automation always begins with a "Trigger"node.
Not just that, a trigger node is also responsible for collecting the input data that the automation relies on to function effectively.
And n8n ships with many types of trigger nodes.
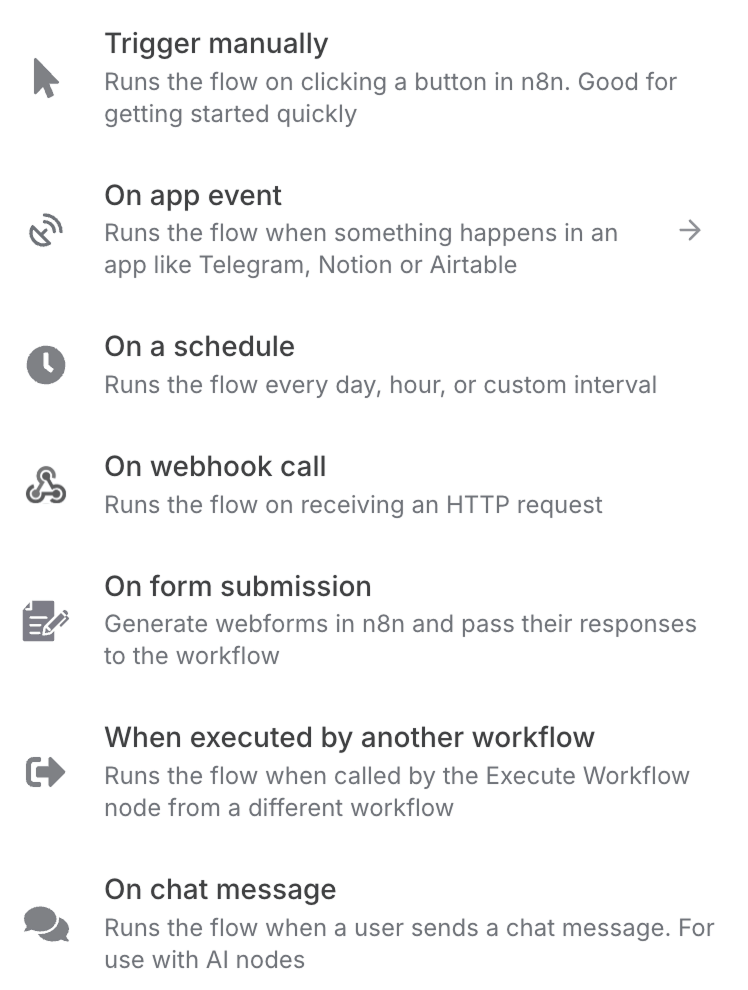
And choosing the right trigger node depends on the workflow at hand.
For example, if you are designing a workflow for website live chat support, you should choose "On chat message" as the trigger node.

It will trigger the automation as soon as a user sends a message inside the live chat.
Here, the user message acts as the input data for the automation.
It also captures the user message so that we can process the message and respond accordingly.
Similarly, if you want to trigger an automation when a form is submitted, you need to pick the "On form submission" node.
Apart from these default trigger nodes, n8n also supports service-related trigger nodes.
n8n supports integration with a ton of services, like:
- WhatsApp Business Cloud
- Google services like Sheets, Gmail, etc.
- Telegram
- 1100+ other services
And each of those 1100+ services comes with its own trigger nodes.
For example, n8n supports integration with WhatsApp, and it provides 10+ trigger nodes for WhatsApp:
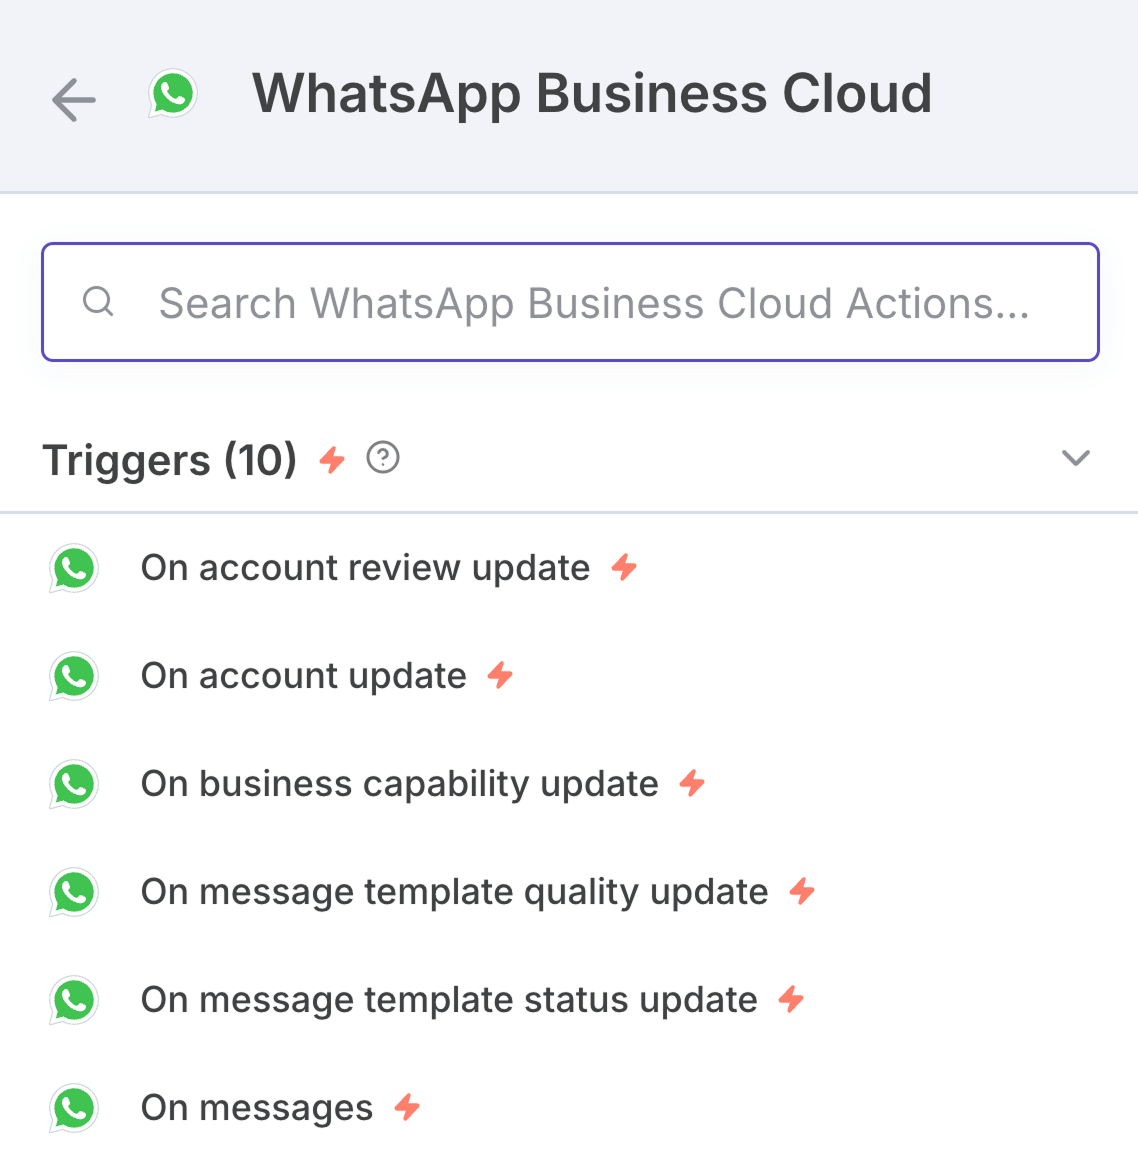
These trigger nodes are helpful if you want to use WhatsApp for providing customer support, sharing a product catalog, etc.
For example, if you add the "On messages" node from WhatsApp as a trigger to your workflow, it will start the automation as soon as a message is received inside WhatsApp:
And if you observe, it also captured the user message and passed it to the subsequent nodes, where the message was processed and responded to.
That's the purpose of trigger nodes.
Anyway, for our AI-generated article workflow, what trigger node should we use?
In our case, the trigger node should capture the topic and then pass it to the remaining nodes so that we can receive an article as the output.
So, we need to choose a trigger node that accepts text as input from us.
And the "On chat message" trigger node does exactly that.
We usually use this node to add a live chat widget to a website, but we can also use it to provide a topic as input to our automation.
Alright! Enough theory.
Come on, let's build this article publishing automation from scratch so that you can understand how to use n8n.
First, perform the workflow manually
I know you're eager to jump into n8n.
But not yet.
Before creating an automation for a workflow, you must perform the workflow manually multiple times.
It will help you understand how each step works and which tool to use for each step.
And once the manual process is finalized, it can be easily automated because we have a plan about how to implement each step using a particular tool.
So, first, let's generate an article using AI manually.
Step 1: Choosing a topic
I want to generate an article about "WordPress Security Checklist".
I encourage you to choose a topic that you like. You don't have to go work with "WordPress Security Checklist".
Step 2: Generating the "Table of Contents (TOC)" for the topic selected
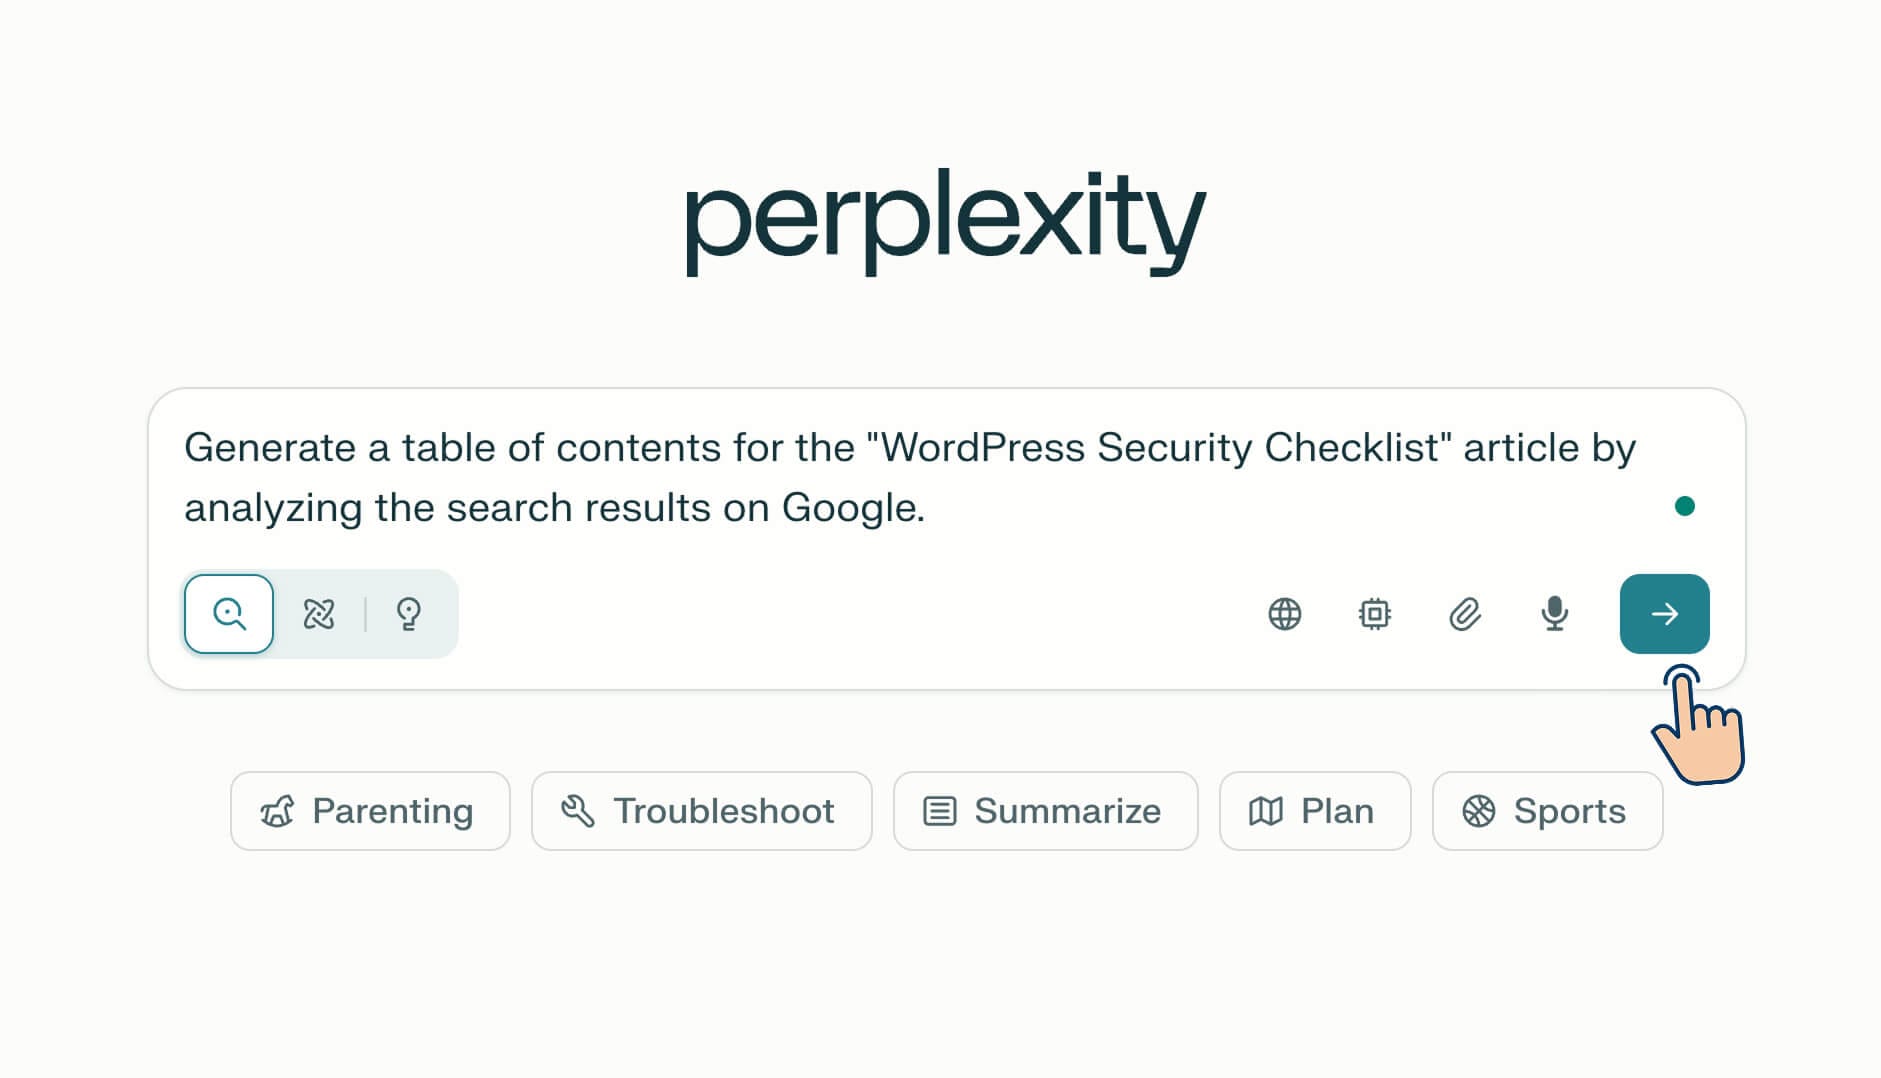
Perplexity AI is great at generating a table of contents for an article by analysing the top search results from Google Search Engine.
So, open up perplexity.ai.
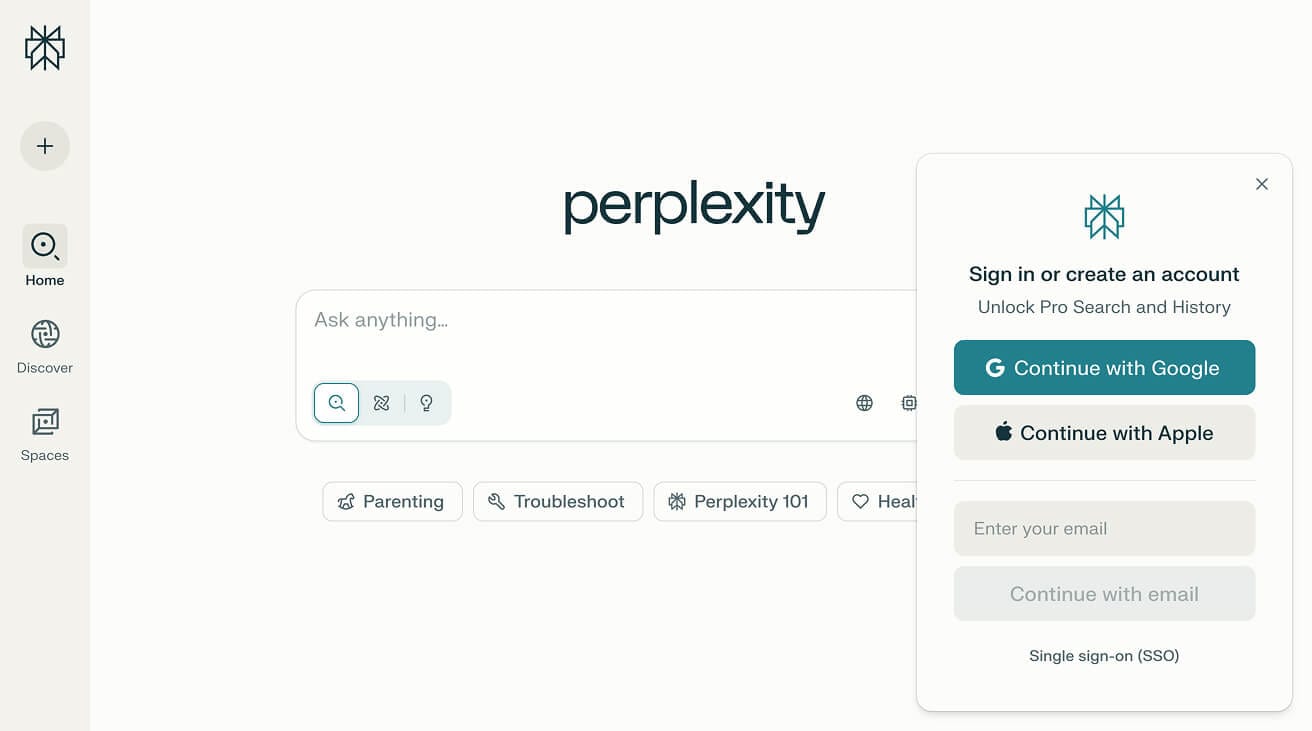
Create a free account and sign in.
Next, type the following prompt into Perplexity's chatbox and hit the submit button:
Next, Perplexity AI has analyzed the top search results from Google and generated the following table of contents:
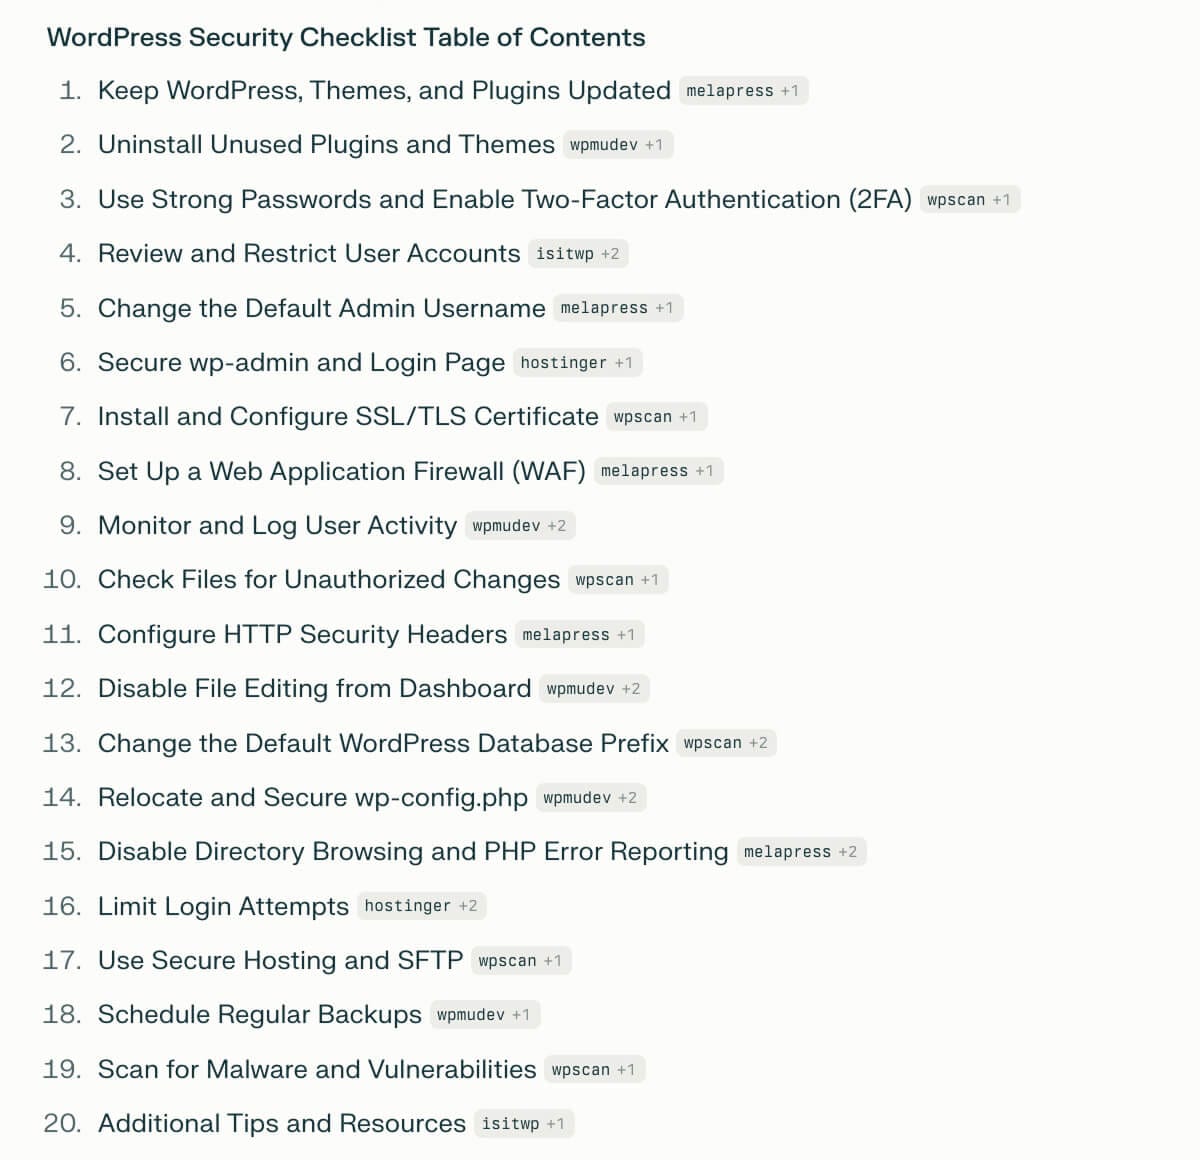
The table of contents looks great.
It is time to convert it into an article.
Claude is great at writing articles with a humanized tone.
I like Claude's writing style when compared to ChatGPT.
So...
Step 3: Provide the "Table of Contents" to Claude and generate an article from it
So, open up, Claude.
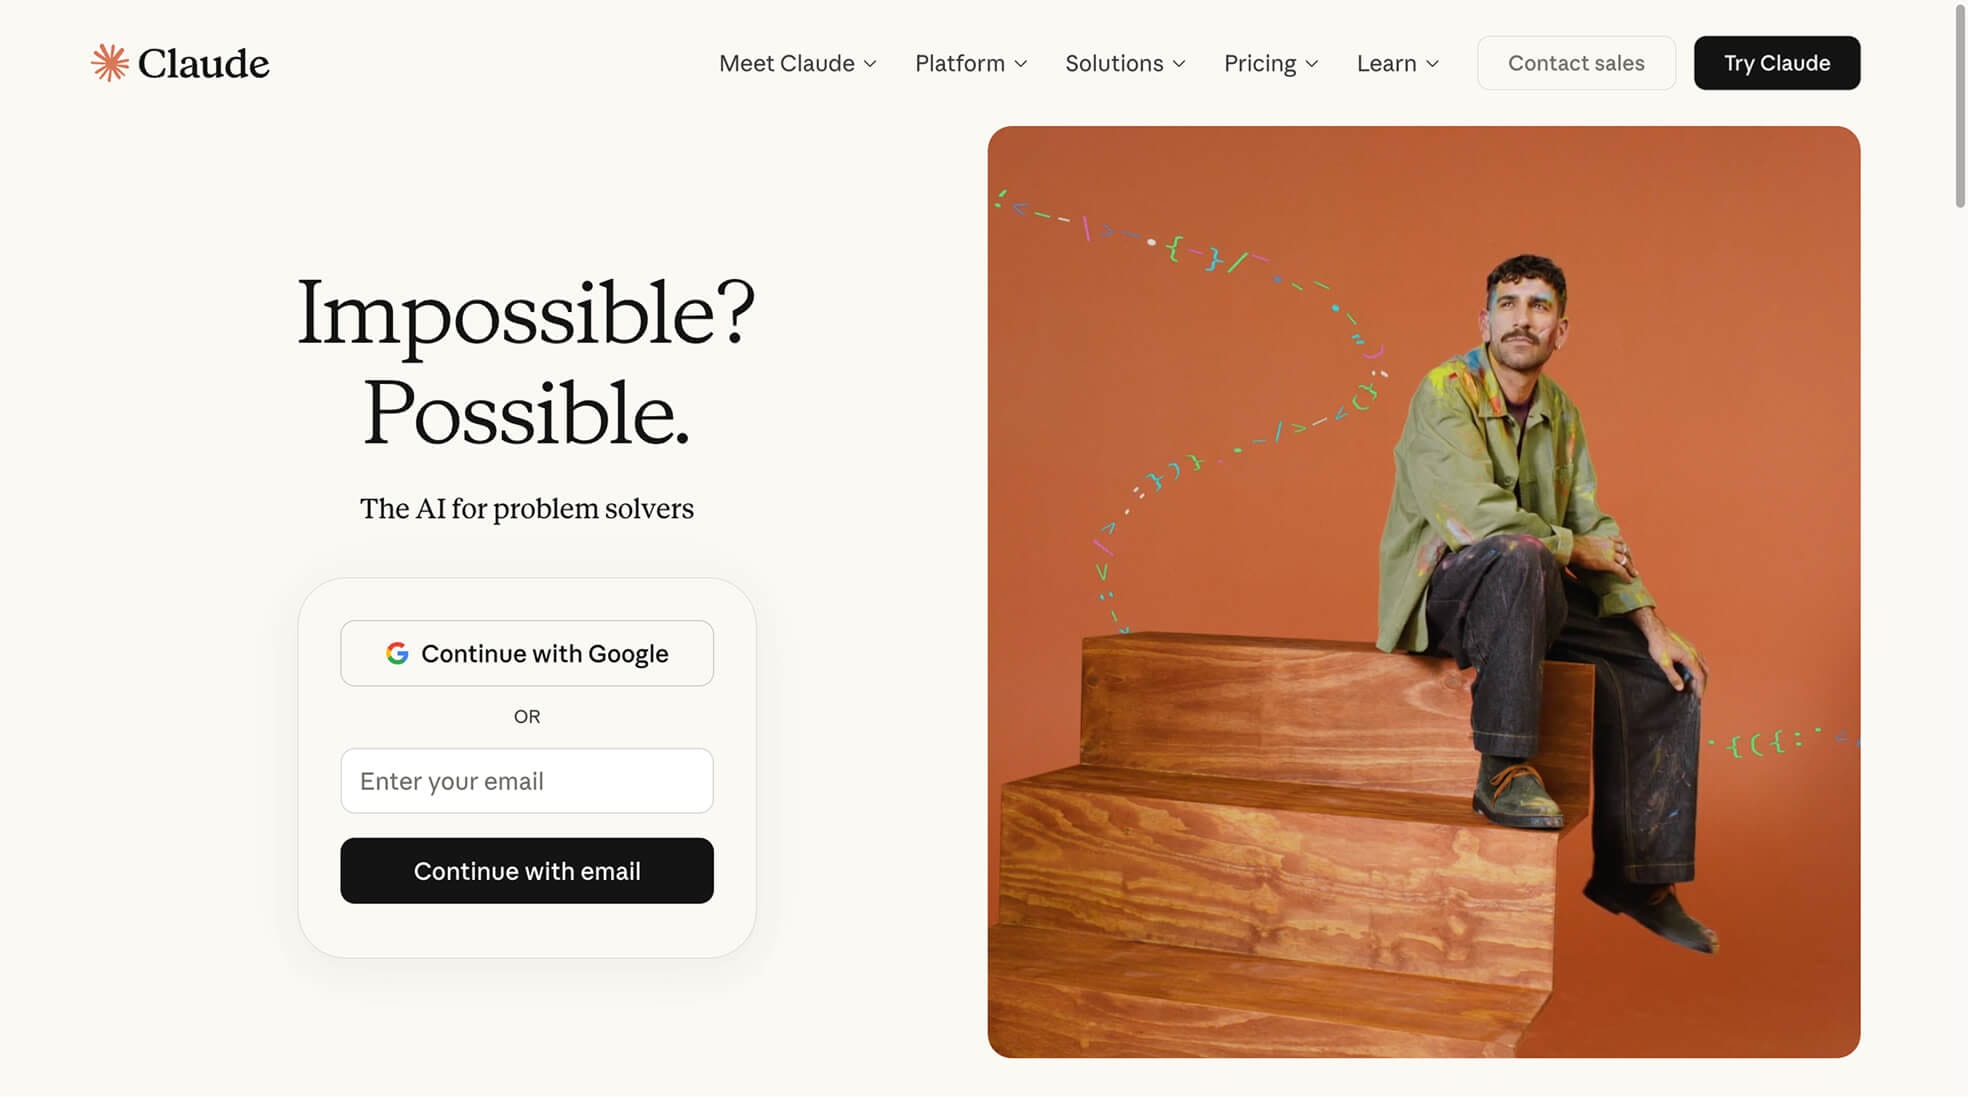
Create a free account and sign in.
Next, inside the chatbox, provide the table of contents from "Step 2" and ask it to generate an in-depth article.
Here is the prompt:
1. Keep WordPress, Themes, and Plugins
2. Uninstall Unused Plugins and Themes
3. Use Strong Passwords and Enable Two-Factor Authentication (2FA)
4. Review and Restrict User Accounts
5. Change the Default Admin Username
6. Secure wp-admin and Login Page
7. Install and Configure SSL/TLS Certificate
8. Set Up a Web Application Firewall (WAF)
9. Monitor and Log User Activity
10. Check Files for Unauthorized Changes
11. Configure HTTP Security Headers
12. Disable File Editing from Dashboard
13. Change the Default WordPress Database Prefix
14. Relocate and Secure wp-config.php
15. Disable Directory Browsing and PHP Error Reportingmelapress+2
16. Limit Login Attempts
17. Use Secure Hosting and SFTP
18. Schedule Regular Backups
19. Scan for Malware and Vulnerabilities
20. Additional Tips and Resources
Generate an in-depth article using simple and easy-to-understand English.
And here is the article Claude generated:
I have read the article, and it fits my needs perfectly.
Step 4: Publish or draft the article on my website
Finally, I will copy the article generated by Claude and will publish it on the WordPress website.
That's all.
For the purposes of this lesson, this is the manual process I will follow to create an AI-generated article and publish it.
Manual process analysis
Now, if you analyze the manual process, we have followed four steps and used three tools (Perplexity AI, Claude, and WordPress) to perform the workflow.
We now have a clear idea about:
- How and when to use each tool
- How to perform each step
And most importantly, we like the output of this manual process.
So, the manual process steps and the tools are now finalized.
And this makes it easier for us to automate this manual process using n8n.
We just have to recreate the manual steps inside n8n.
So, let's access n8n and start building this automation.
How to access n8n
n8n is a web application software with a fair-code license.
This means:
- You can download n8n and host it locally on your personal computer for free
- You can self-host it on a third-party web hosting service like Hostinger or Elestio.
- Or, you can use the official cloud hosting service of n8n itself.
The choice depends on how you want to use n8n, and there are some trade-offs for each choice.
We will discuss the trade-offs in another lesson.
For the purposes of this lesson, let's go with n8n's cloud hosting service because it is easy to get started, and most importantly, you can begin with a free 14-day trial.
You don't even have to provide the credit card.
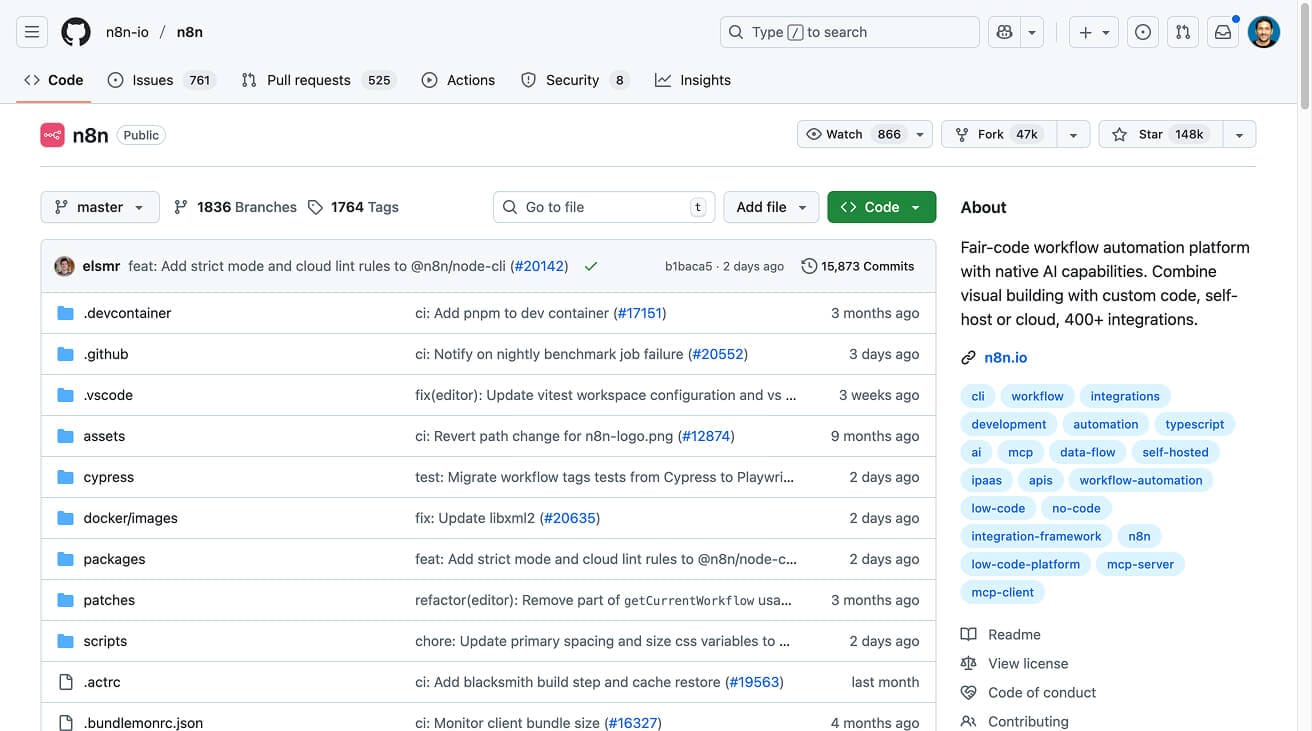
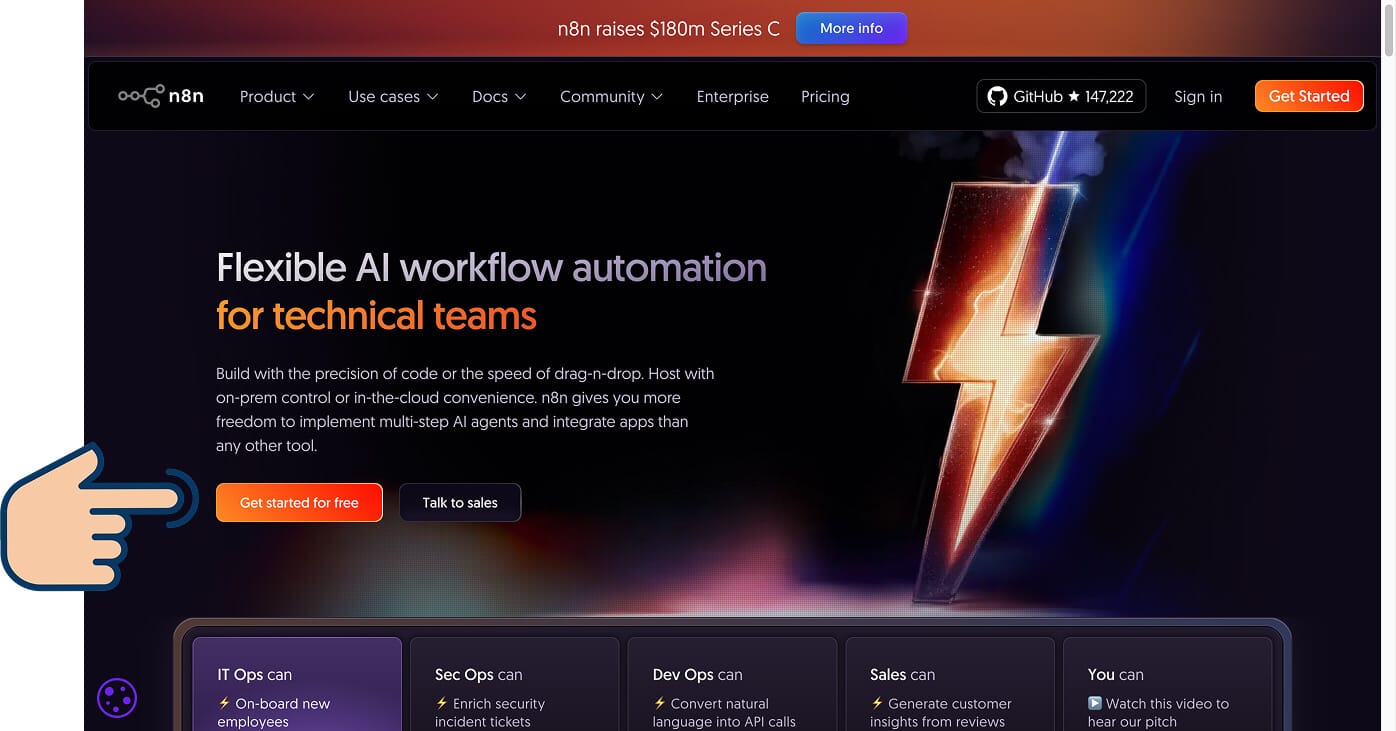
So, go to n8n.io and click on the "Get started for free" button.
Next, create a free trial account:
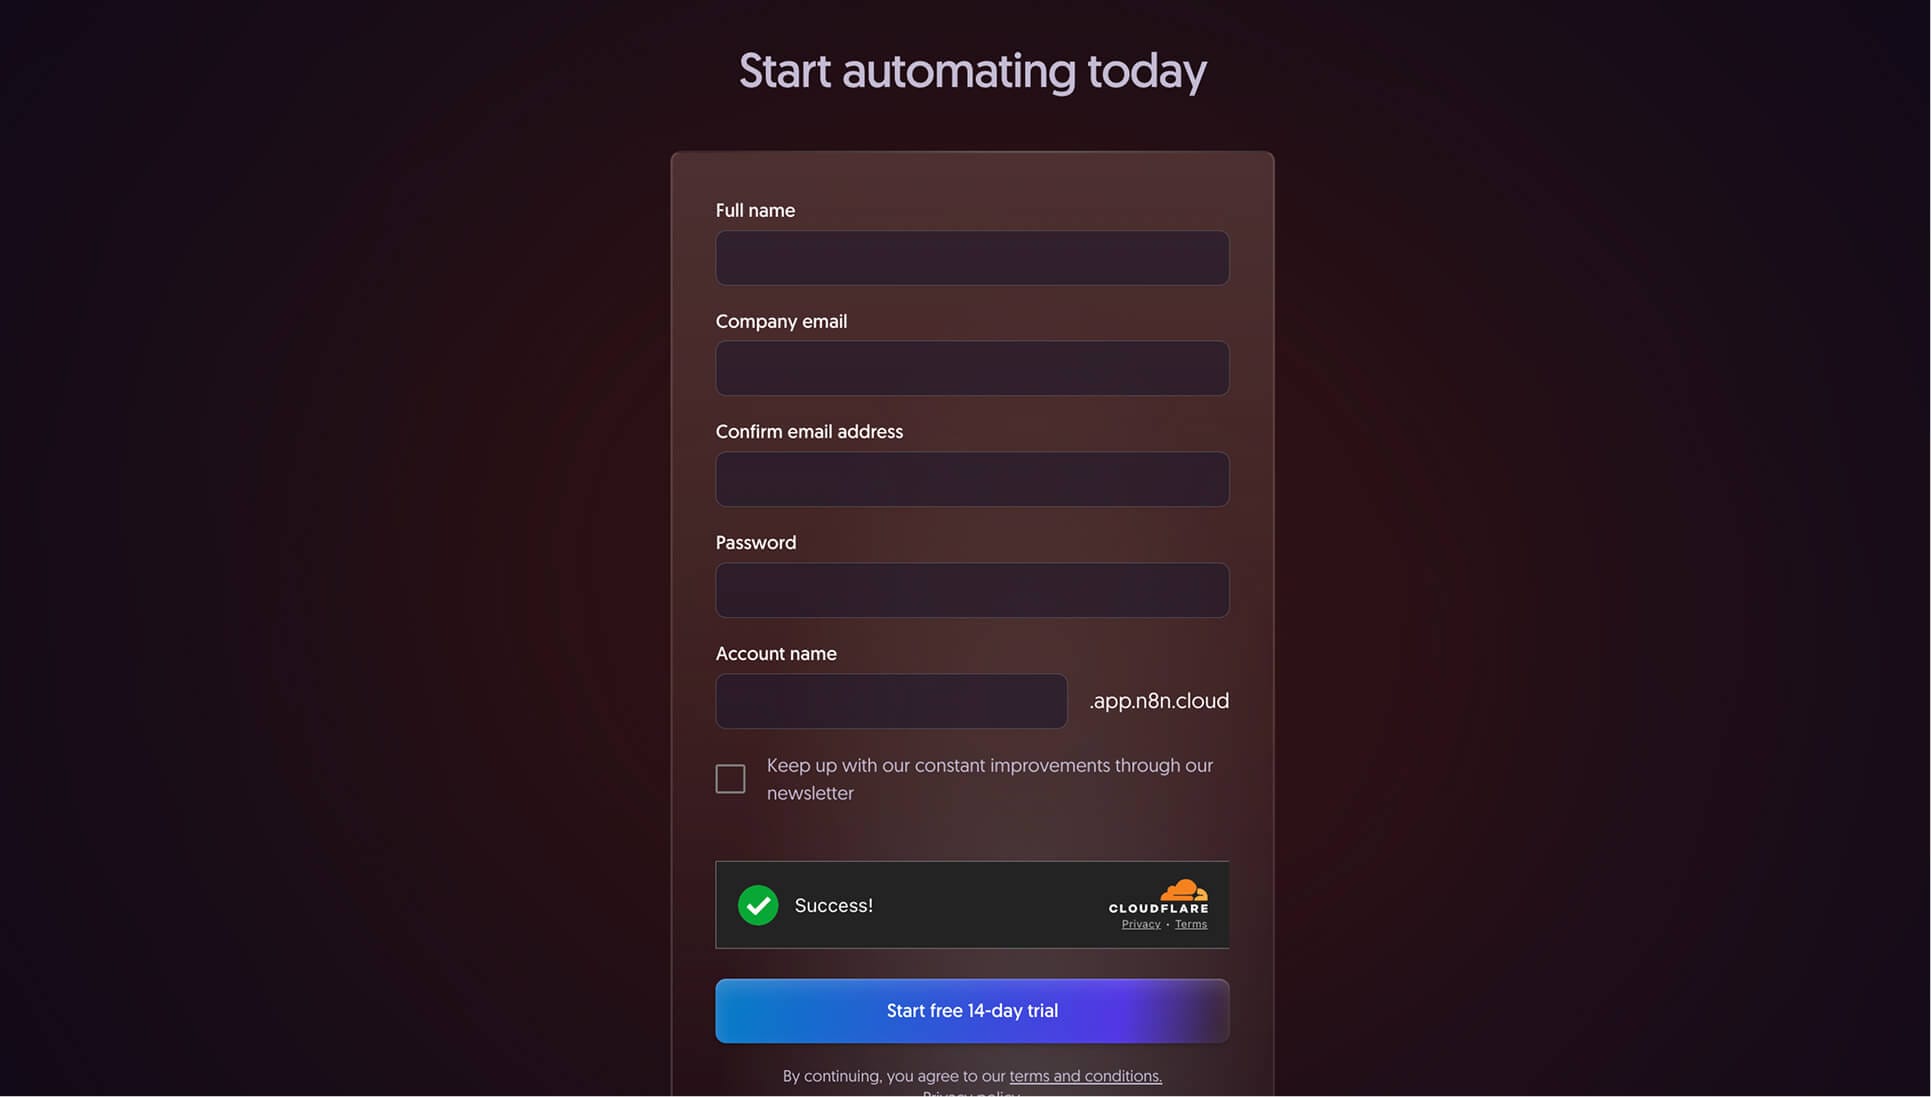
After that, you might go through an onboarding process, and eventually, you'll land on this n8n dashboard:
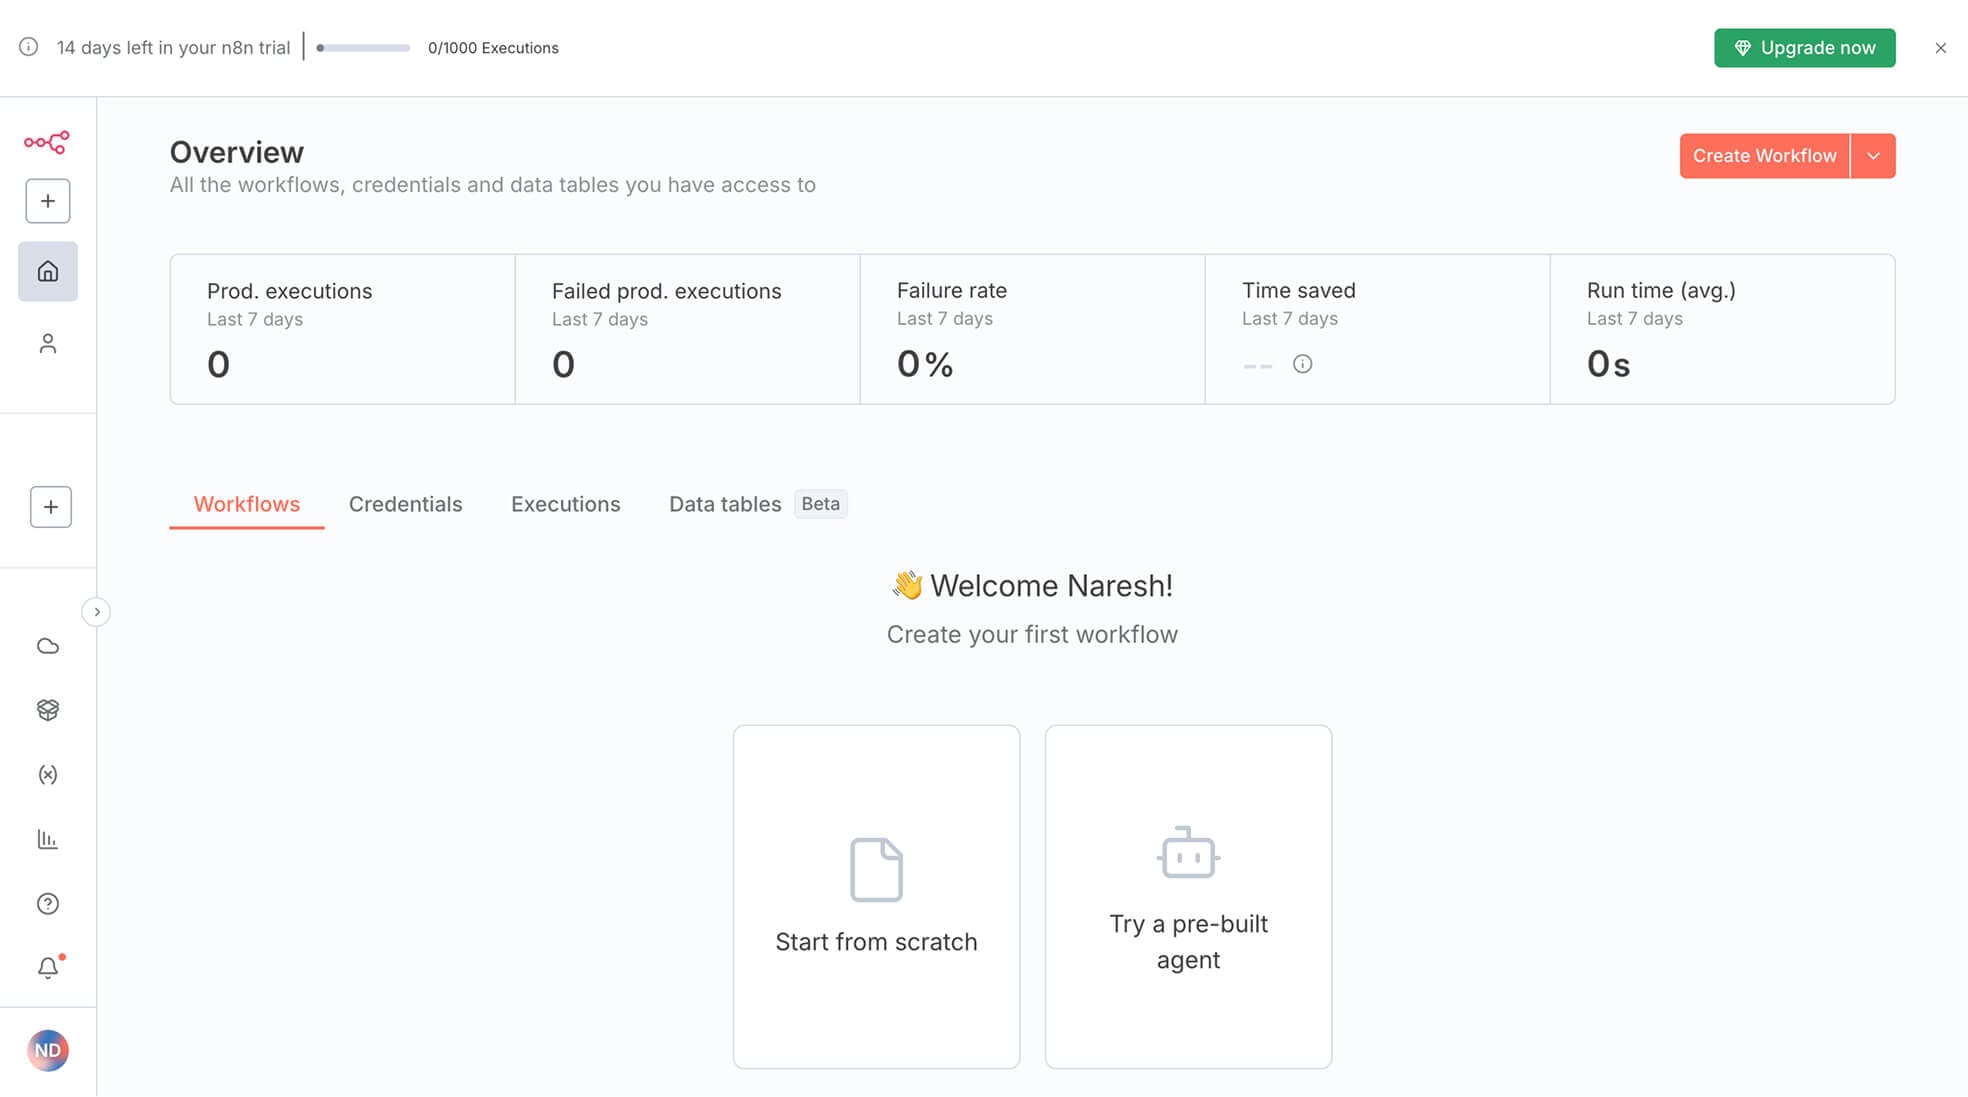
It is the home screen of the n8n dashboard:
- It contains an overview of how your workflows are performing.
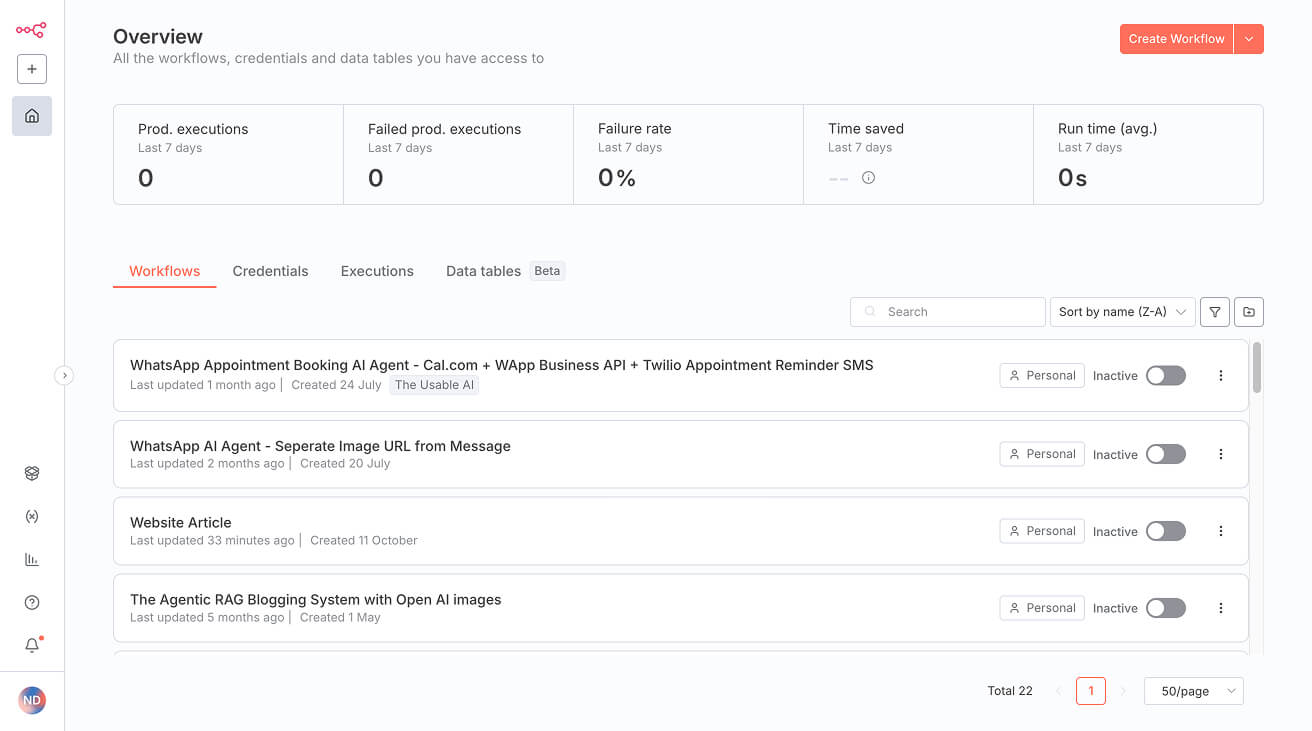
- It contains the list of workflows you have created once you have built a workflow or two
Also, if you notice the dashboard, it has a main menu (collapsed) on the left side of the screen.
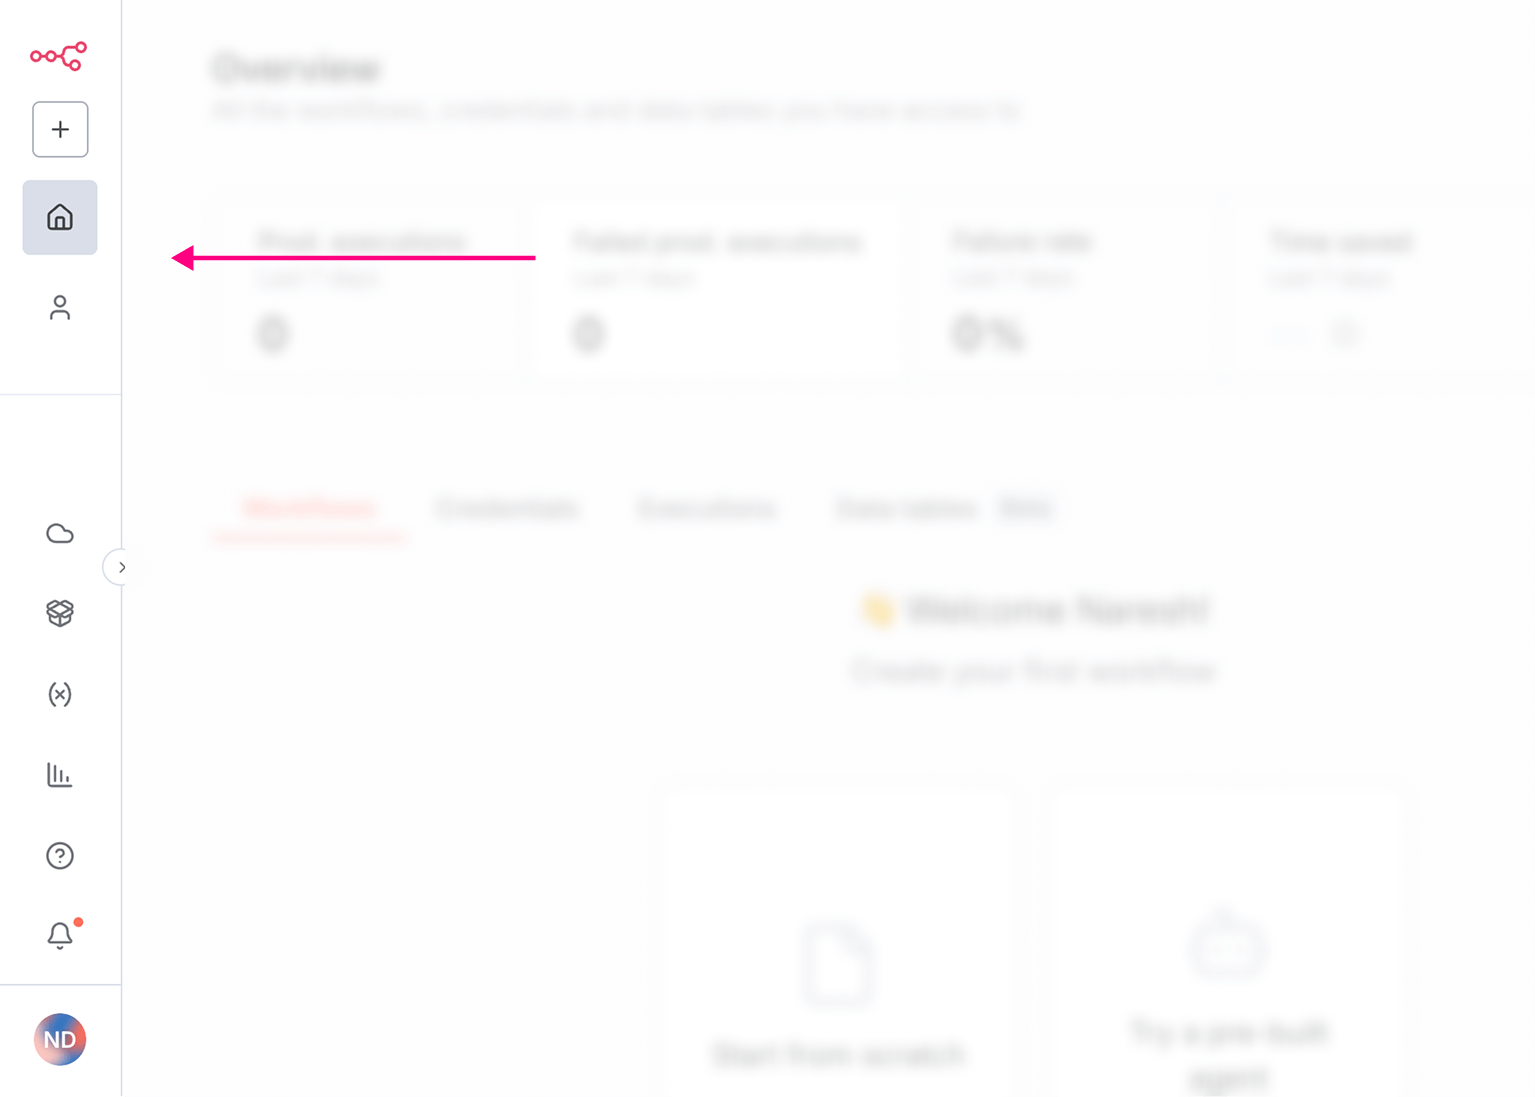
It will help you access different screens of the n8n dashboard, and you can access this menu from any screen.
Anyway, that's all for the dashboard tour for now.
And, it is now time to start building our AI-generated article workflow.
And we can achieve it in three steps:
- Create a new workflow inside n8n
- Add nodes to the workflow one by one and test them thoroughly
- Keep improving the workflow until you're satisfied with the output
How to create a new workflow in n8n
n8n provides multiple ways to create a workflow.
If you notice the top-right corner of the n8n dashboard, there is a "Create Workflow" button:
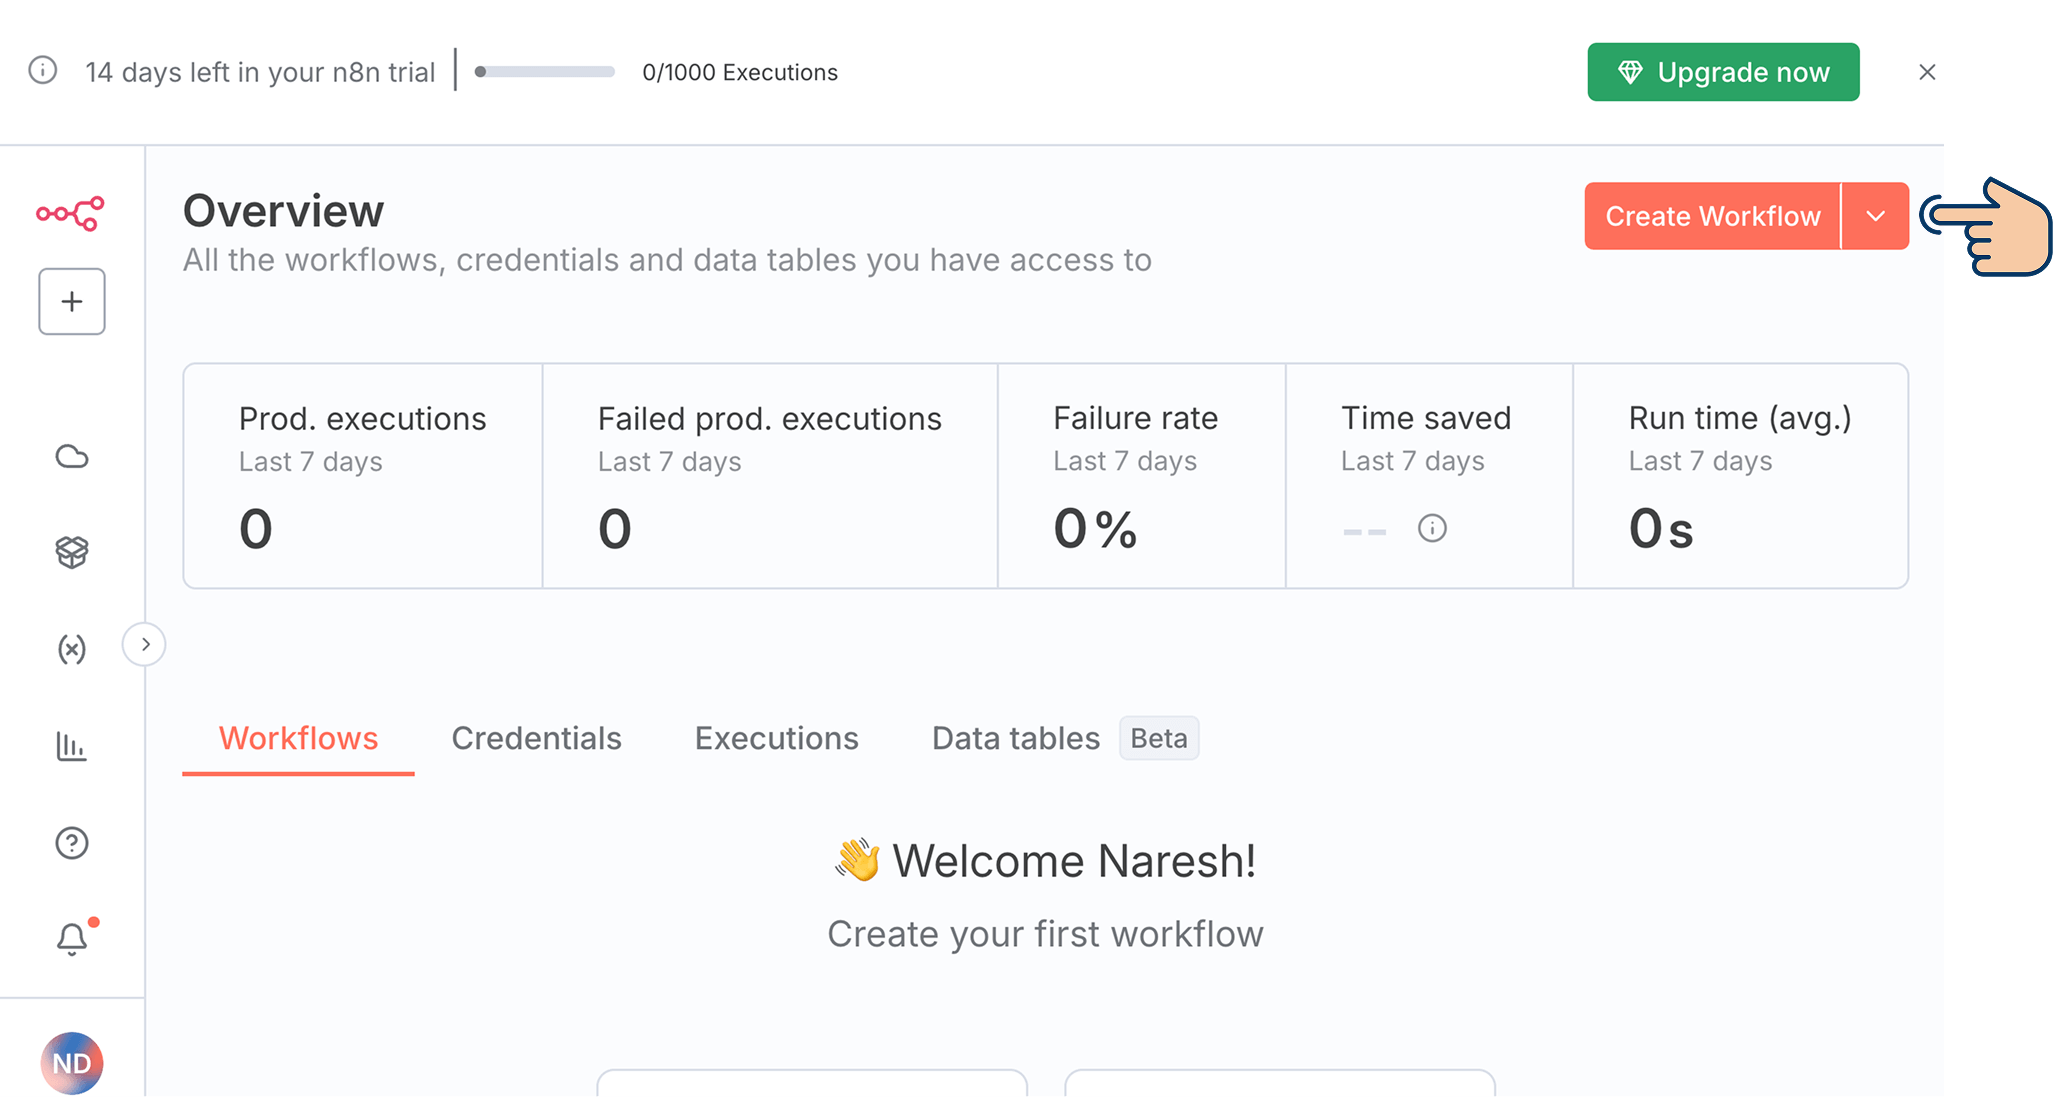
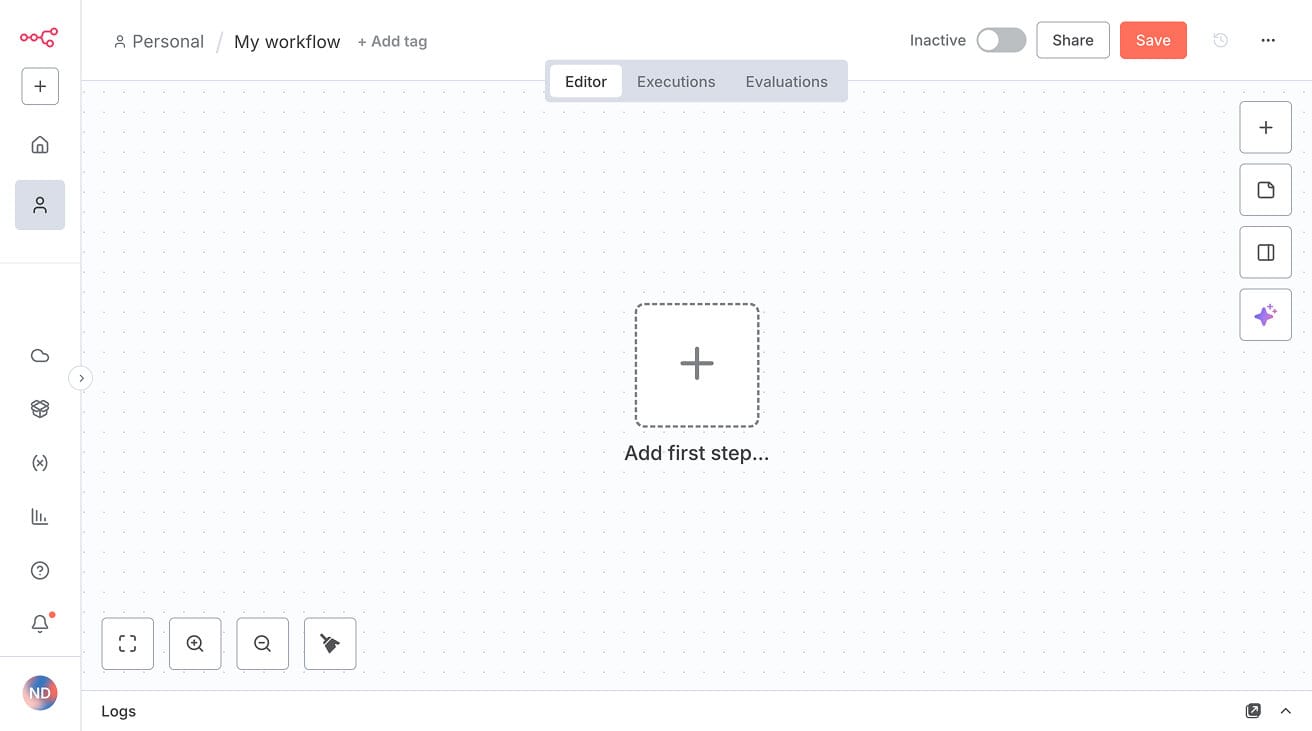
If you click on it, you will land on the "My Workflow" screen, where you can start adding nodes and build the workflow:
There is also one more quick way to reach the same "My Workflow" or "New workflow" screen.
If you notice the top-left corner of any screen inside the n8n dashboard, you'll see a "+" button:
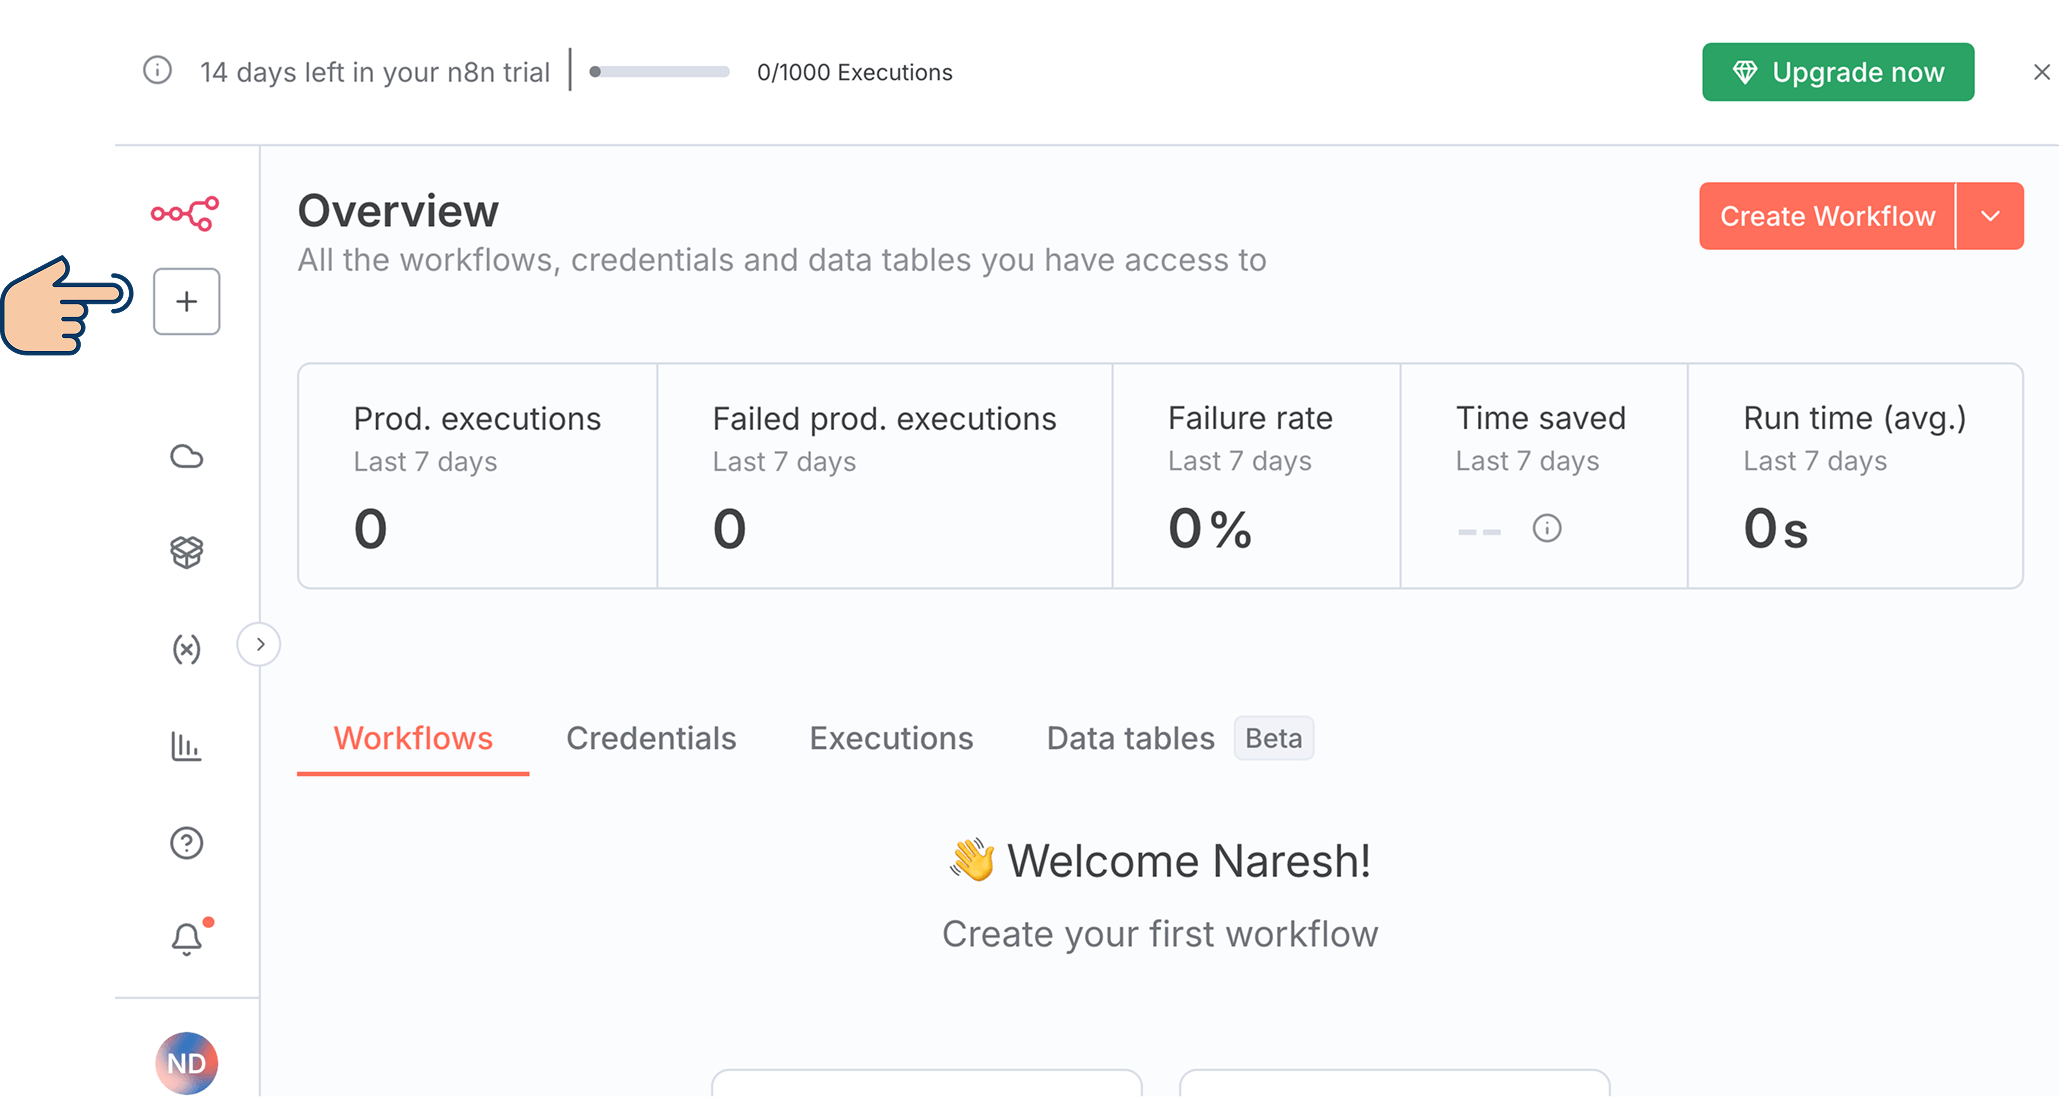
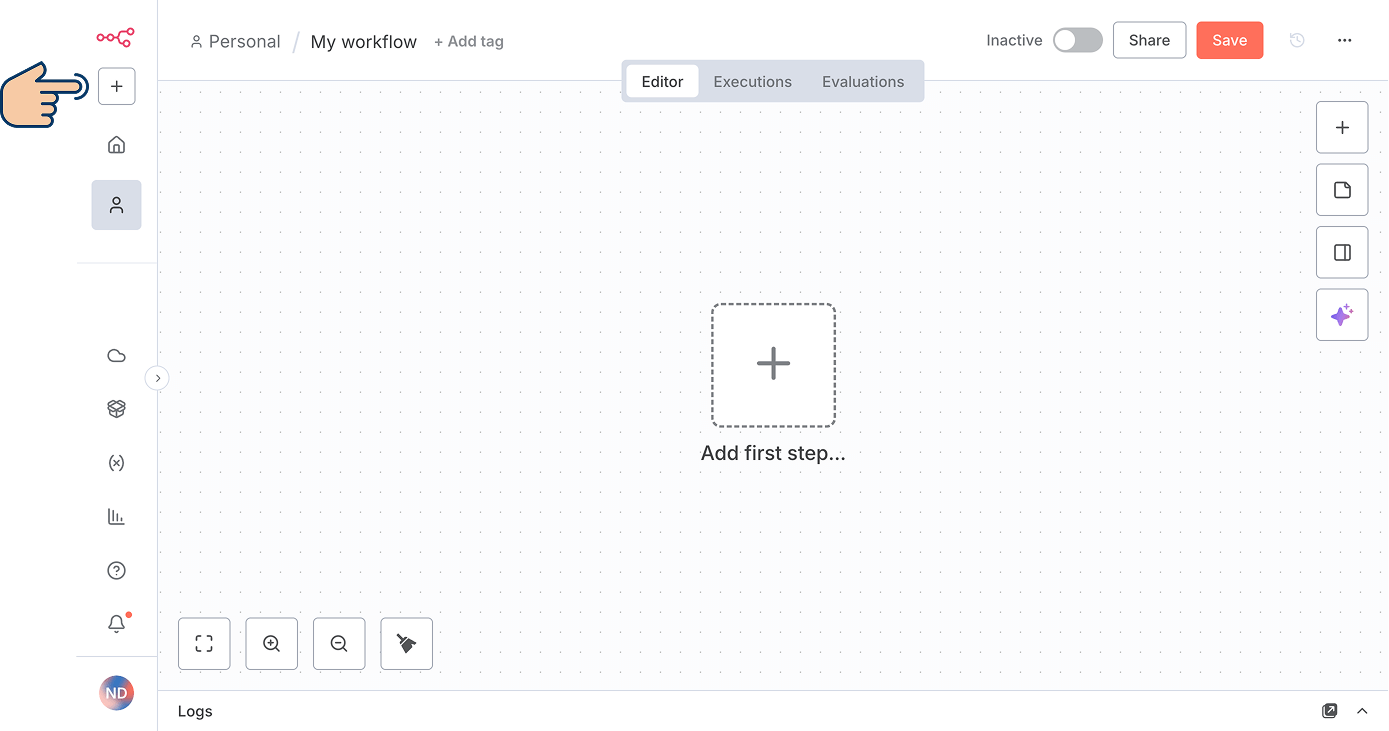
It is part of the collapsed main menu of the n8n dashboard.
A pop-up will open if you click on it.
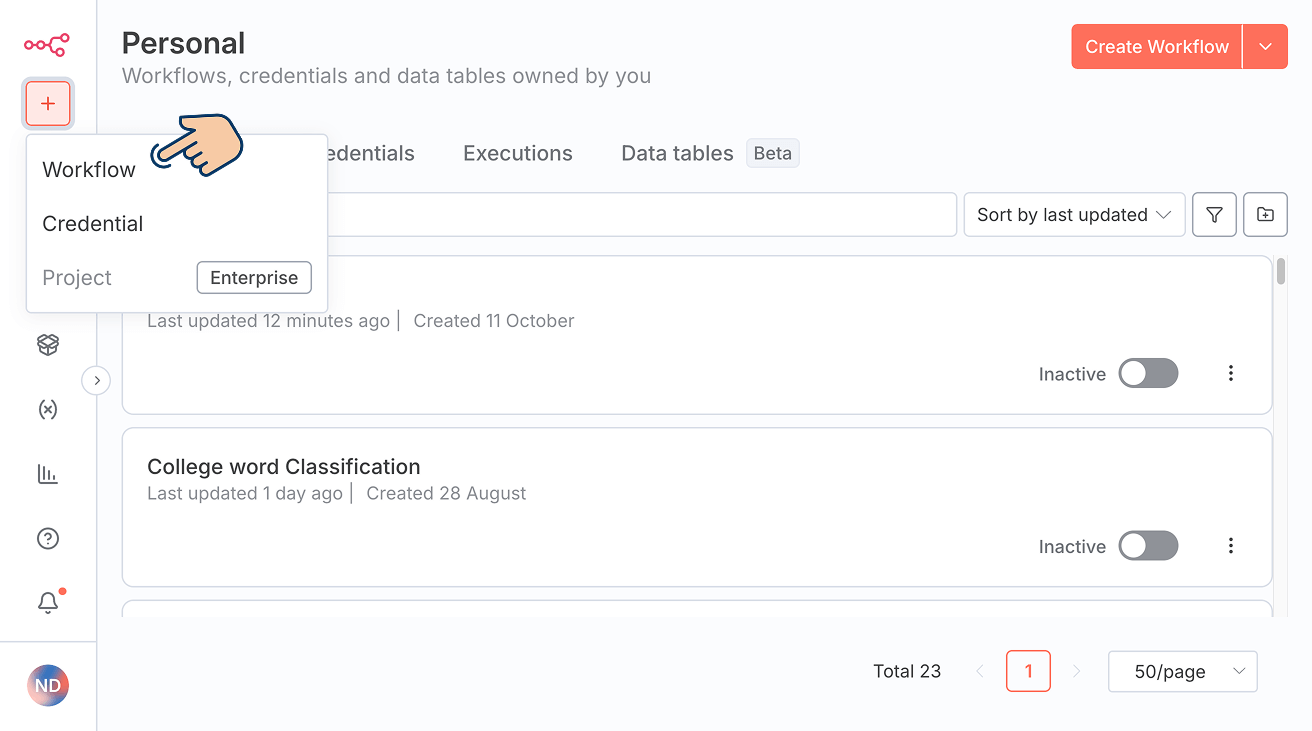
And from the pop-up, you can click on the "Workflow" button to access the same "New workflow" screen.
Anyway, assuming we are now inside the "New workflow" screen, let's start building our workflow.
How to build a workflow inside n8n
As I mentioned at the beginning of this lesson, we build an n8n workflow by adding nodes to it.
As you can see, our automation should begin with the "On chat message" trigger node that accepts the article's topic as the input data.
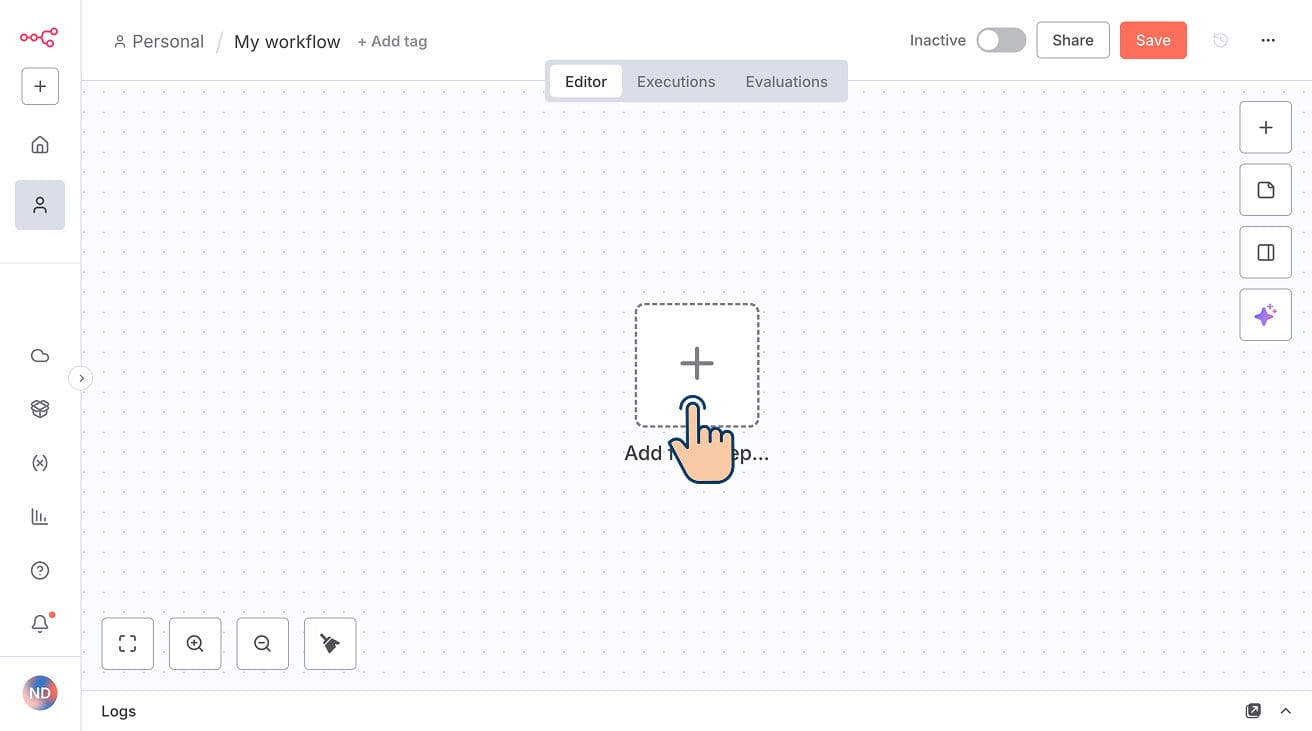
Assuming you are on the "New Workflow" screen, click on the "Add first step" button that is located at the center of the screen:
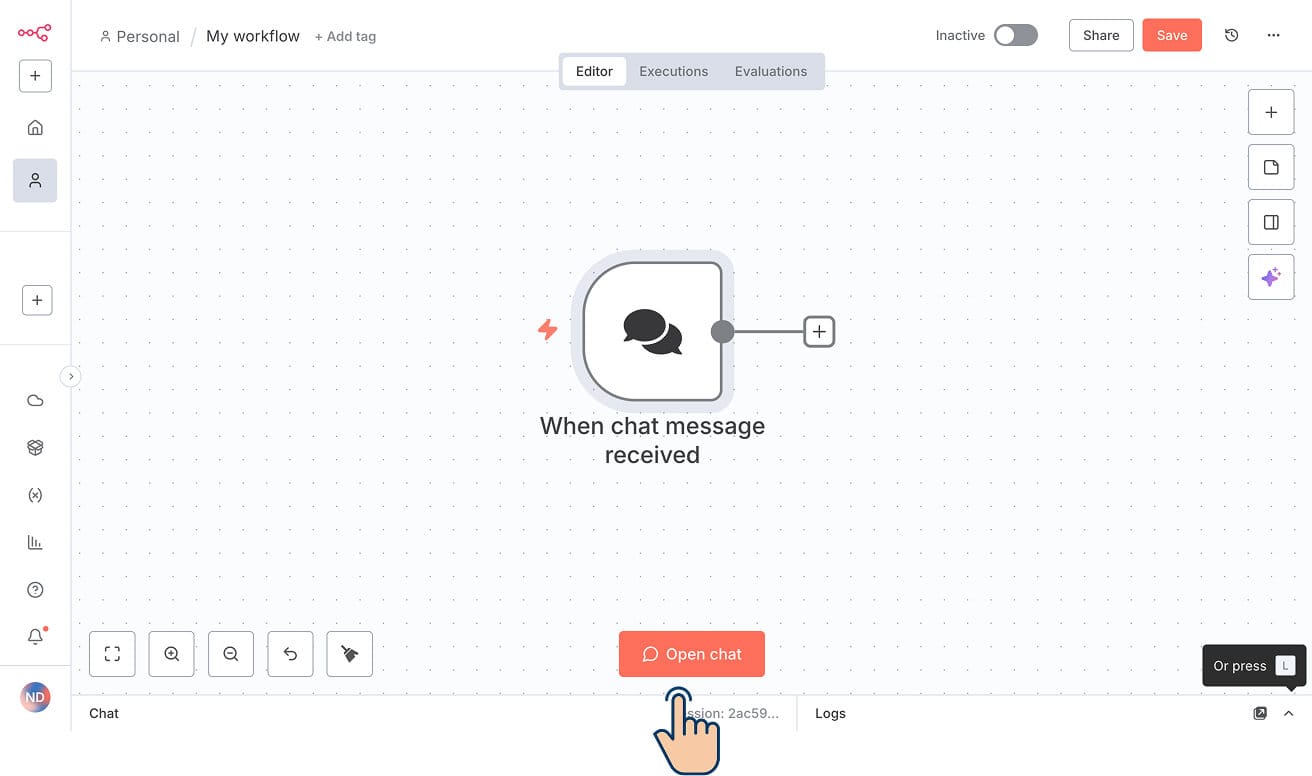
Next, choose "On chat message" as the trigger node:

And once the "On chat message" node is added to the workflow, click on the "Open Chat" button to bring up the chat interface.
This button is located at the bottom-center part of the screen.
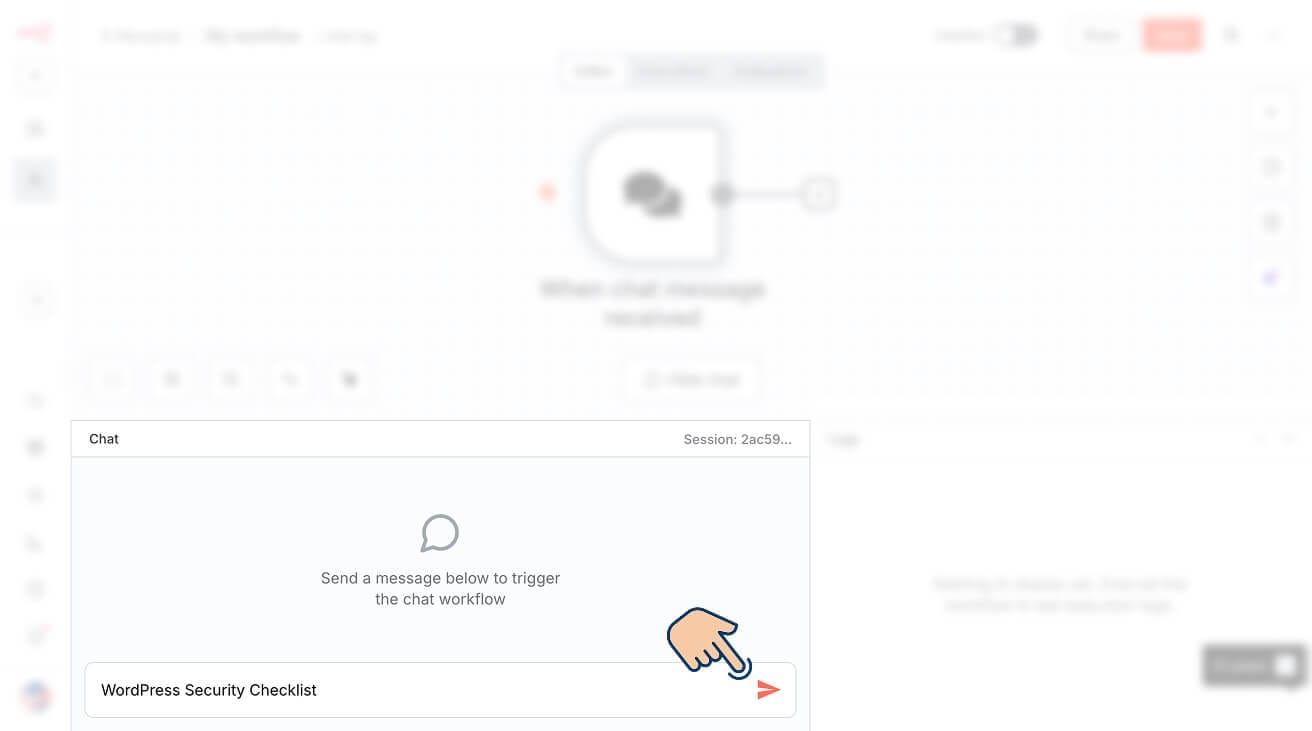
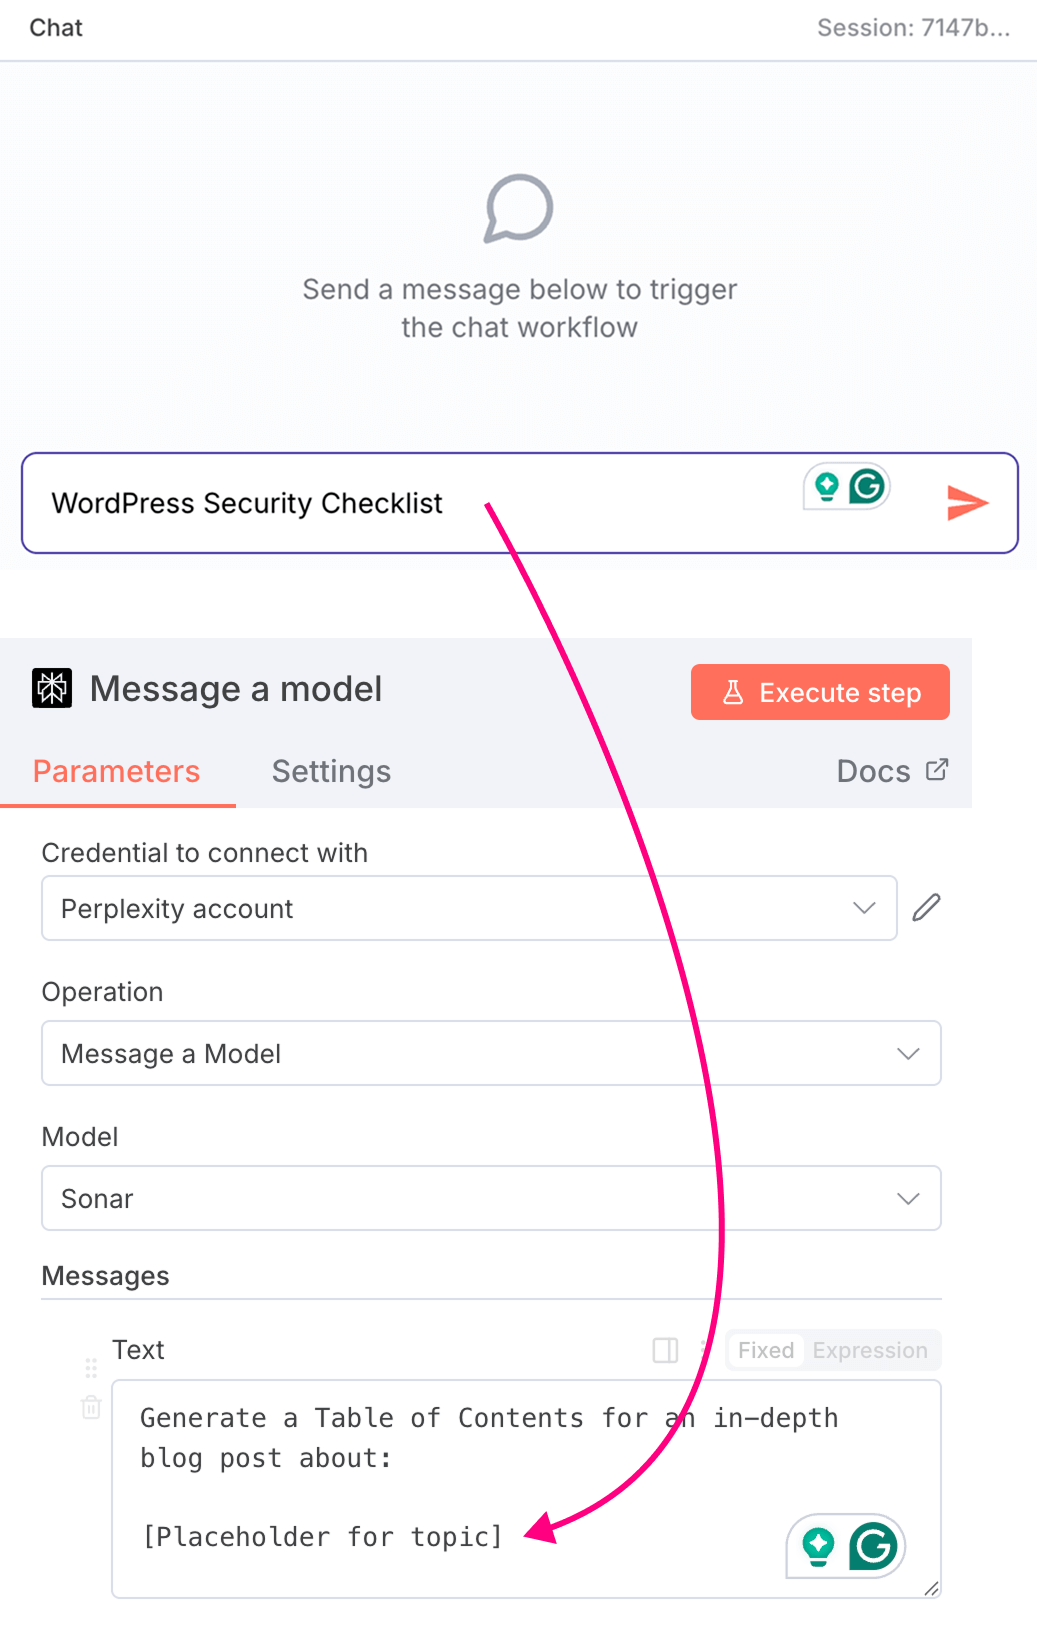
Next, inside the chatbox, type the topic you want to generate an article for and hit the submit button.
In my case, I want to generate an article for "WordPress Security Checklist".
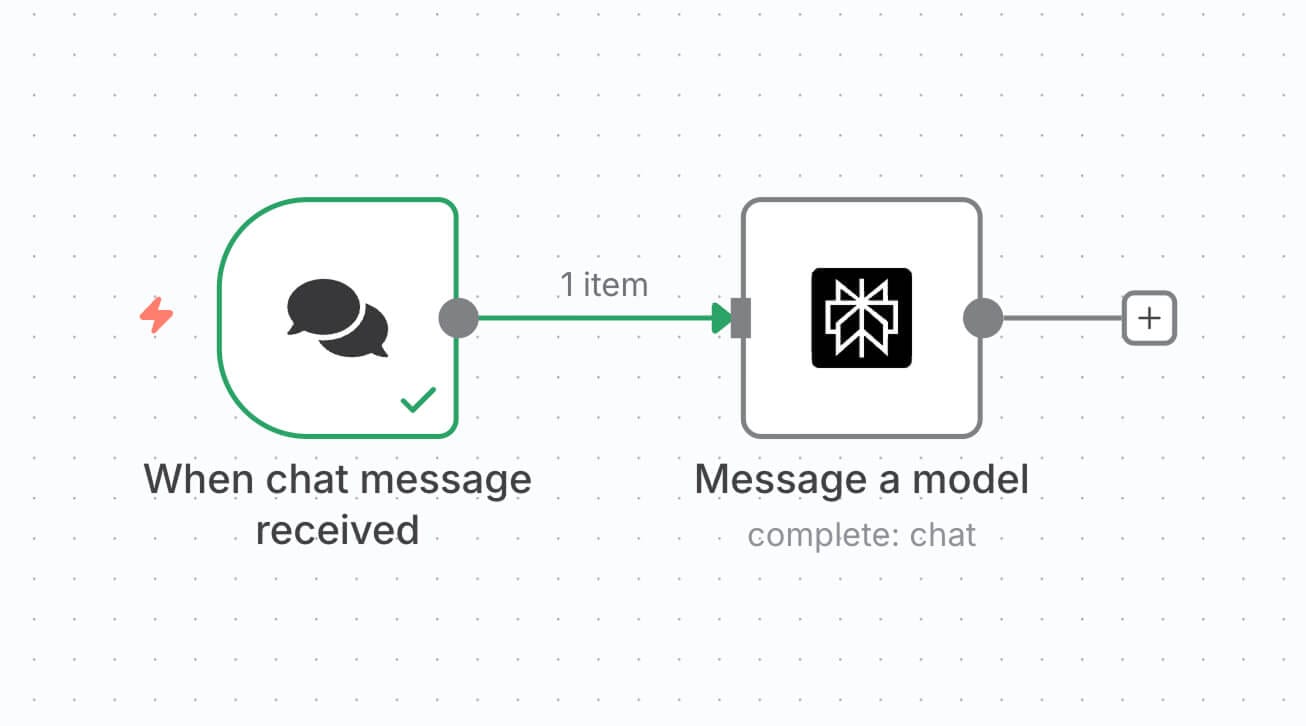
So, I put that into the chatbox, and as soon as I submitted it, the automation got triggered.
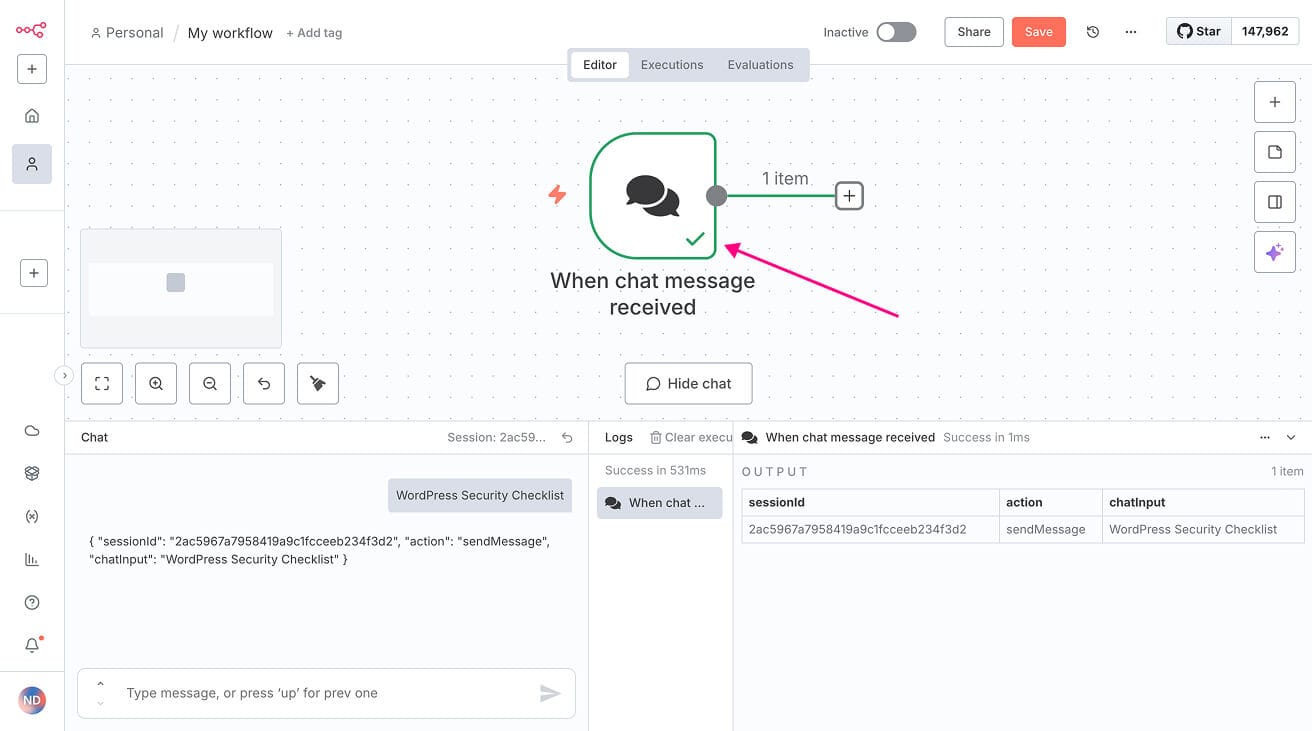
If you notice, the "On chat message" node has a green border.
This means that the node was executed without any error.
And if you double-click on the node, you can see its execution details, such as the chat input it received.
Step 1 of our workflow is now complete.
Choose a topic- Prepare a table of contents using Perplexity AI
- Expand the table of contents into an article
- Publish the article
Next, we need to pass this topic to Perplexity AI so that we can generate a table of contents.
To achieve this, we need to add a Perplexity node to our automation pipeline.
So, exit out of the execution details of the "On chat message".
You can do this by clicking on the "Back to canvas" button or anywhere on the grey area of the pop-up.
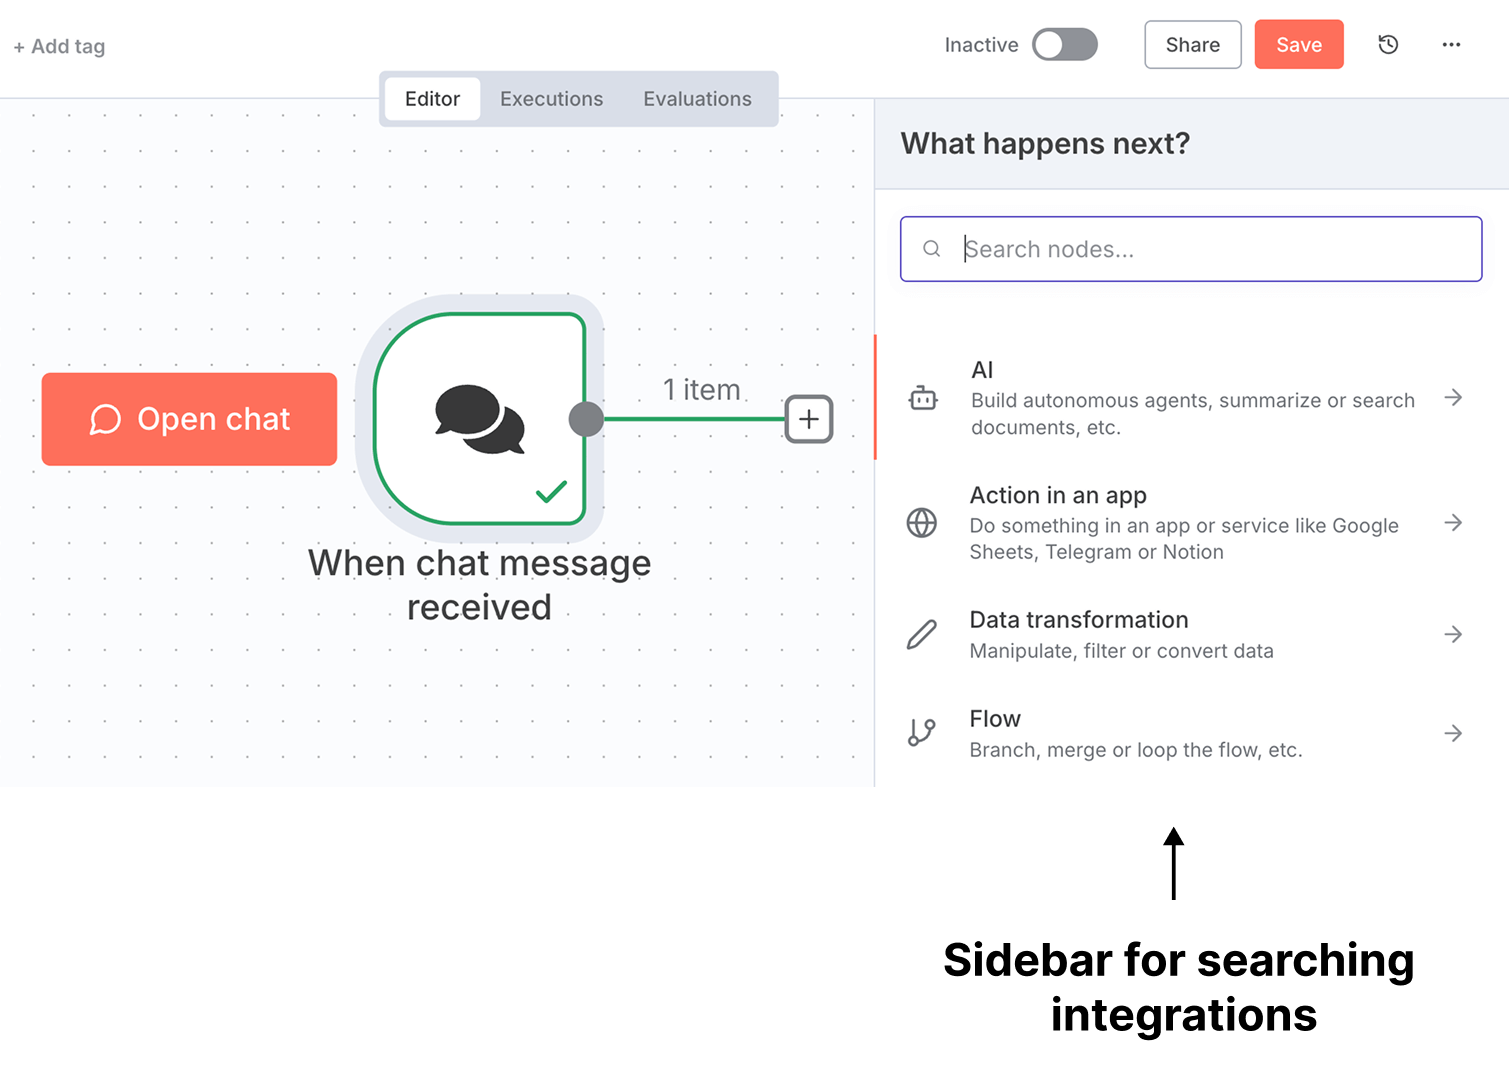
Next, click on the "Add node" button:

It will open up a sidebar where you can search for third-party integrations supported by n8n:
Next, search for "Perplexity" integration:

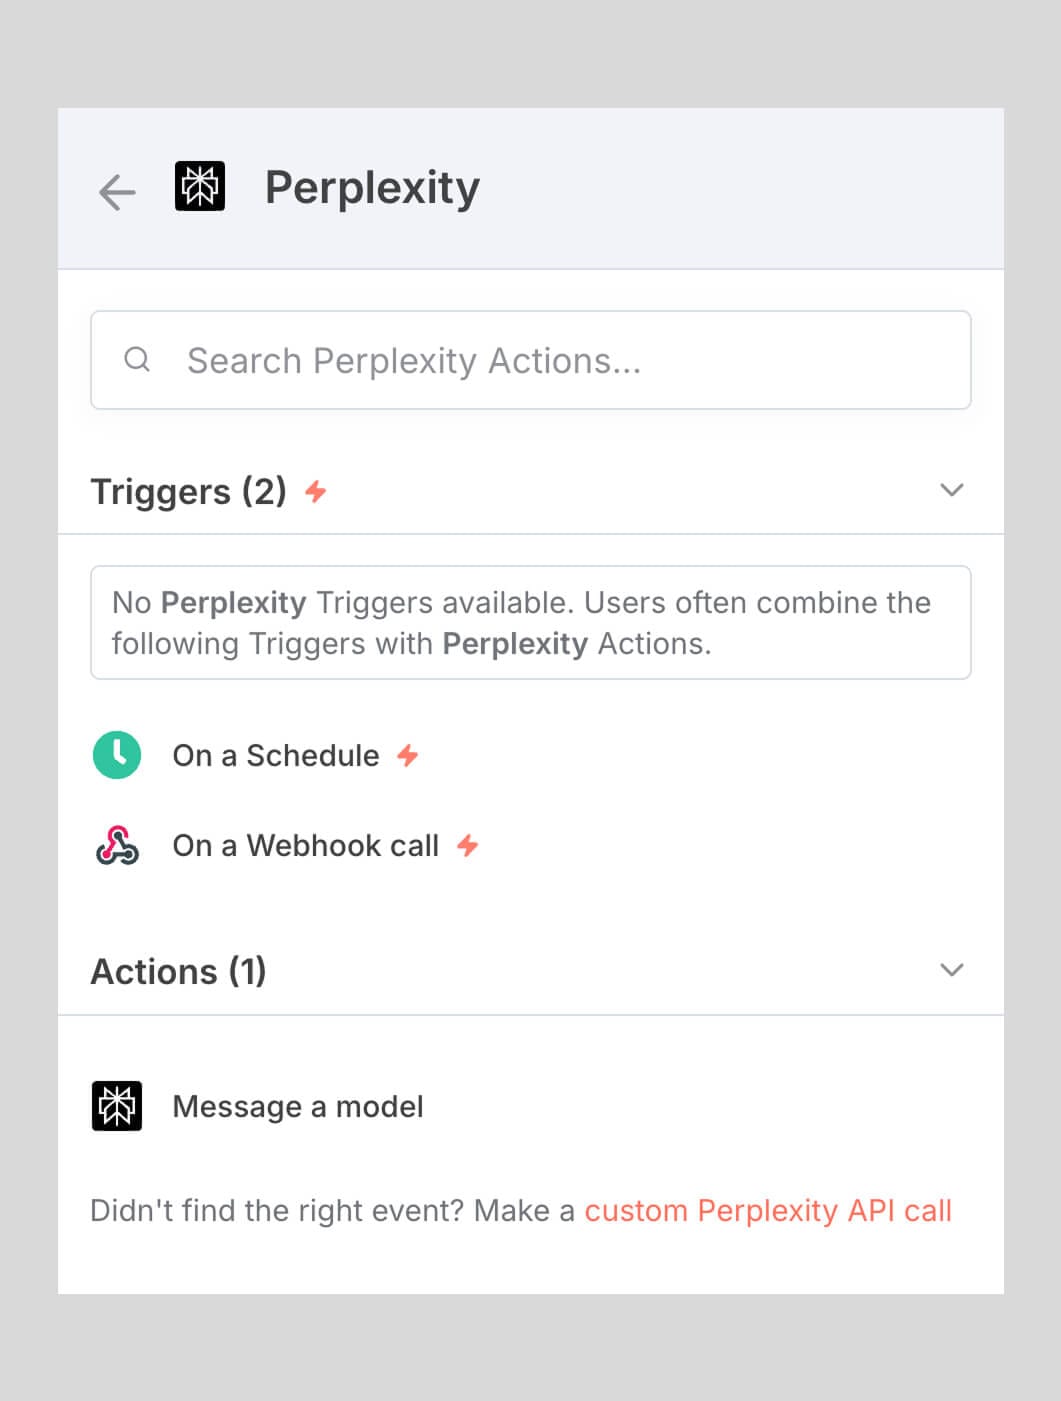
And, from the results section, click on "Perplexity" to access its nodes.
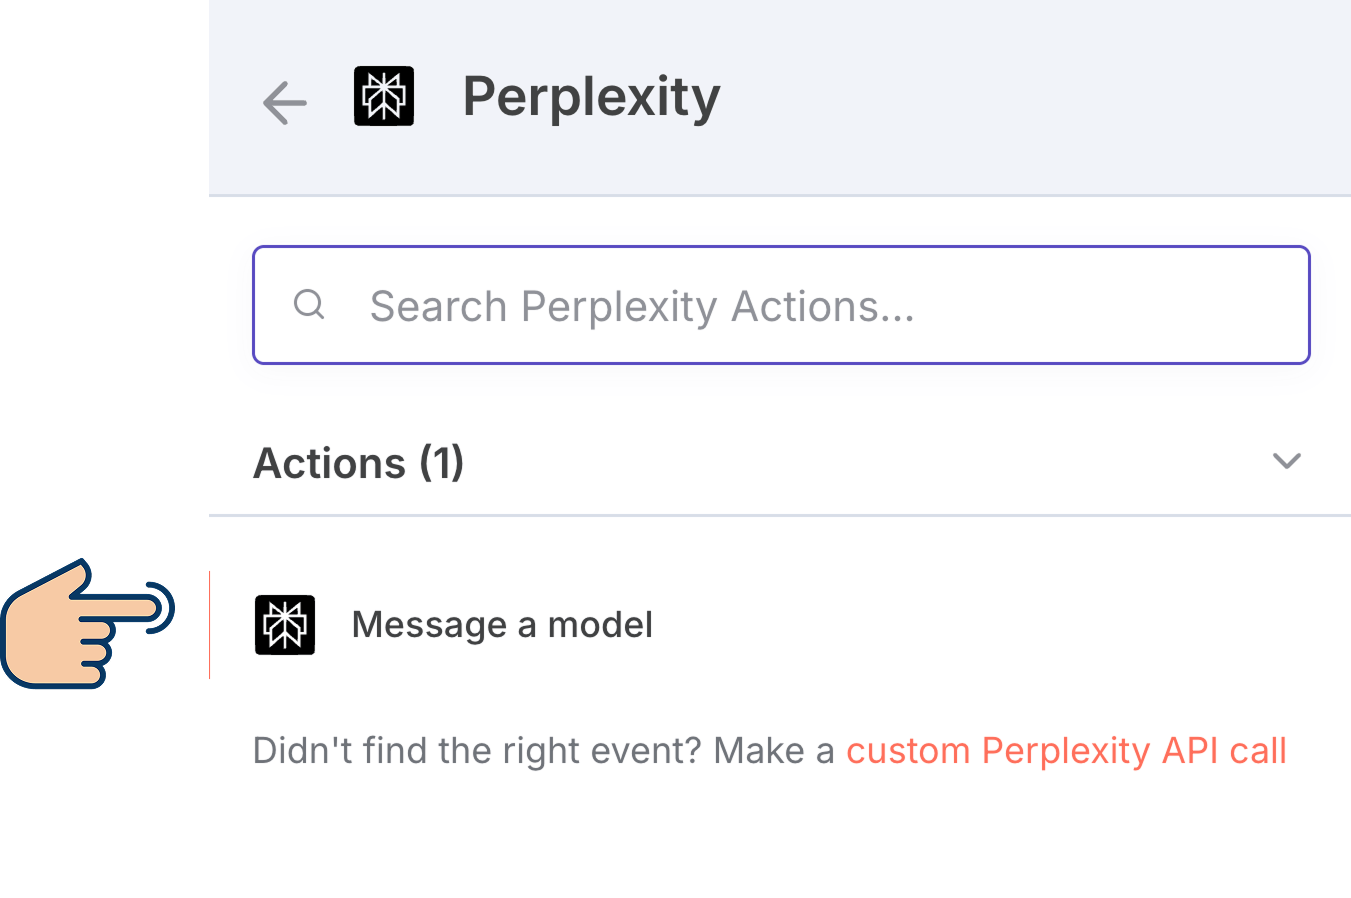
As you can see, Perplexity integration has only one action node called "Message a model".
This node will help us connect to the Perplexity API to generate a table of contents for a given topic.
Not just the Perplexity node, most nodes on n8n are specifically designed to make it easy to connect to their respective platforms.
This is why people love n8n. It makes it easy to connect to any platform's API with easy-to-configure options.
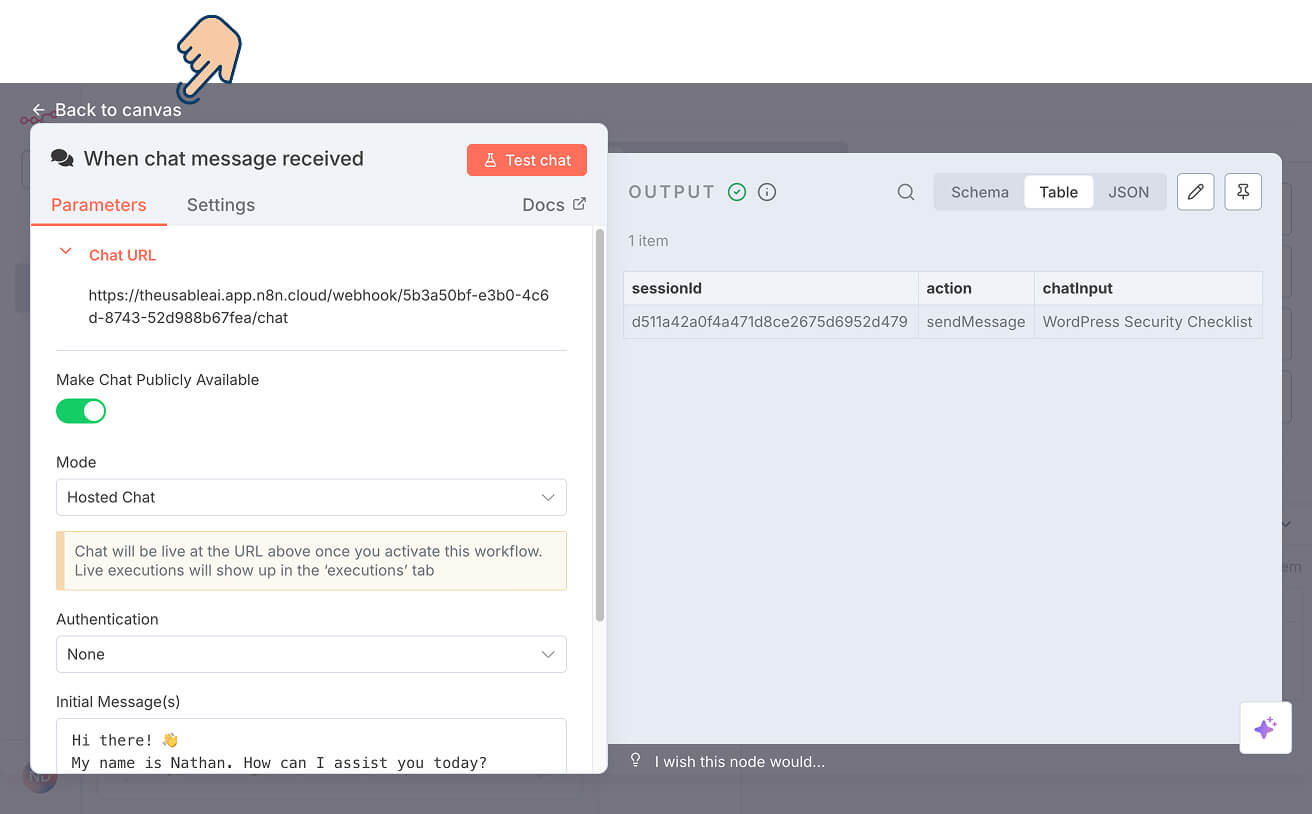
So, click on the "Message a model" node to add it to our automation pipeline, and as soon as you click on it, the configuration screen for accessing Perplexity AI opens up:
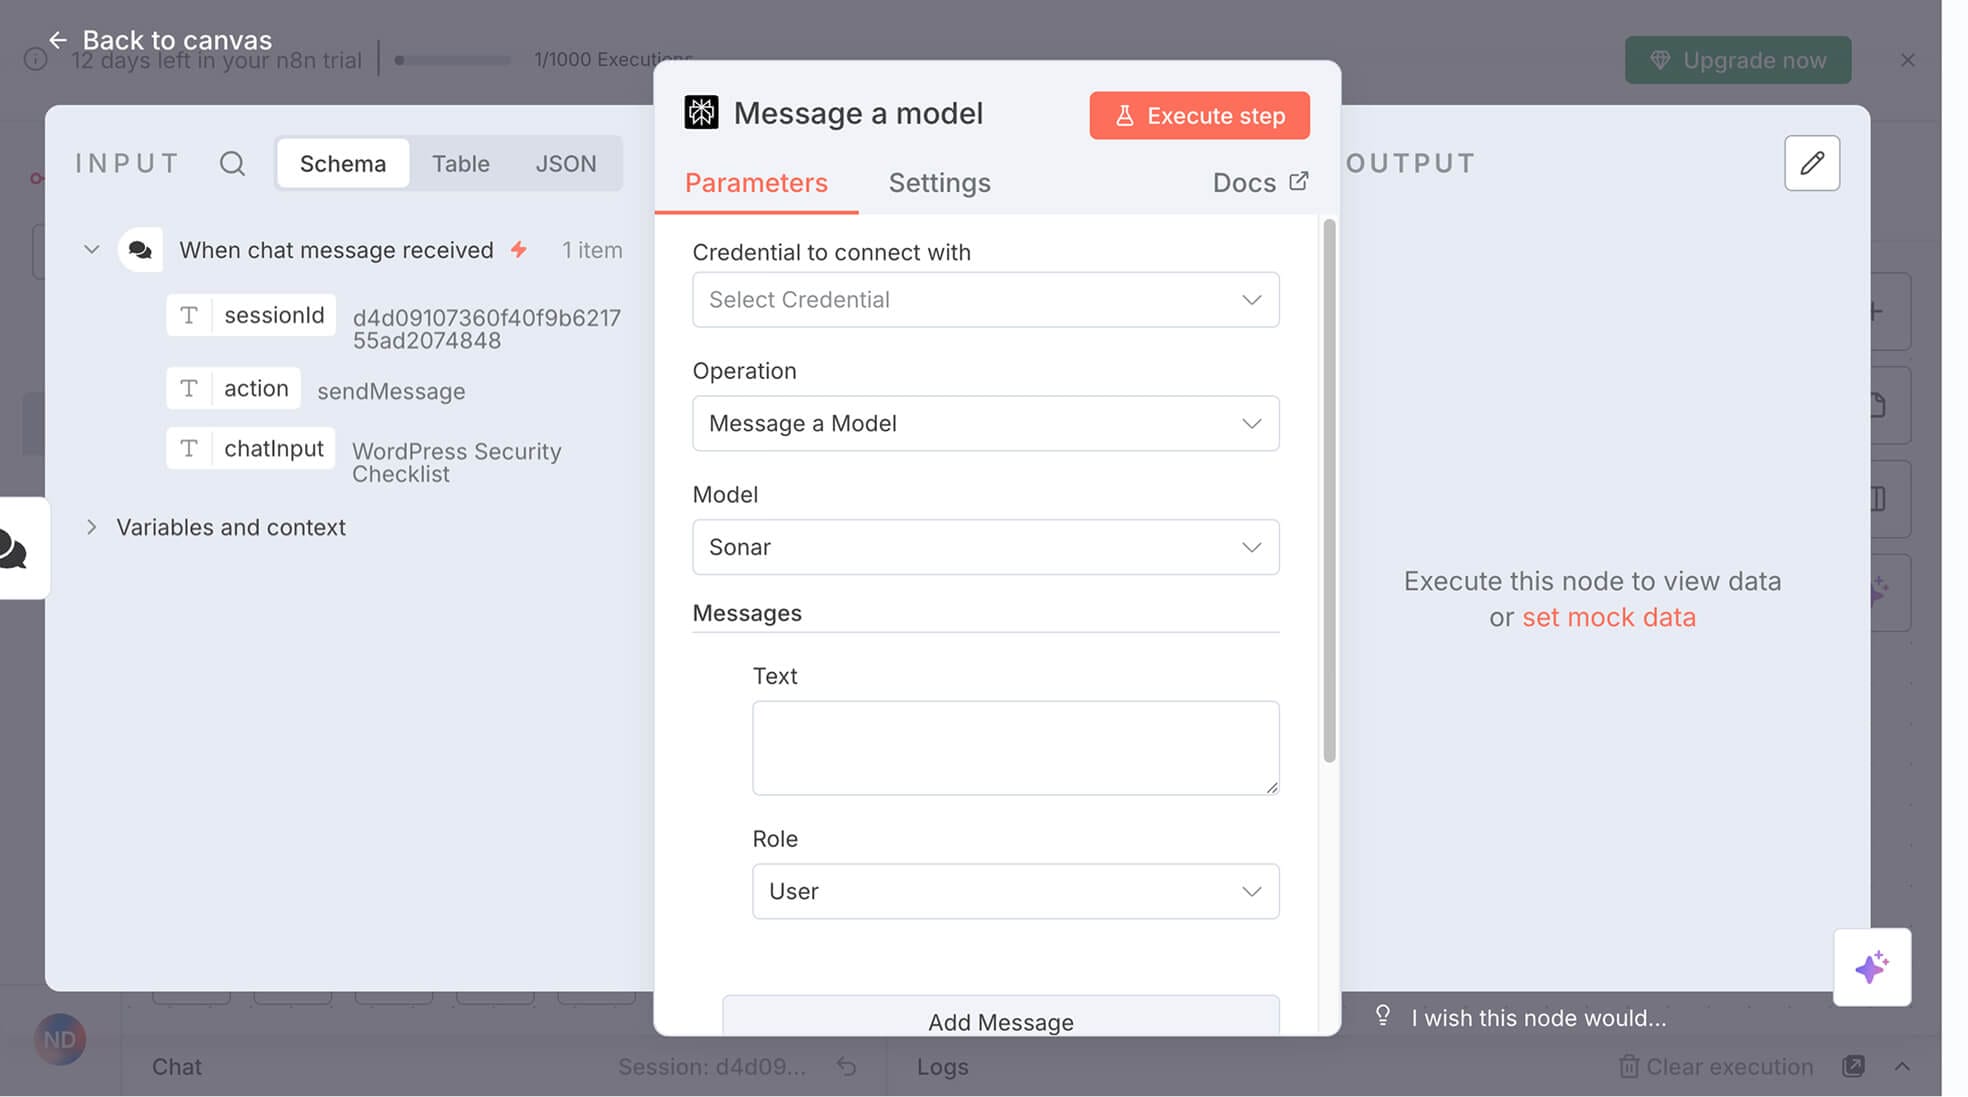
And if you look at this configuration screen, you'll see it has three portions.
The first portion contains processed data from the previous node (s), which is the "Chat message" node.
And we can provide this processed data to the current node, that is, Perplexity's "Message a model" node.
Next, the second portion contains options for connecting Perplexity API with n8n.
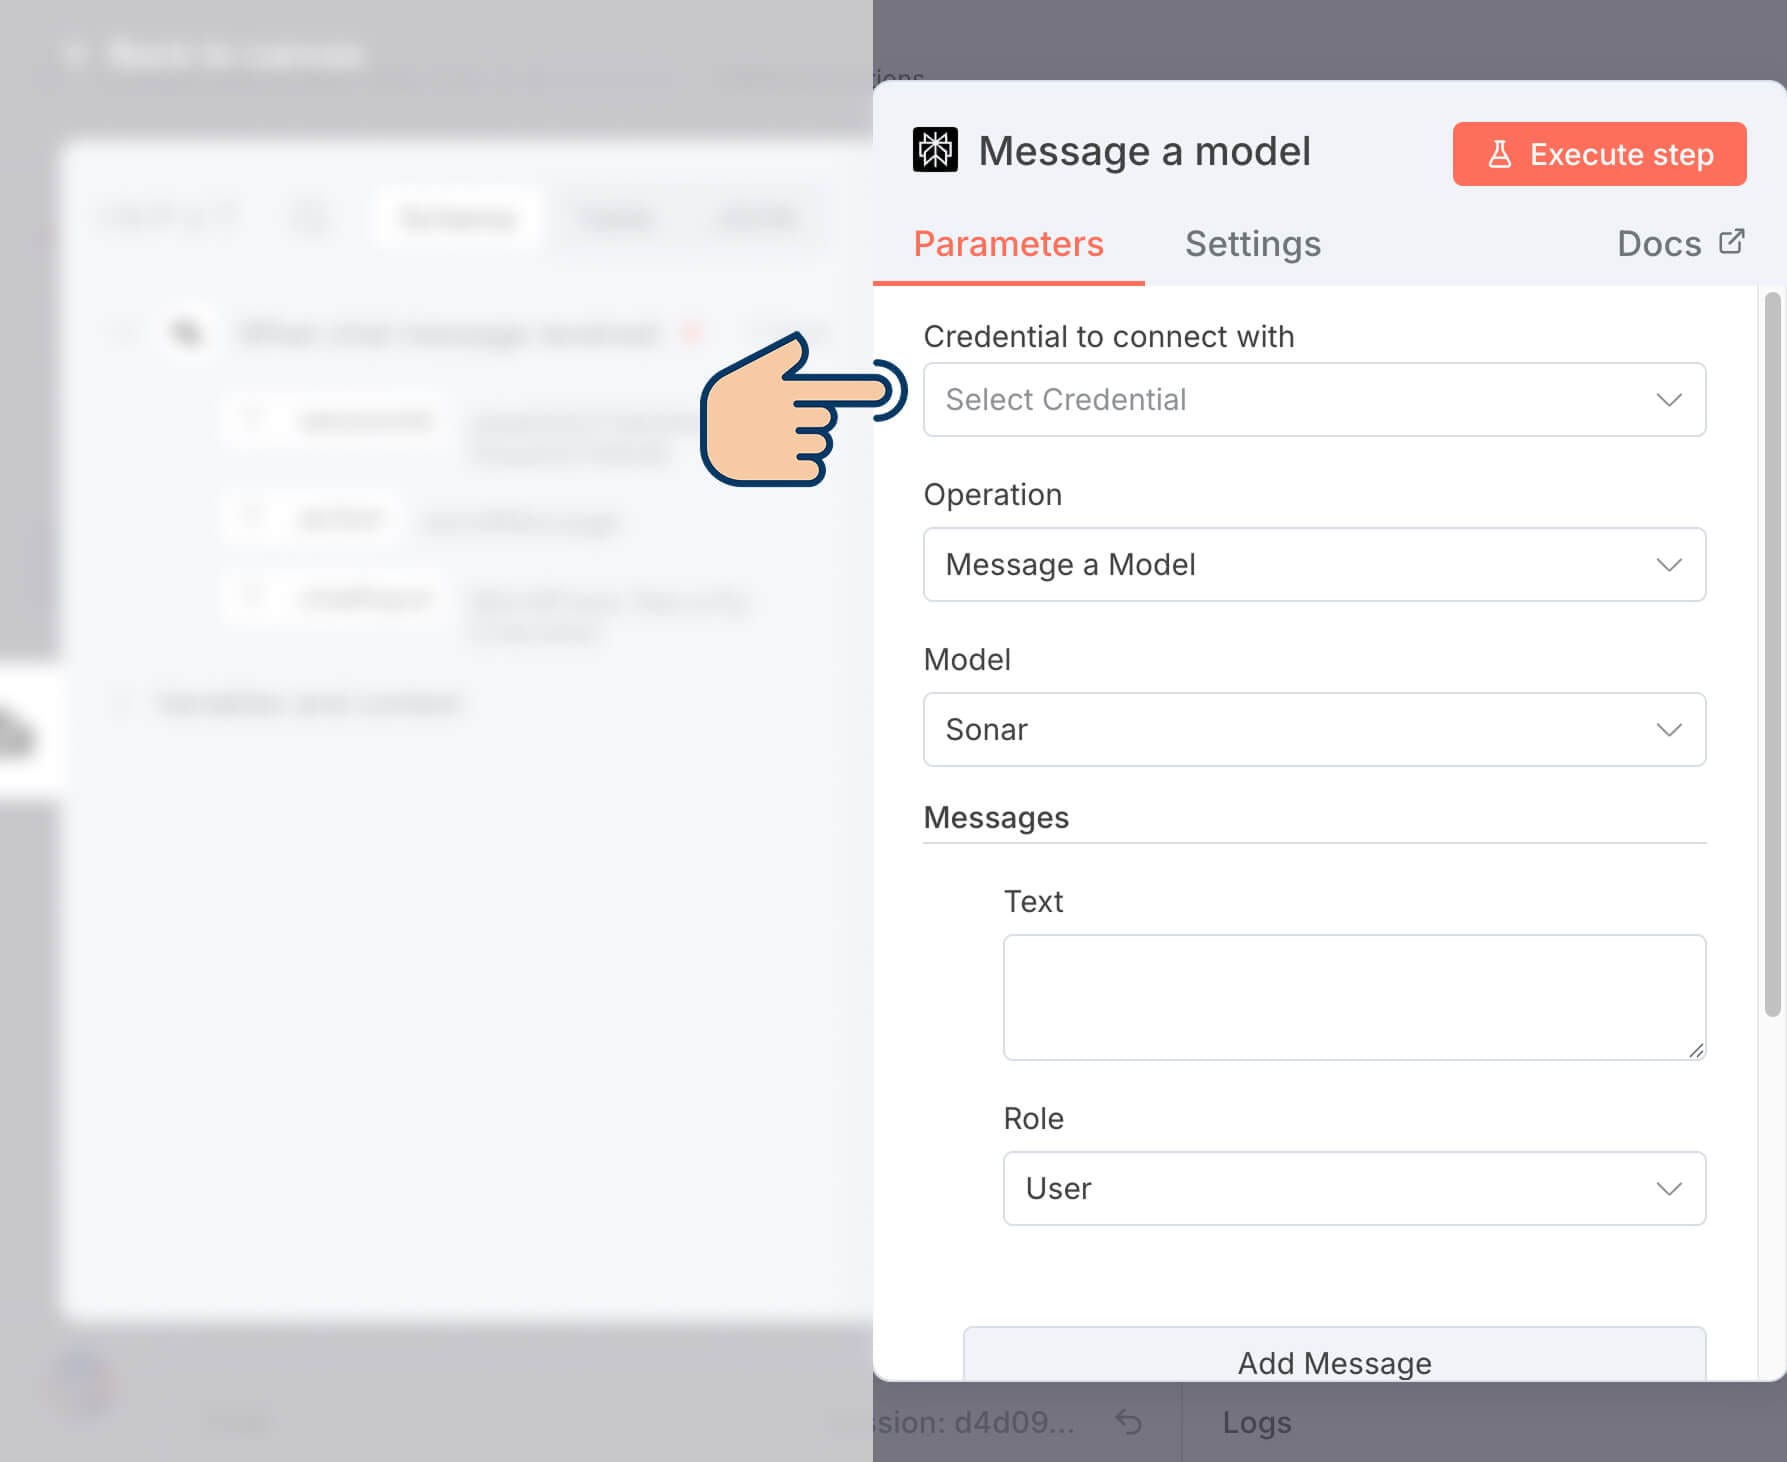
And if you notice, there is an option called "Credential to connect with".
It is this option that will connect n8n with Perplexity API.
So, click on "Select Credential" and then click on "Create new credential":
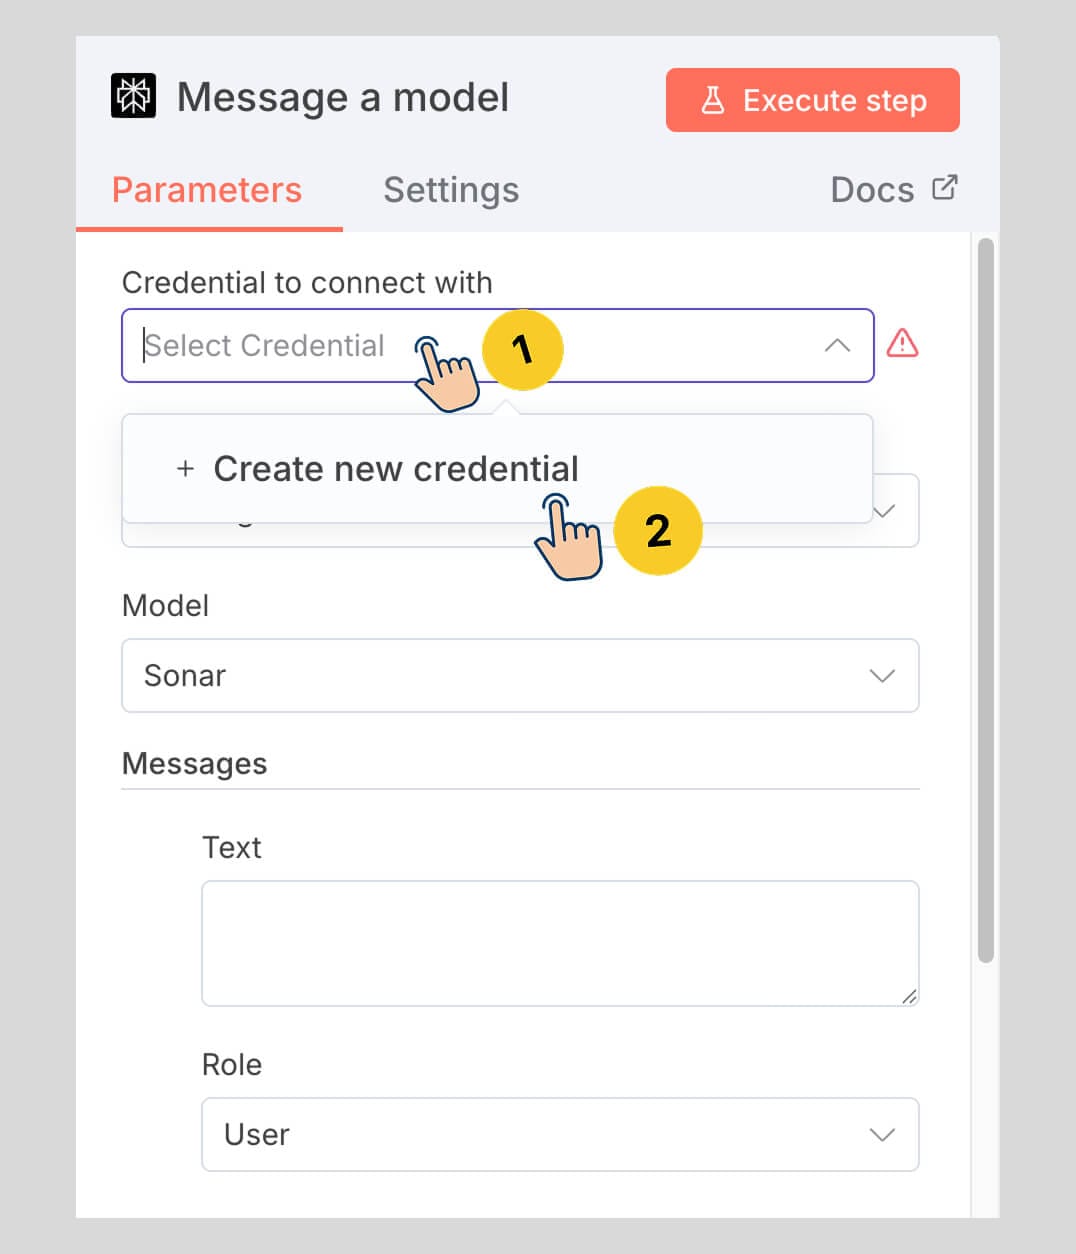
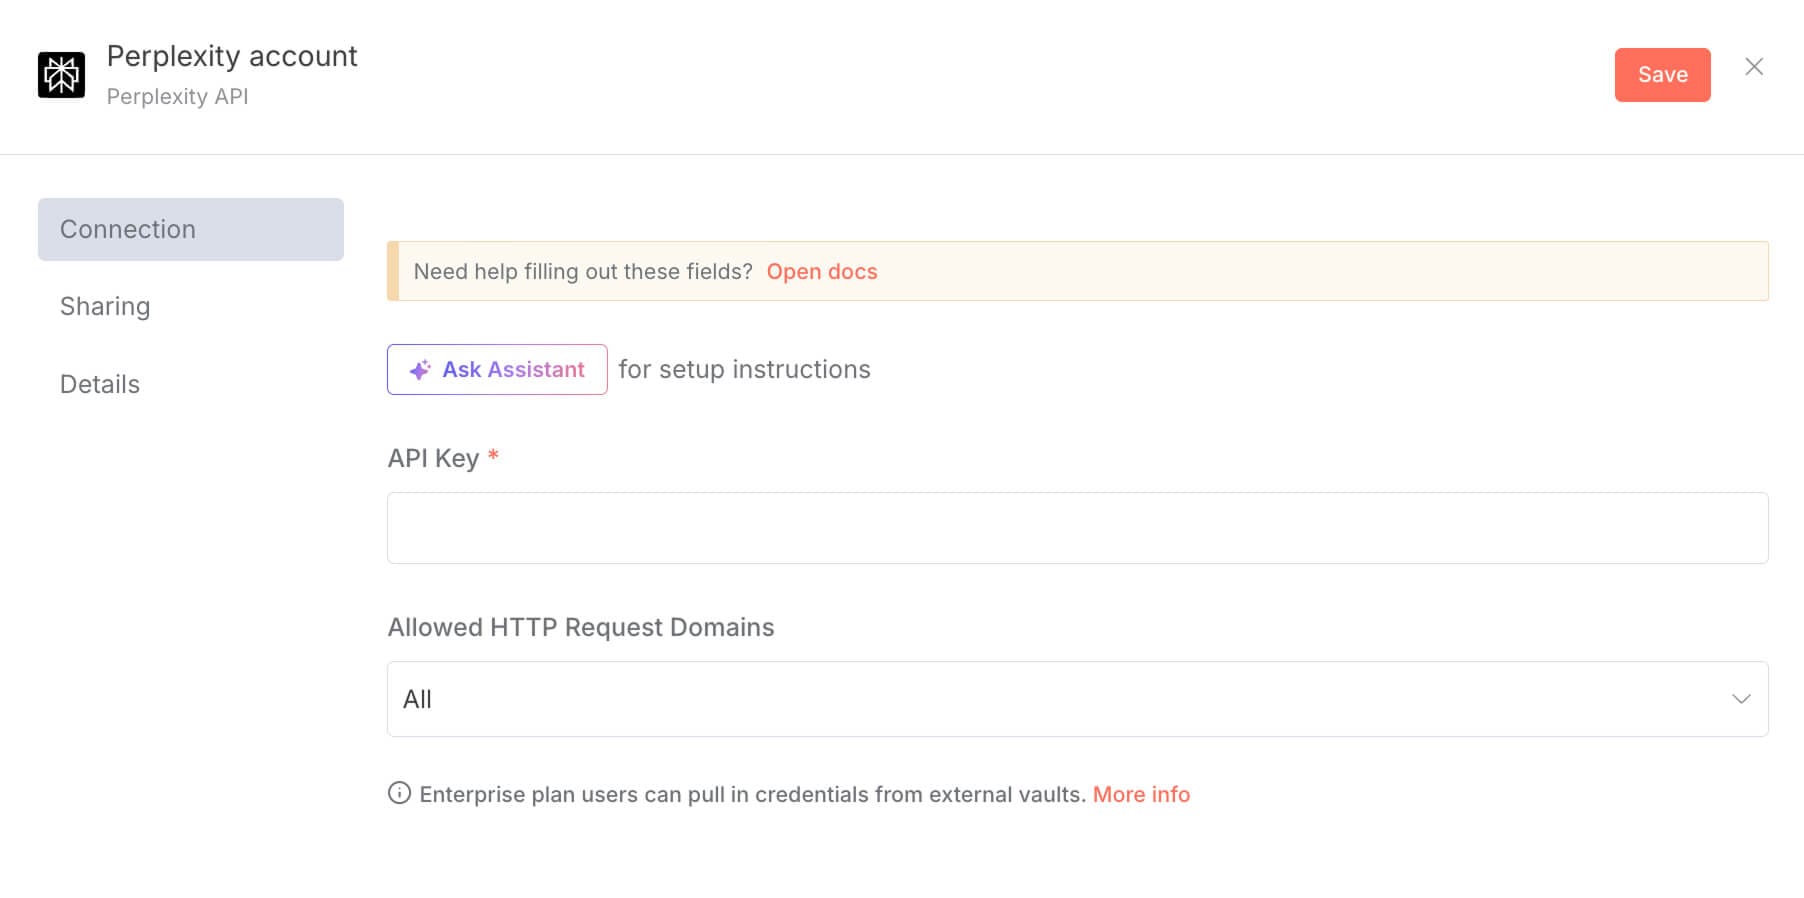
It will now open up a new window where you can enter an API key that you can get from Perplexity:

Woah! Woah! Wait! What is an API credential?
Simple.
If we were performing this workflow manually, to generate a table of contents:
- We would have visited the Perplexity AI platform using a web browser.
- And then sign in to the platform using our Google or Email credentials
- And only then are we allowed to use Perplexity's AI features.
But because we are automating this step using n8n, we need to access the Perplexity AI platform inside n8n. We can not use Perplexity's website.
How do we do that?
This is where a mechanism called API comes in.
So, what is an API?
An API stands for Application Programming Interface, and it acts as a bridge that connects two different apps.
In other words, an API is a mechanism that enables two different software apps to communicate with each other.
For example, Perplexity AI has its own website where you can get answers to your queries.
But Perplexity AI also provides an API, and because of this, you can use Perplexity's AI features from inside n8n without ever visiting the Perplexity website.
And it's not just Perplexity AI; many platforms create APIs specifically so you can access their features and data inside your own apps or third-party tools like n8n, Make.com, etc.
And, allowing you to access a platform's API to help you automate a workflow is the core feature of n8n.
For example, n8n created Perplexity AI nodes to make it easy for you to access Perplexity's API.
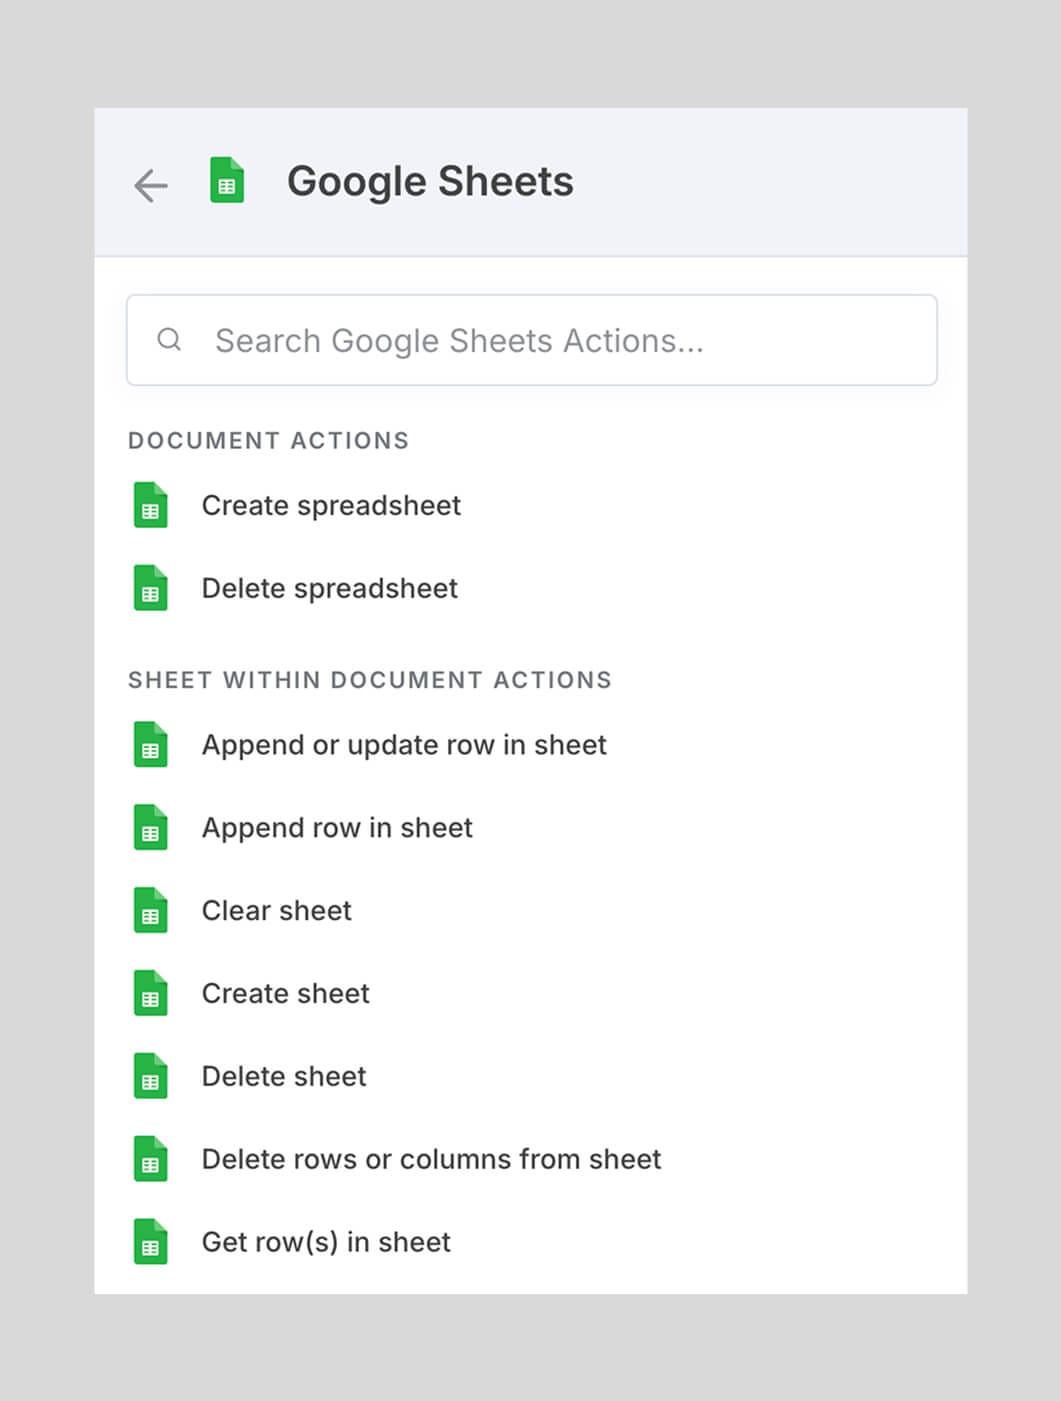
Similarly, n8n created nodes for Google Sheets to help you access the Google Sheets API easily:
And similarly, n8n created API nodes for 1000+ platforms:
Anyway, APIs are better understood when we use them.
But here's an important question: How does n8n verify that we have permission to use Perplexity's API or any other platform's API, for that matter?
Think about it.
When you visit Perplexity's website manually, you sign in with your email or Google account to prove you're an authorized user.
But when n8n tries to access Perplexity on your behalf, how does Perplexity know it's really you?
This is where API credentials come in.
What is an API credential?
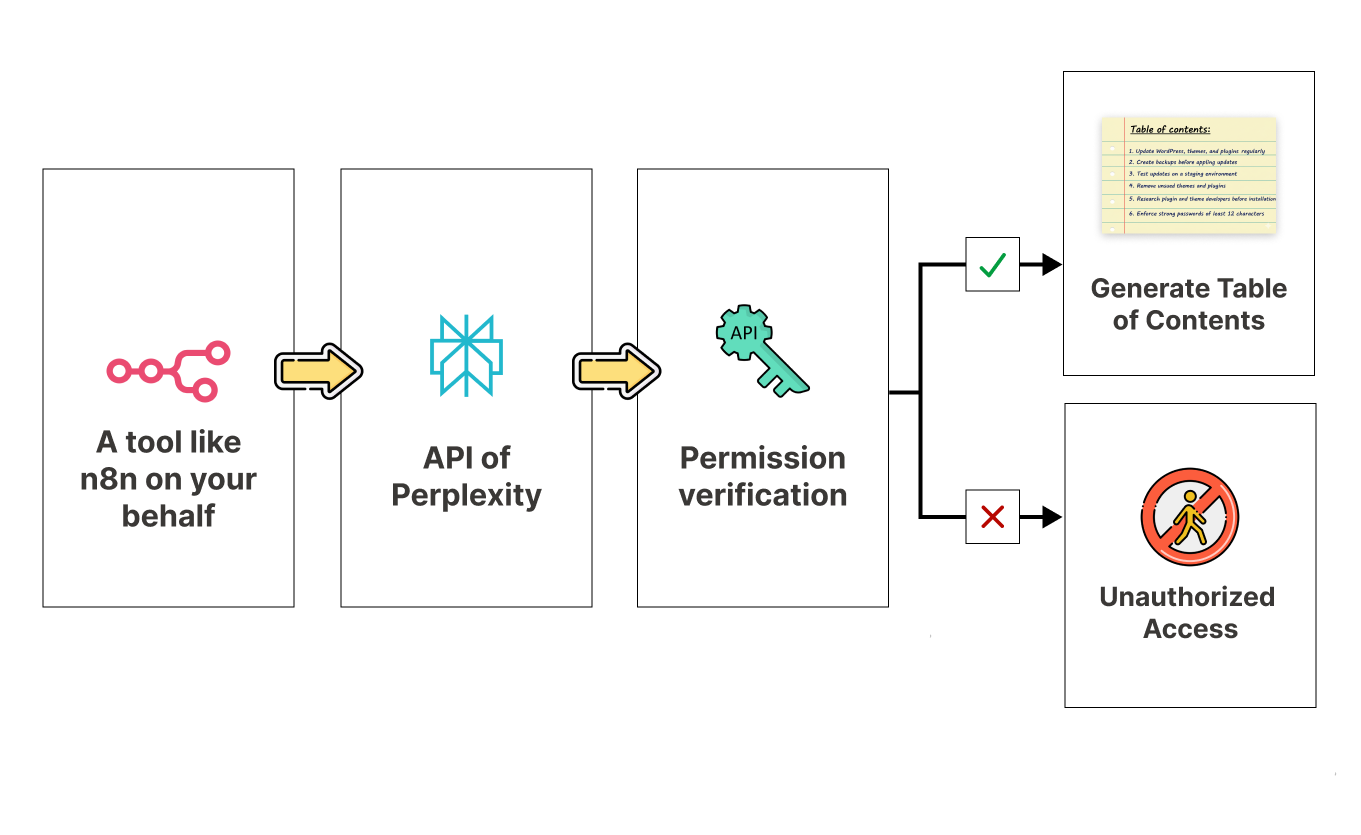
An API credential is like a password that proves to a platform that you have permission to use its API.
Most platforms require you to create an API key (a type of credential) from their settings.

Once you have this API key, you provide it to a tool like n8n.
And when a tool like n8n connects to that platform's API, it presents this key as proof that you're authorized to use the service.
It's like showing an ID card to enter a building.
Alright, enough theory. Let's actually create one of these API keys so you can see how simple it really is.
Let's create an API key for Perplexity AI.
To connect n8n with Perplexity AI, we need to get an API key from Perplexity.
Let's do that now.
How to create an API key
Go to Perplexity AI website and log in.
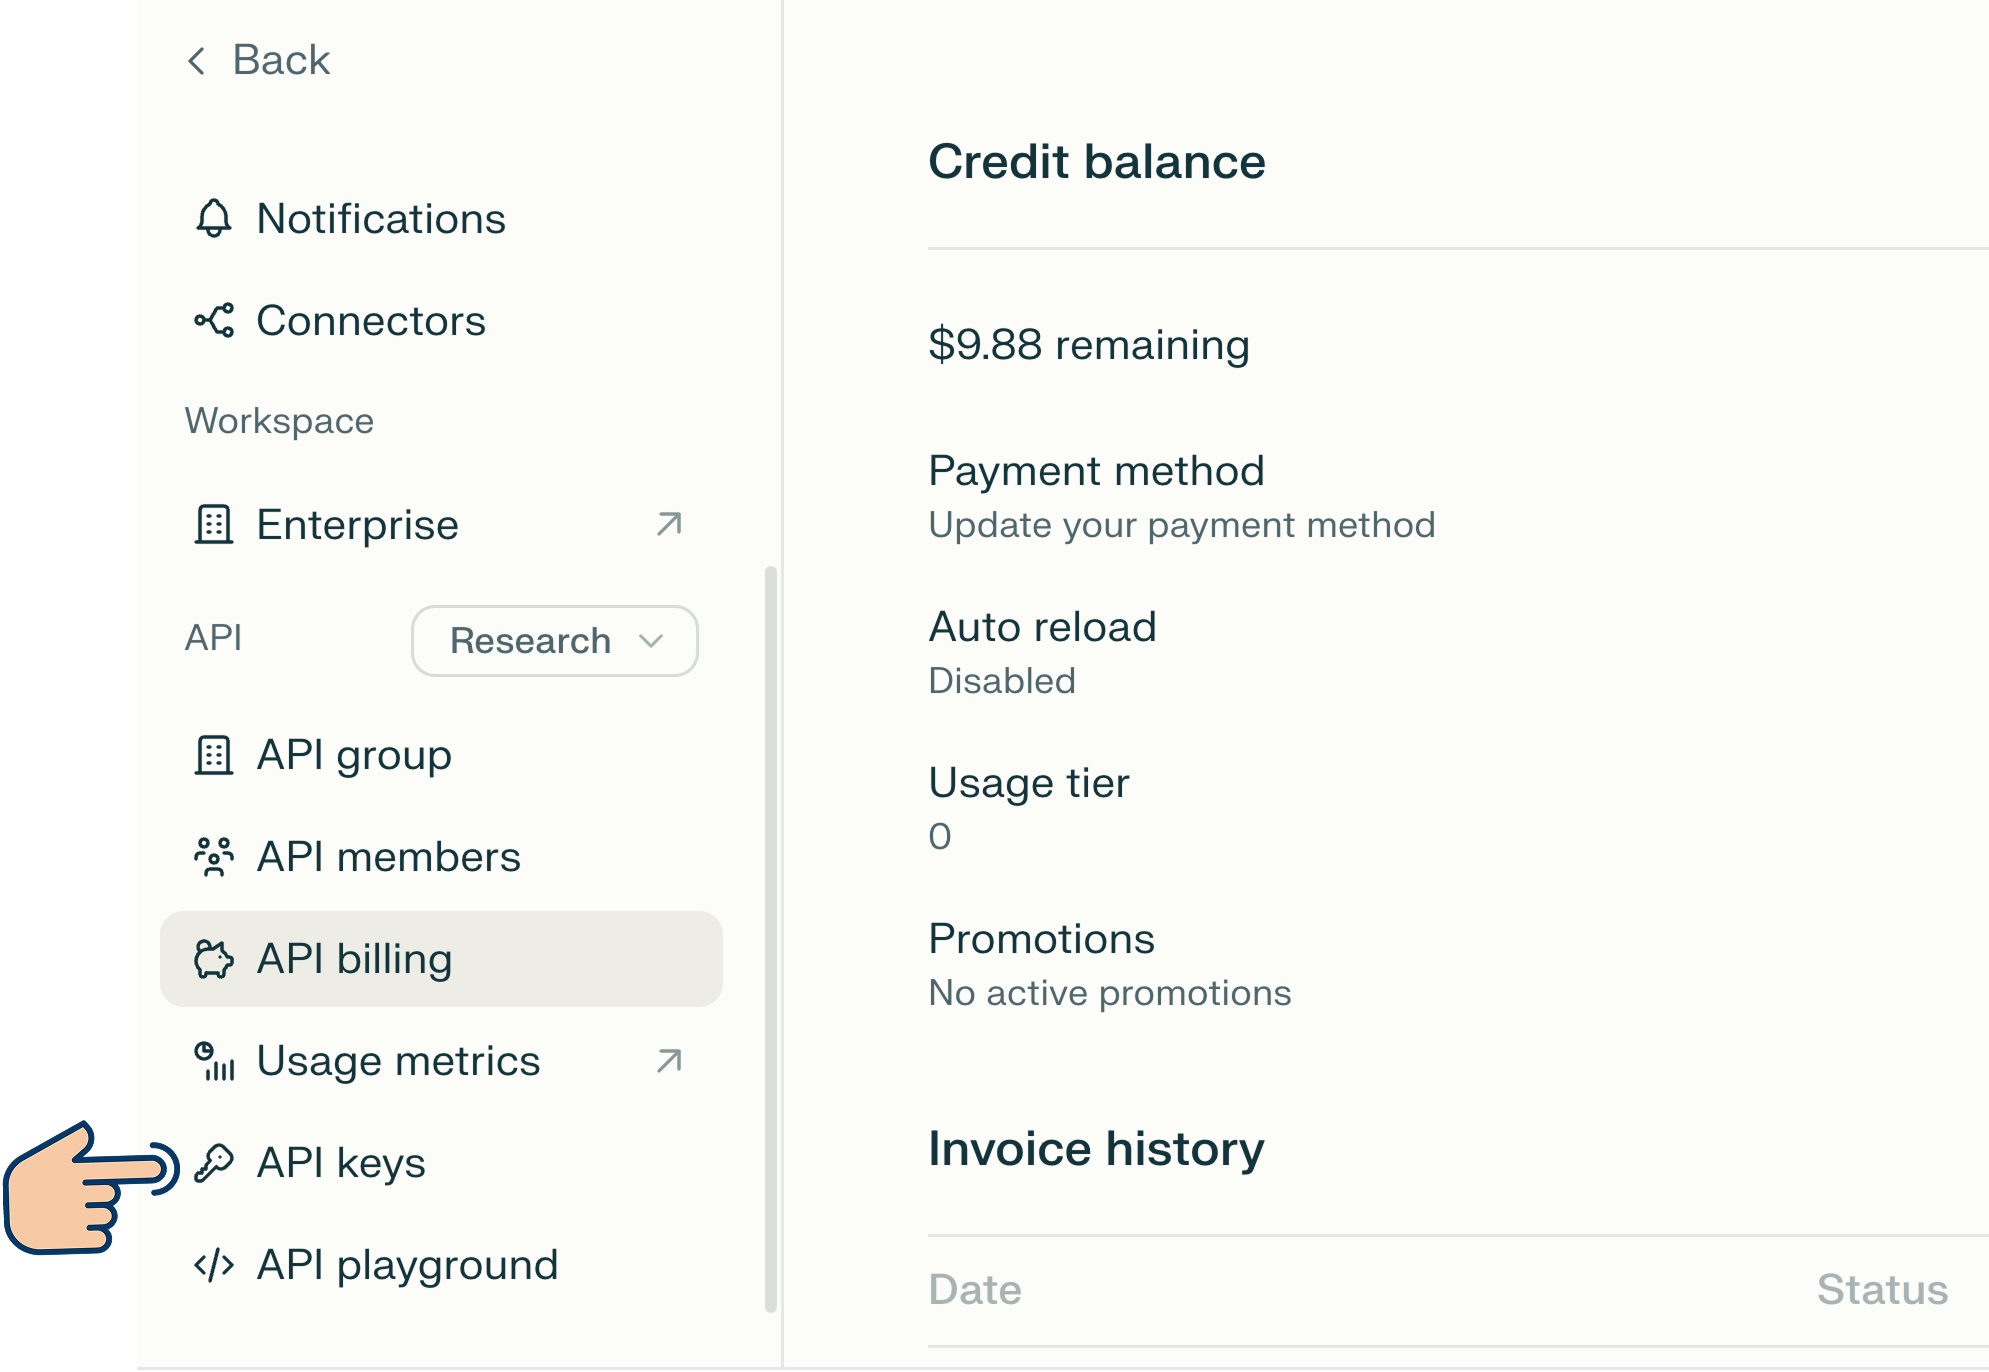
Next, from the menu on the left, click on the "Account" link and then click on the "API" link:
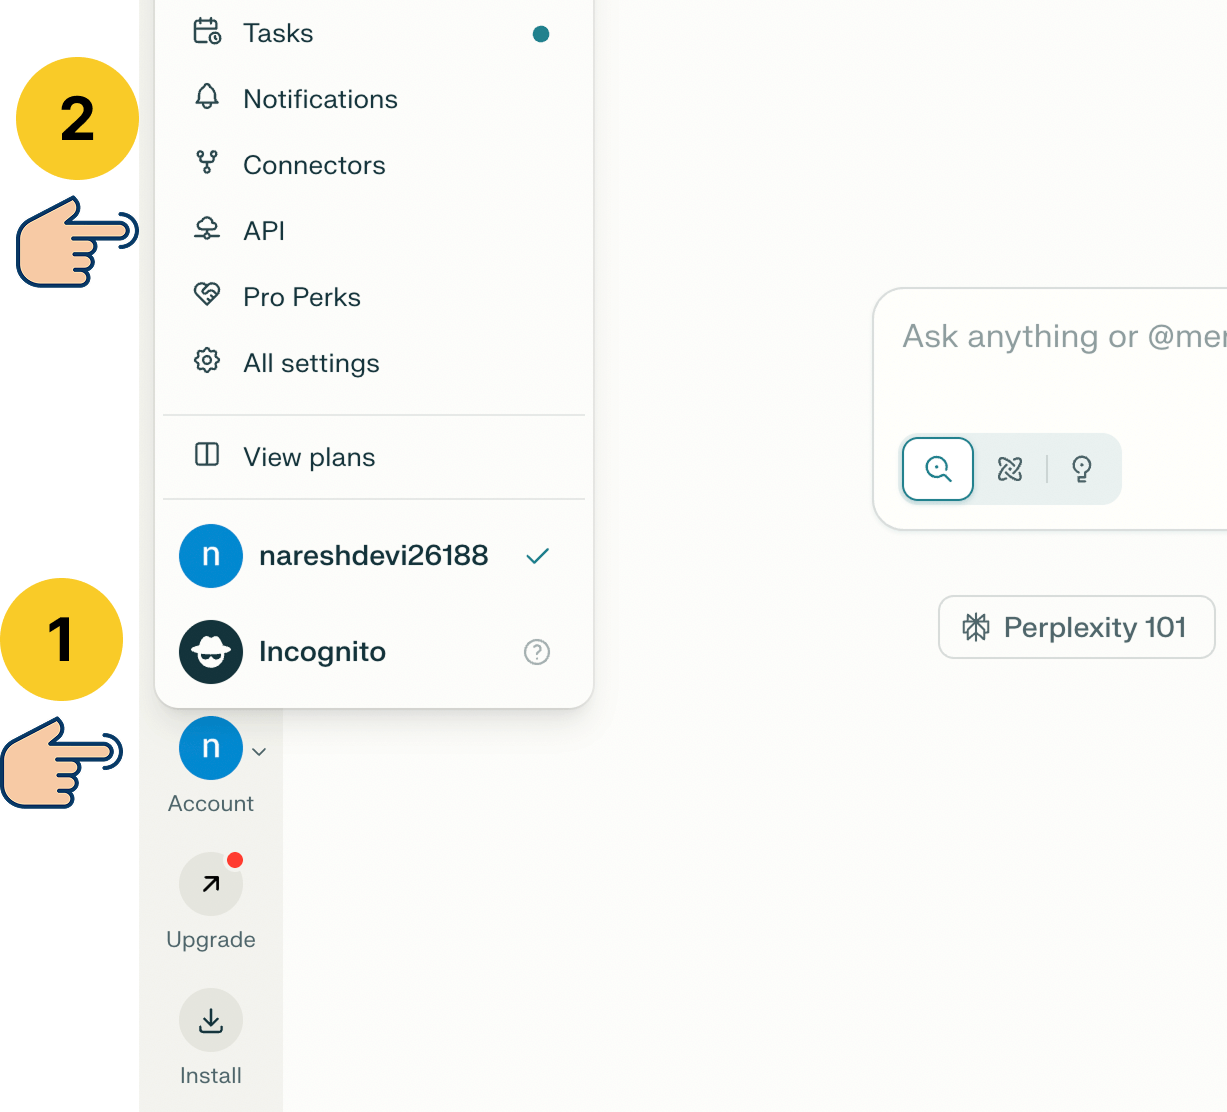
And if you are accessing the Perplexity API screen for the first time, you'll be forced to create an API group:
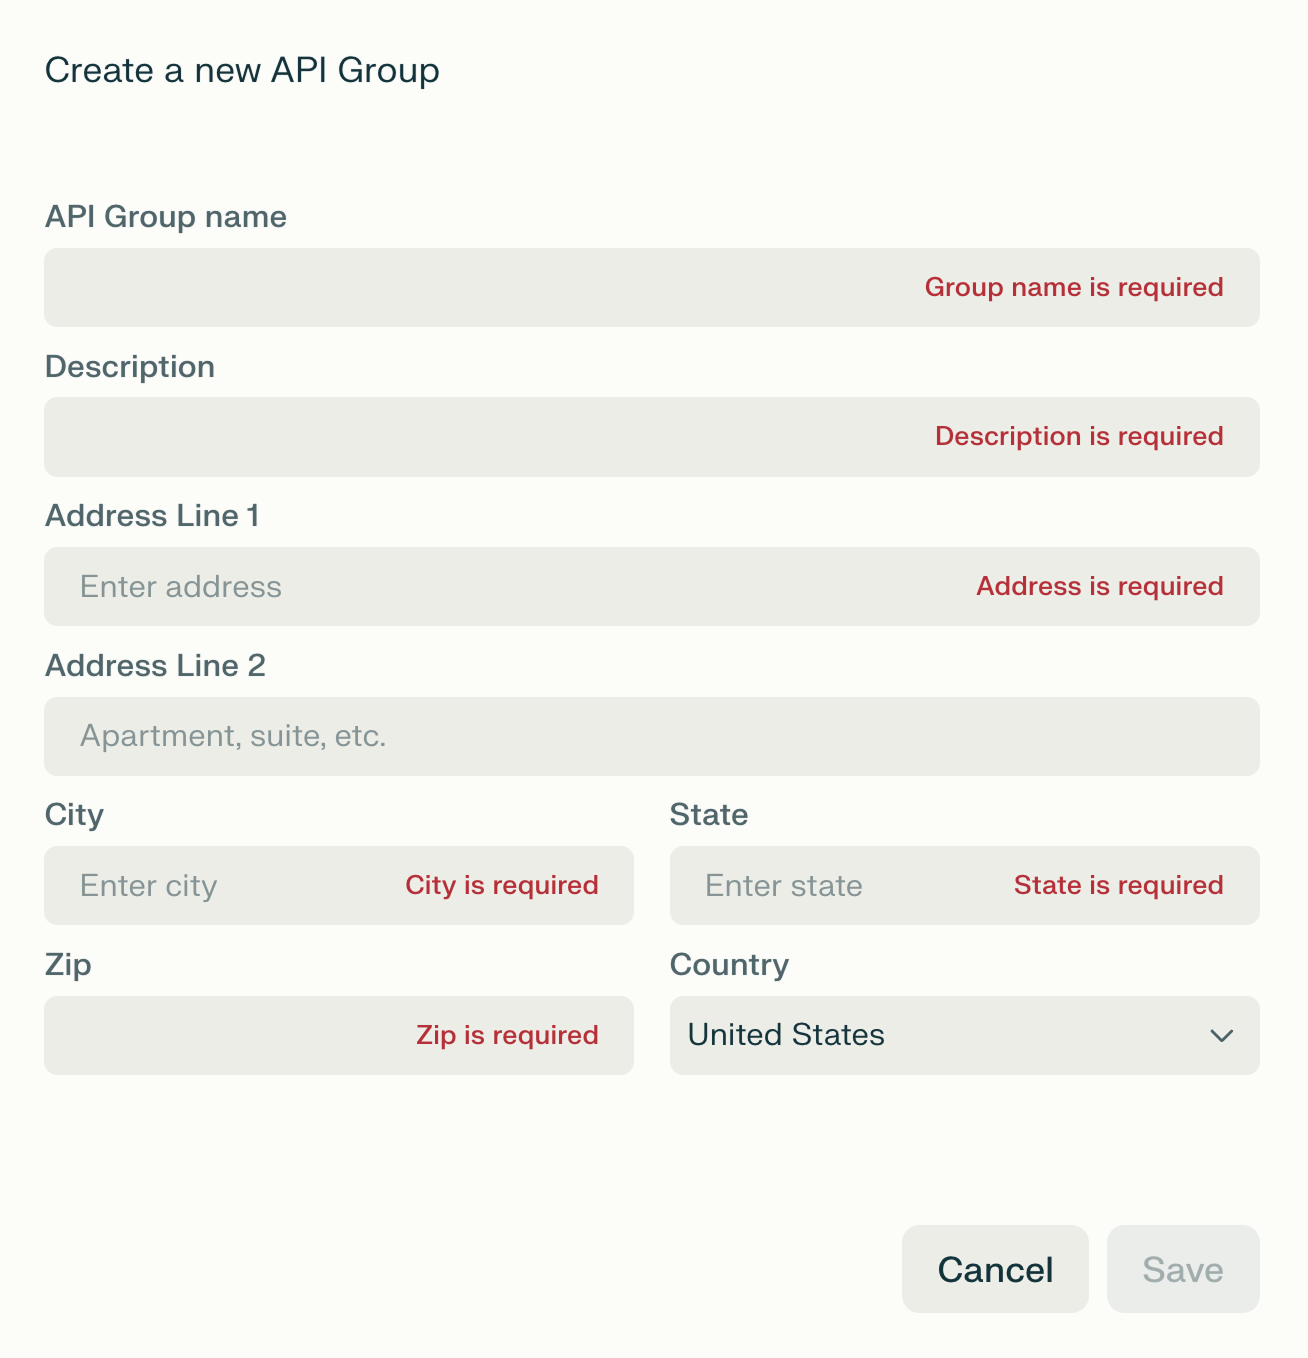
An API group will help you organize API keys in a better way.
For example, if you are working with multiple clients, you can create an API group for each client.
This will make sure one client's API key is not being used for the other clients.
This is important because Perplexity's API is not free.
Every time you interact with the API, a certain amount of money will be deducted from the preloaded credits.
So, if you're accidentally using one client's API key for another, one client will be unnecessarily paying for the other client's usage.
So, go ahead and create an API group in a thoughtful way.
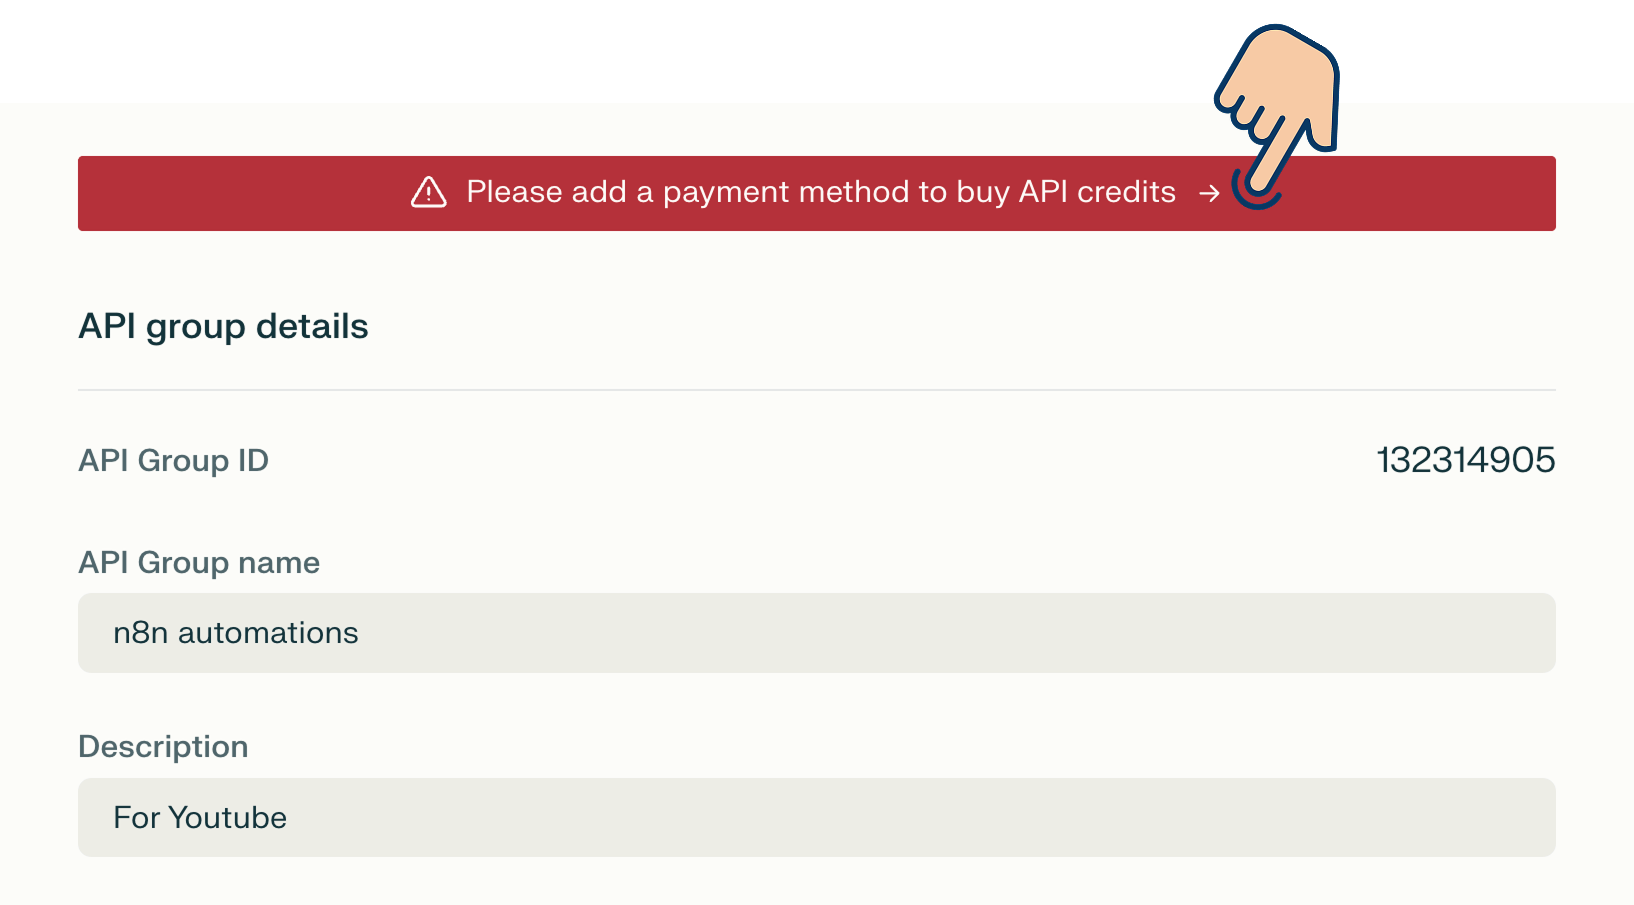
And as soon as you do that, you'll be asked to add a payment method to buy API credits.
Adding the payment method for purchasing API credits
As mentioned earlier, using AI models like ChatGPT or Perplexity through API within automation tools like n8n requires buying API credits.
And to buy API credits, we need to add a payment method first.
So click anywhere on the red notification:
Next, click the "Enter payment method" button to add your card or bank details:
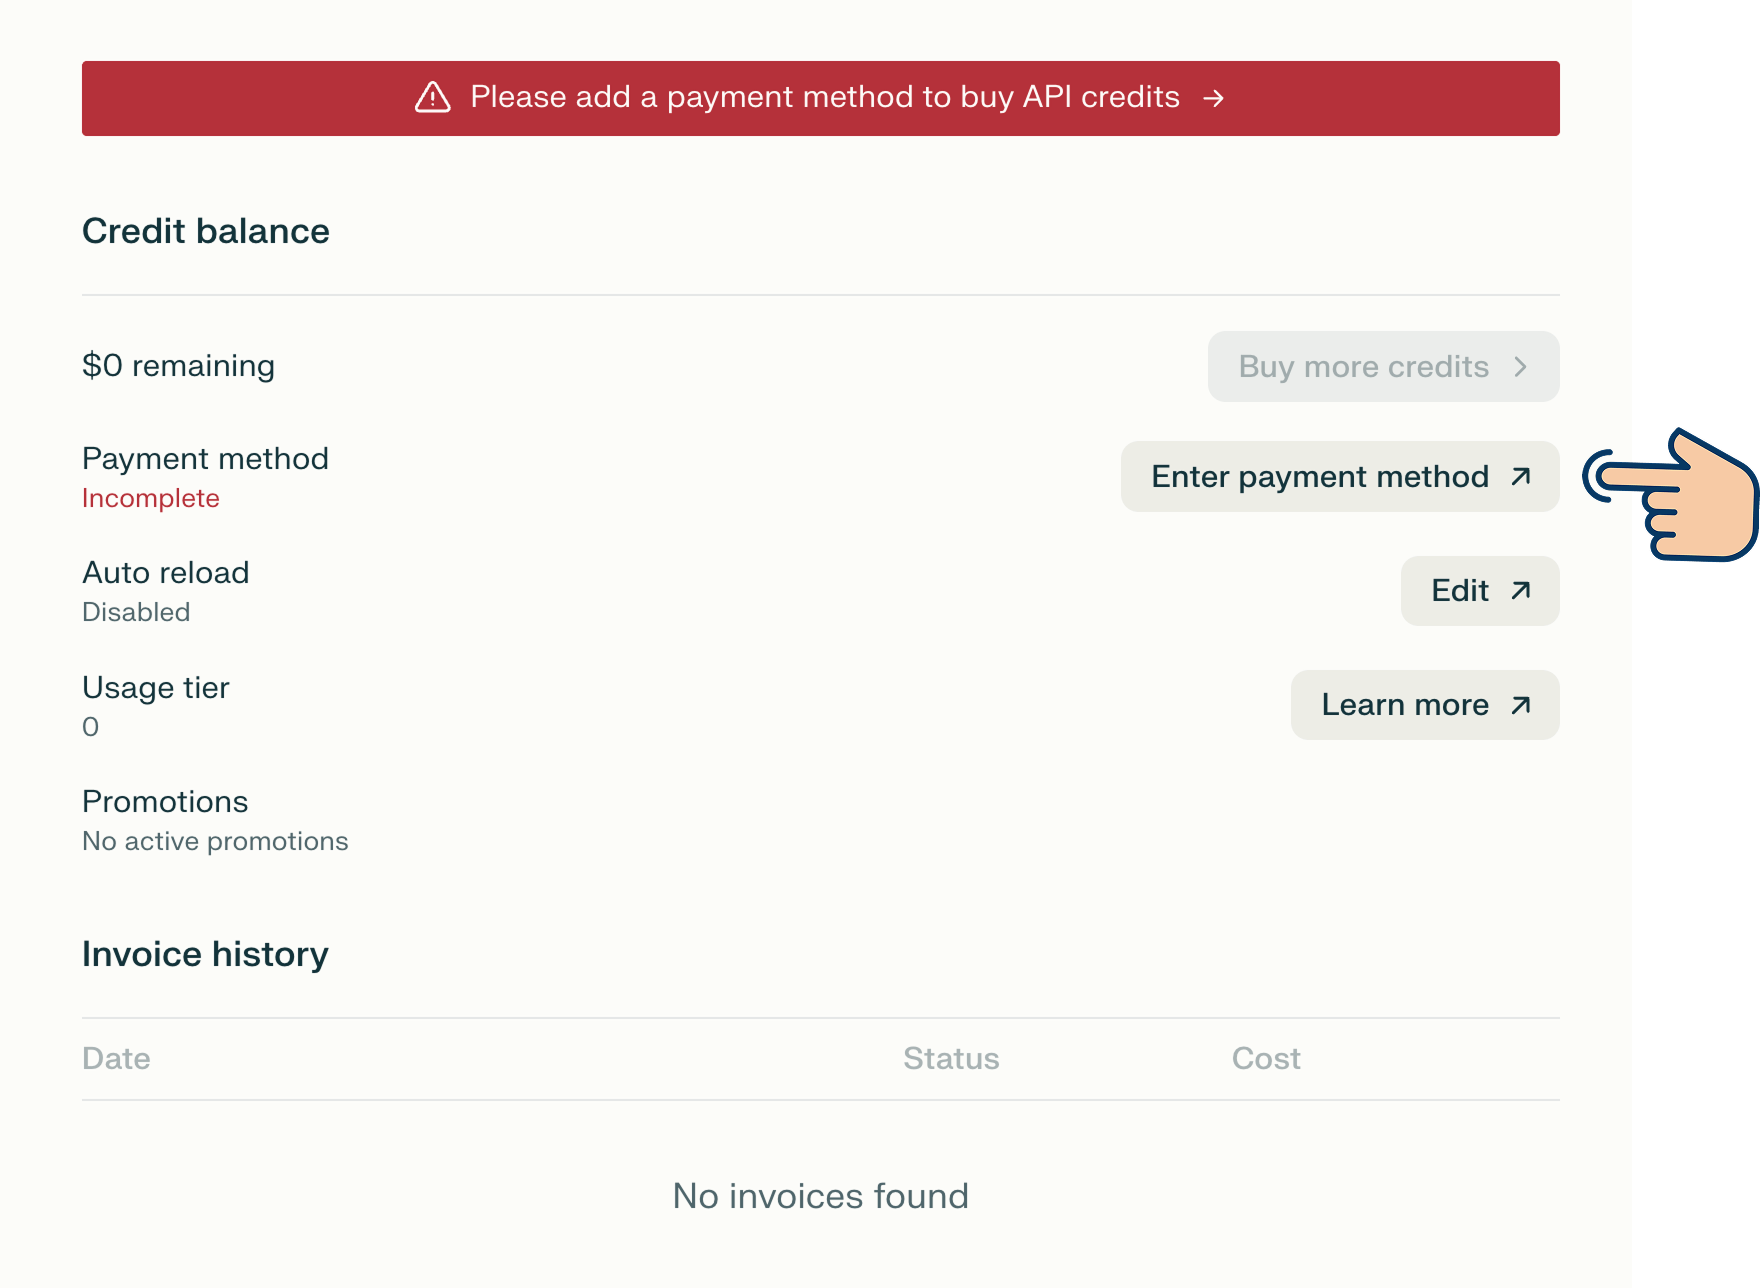
After successfully adding the payment method, click on the "Buy more credits" button to purchase credits worth $3 or more, depending on how much you plan to use the platform's API.
The minimum amount is $3 for using the Perplexity API.
If you're going to use it regularly, $10 is a good starting point. I went with $10.
But if you're going to use it only for the sake of following this tutorial, go ahead $3 because we are not allowed to enter a lower amount that that.
Next...
Creating the Perplexity API key
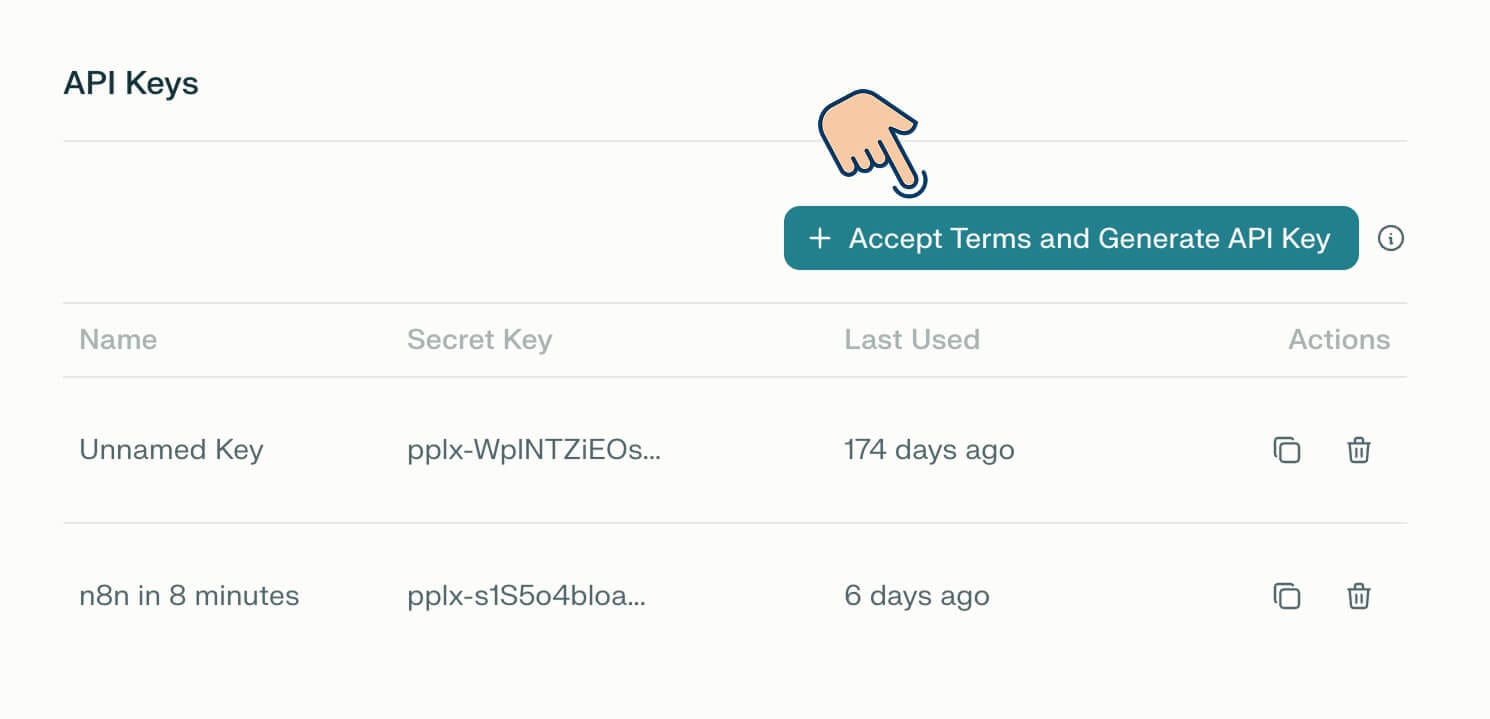
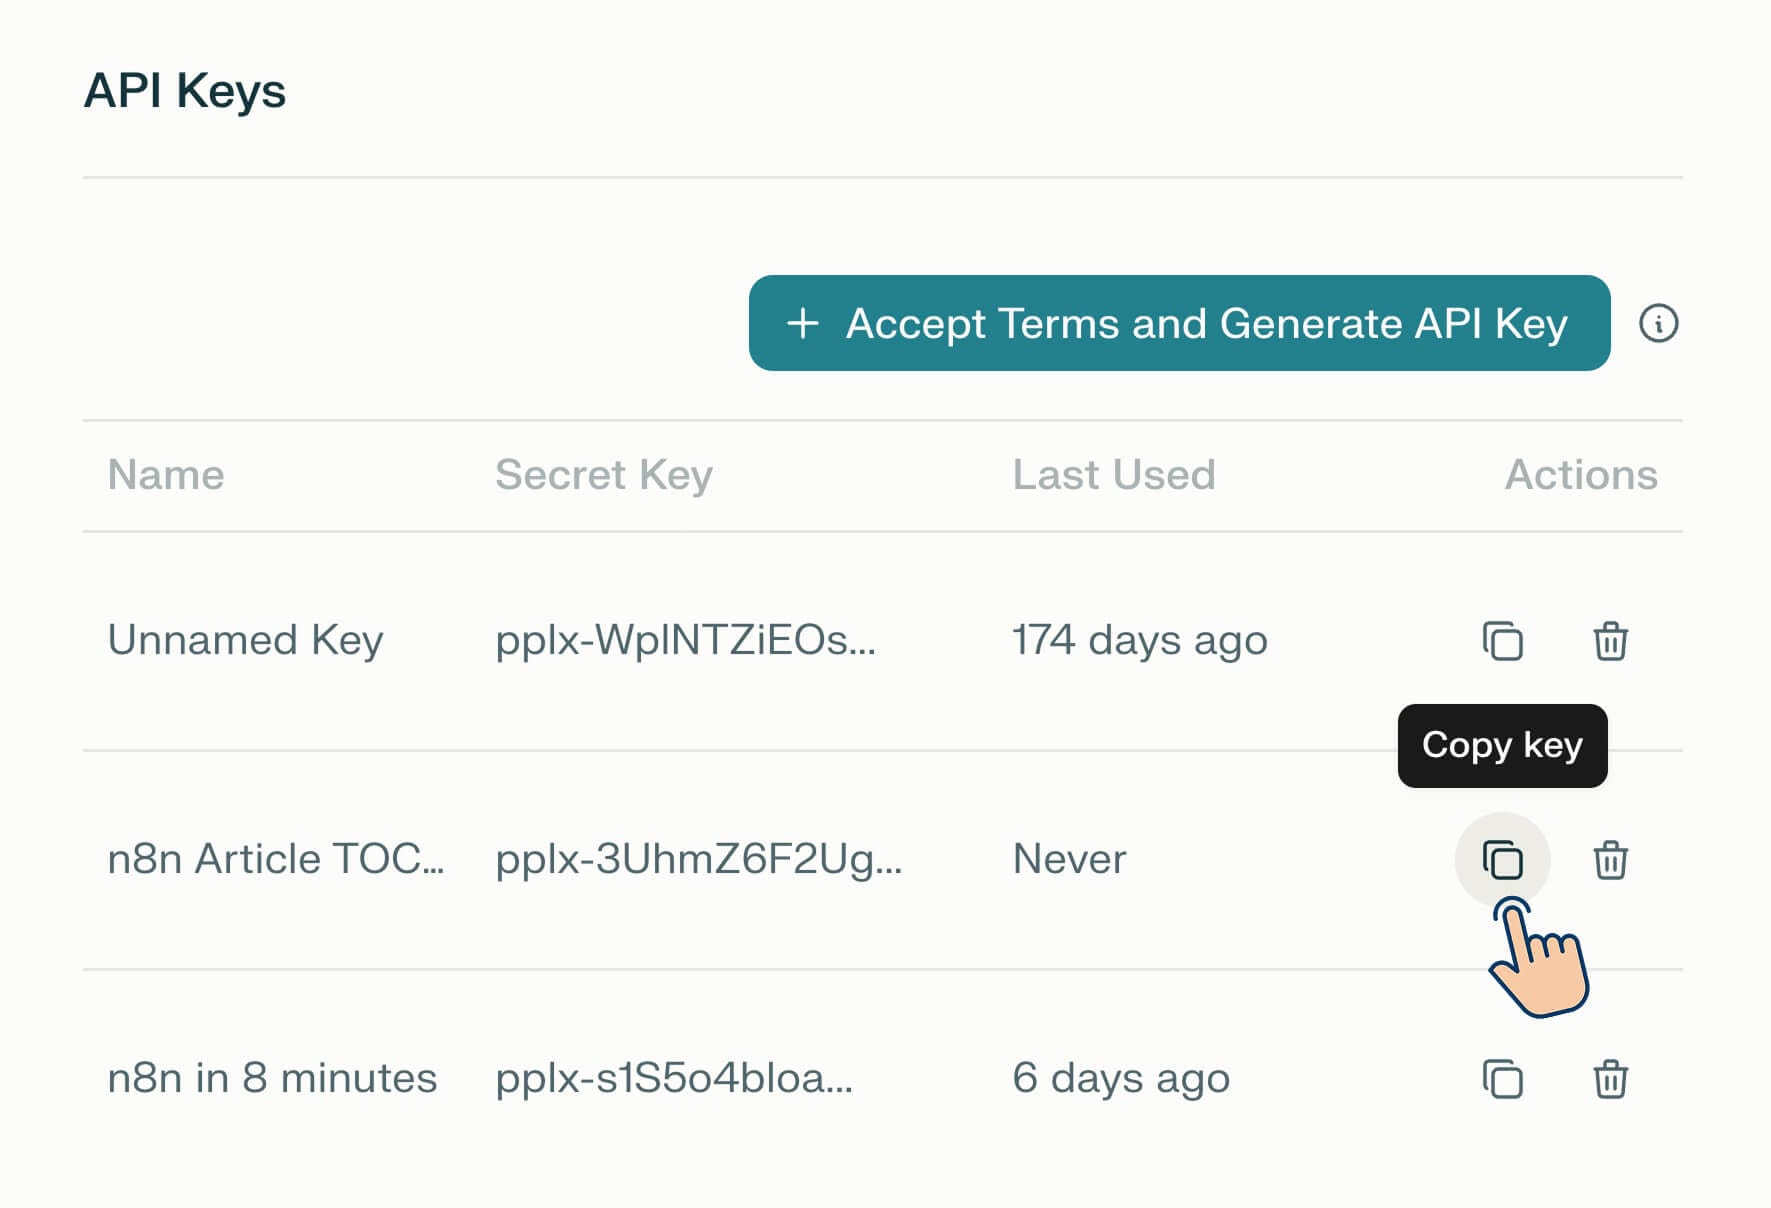
Once you are done adding the credits, from the left-hand sidebar, click on the "API Keys" link:
And, click on the "Accept Terms and Generate API Key" button:
This will now bring up a pop-up for creating the API key:
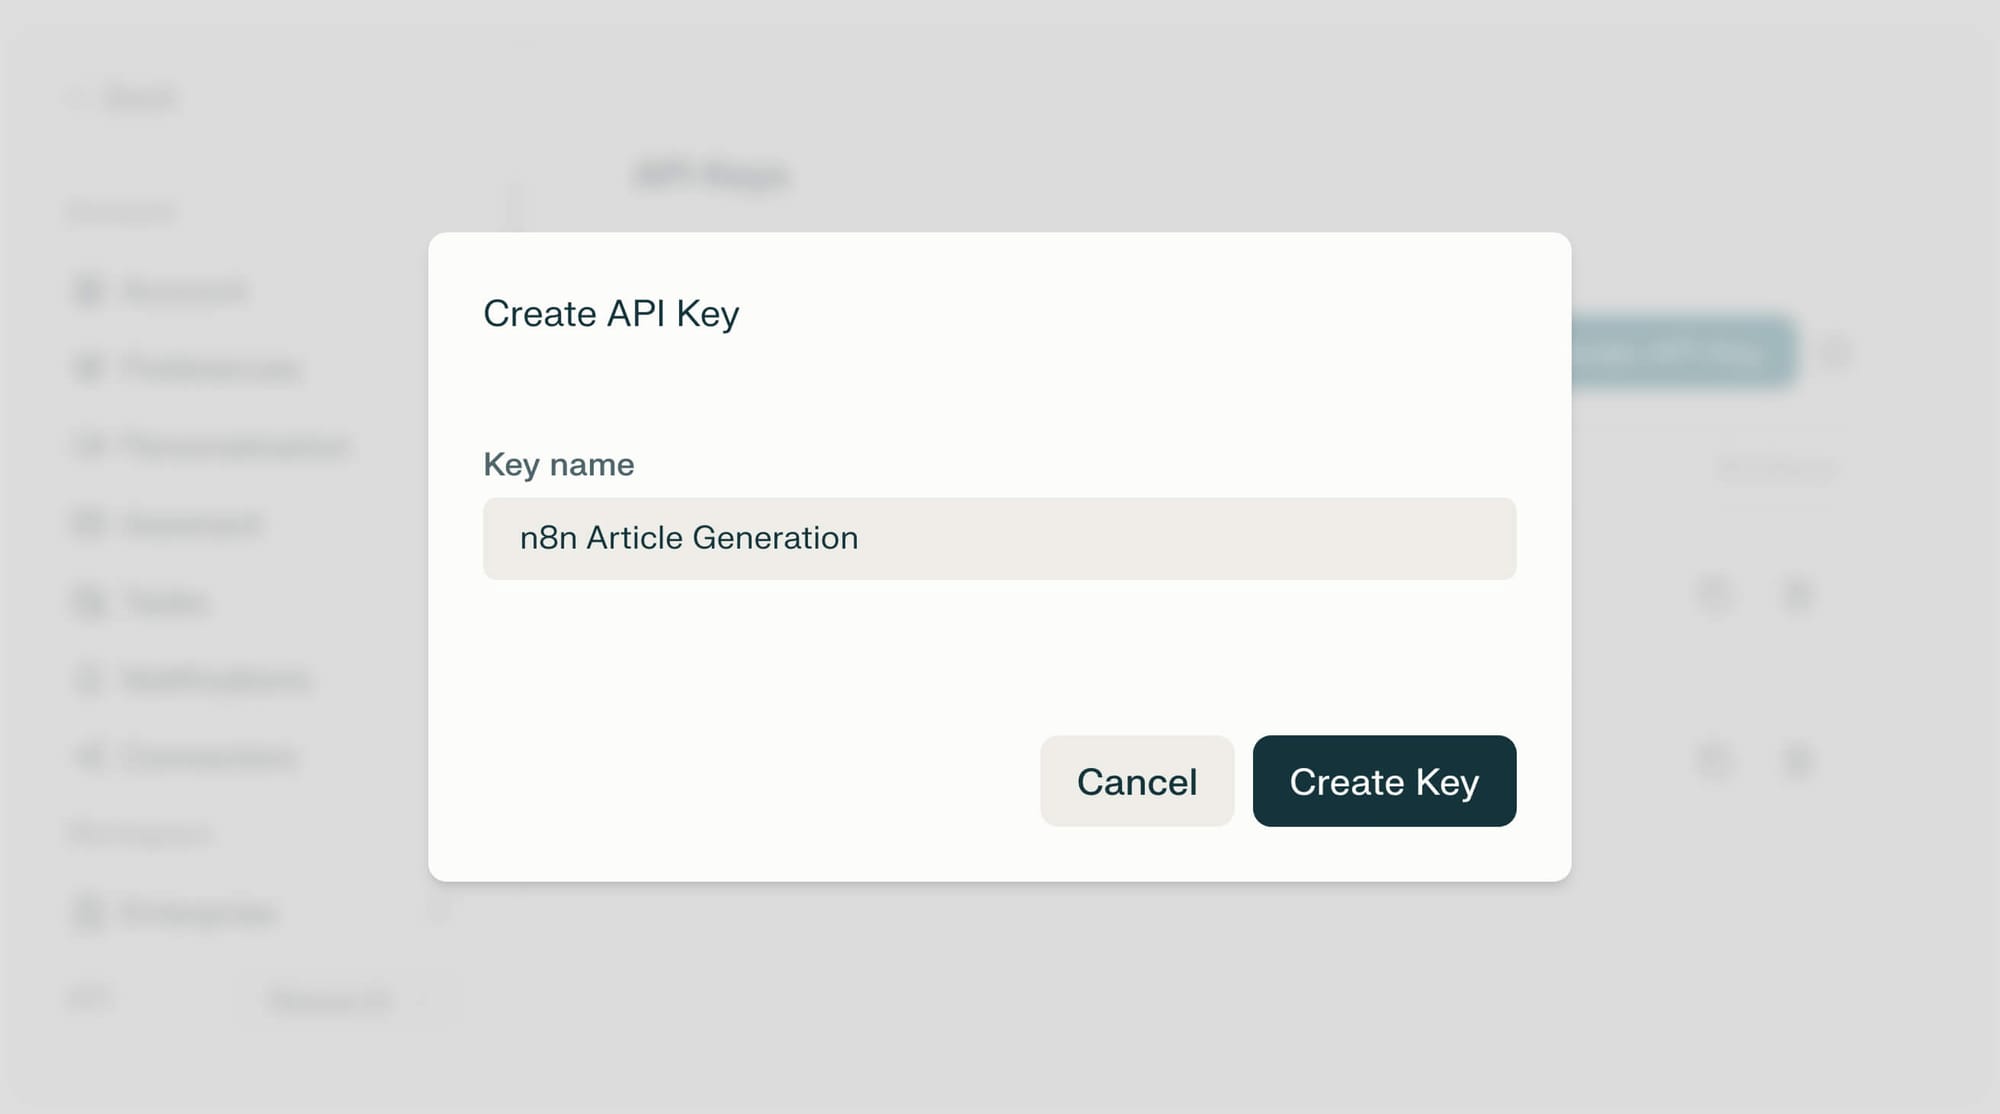
Name the API key in a thoughtful way
Before creating the key, you need to name the key.
Name the key in such a way that you can recognize the purpose of the key from the other keys.
For example, we are currently creating this key for generating a table of contents for our article, right?
So, I named it "n8n Article TOC Generation":
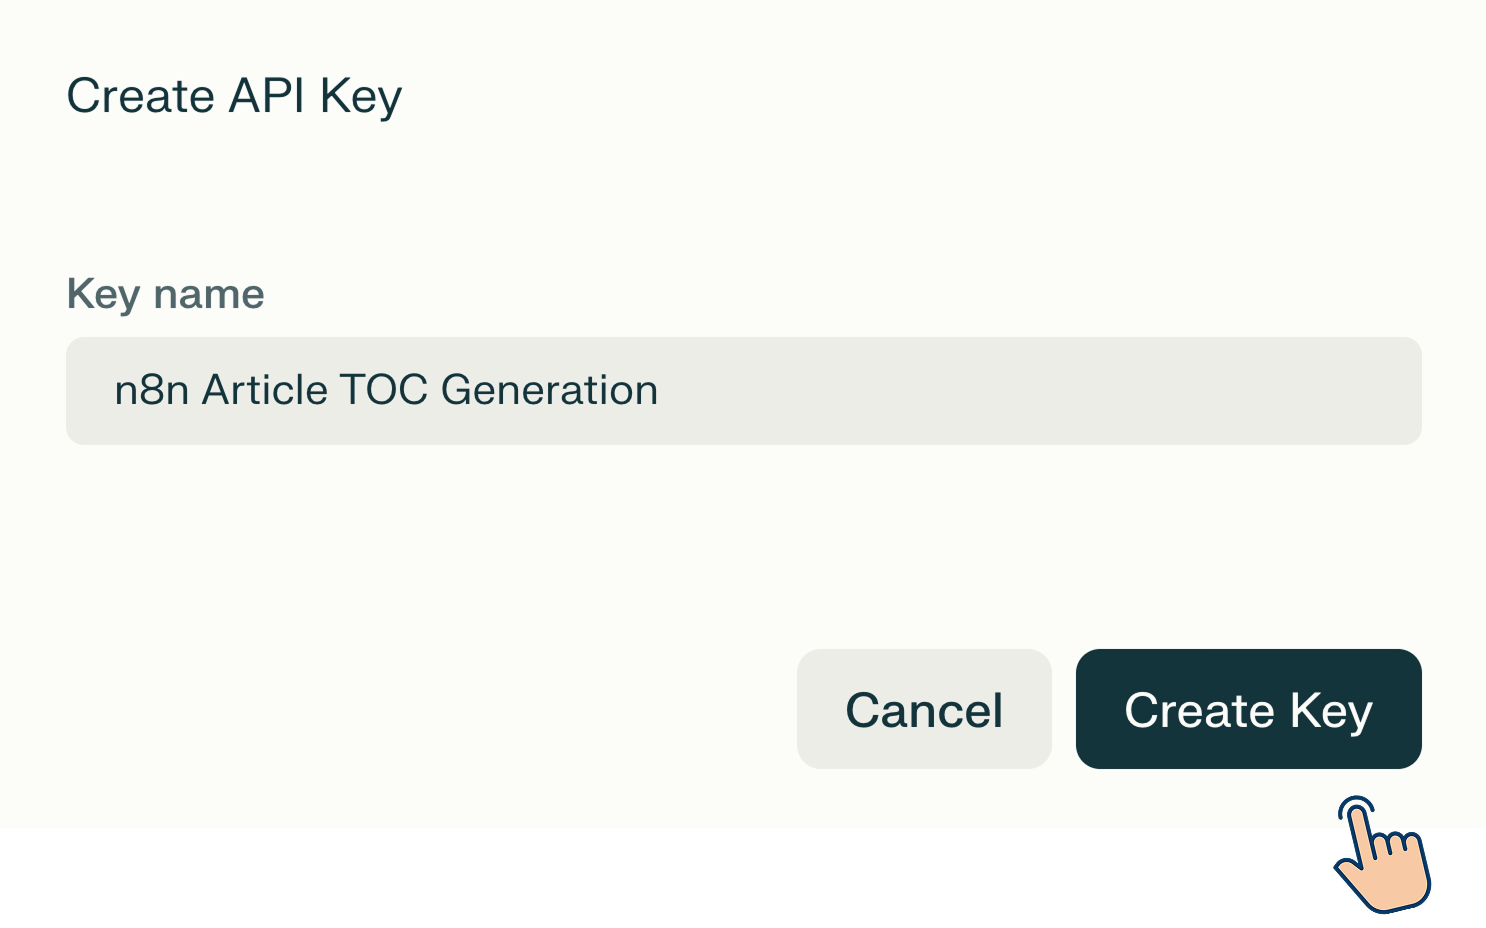
Anyway, click on the "Create Key" button once you have named your key in a meaningful way.
And as soon as you click on the "Create Key" button, Perplexity will create an API key and take you back to the "API Keys" screen.
That's all you need to do to create an API key.
But wait!
Our job is only half done :)
We have created this key so that we can allow n8n to generate TOC for our article on behalf of us, right?
So, copy the API key you just created.
Next, switch back to n8n.
If you remember, inside n8n, we were creating a credential to connect with the Perplexity platform by using its "Message a model" node:
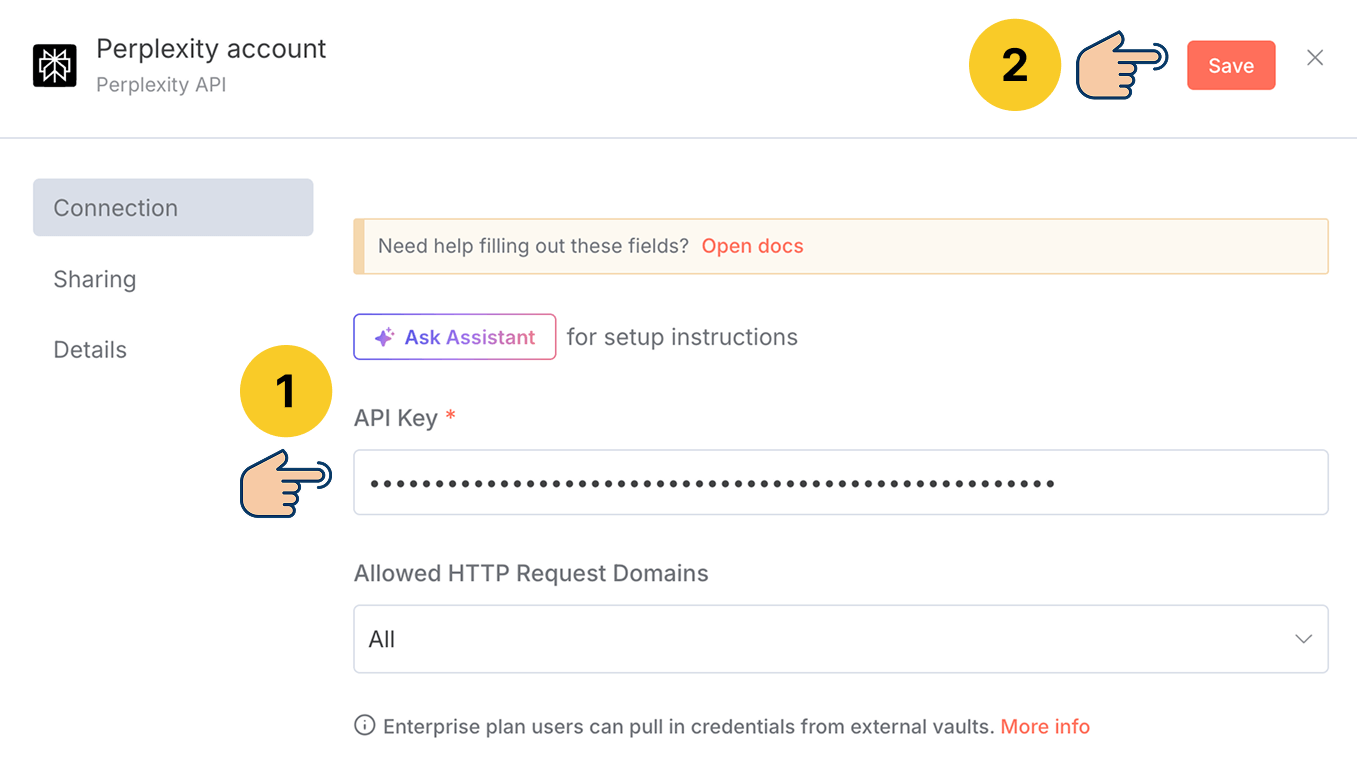
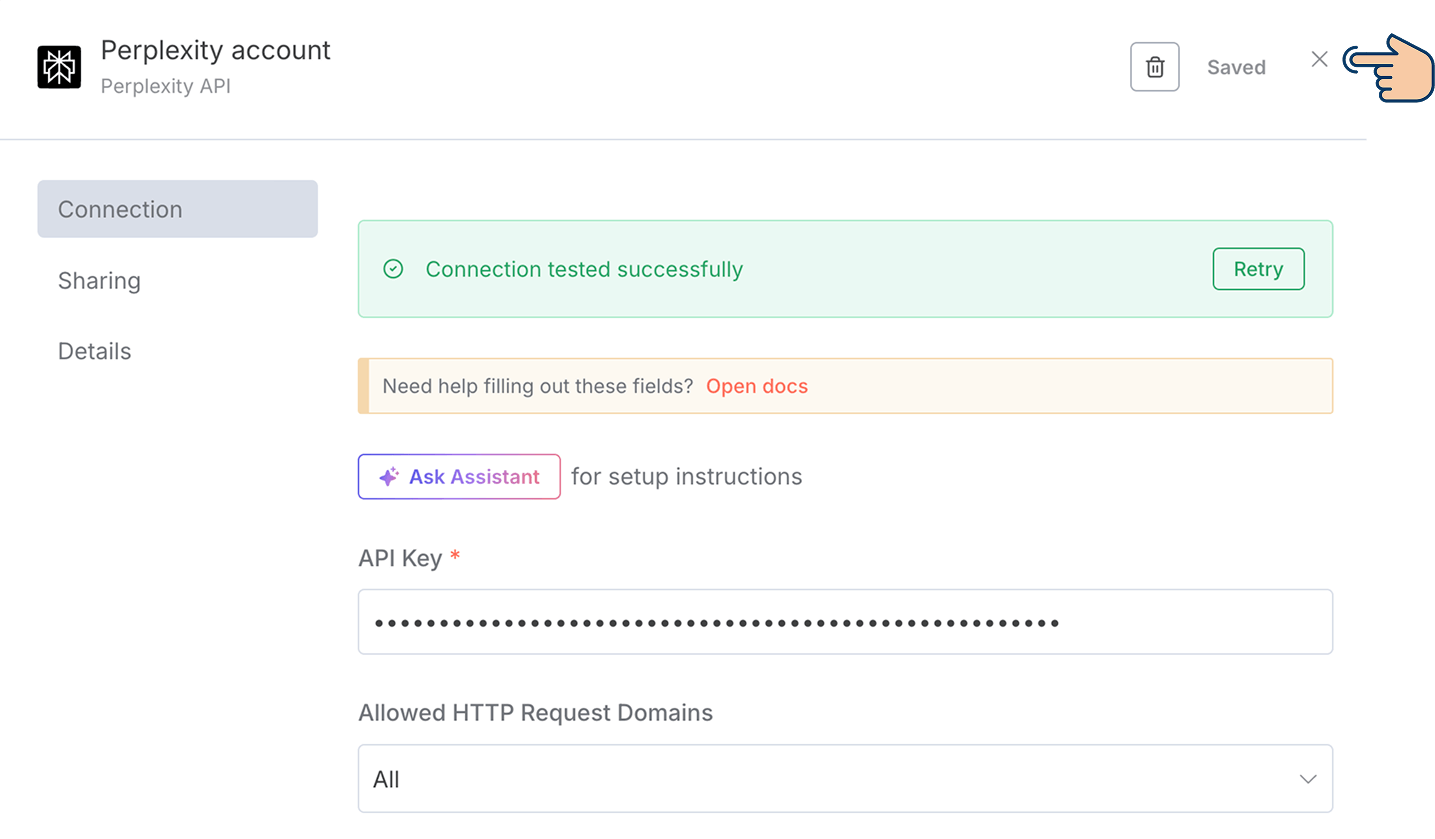
If you notice the credentials form, there is an "API Key" field.
Now, paste the copied API key from Perplexity AI inside this "API Key" field and save the credential:
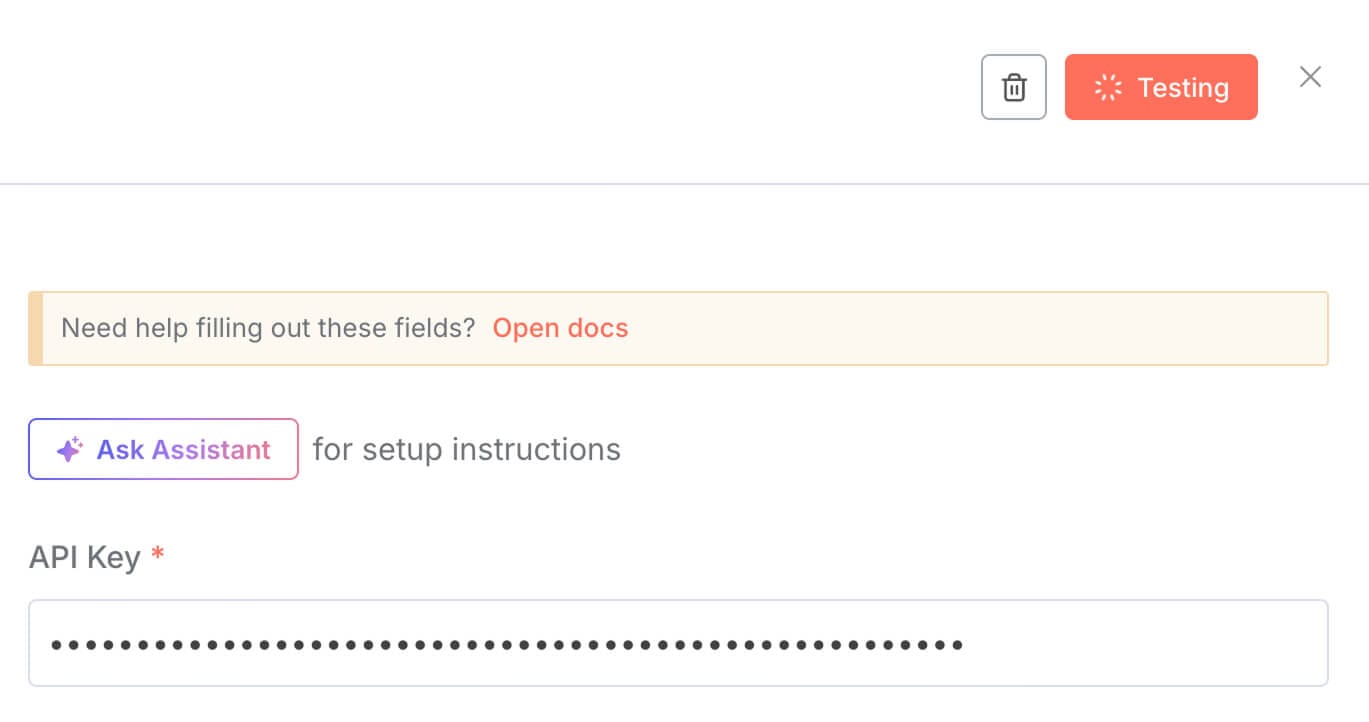
And as soon as you hit the "Save" button, n8n will automatically test the API connection for you:
And if all goes well, n8n indicates that the connection test was successful:
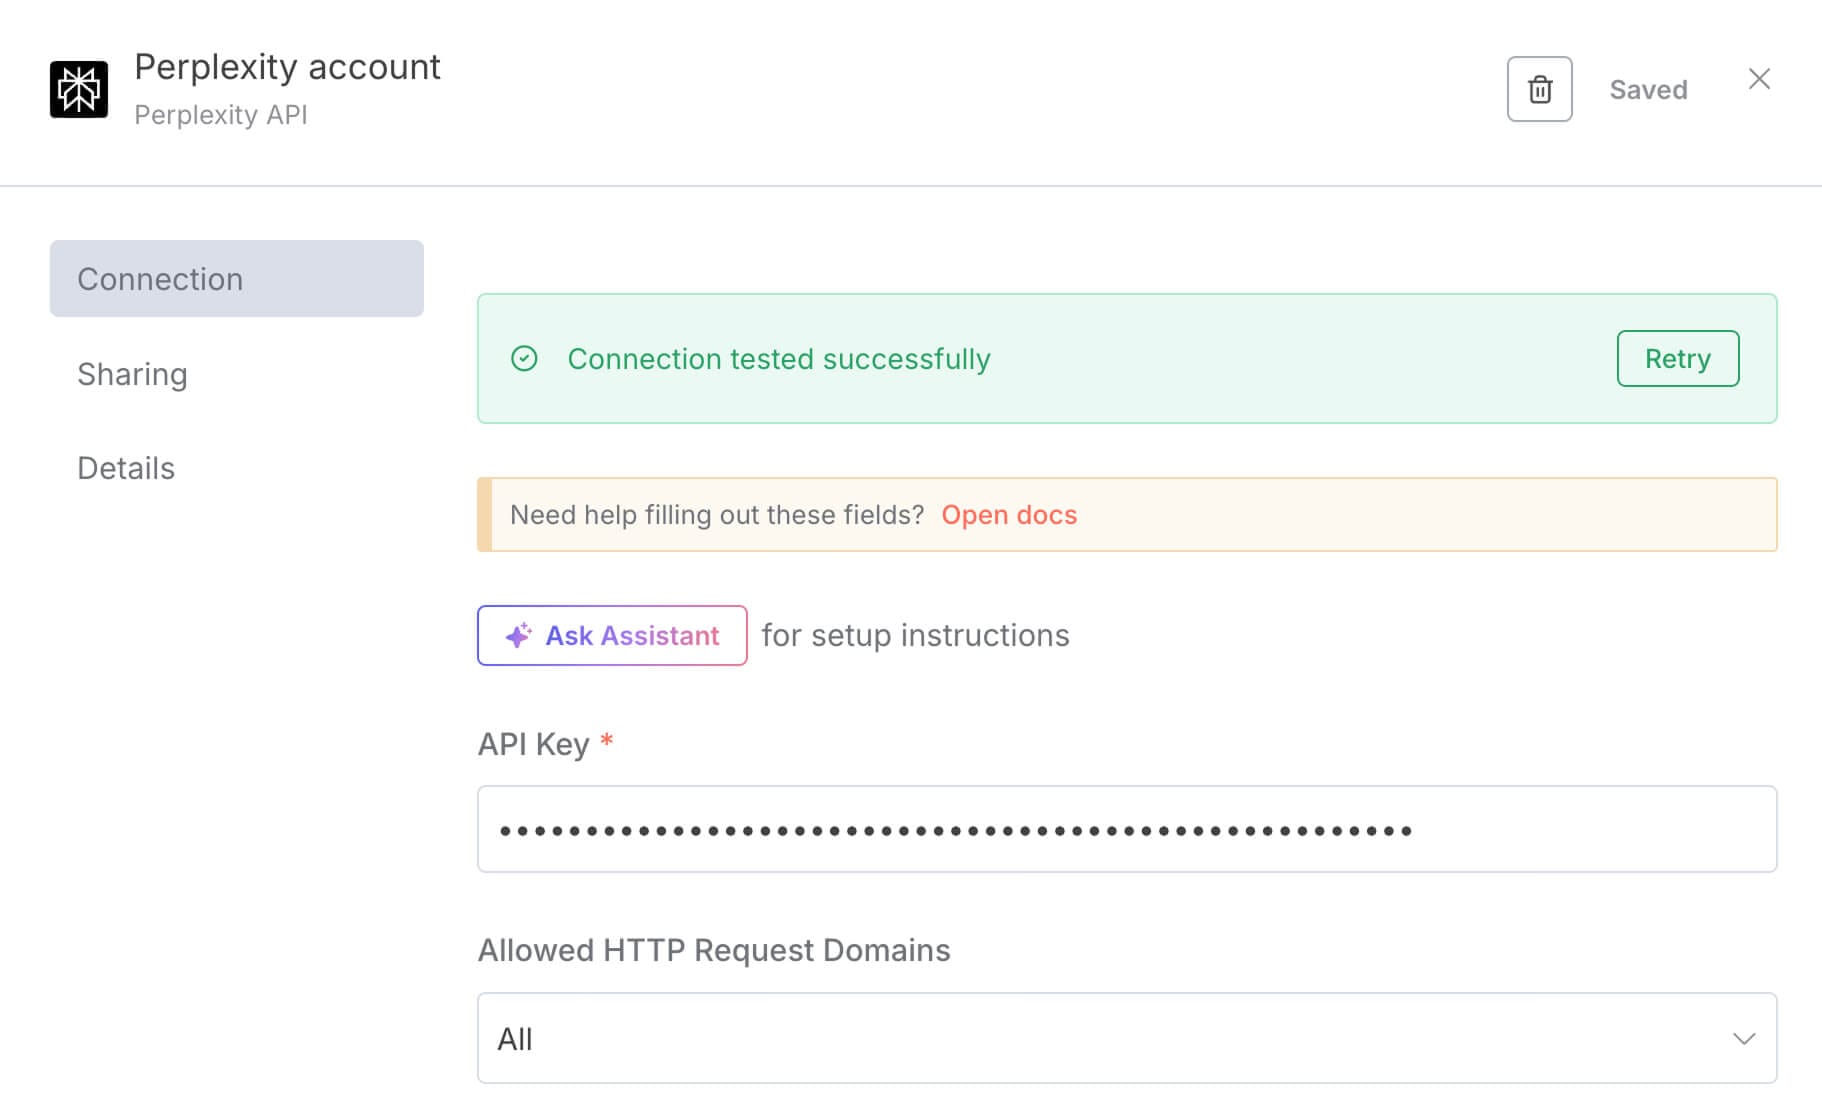
This means that we can now use the AI capabilities of the Perplexity platform without even leaving n8n.
How cool is that?
Great! But how do we provide a prompt to Perplexity from n8n?
We are getting there.
How to configure a node inside n8n
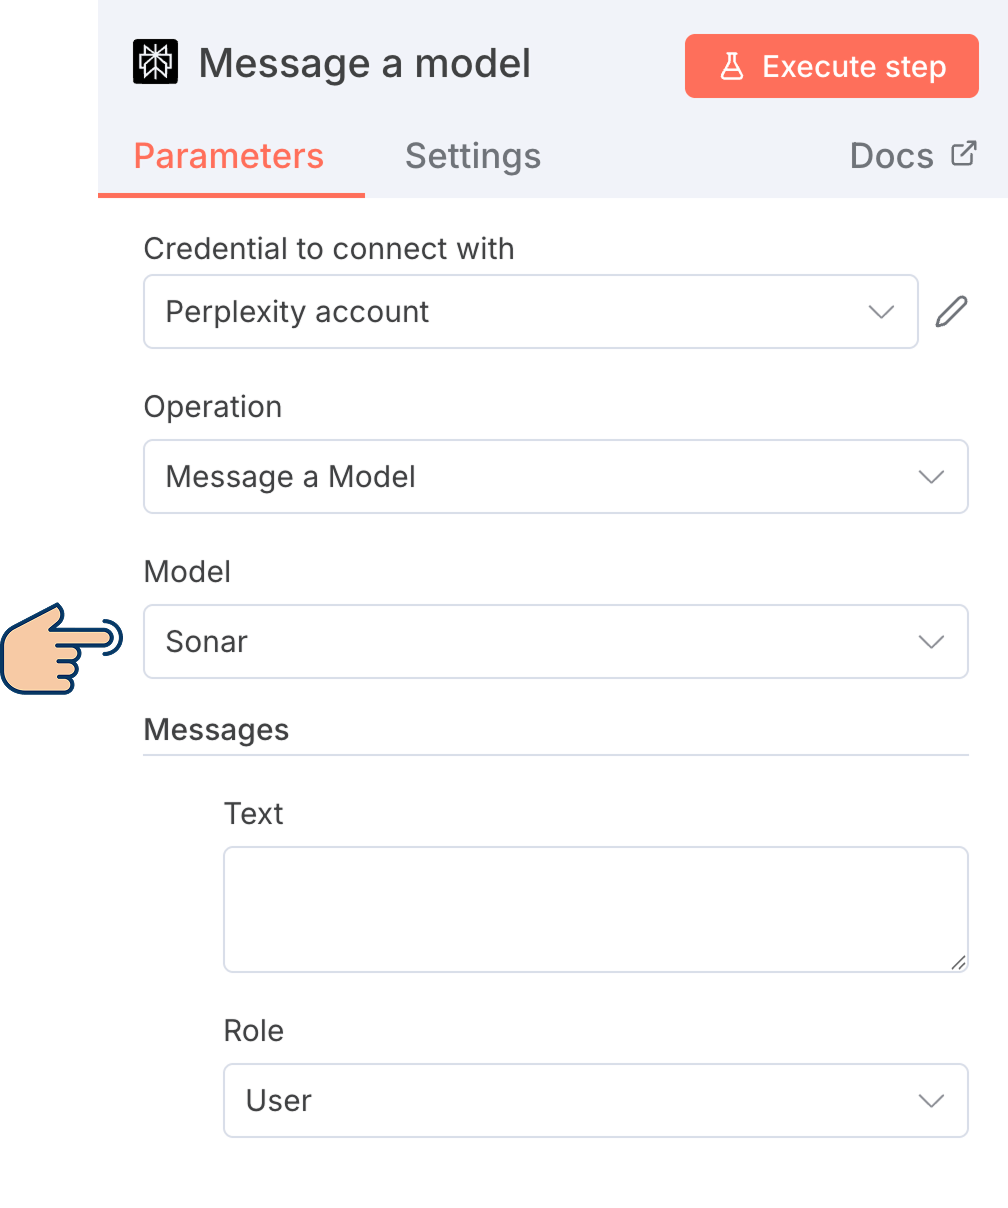
First, close the credentials pop-up so that we can access other setup options of Perplexity - n8n connection:
Next, we need to choose Perplexity's AI model for generating the table of contents:
AI platforms like Perplexity will keep updating their existing AI models and release them with an updated name.
And we can access all those models inside n8n too:
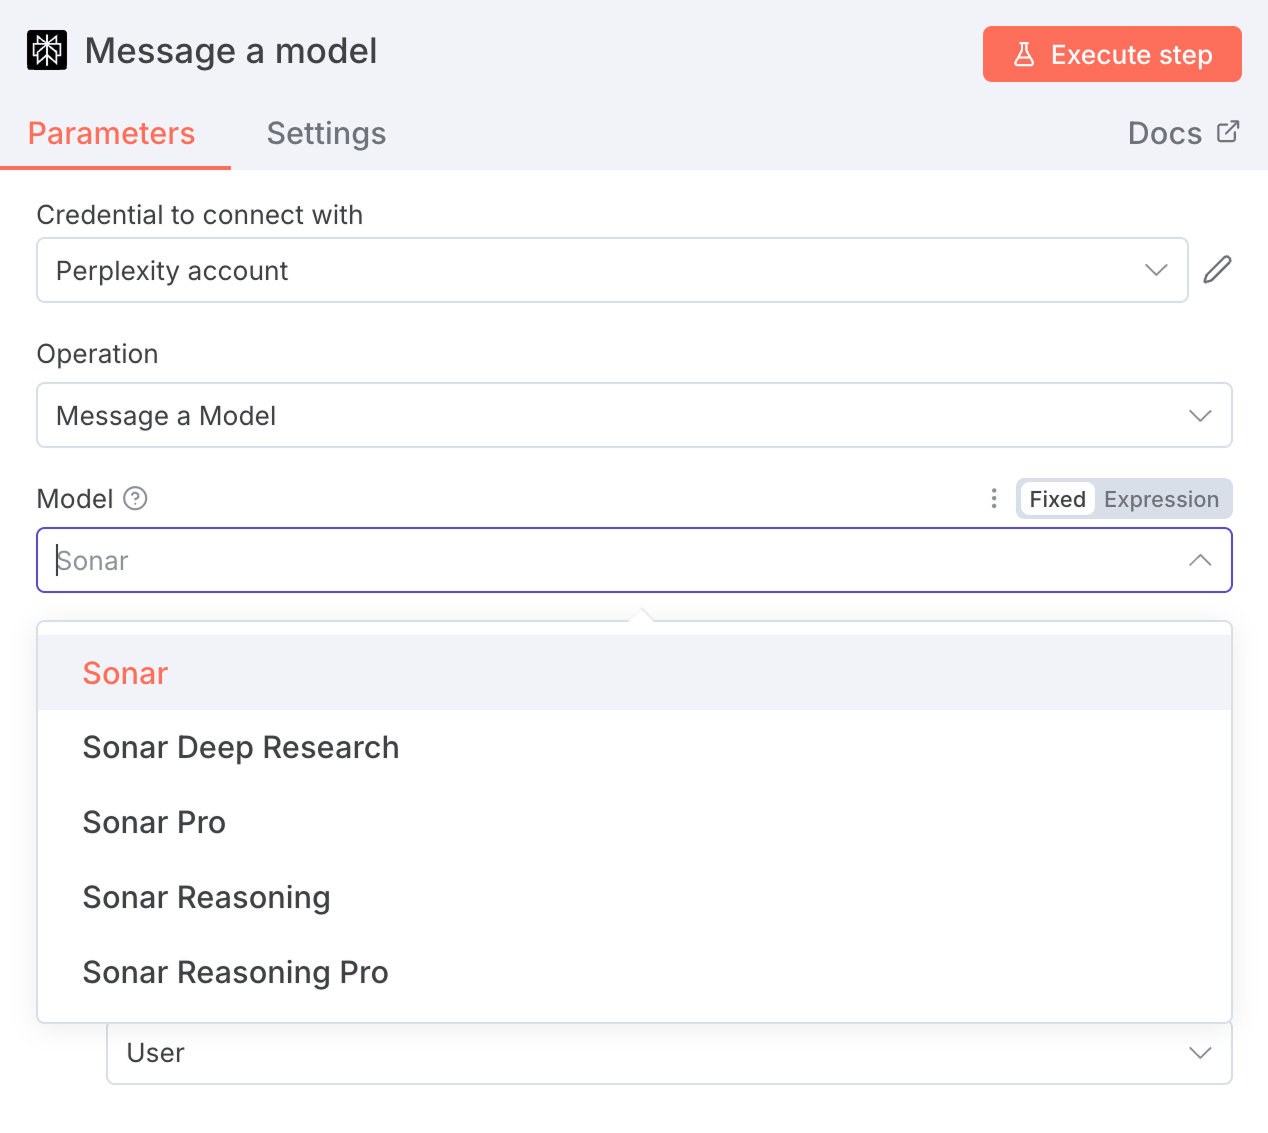
And we have to choose the AI model depending on the task at hand.
For example:
- If you want the automation to perform a deep research, you have to pick the "Sonar Deep Research".
- If you want to perform a complex operation that involves reasoning, you have to pick "Sonar Reasoning" or "Sonar Reasoning Pro".
So, be watchful of what model you pick.
At the time of writing this lesson, Sonar is the latest AI model for Perplexity.
And when I tested the process manually, it was generating a table of contents according to my expectations.
So, I am gonna keep "Sonar" as is for the "Model" option.
And next comes the most important option, the "Message".
It helps you prompt the Perplexity AI model.
If you notice, there is a "Text" field as part of the "Message" option.
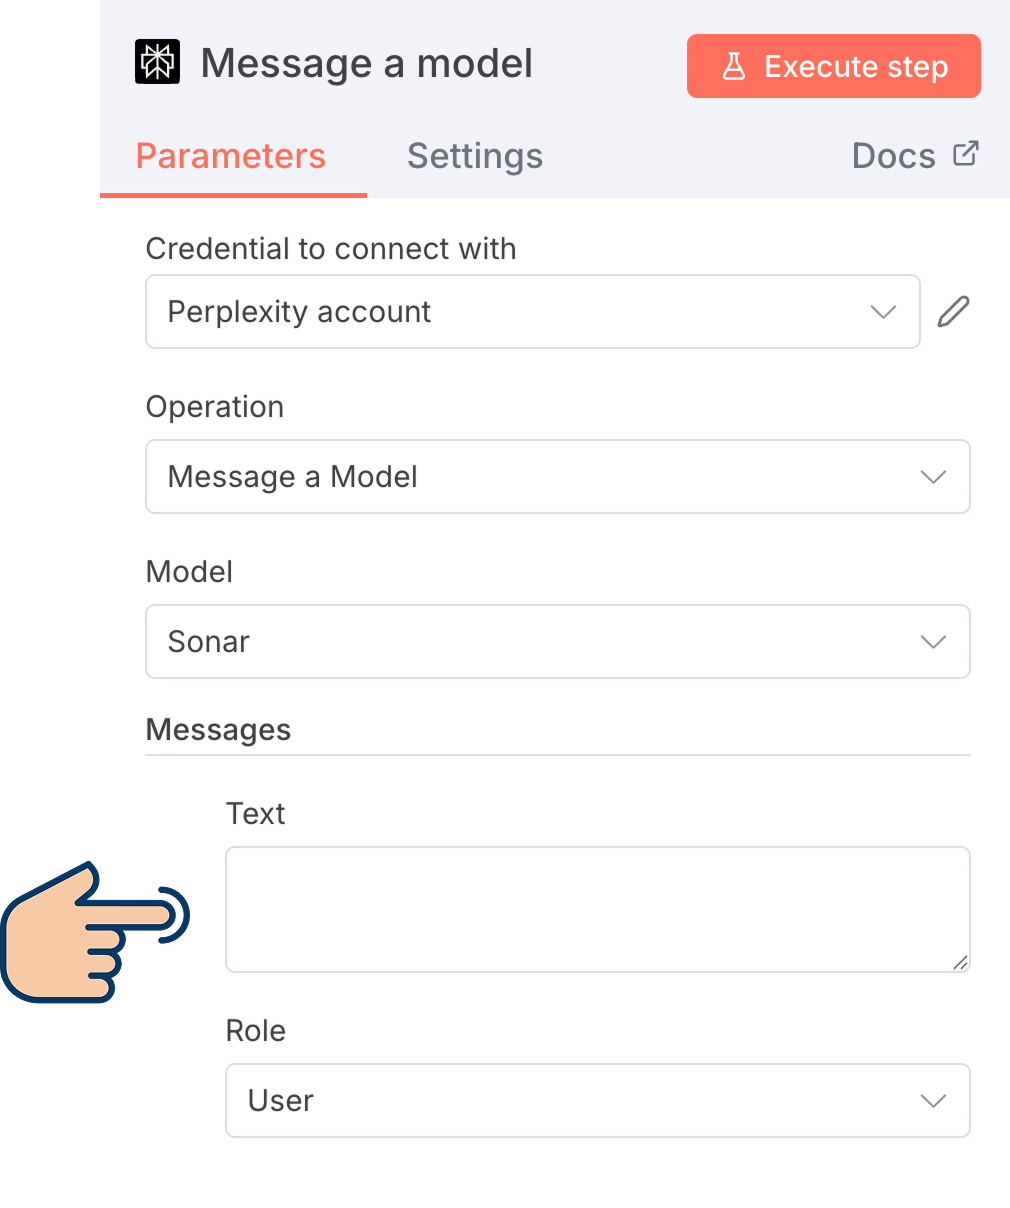
You have to write the prompt for generating the TOC inside this "Text" field.
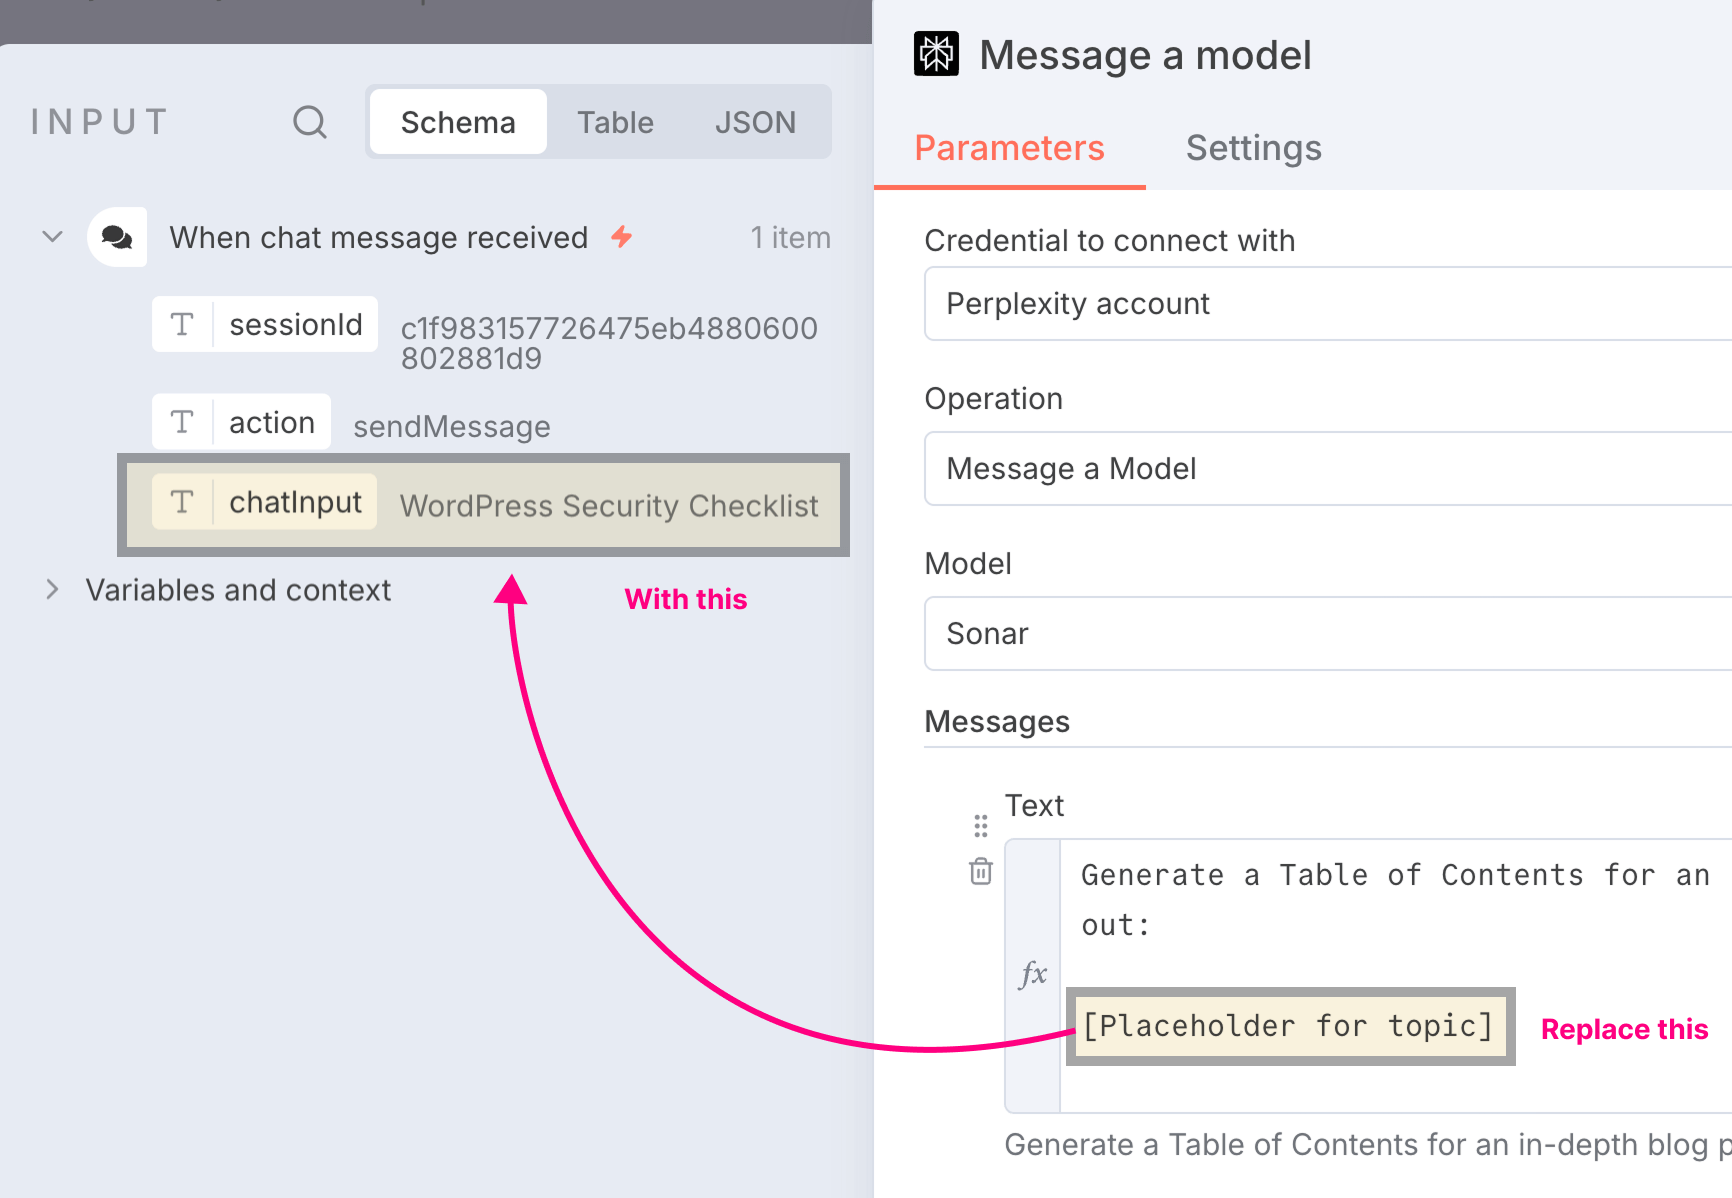
So, I am gonna first type the initial prompt with a placeholder for the topic:
[Placeholder for topic]
And if you notice, the "Text" field has two types of editors that you can switch between:
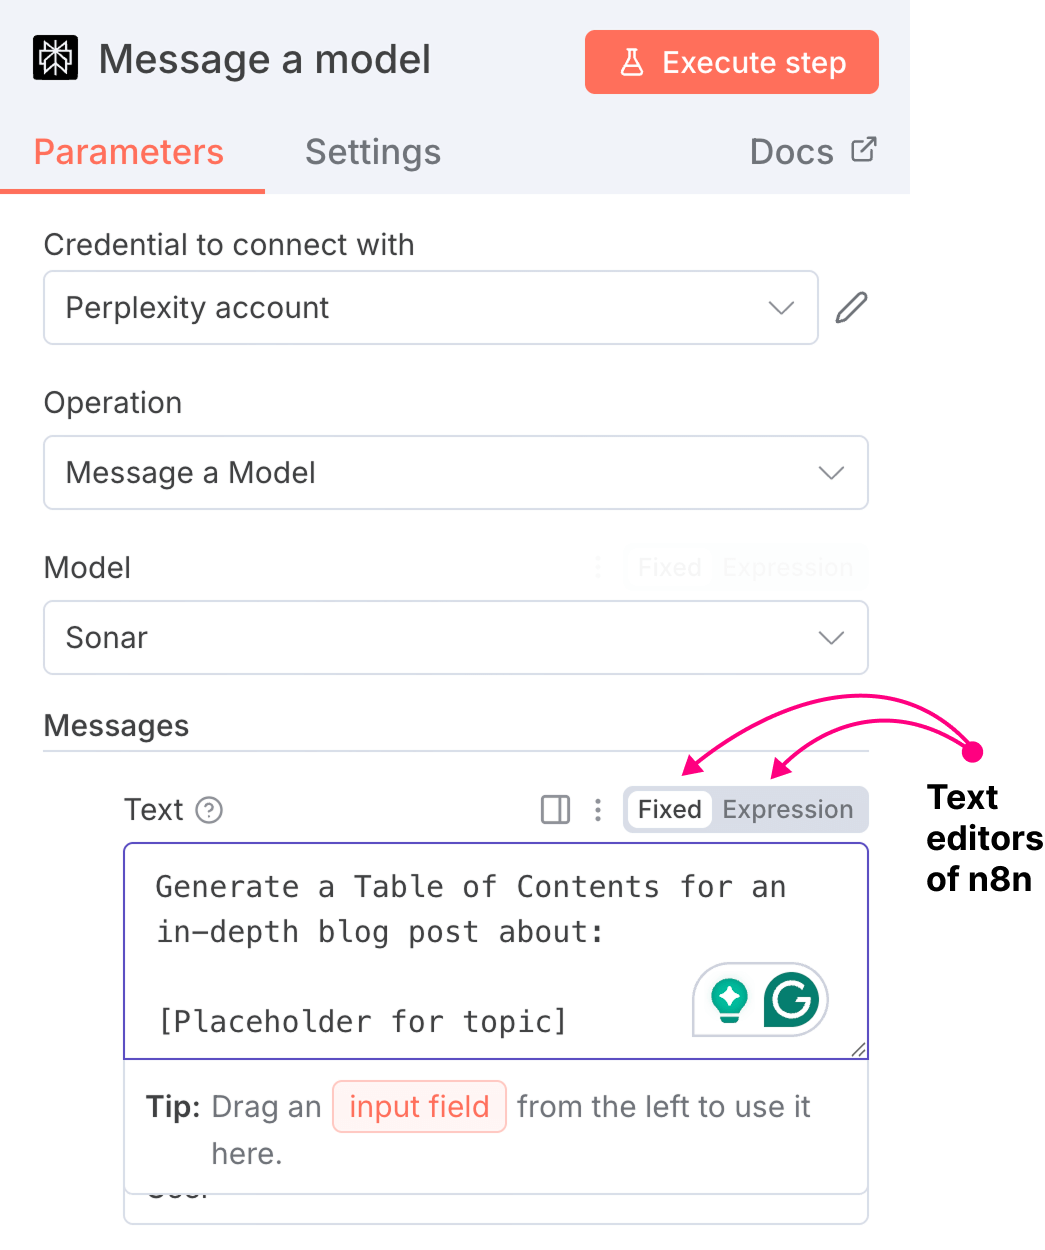
- Fixed editor - Use it if you want to add plain text
- Expression editor - Use it if you want to type JavaScript code or use data inputs from the previous nodes in the automation pipeline.
By default, n8n activates the "Fixed" editor, assuming we will type plain text, and it can automatically switch to the "Expression" editor if dynamic data is being used.
Anyway, we now need to replace the topic placeholder with an actual topic.
Otherwise, Perplexity cannot generate a table of contents for our article, right?
But we shouldn't type in the topic manually.
It will make our automation less flexible with hard-coded inputs.
We don't want that, do we?
Instead, we need to dynamically replace the placeholder using the abilities of n8n.
Now, if you remember, we already provided the topic using the chat node.
And, we just need to pass this chat input to the Perplexity node:
Let's see how to achieve it.
How to pass data from one node to the next inside n8n
n8n automatically passes the data and output from the previous node to its subsequent nodes.
For example, in our case, when we submitted a topic via chat, n8n automatically passed the chat input (topic provided) to the next node in the pipeline, that is, the Perplexity node.
And you can review this chat input in three formats:
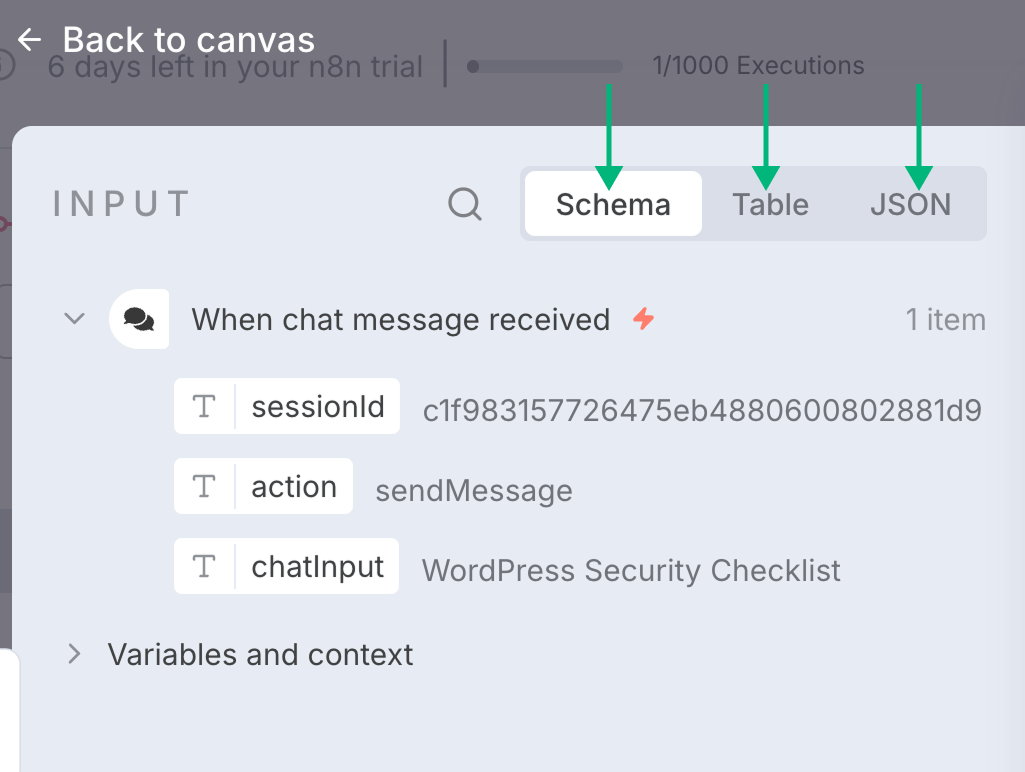
1) Schema format - We usually use this format for visually dragging and dropping data (chat input) into the next node.
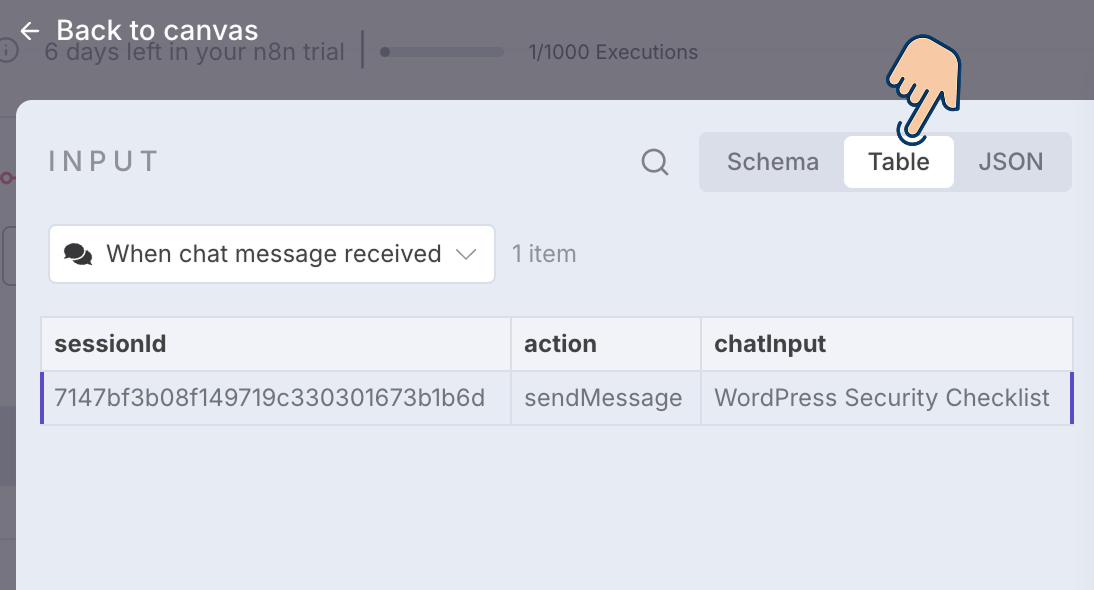
2) Table format - If you think viewing data in tabular format gives you more clarity, you can just switch to the "Table" tab:
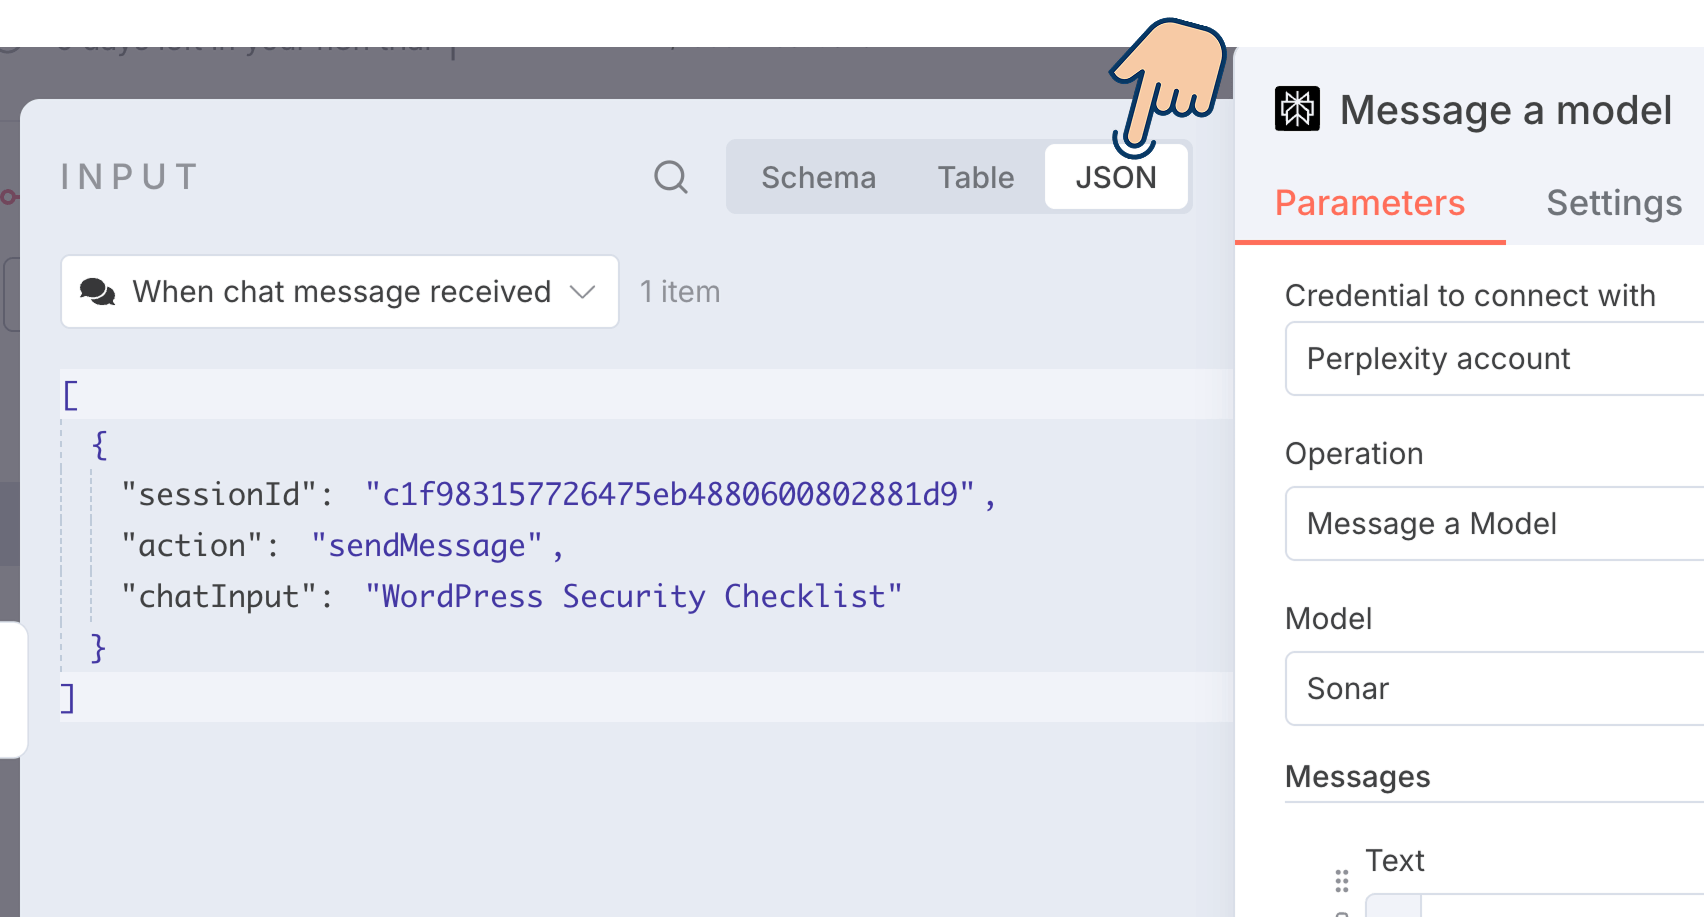
3) Finally, the JSON format helps techies and programmers understand the structure of the data that is getting passed from the previous node.
Come on, let's quickly see how to use these formats separately to provide chat input to the Perplexity node.
How to access and use the previous node's data in n8n
There are three ways:
- Using the "Schema" tab
- Using the "Table" tab
- Using the "JSON" tab
For the purposes of this lesson, let's see how to use:
- The "Schema" tab for dragging and dropping data into the next node.
- The "JSON" format for manually accessing the data in the next node.
Using the "Schema" tab
Many people who use n8n are non-technical, and n8n understands this very well.
So, to help you avoid its low-code nature, n8n provides the "Schema" tab as an easy way to access the previous node's data in an easy-to-read format.
For example, if you notice, there is a section dedicated to the data of each of the previous nodes.
Each section is labeled with the name of the previous node, and its data is made accessible directly underneath the label.
For example, in our case, the Perplexity node has only one previous node, that is, the chat input node.
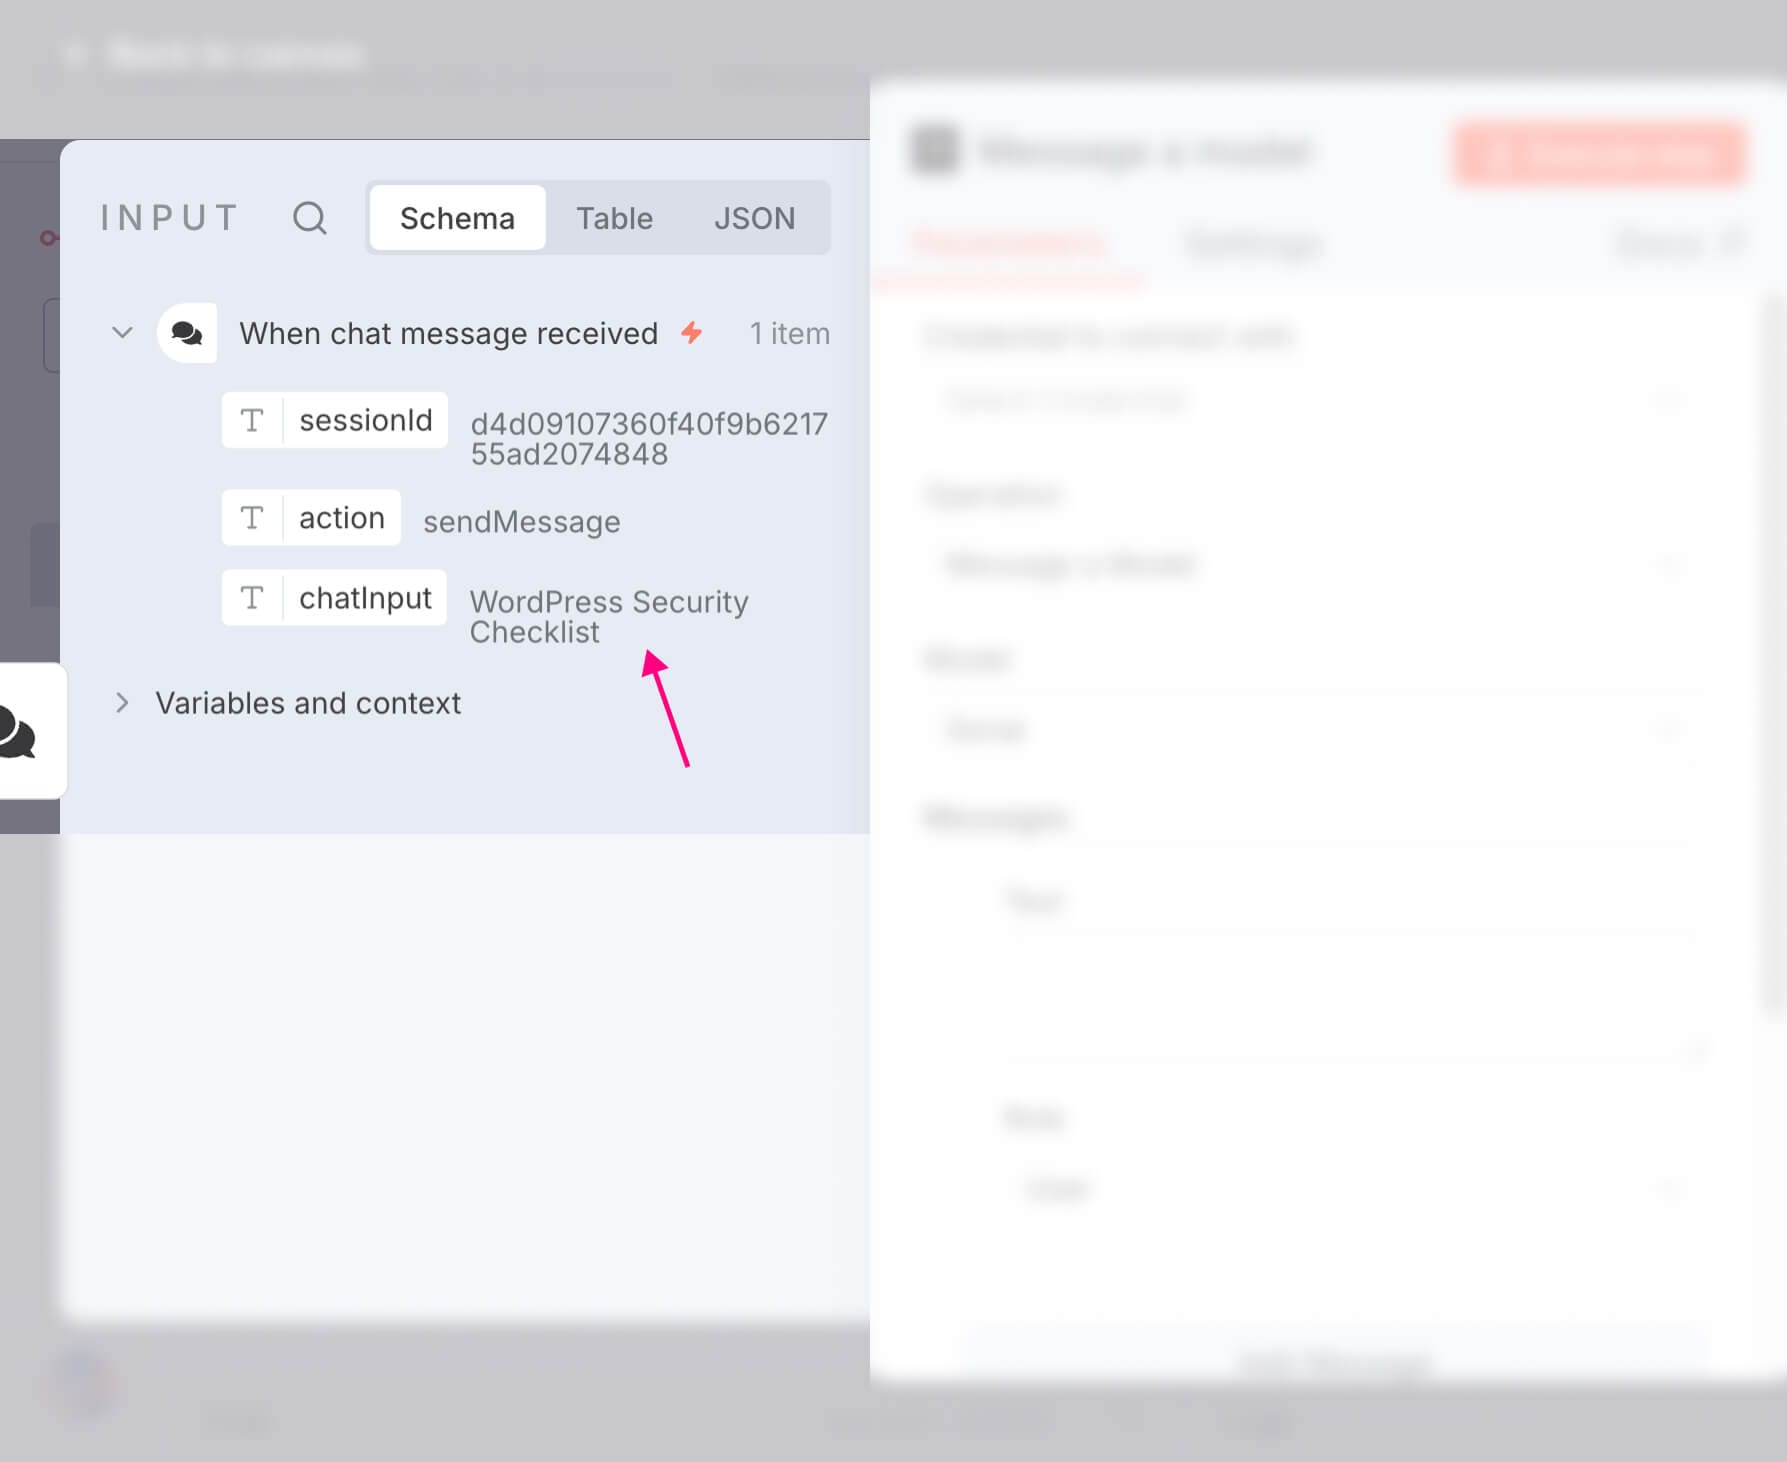
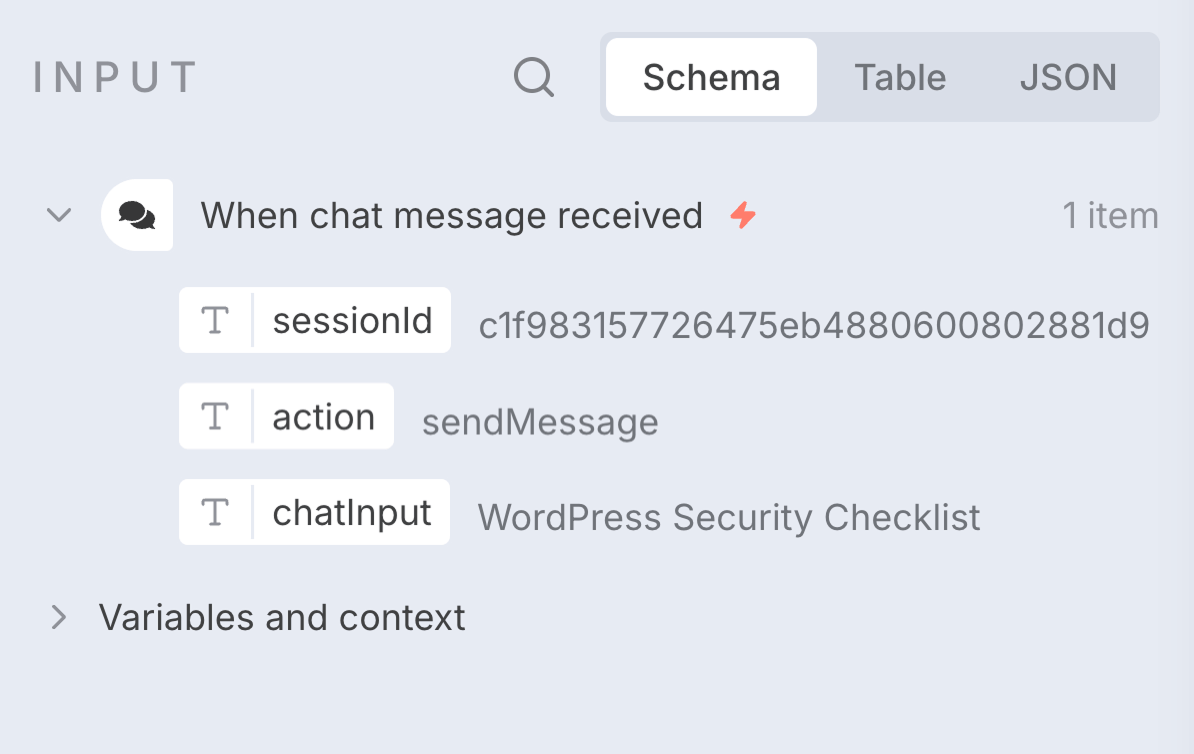
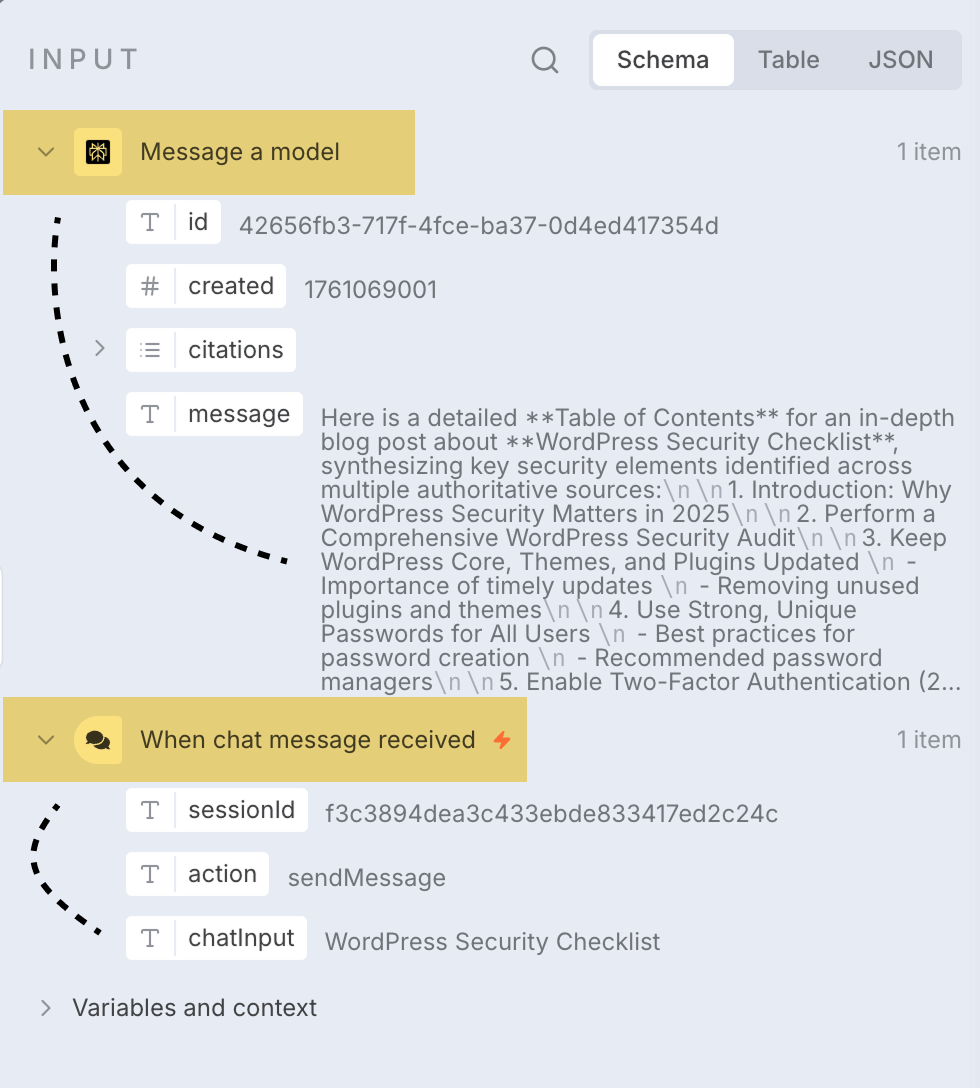
So, the "Input" portion of the Perplexity node has a section dedicated to its previous node, that is, the "When chat message received" node:
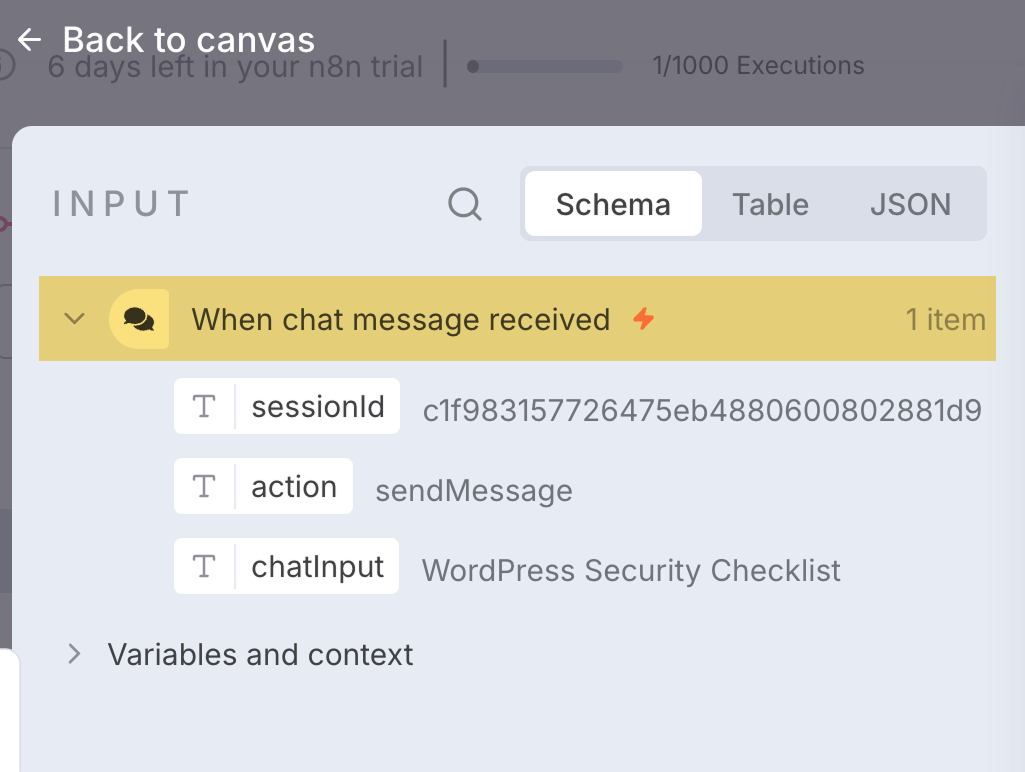
And inside the chat input section, we can clearly see its data in an accessible way:
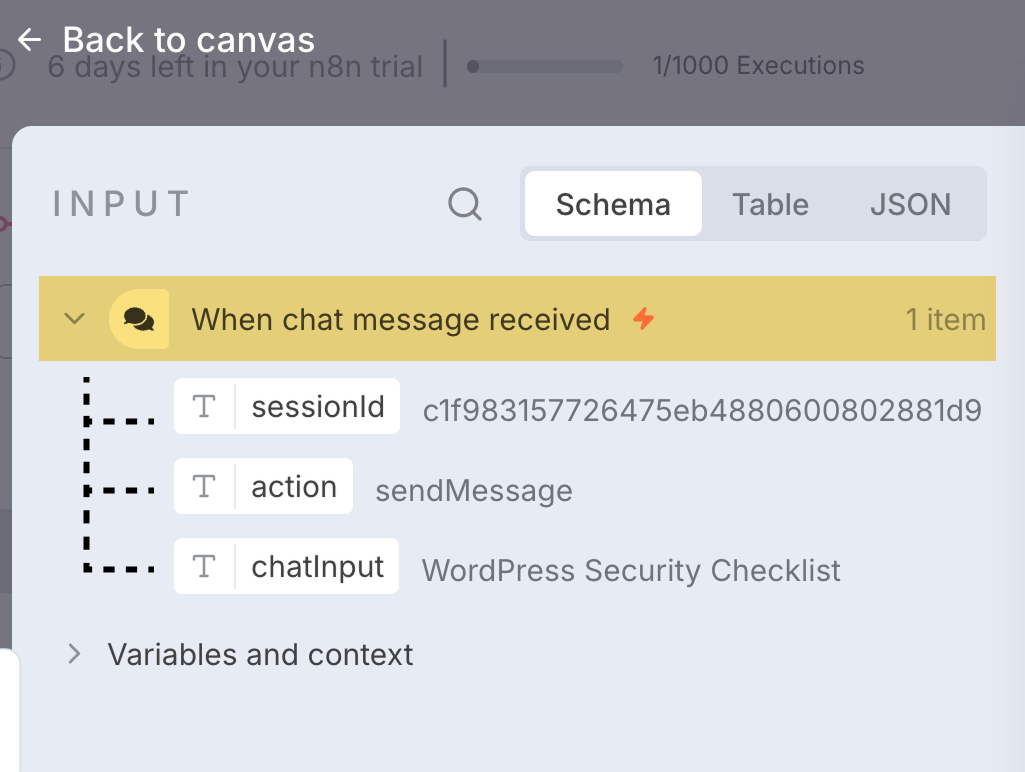
Each piece of data has a label, too.
In the terminology of n8n, we call this label as "Property".
For example, our chat input data has three properties:
- sessionID - Useful for powering live chats
- action
- chatInput - Contains the message entered into the chat
And for now, we are only interested in the chatInput property because it contains the topic we provided for generating the table of contents.
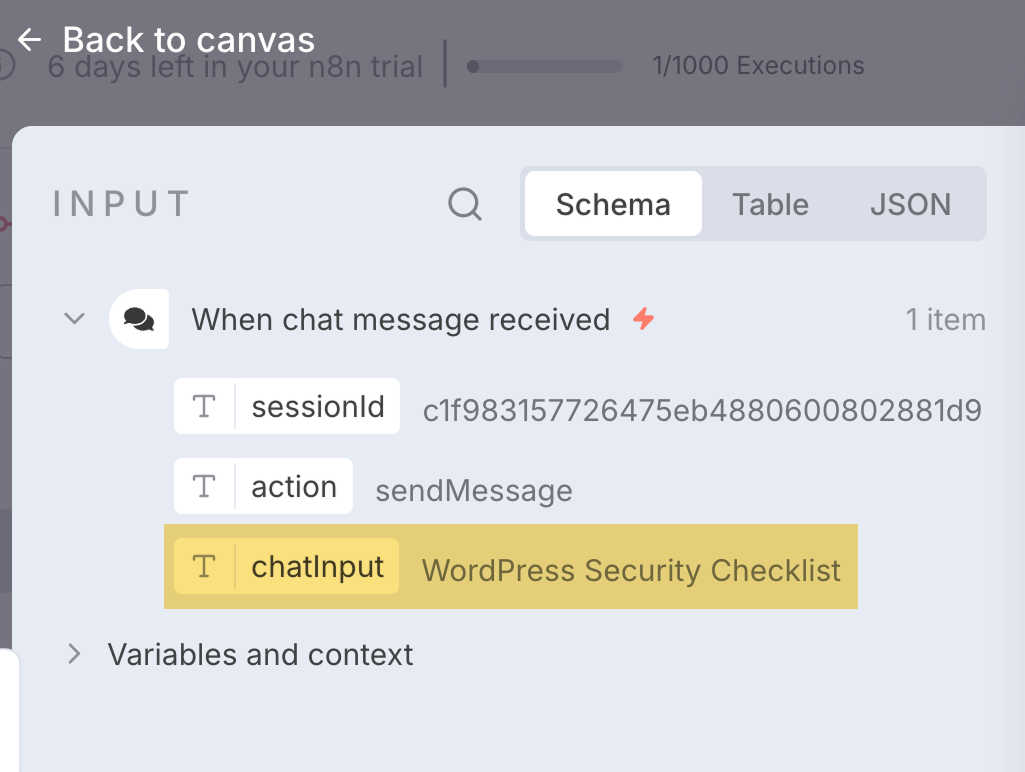
And our goal with the chatInput property is simple.

Because it holds the topic I provided as chat input, I want to update Perplexity's prompt by replacing the topic's placeholder with the value of chatInput property.
And we can achieve it in three easy steps using the "Schema" tab:
- Delete the placeholder inside the text field.
- Make sure you're on the "Schema" tab to click and drag the "chatInput" property into the "Text" field:
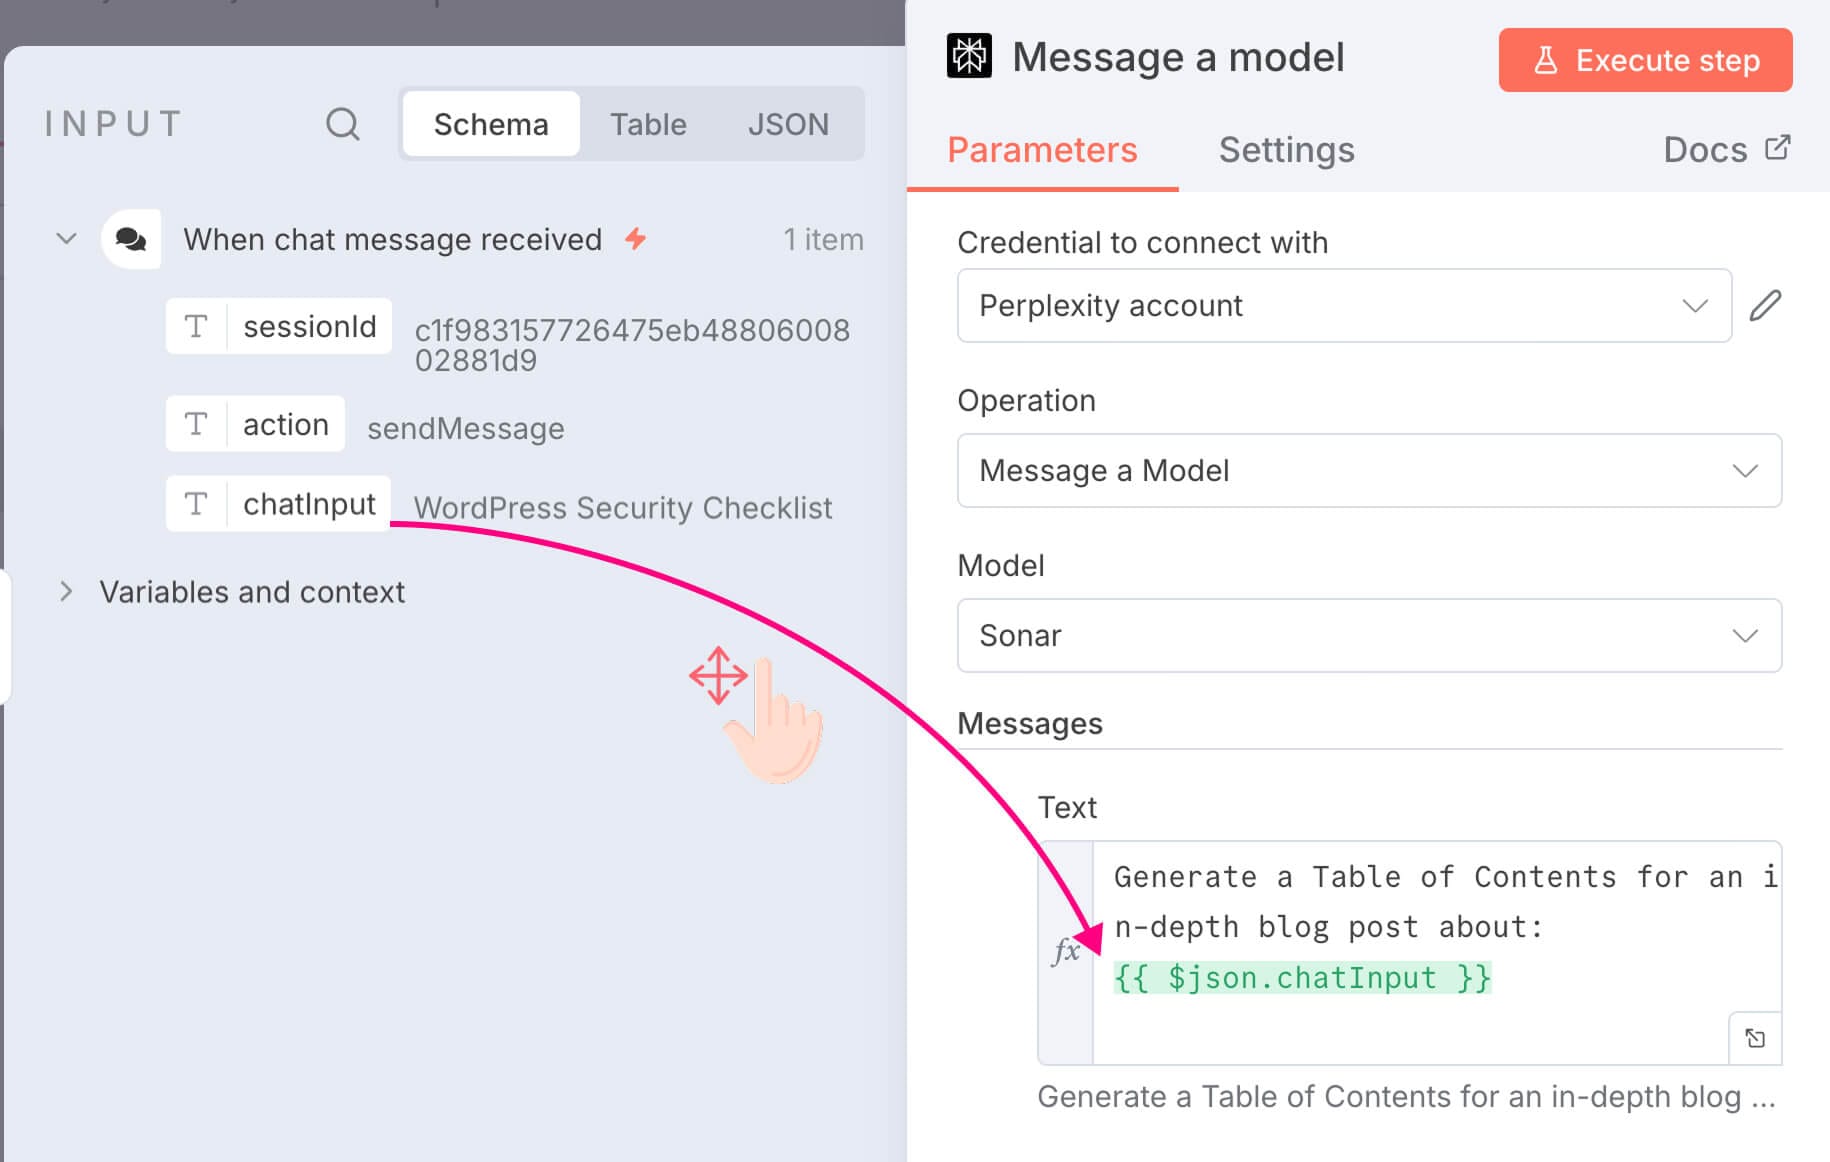
That's all.
We have now successfully embedded the value of the chatInput property in our prompt without touching the code.
If you notice, the chatInput property was transformed into a JavaScript code block automatically:
{{ $json.chatInput }}We can also call this code as Javascript expression.
This is why n8n automatically changed the "Text" field to use the "Expression" editor:
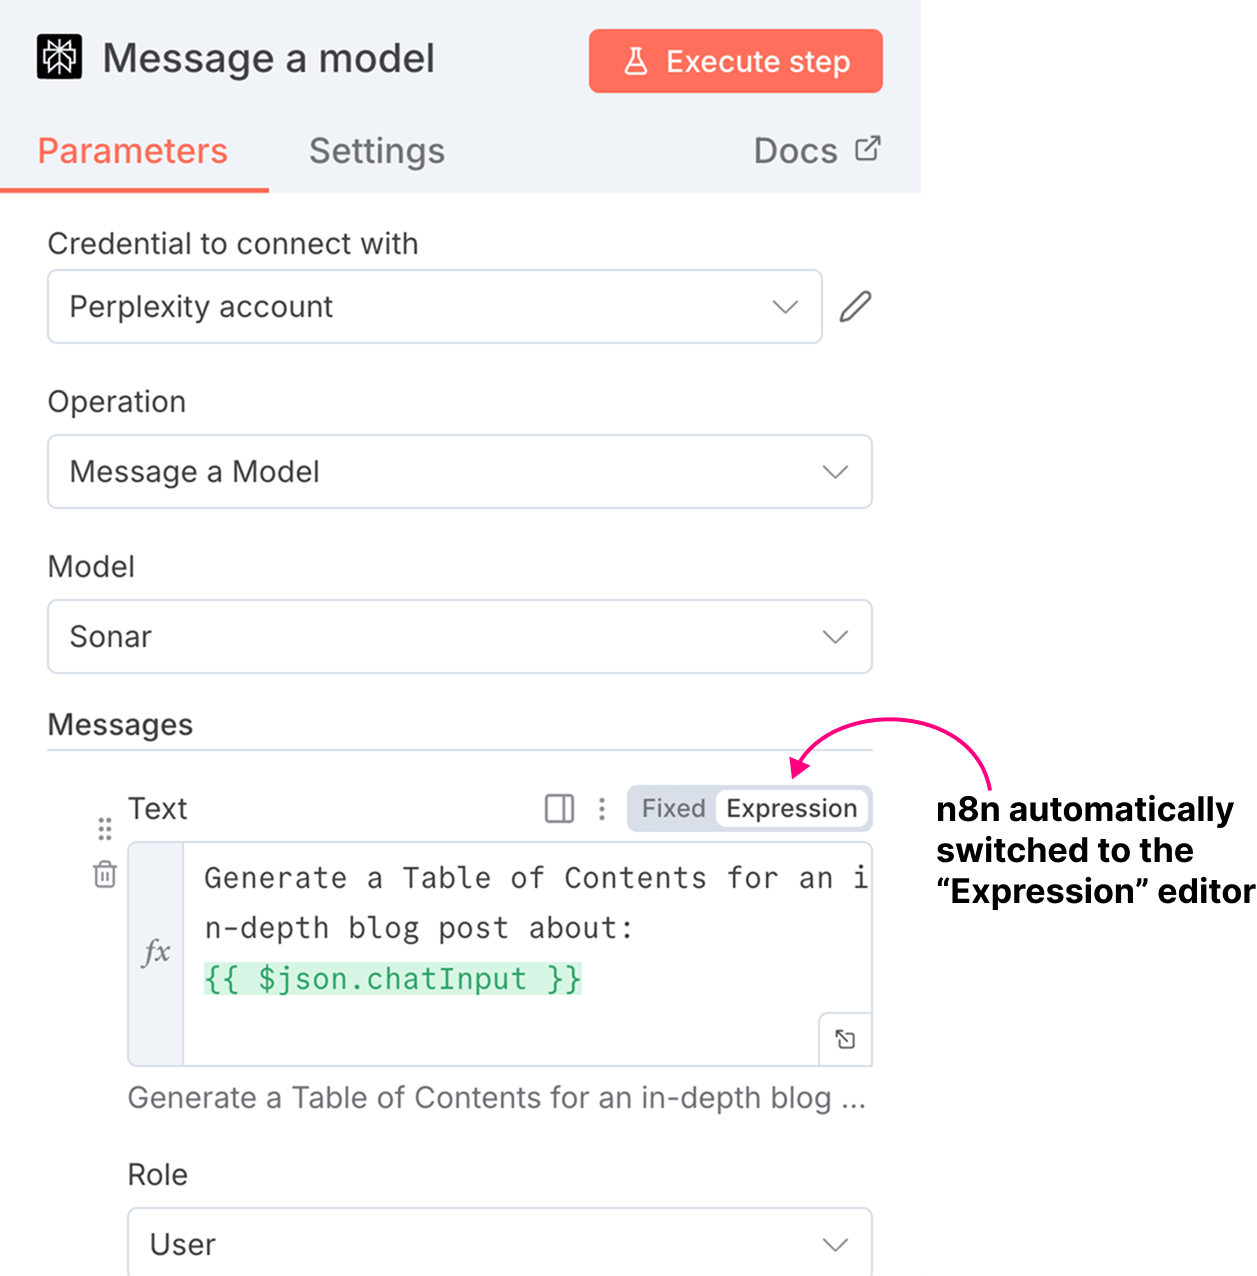
This also means that n8n uses JavaScript to allow data from one node to be accessed inside another node.
And whenever we use the JavaScript expression to access data, we need to use the "Expression" editor instead of the plain text "Fixed" editor.
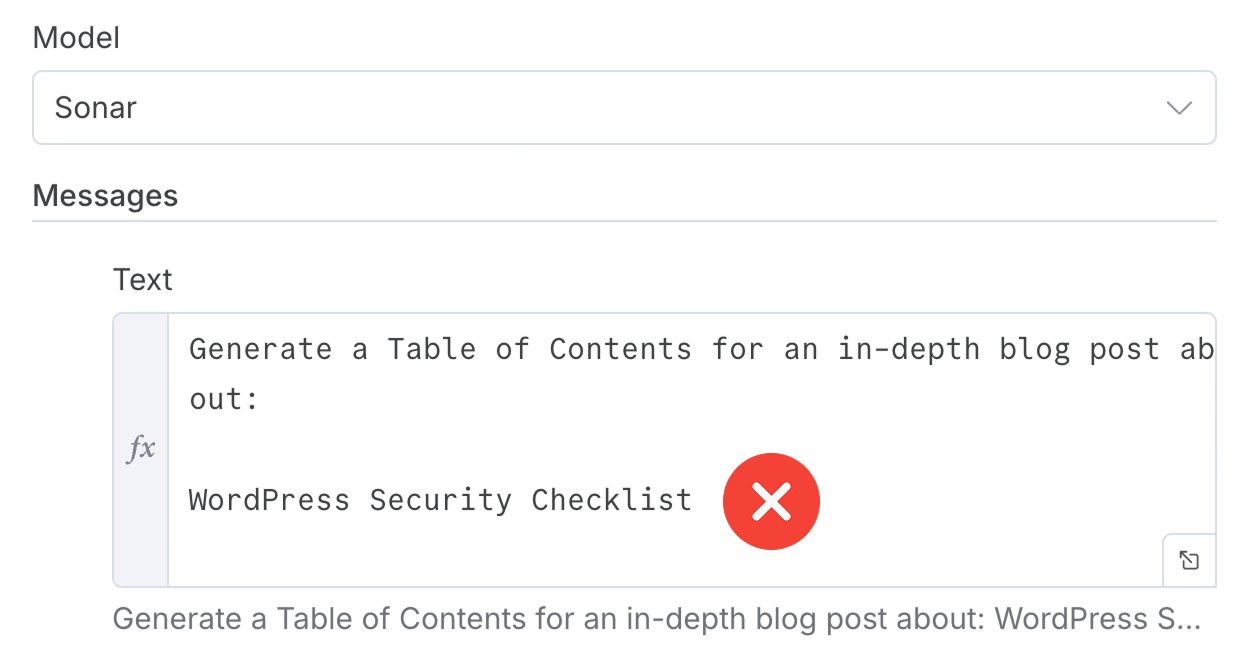
Anyway, n8n also processes the JavaScript expressions in real-time and helps you visualize how the final text will look with input data.
For example, in our case, n8n transformed {{ $json.chatInput }} Javascript expression with WordPress Security Checklist automatically.
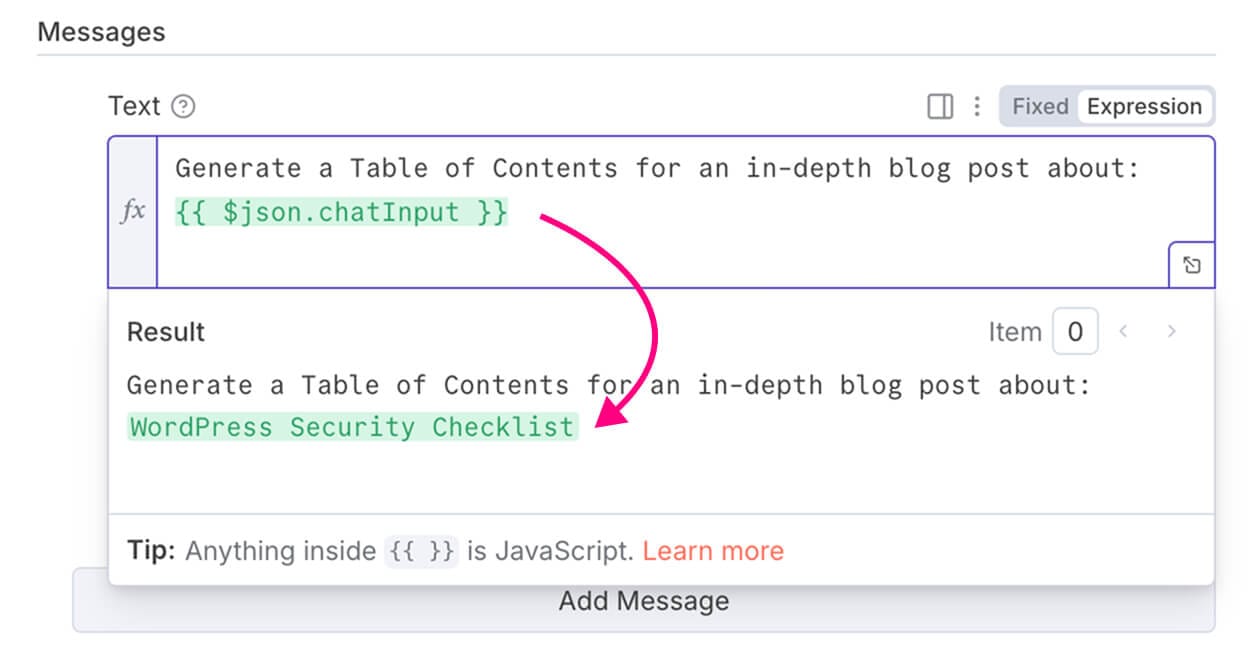
This real-time visualization will help us see how the final prompt reads like before it is sent to Perplexity for TOC generation.
Also, sometimes, you might not be able to drag and drop a data property.
You might have to access it manually by typing the same JavaScript expression yourself.
{{ $json.chatInput }}So, let's quickly see how to achieve the same result by tying code.
If you're not a programmer, please feel free to skip to the next section.
How to access n8n data using JavaScript expressions
As usual, first, let's delete the placeholder from the prompt we provided to the Perplexity node:
And this time, we are trying to access the chatInput property using Javascript, right?
So, put in the double flower brackets {{ }} in the place of Placeholder:
This {{ }} indicates that we will use a JavaScript expression to help you access data from the previous node.
Without the flower brackets, you can not run JavaScript expressions inside n8n.
Anyway, finally, put $json.chatInput inside the flower brackets:
{{ $json.chatInput }}
Internally, n8n passes the data between the nodes in a JSON format. JSON stands for JavaScript Object Notation.
So, when using JavaScript to access the previous node's data, we are accessing the previous node's property using $json object that comes prebuilt with n8n.
Also, n8n depends on JavaScript and Python programming to help you automate workflows.
And n8n doesn't hide this fact because it is a low-code automation tool that allows you to process your automations with custom code.
Simply put, if you know programming, you can use JavaScript or Python to achieve more control over your automations.
Using code to enhance an automation is purely optional.
So, if you're a non-techie, you don't have to worry about using the code.
Also, if you mess up the JavaScript code, n8n will show an error.
For example, the name of the chat input property is chatInput:
But I somehow messed up the spelling of the chatInput to chatInpu and n8n is throwing an error:
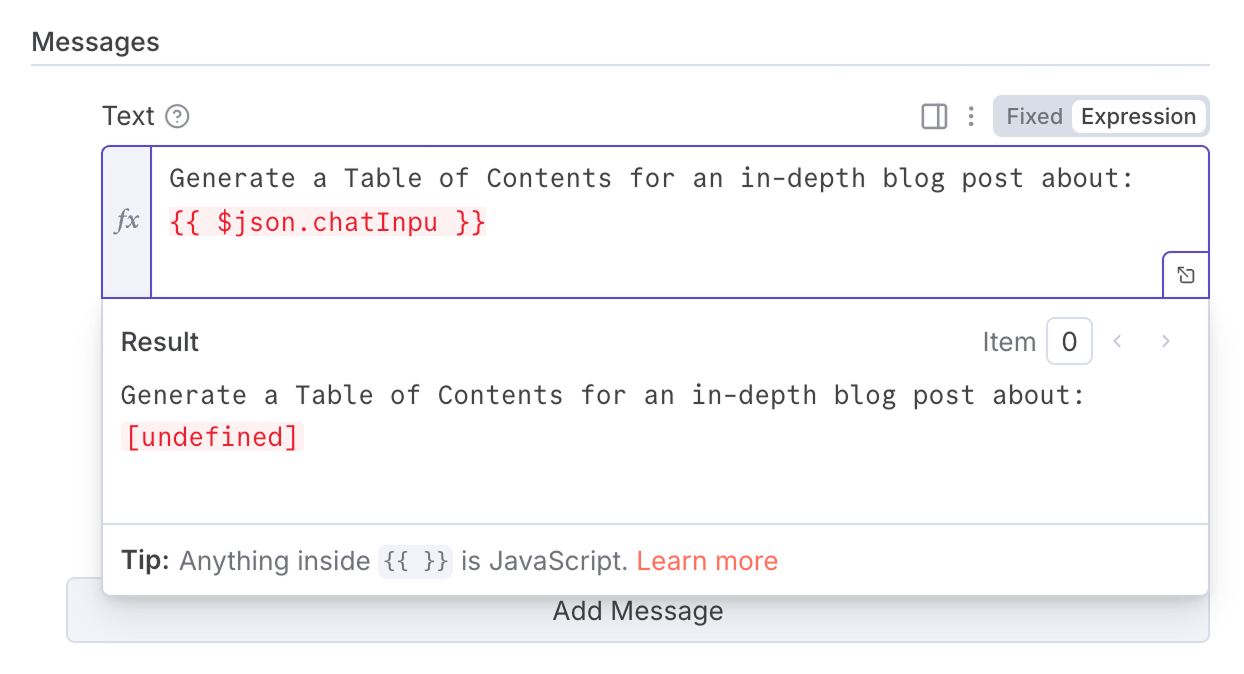
The error undefinied simply means that n8n couldn't have a property named chatInpu from any of the previous nodes before the Perplexity node.
So, be careful when you enter the property names manually.
Anyway, let's get back to the task at hand.
You can check out the actual JSON data of the chat node by clicking on the "JSON" tab:
Anyway, now let's quickly see how to access the chat input data and provide it to the Perplexity node.
Anyway, let's get back to the task at hand.
Here is the progress we have made so far:

- We created a credential for accessing the Perplexity AI Model inside n8n.
- Nert, we chose "Sonar" for the Perplexity AI "Model"
- And using the
chatInputproperty from the previous node, we have crafted a dynamic prompt to generate a table of contents for the article.
Finally, we have to choose a role for our prompt.
How to pick the role of an AI Model
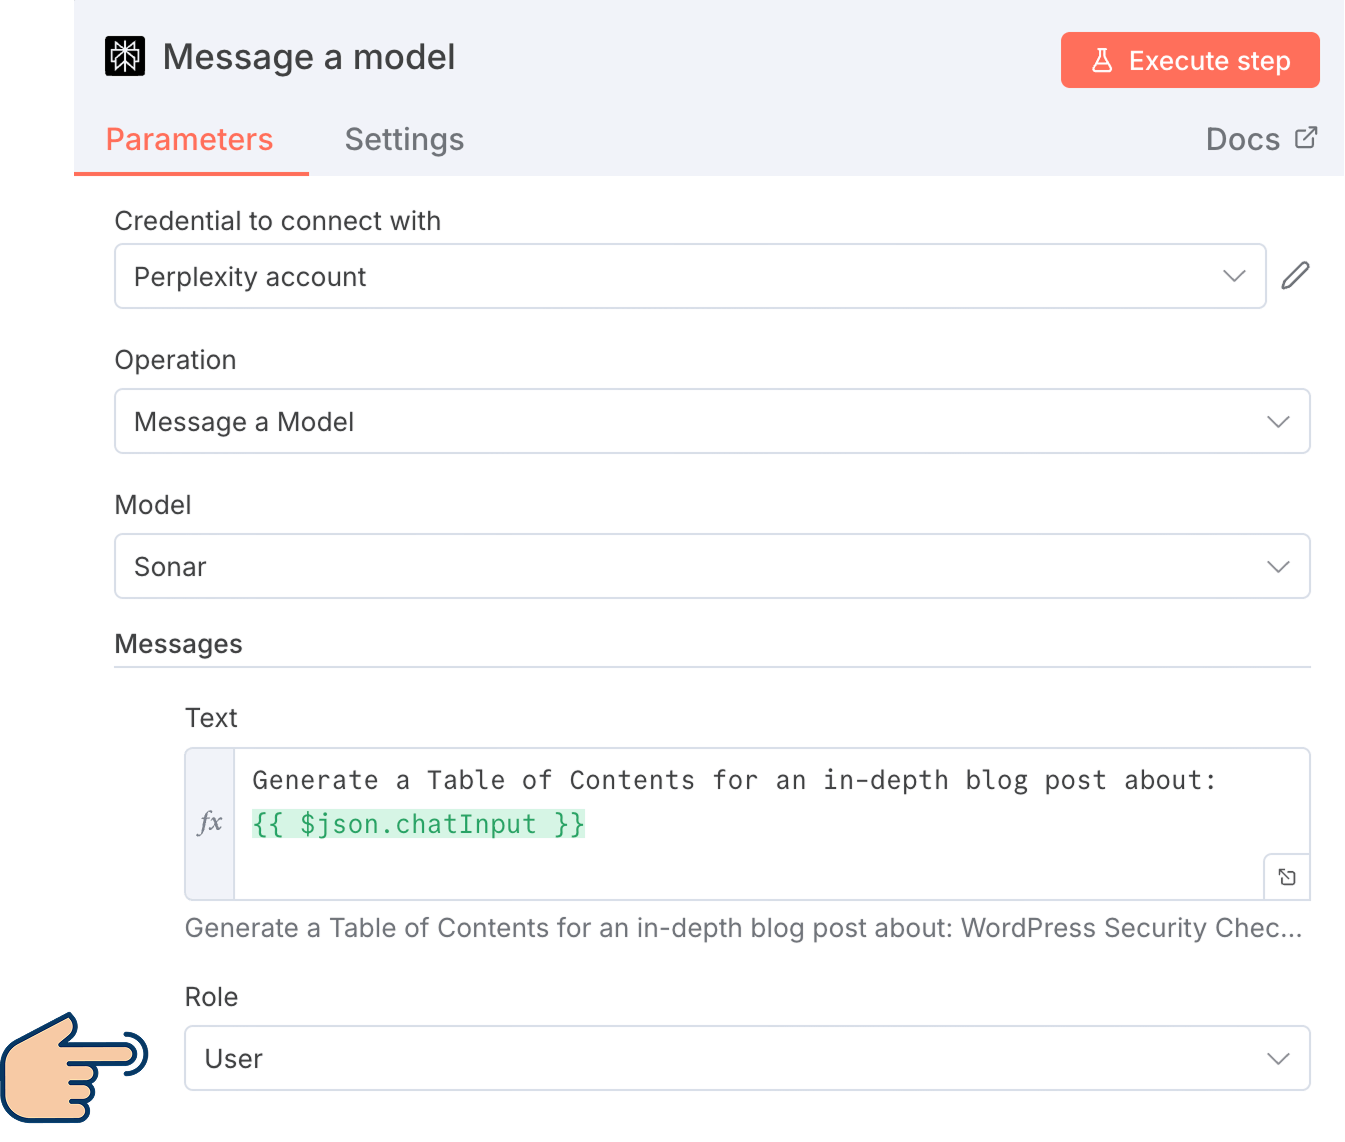
The thing is, when working with AI models like Perplexity, ChatGPT, etc., using an API, we can send a different set of instructions using different roles.
The role we select will decide the instructions we need to send to the AI model.
And there are three roles that you can pick from:
- Assistant - Pick this role to tell the model to adopt a specific tone or personality. For example, if you are generating an article, you can specify tone of voice instructions using this role.
- System - Pick this role to set the model's behavior or context. For example, if you want the AI model to answer FAQs of your business, you need to provide the FAQs data as instructions and context by selecting this role.
- User - Pick this role if you want to send a message as a user and get a response from the model. For example, pick this role if AI should write content for you.
Now tell me something.
We want Perplexity AI Model to generate content (table of contents) for us. Which role do you pick to achieve this?
Easy! We need to pick the "User" role!
Correct! You're sharp. I will give you that :)
Yes, we need to select the "User" model because we are requesting to generate a table of contents as a user.
It is just like we are logging into Perplexity and asking it to generate the content we want.
This also means that the role of "System" or "Assistant" is invalid for our purpose.
So, I am gonna leave the role to be "User" as is:
Next comes another important question.
Do we need to utilize the "Assistant" role to add another message with tone of voice instructions for our table of contents?
I would prefer that, yes! But am I allowed to send multiple messages using n8n?
Yes!
We are allowed to send multiple messages to the AI model
To do that, just click on the "Add Message" button one more time:
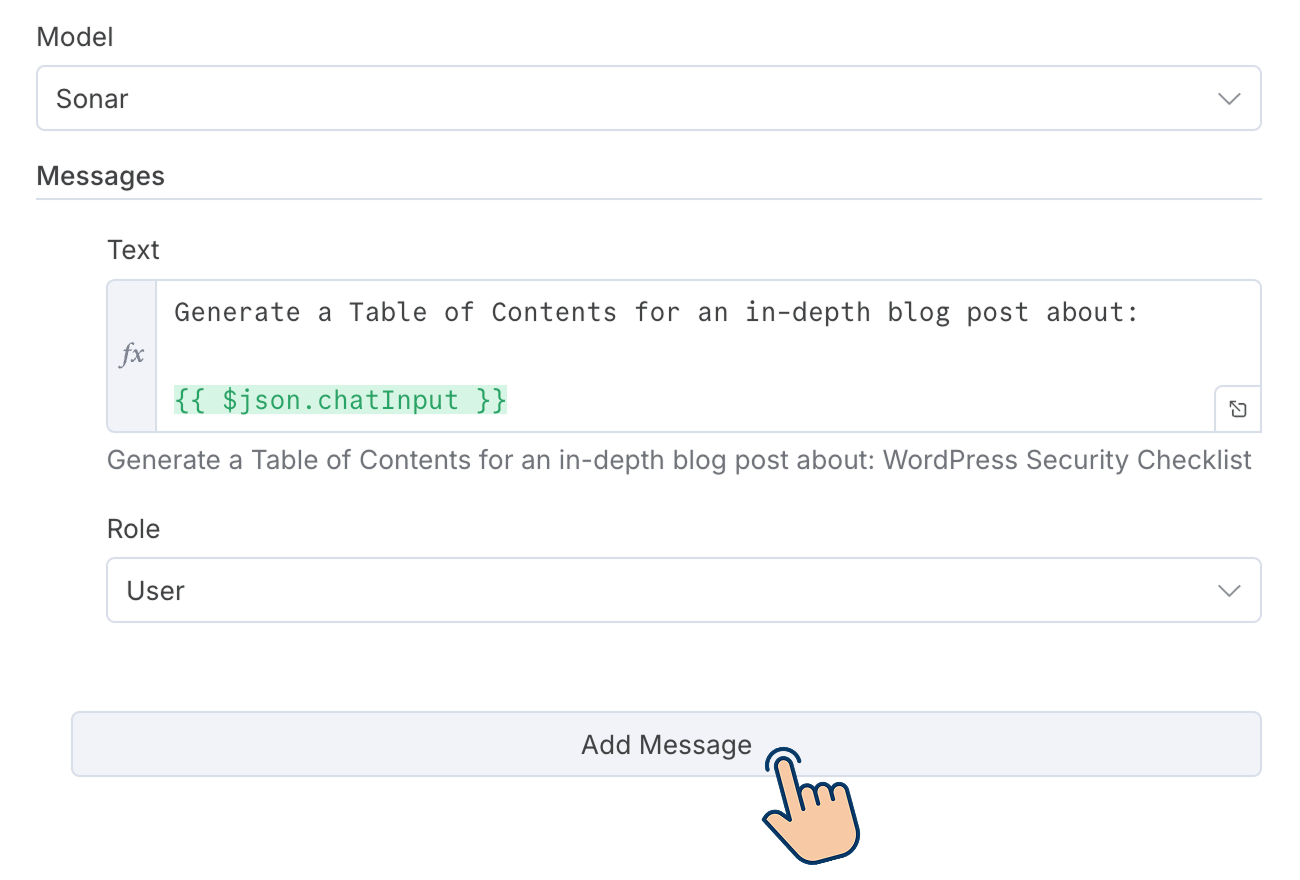
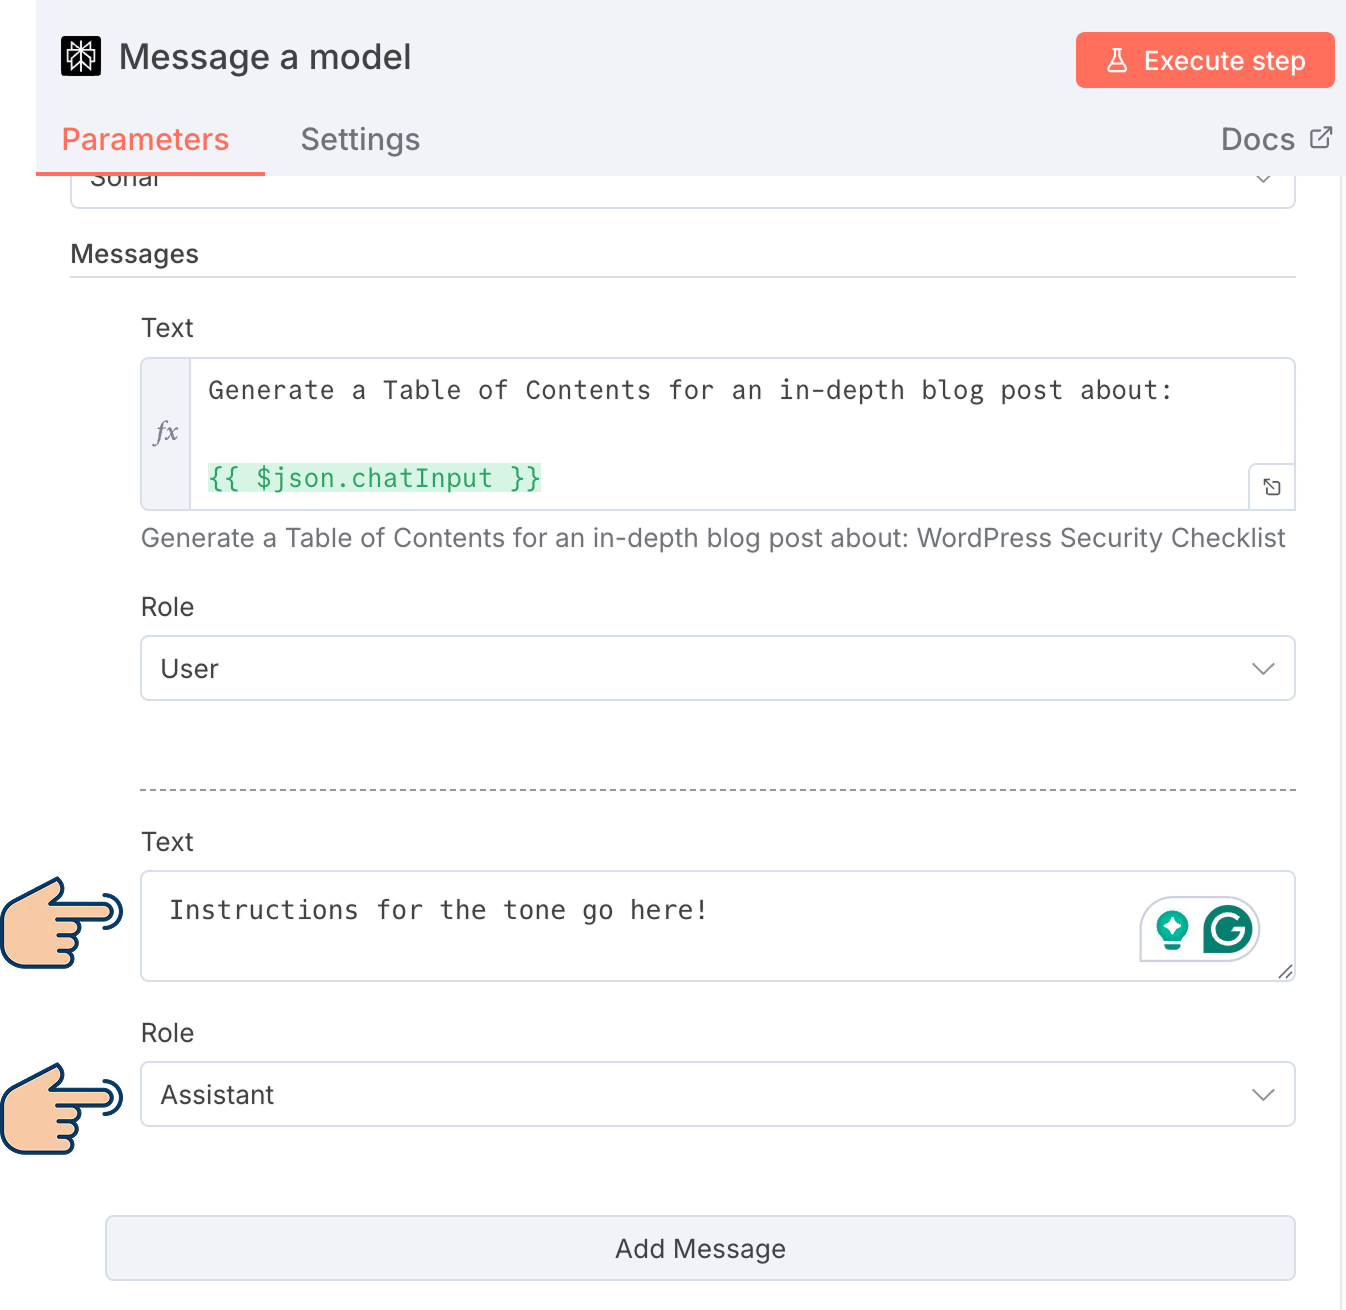
Next, add the instructions for the tone of voice inside the new "Text" field and set "Assistant" for the role.
That's all.
That's how you send a message with another role and set of instructions to the AI model.
Having said that, I don't want to set the tone or context because the table of contents usually doesn't have a tone.
So, I am gonna delete this additional message I just created.
And we don't need reasoning or context capabilities because Perplexity is just browsing the top Google search results for generating the table of contents for our article.
So, I don't want to create an additional message with "System" role either.
That's all.
We don't have to worry about the remaining options for now.
Next, I want to execute the Perplexity node to check:
- If n8n is connecting to the Perplexity API properly
- And if Perplexity is generating a table of contents according to our expectations.
How to execute a node in n8n for testing purposes and what to expect
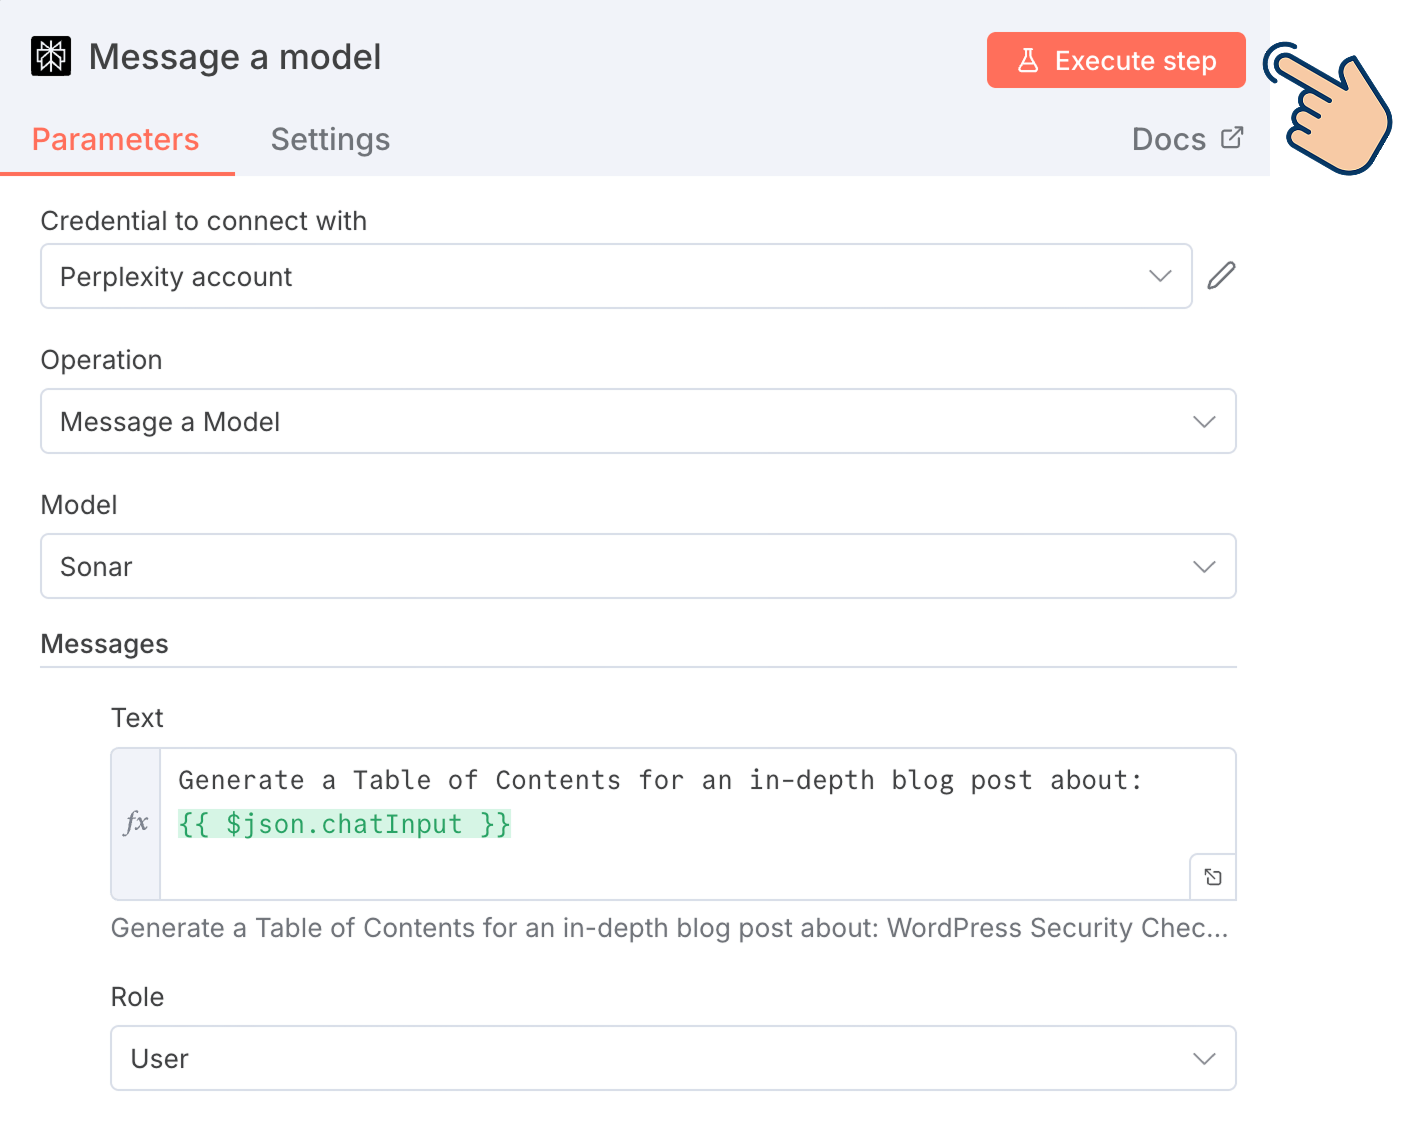
Executing a node is easy.
You just need to click on the "Execute Step" button:
And as soon as you do that:
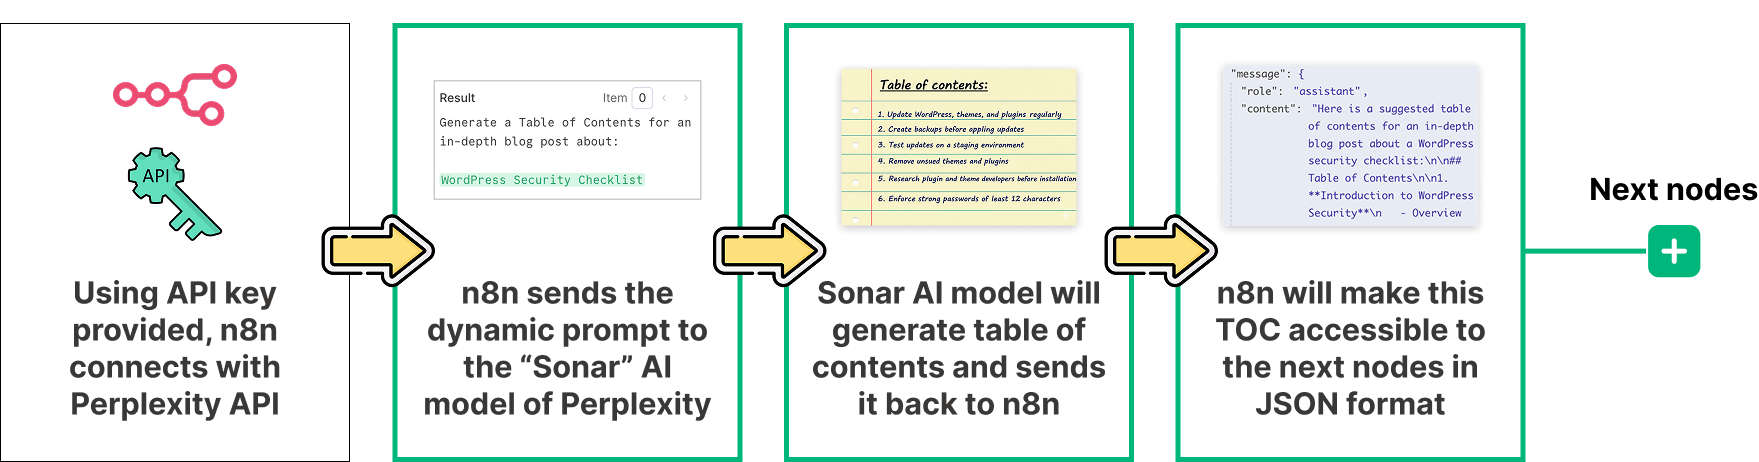
- n8n establishes a connection to your external service (Perplexity API) using the credentials you've configured. This validates that your API keys and authentication settings are correct.
- If the connection is successful, n8n will send the dynamic prompt with the topic to the "Sonar" model of Perplexity AI
- Based on the prompt, the "Sonar" model will generate a result (table of contents) and send it back to n8n
- n8n will make that data accessible in JSON format by automatically transferring it as an input to the next node in the automation pipeline.
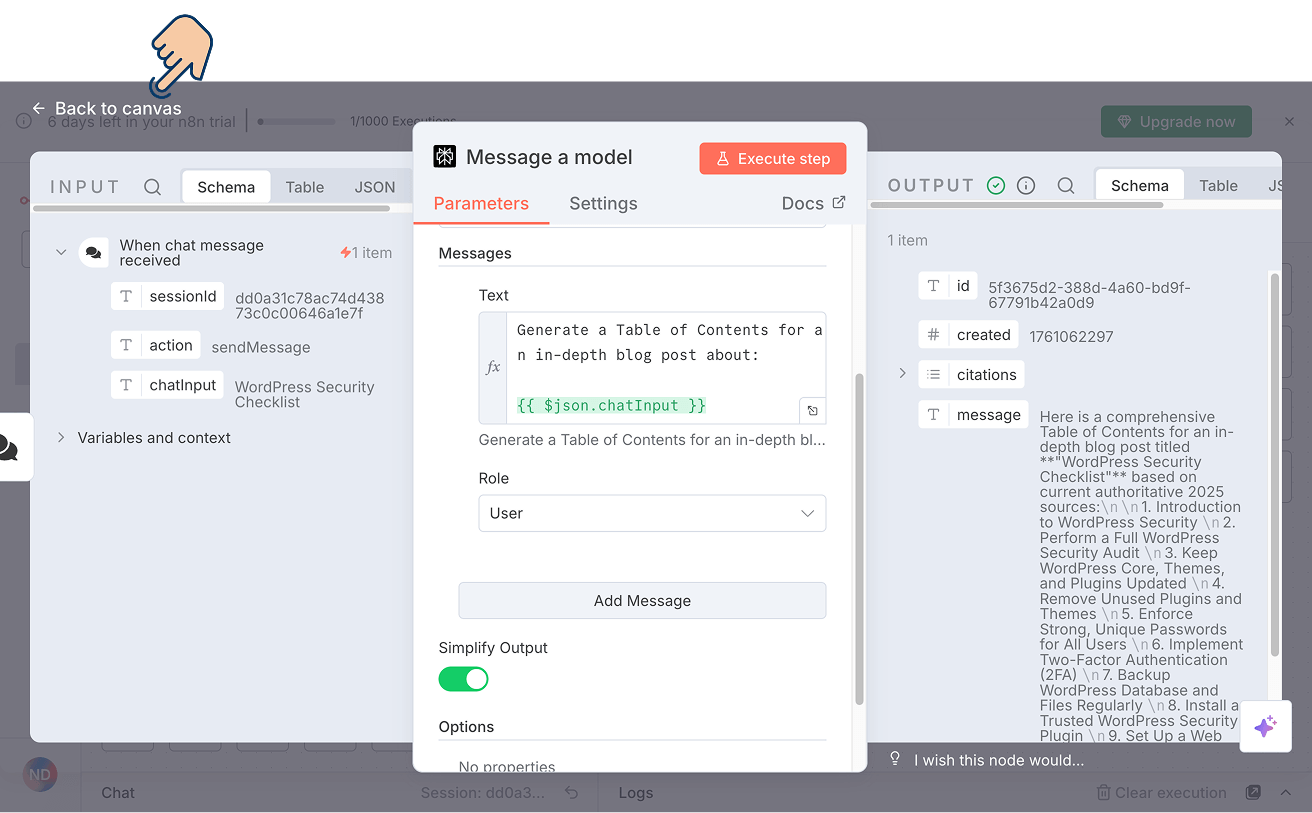
In my case, the execution was successful, and n8n populated the "Output" panel of the Perplexity node with the data that resulted from the Perplexity API call:
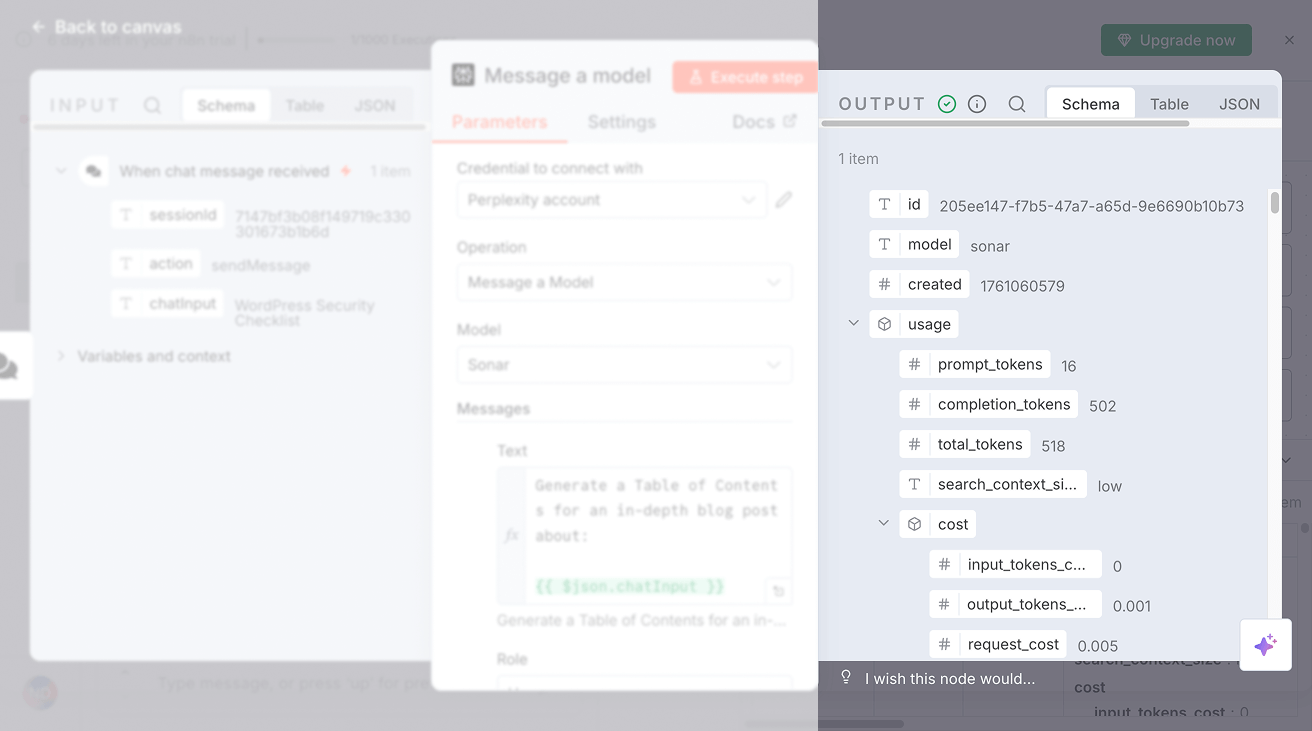
And if you notice, the output panel has a lot of data.
And if you scroll down through that data, you'll find a property called "choices" and it has a sub-property called "content":
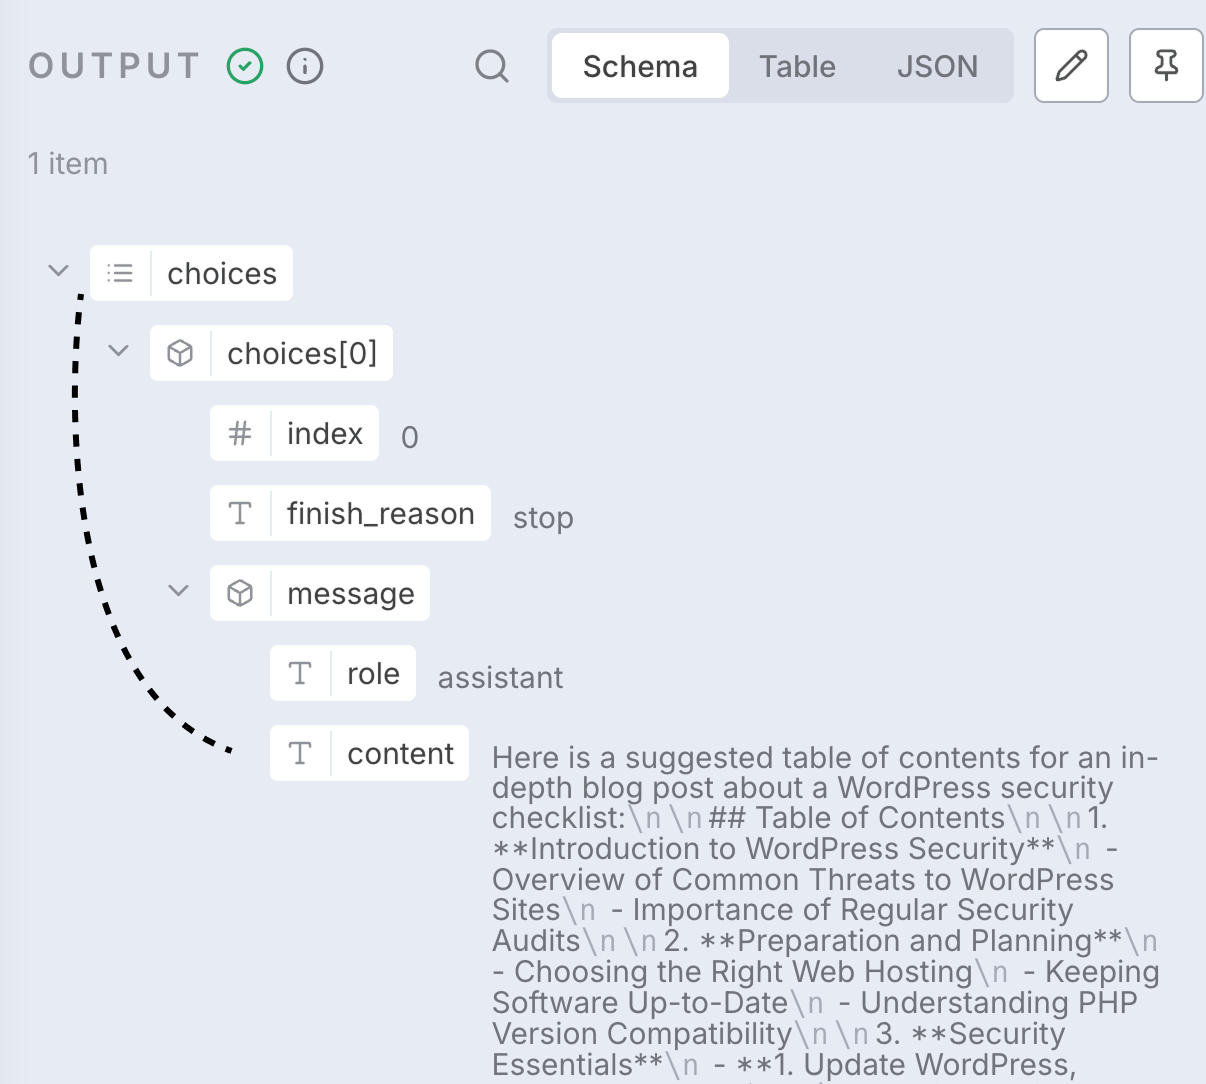
And as you can see, the content sub-property contains the table of contents generated by Perplexity AI.
And n8n automatically makes all this output data accessible as an input to the next node that we are about to add (the Claude node for article generation).
Having said that, if you observe the output data of the Perplexity node, it contains a lot of information that we don't need.
Yep! Is there any way to remove unnecessary data from the output?
Yep! It is possible and it is easy.
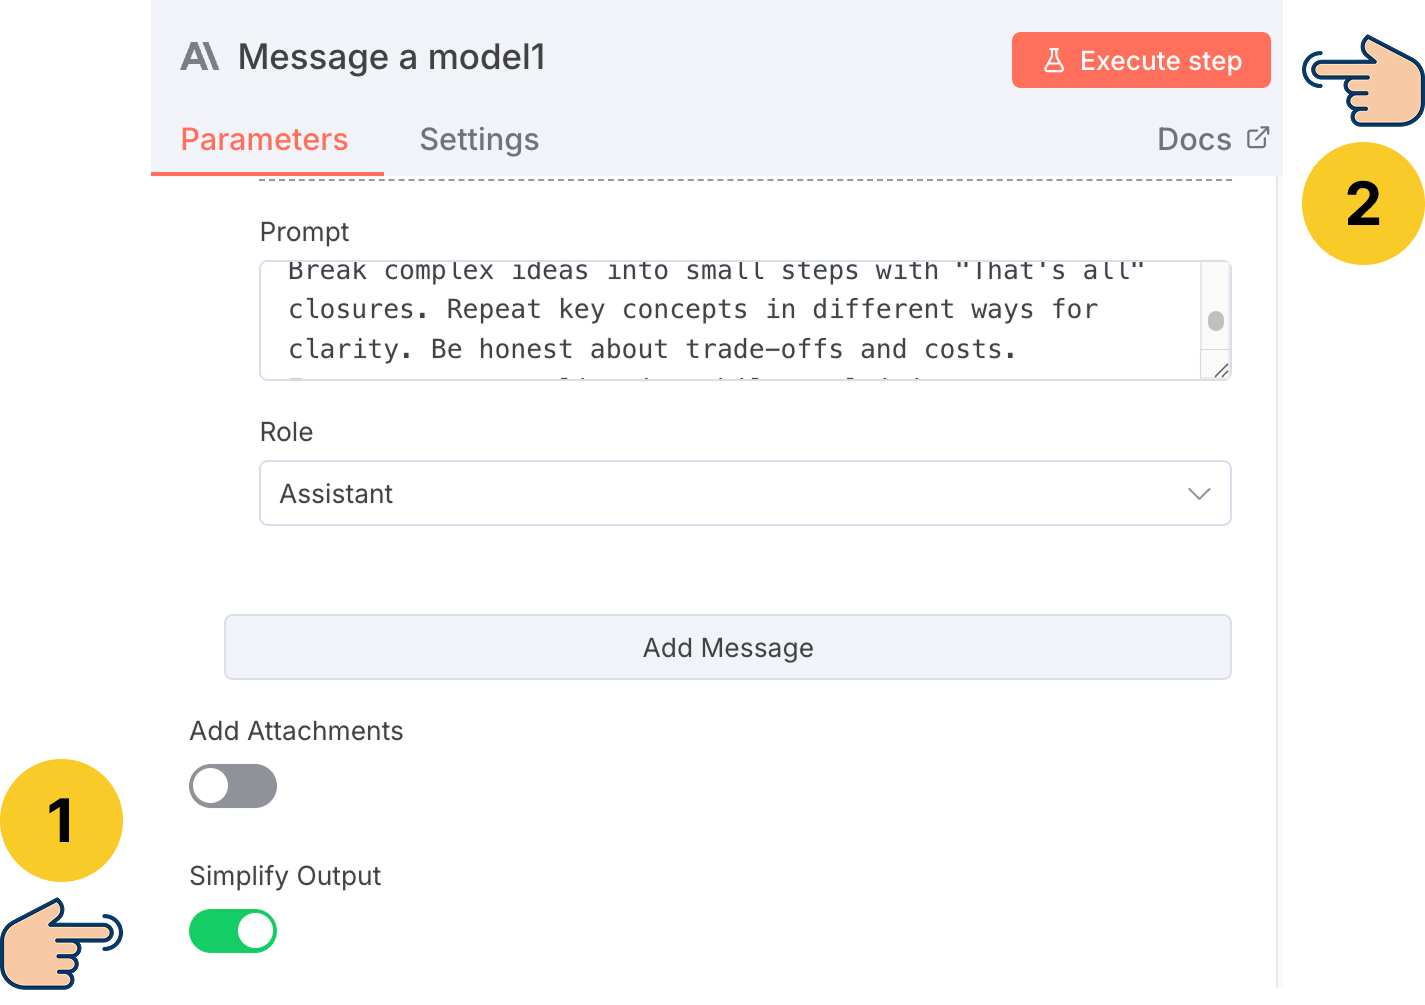
If you notice, inside the Perplexity node's configuration, there is an option called "Simplify Output".
It is located right underneath the "Messages" option:
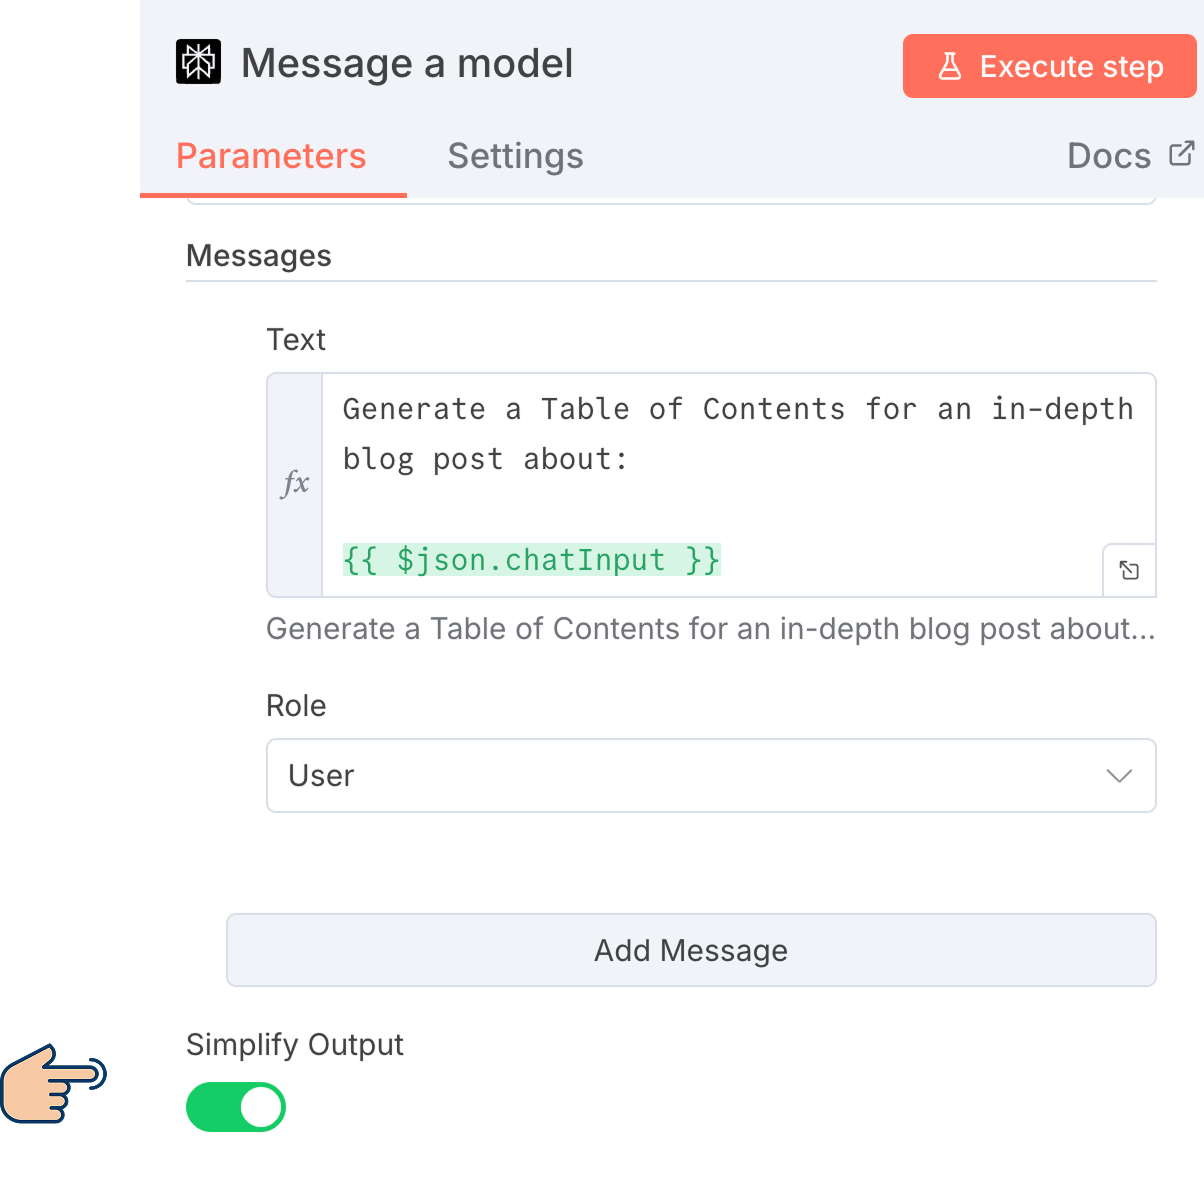
If you enable it and execute the node again, n8n will only produce the output data that is important for us. In our case, that is:
citationsproperty - It contains links of web pages using which Perplexity generated table of contentsmessageproperty that contains table of contents
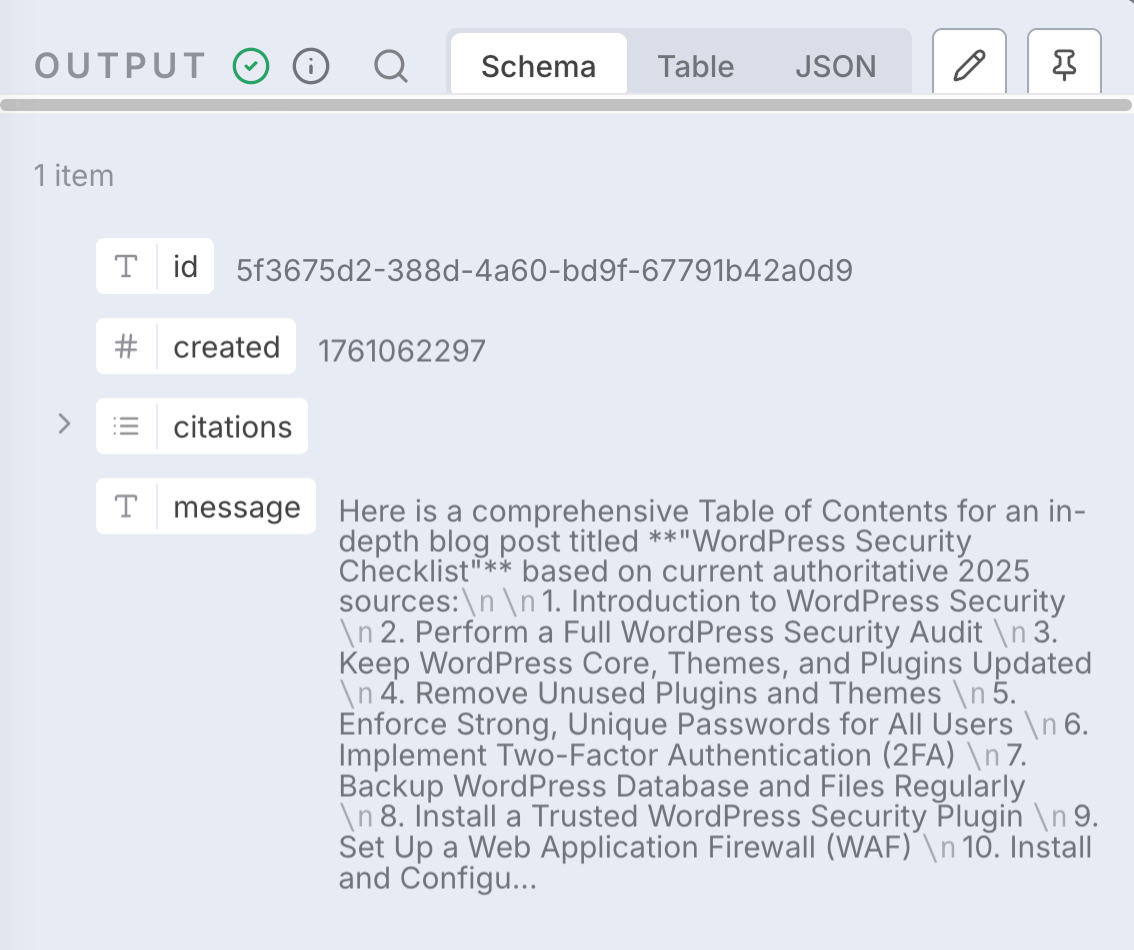
See the difference now?
This output is much cleaner, and we can easily access it when we are working with the next node.
Anyway, I like the simplified output. So, I am gonna keep the "Simplify Output" option enabled.
Next, let's generate an article based on this table of contents.
And we can generate an article using Claude or ChatGPT.
They both work great.
And as I said before, I like Claude's writing style personally.
So, I will go with Claude.
If you don't like Claude, by all means, go with ChatGPT.
Generating an article using n8n and Anthropic's Claude API
Go back to the workflow canvas where we can add a new node:
Next, click on the "Add node" button:
And search for the Anthropic platform because Claude is the AI model provided by Anthropic, a software company.
Just like how ChatGPT is an AI model provided by OpenAI, a software company.
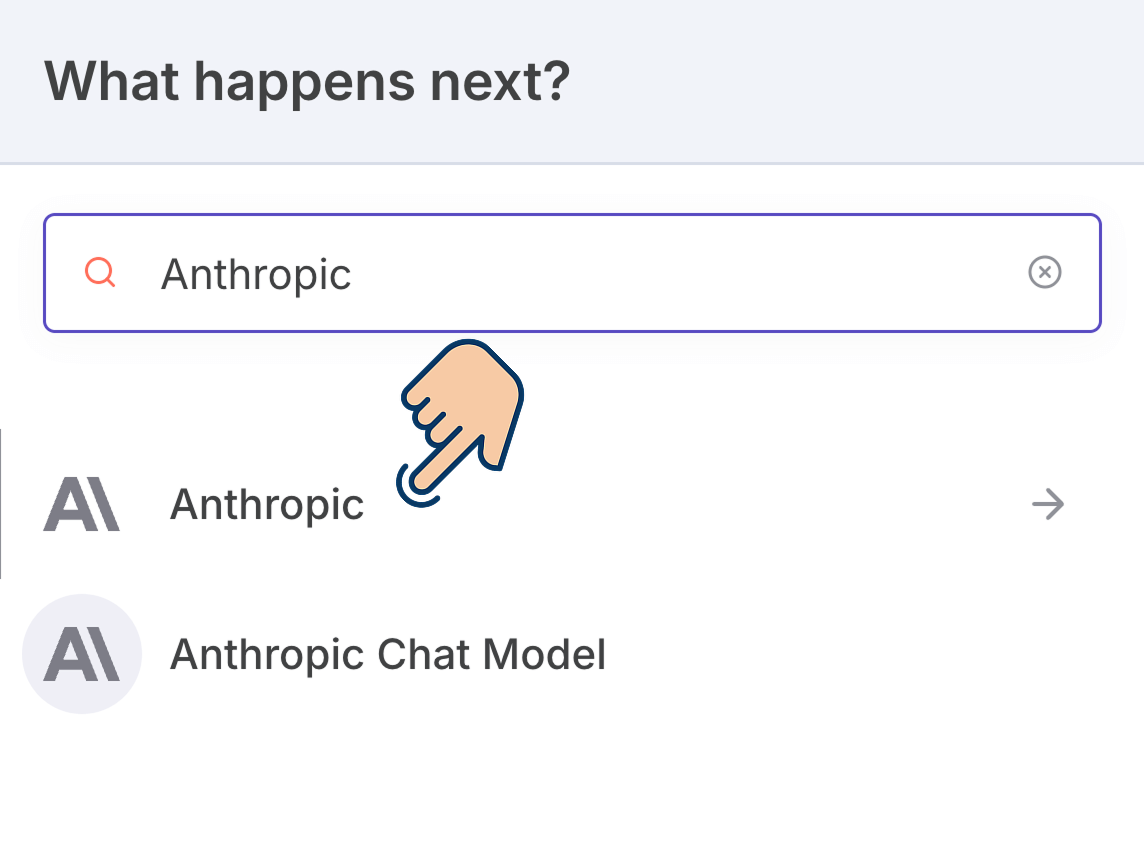
Anyway, once you find it, click on it to browse the "Action" nodes provided by Anthropic.
Currently, it provides 10 action nodes, and we are interested in the "Message a model" node as usual.
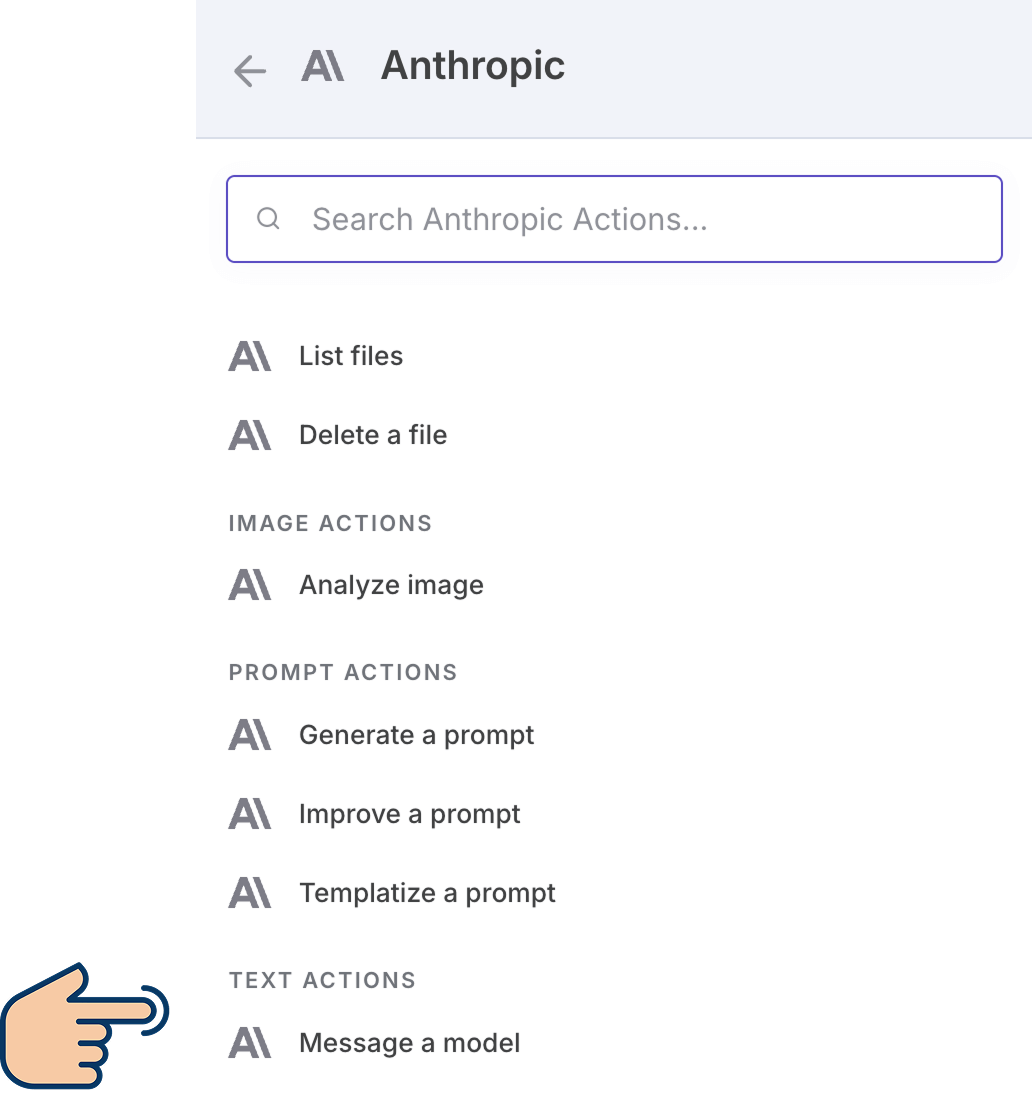
It works in the same way as the "Message a model" node from Perplexity AI, that is, generating AI content.
Having said that...
For example, Perplexity and Anthropic are both AI companies and they both have nodes that was named "Message a model".
And although both nodes work in the same way, they both contact different APIs.
Anyway, click on the "Message a model" node of Anthropic to add it to our workflow, and as soon as you do that, it will bring up API configuration options for Anthropic:
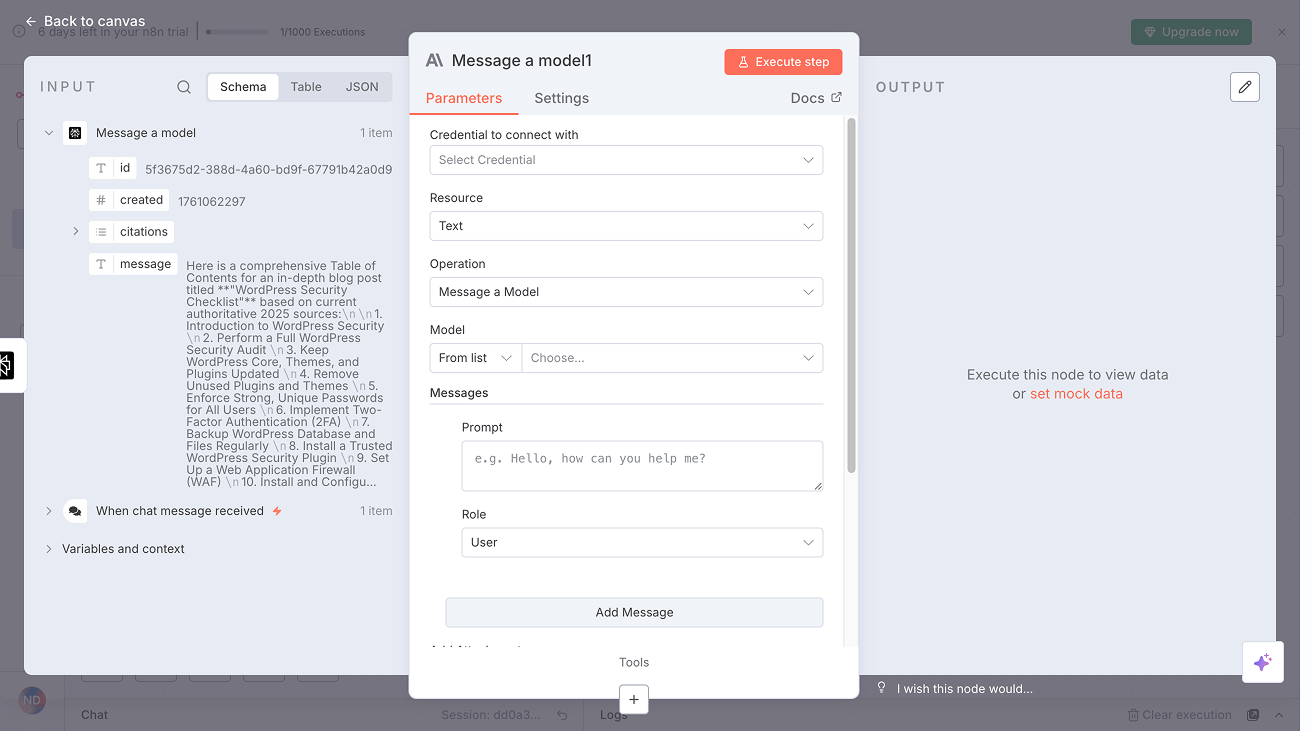
Now, notice that Anthropic's node can access the results from the two previous steps:
- The topic you entered in the Chat node
- The table of contents created by the Perplexity node
This means we can use the output from both earlier nodes as input for Claude AI to write the article.
For example, when generating the article, we don't need the original topic name. We only need the table of contents.
So we'll give Claude just the table of contents that Perplexity created. Claude will use that to write the final article.
With that being said, I want to shift focus to the configuration options of Anthropic API.
If you observe, the configuration options of Anthropic API look the same as the configuration options of Perplexity AI:
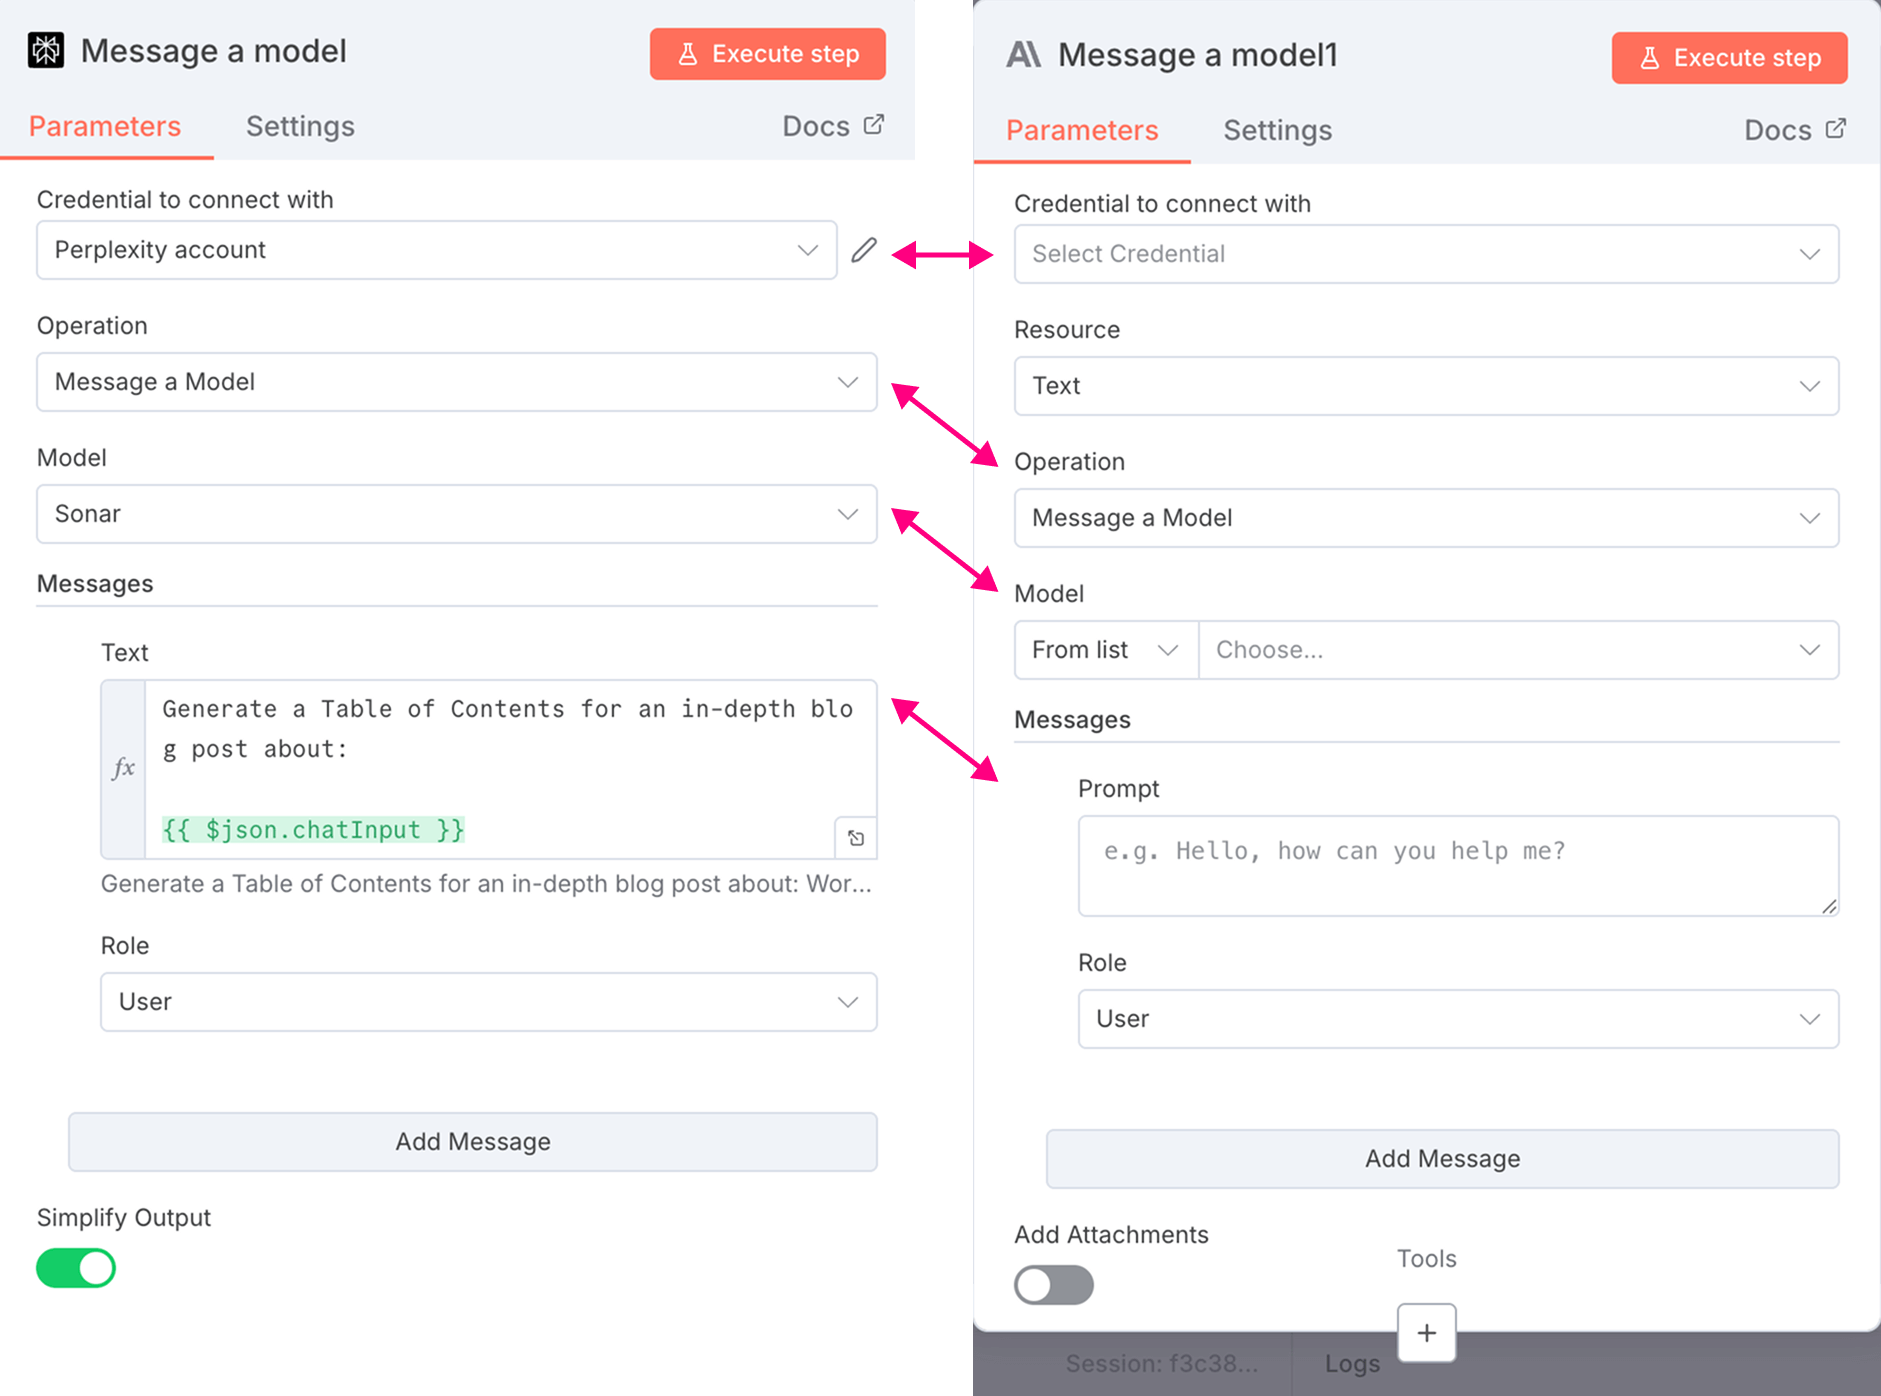
Both nodes have options for:
- Creating API credentials for respective platforms
- Choosing the AI model for content generation
- Providing a prompt for content for generation
- And other similar options
And this is not a coincidence.
n8n makes a conscious effort to create a universal and easy-to-use interface for working with any API.
In other words, if you learn how to connect with one platform's API inside n8n, the process remains the same for connecting with the API of any other platform.
Let me prove it.
I will connect to Anthropic's API really fast to access its Claude AI model.
How to create an API key for Claude and connect it to n8n
As usual, first, let's create the credentials for connecting n8n with Anthropic API.
To do that, click on "Select Credential" and then click on "Create new credential".
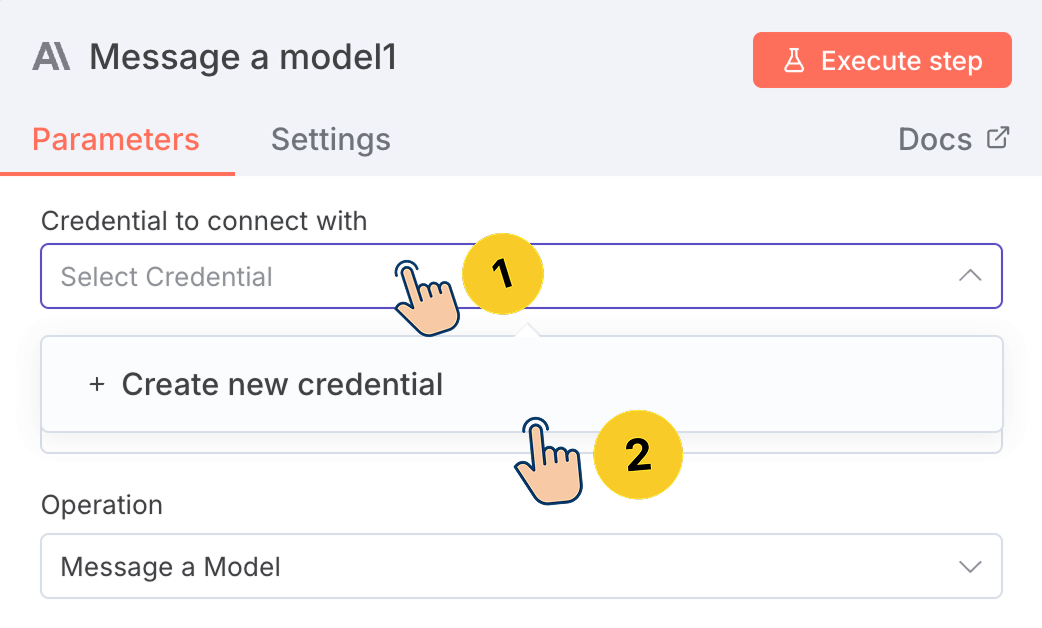
It will now open up a new window where you can enter an API key that you can get from the Anthropic platform:
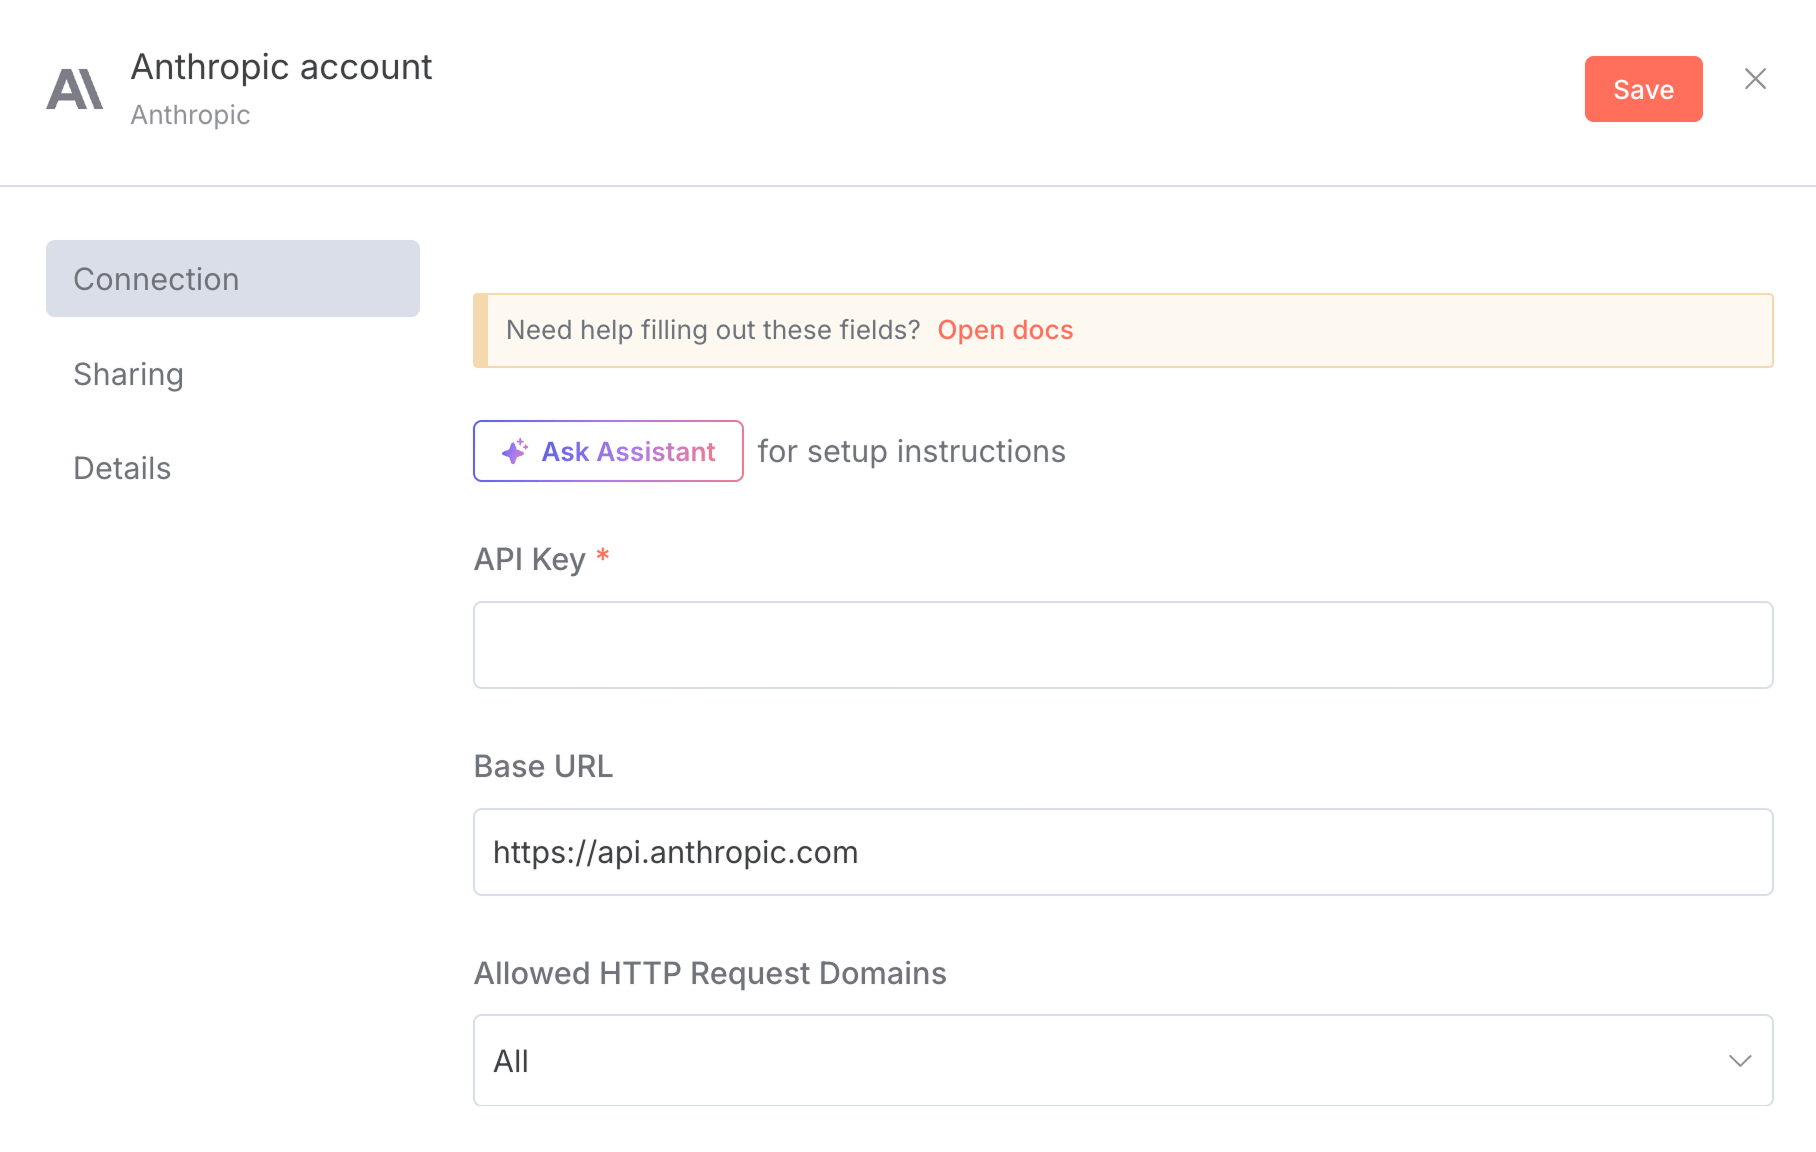
But we haven't yet created an API key for using Anthropic's Claude.
So, go to claude.ai.
Next, from the main navigation at the top, go to "Platform" and then click on "Console login":
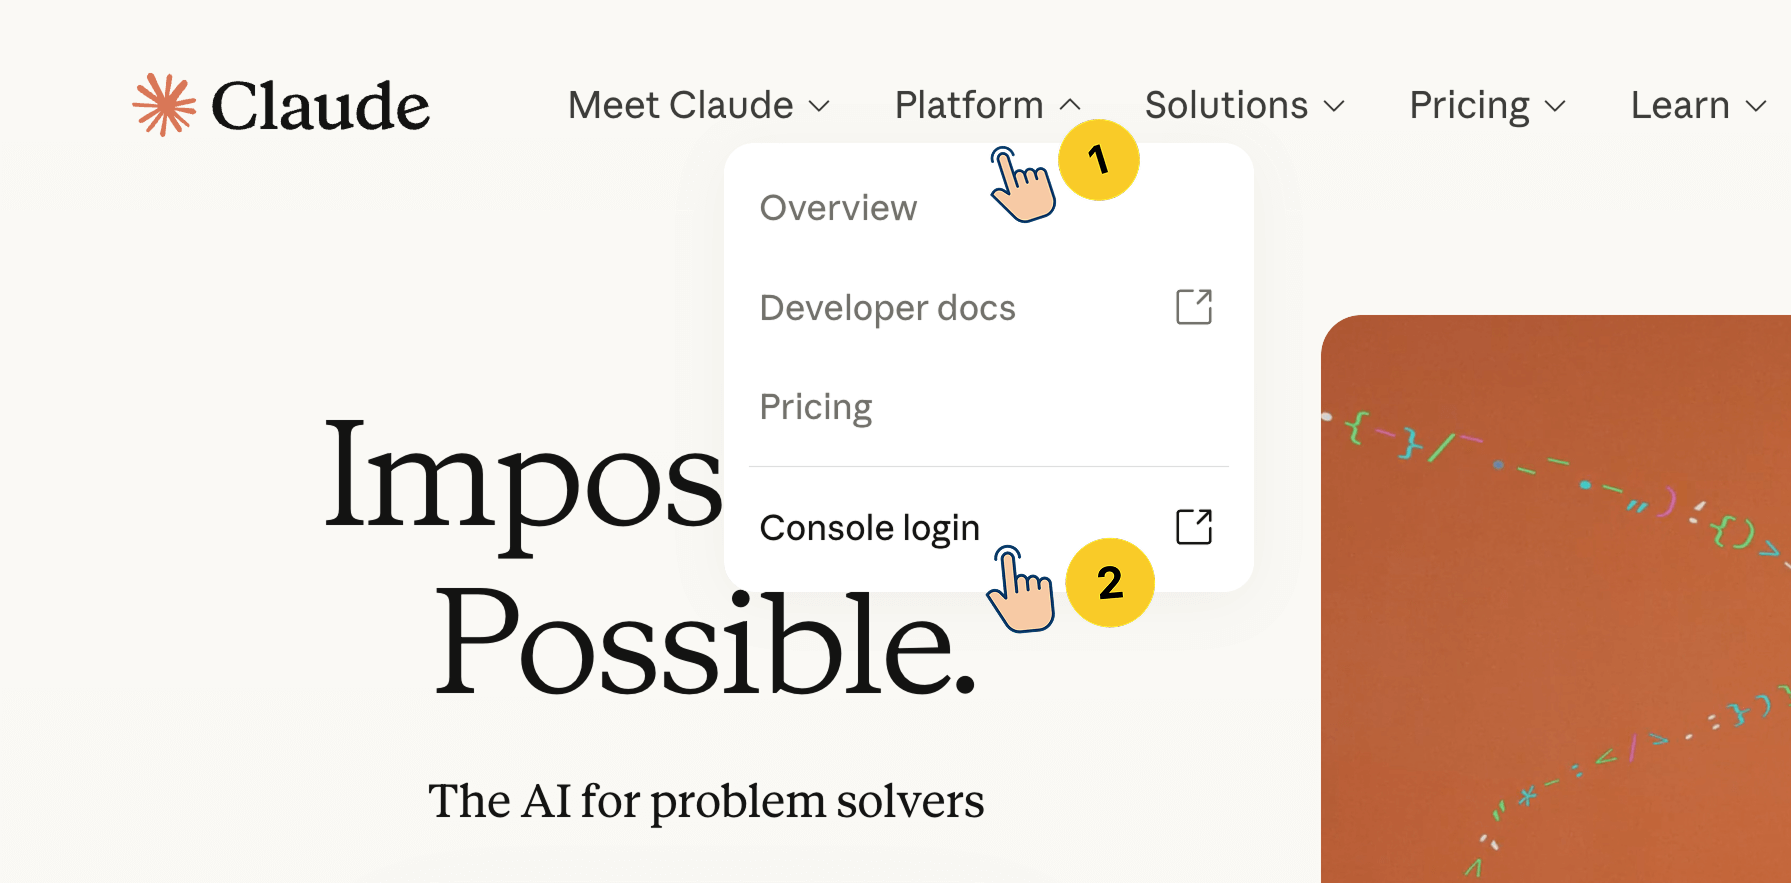
Next, create an account if you don't have one and log in to the platform.
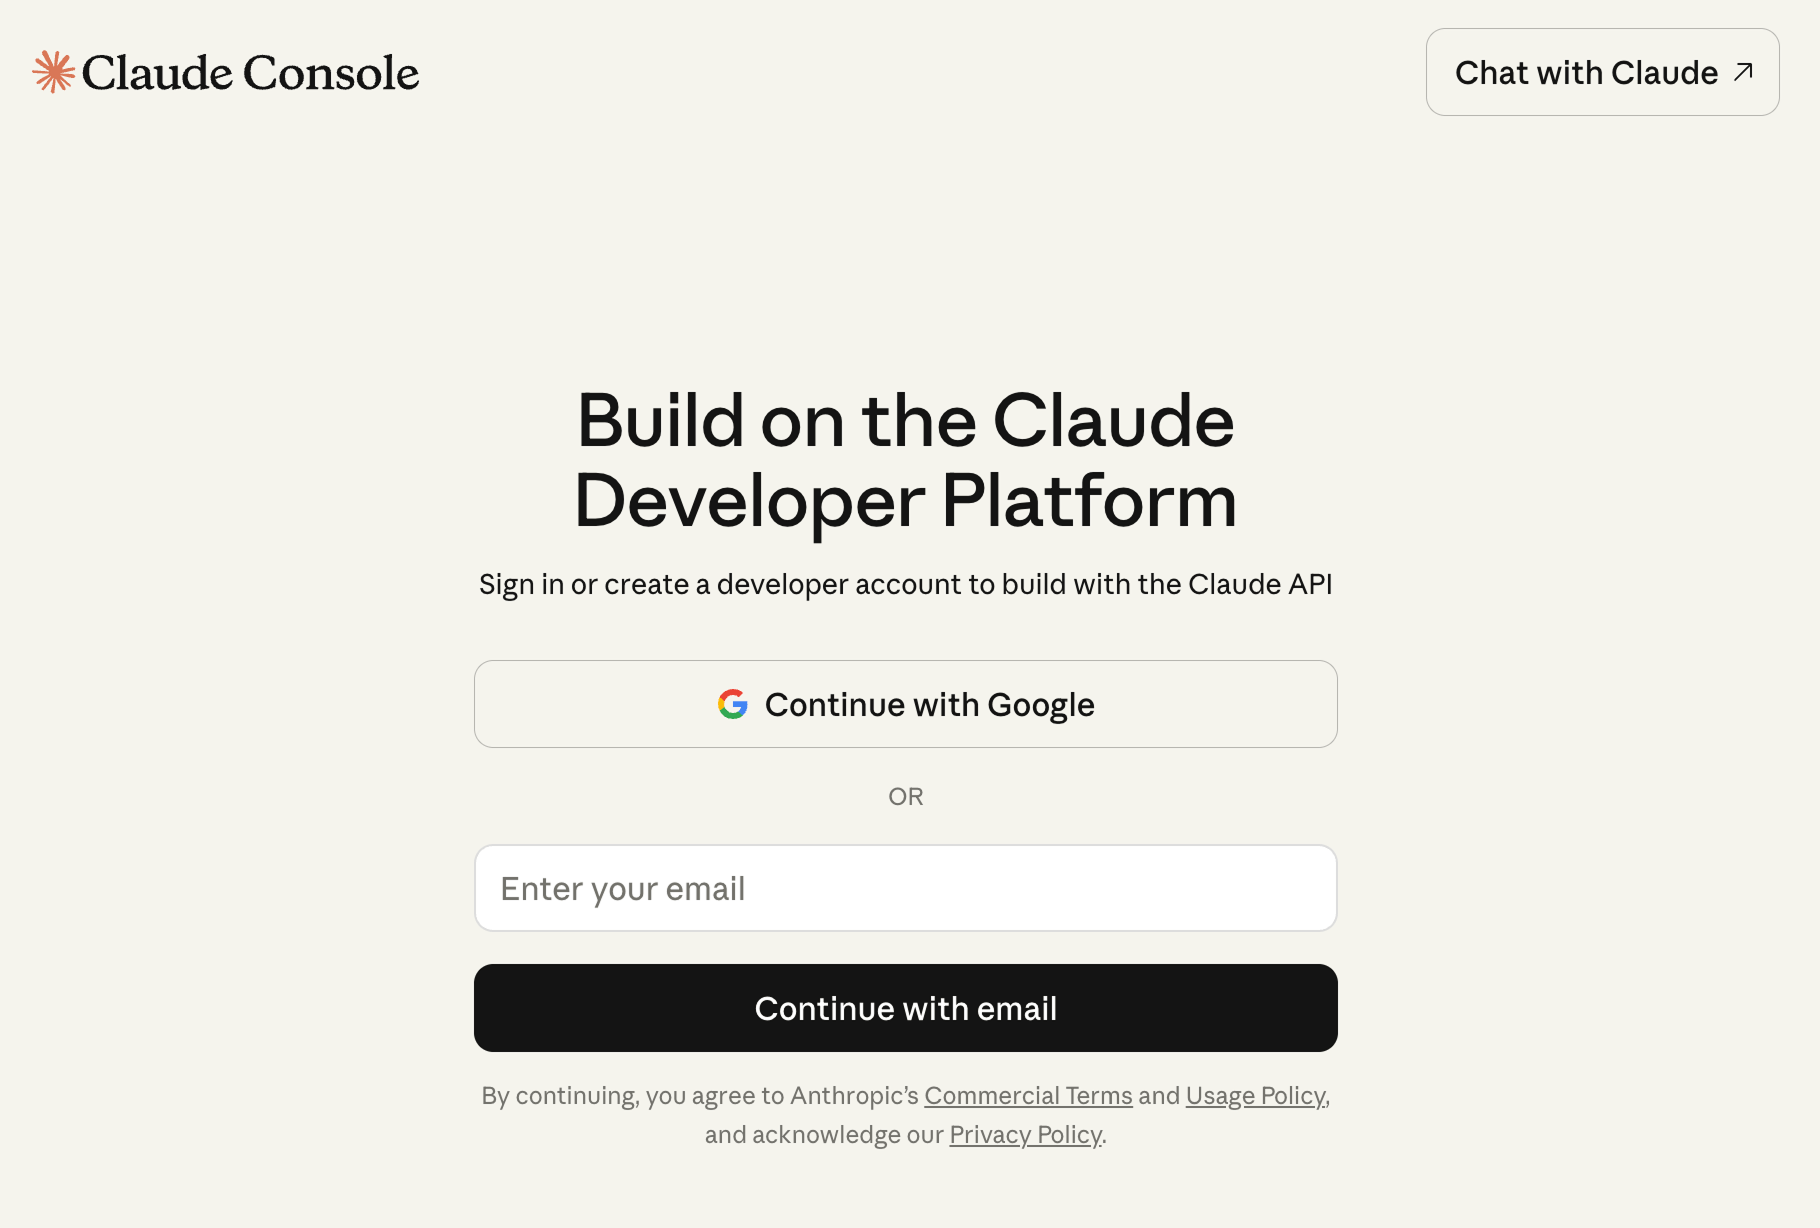
After logging in and after some onboarding process, you'll land on a screen where you access the "Get API Key" button:
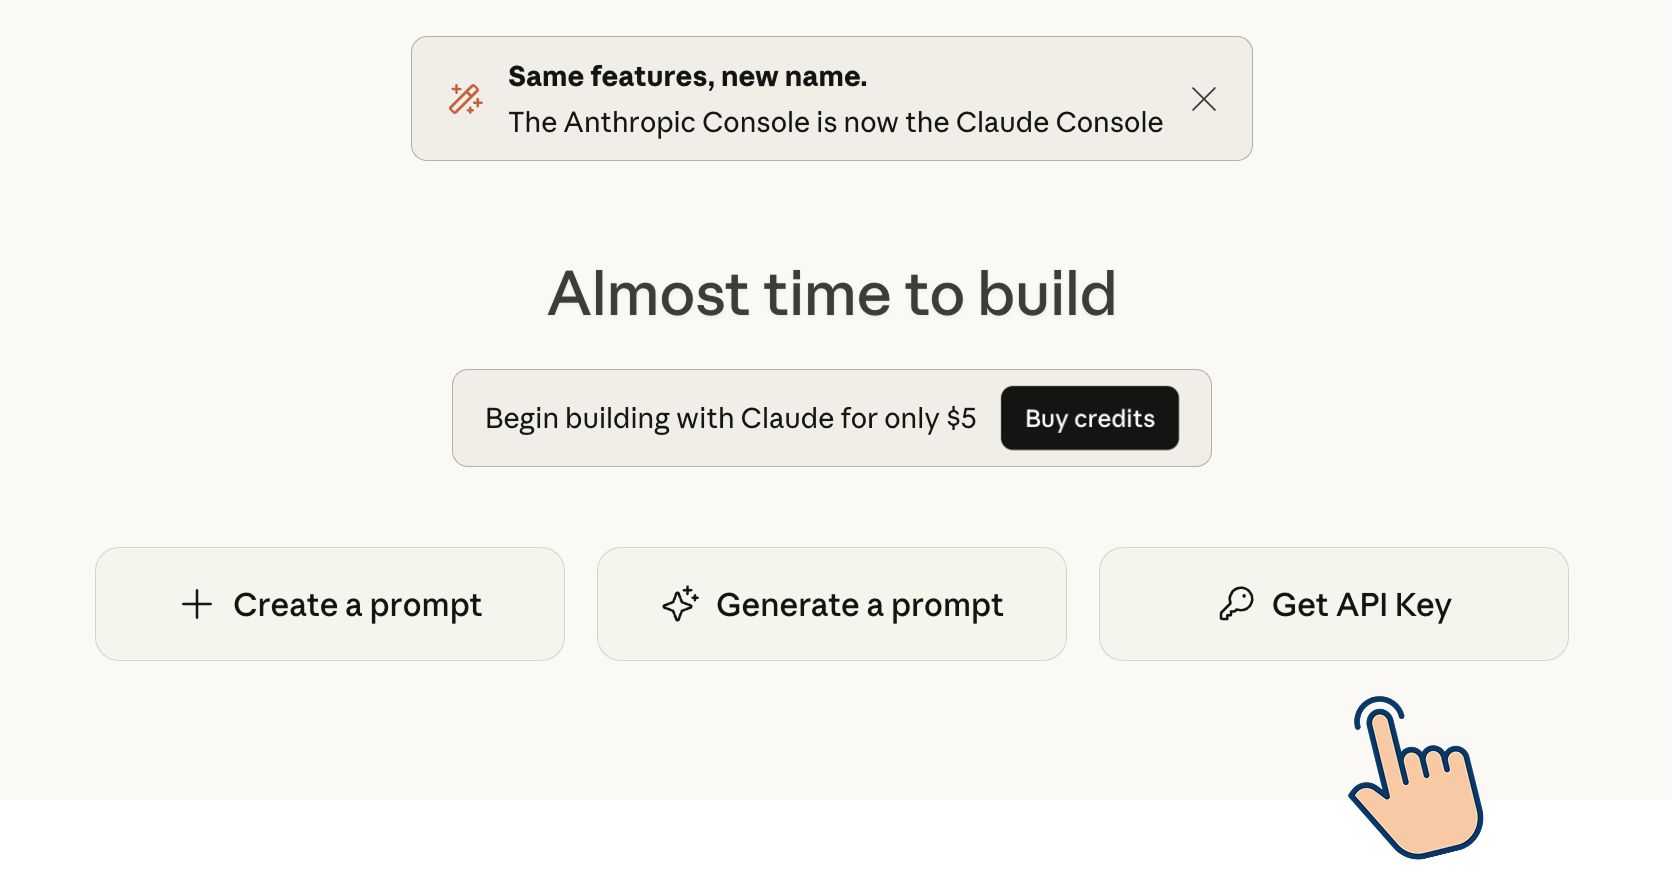
Click on it, and Claude will ask to buy credits just like Perplexity AI and other AI platforms.
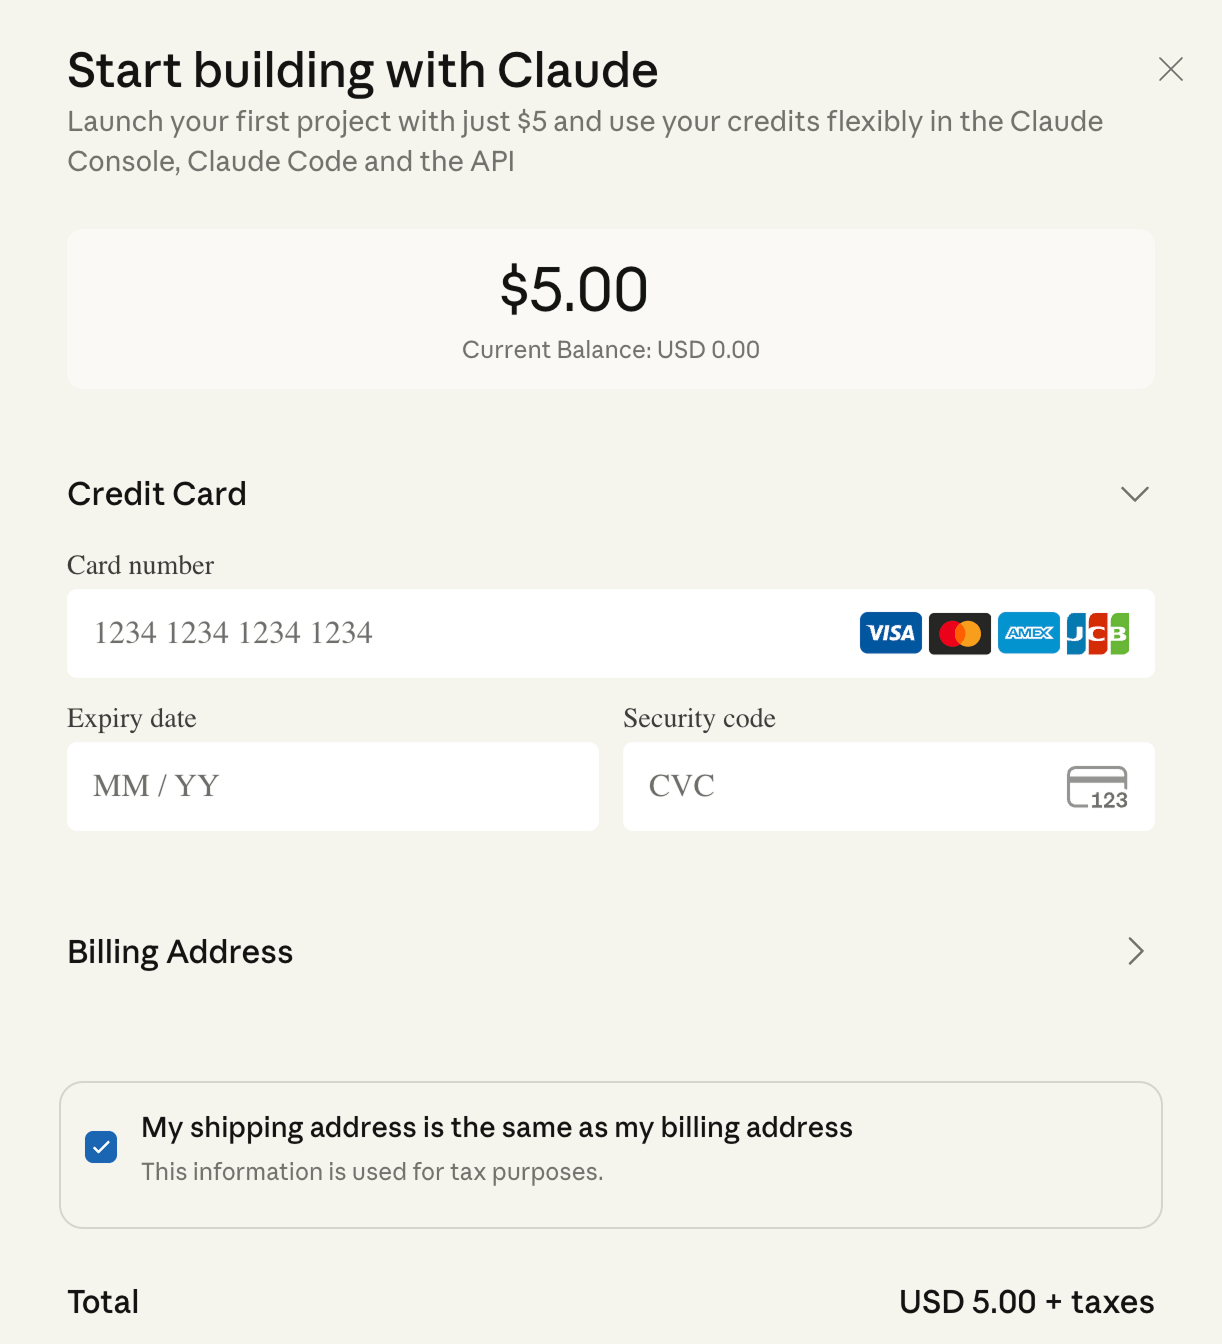
With Claude, you have to buy a minimum of $5 worth of credits.
After the purchase, go back to the home screen of the platform and then click on the "Get API key" button once again.
This will take you to the "API Keys" screen:
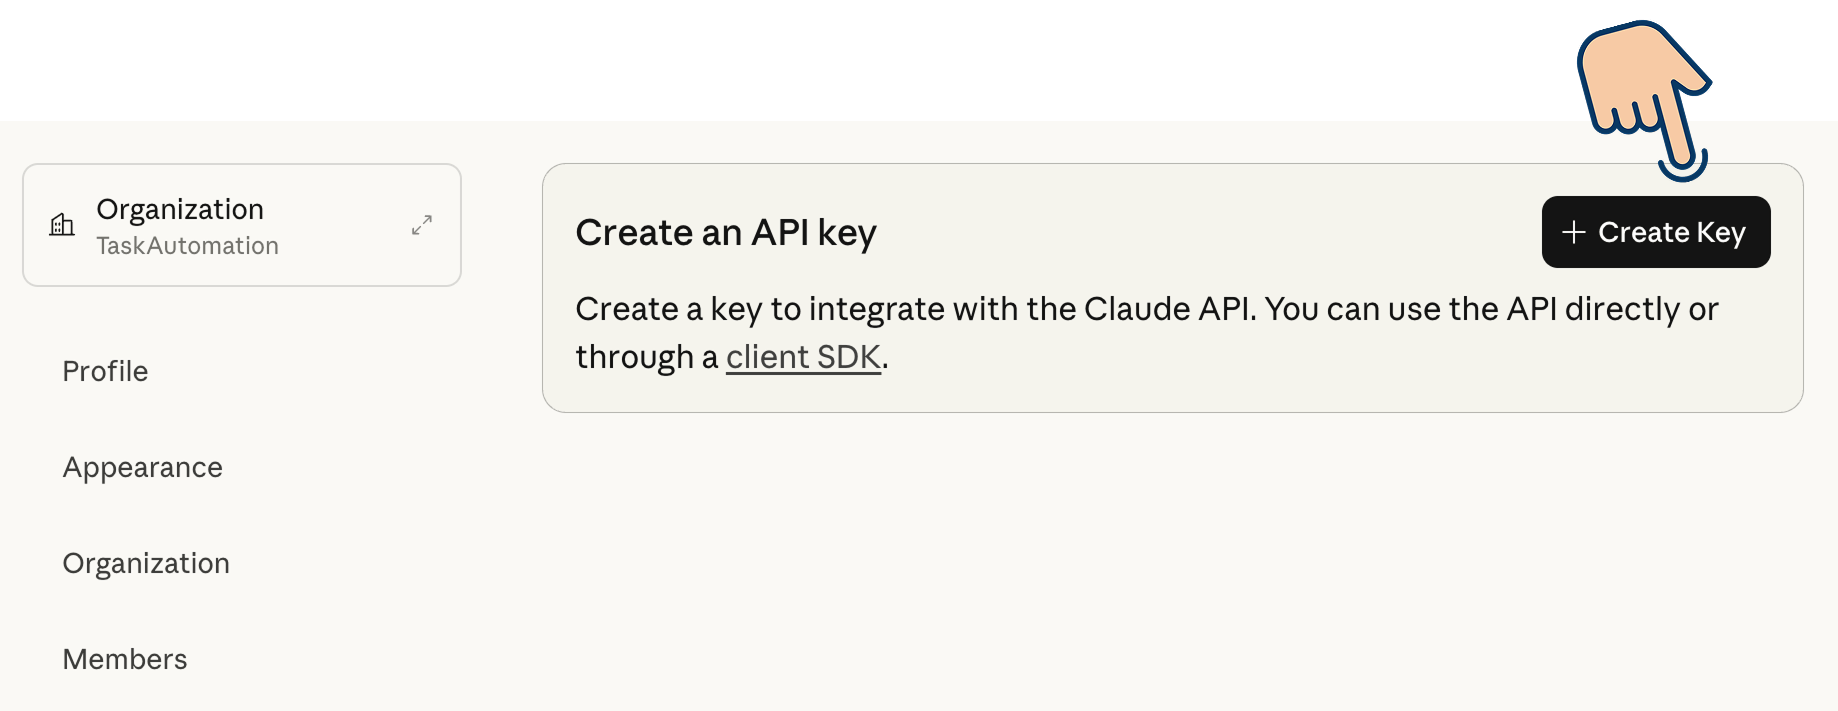
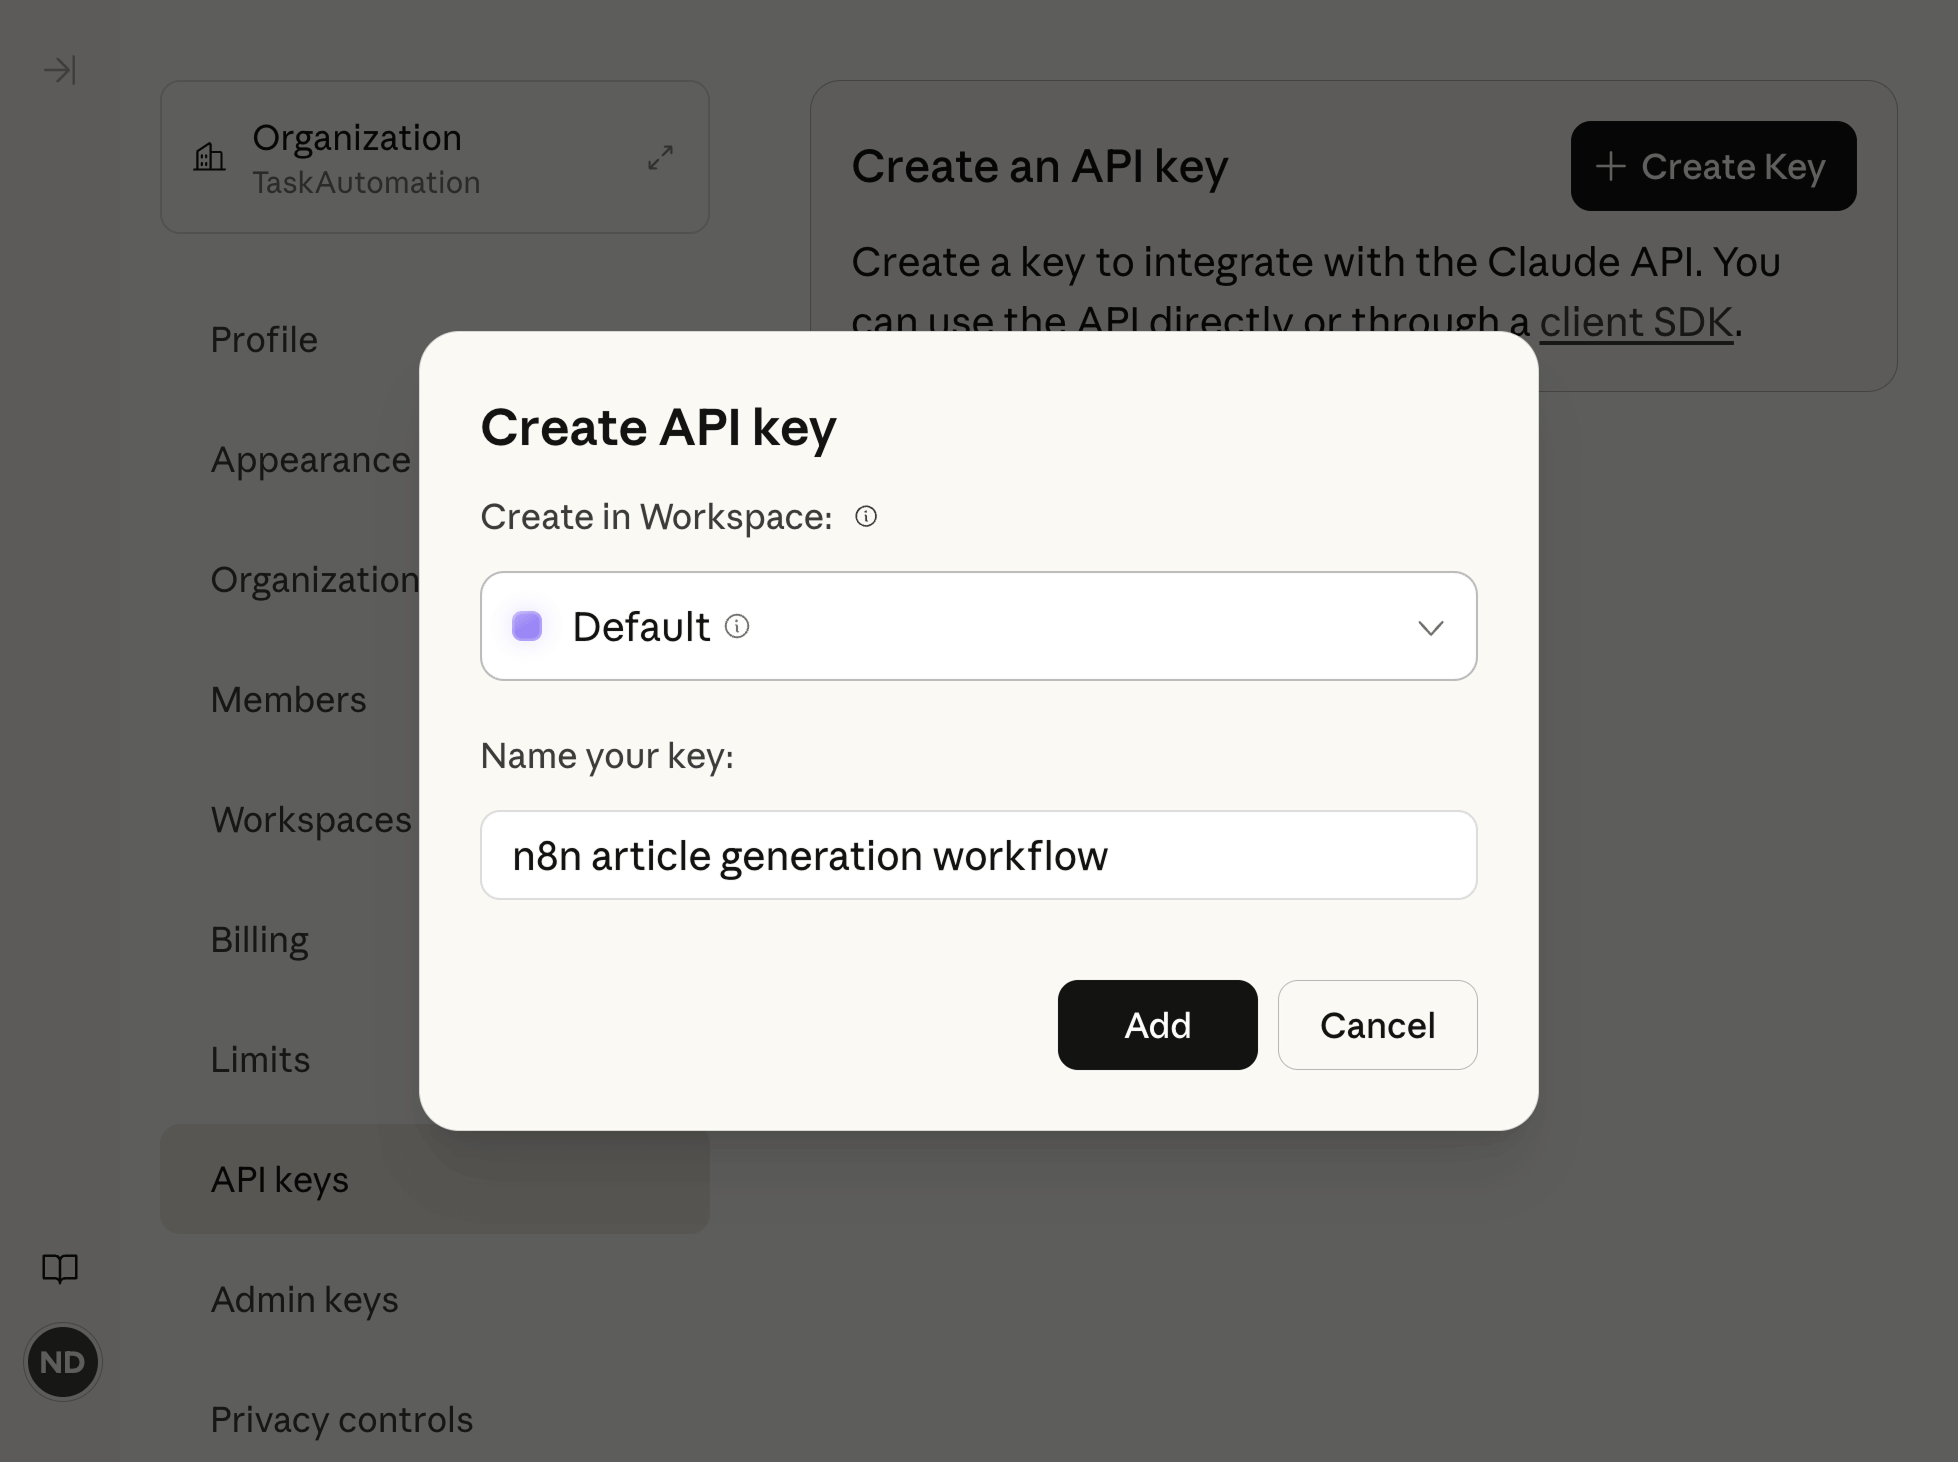
Next, click on the "Create Key" button, name the key as usual:
After that, copy the API key:
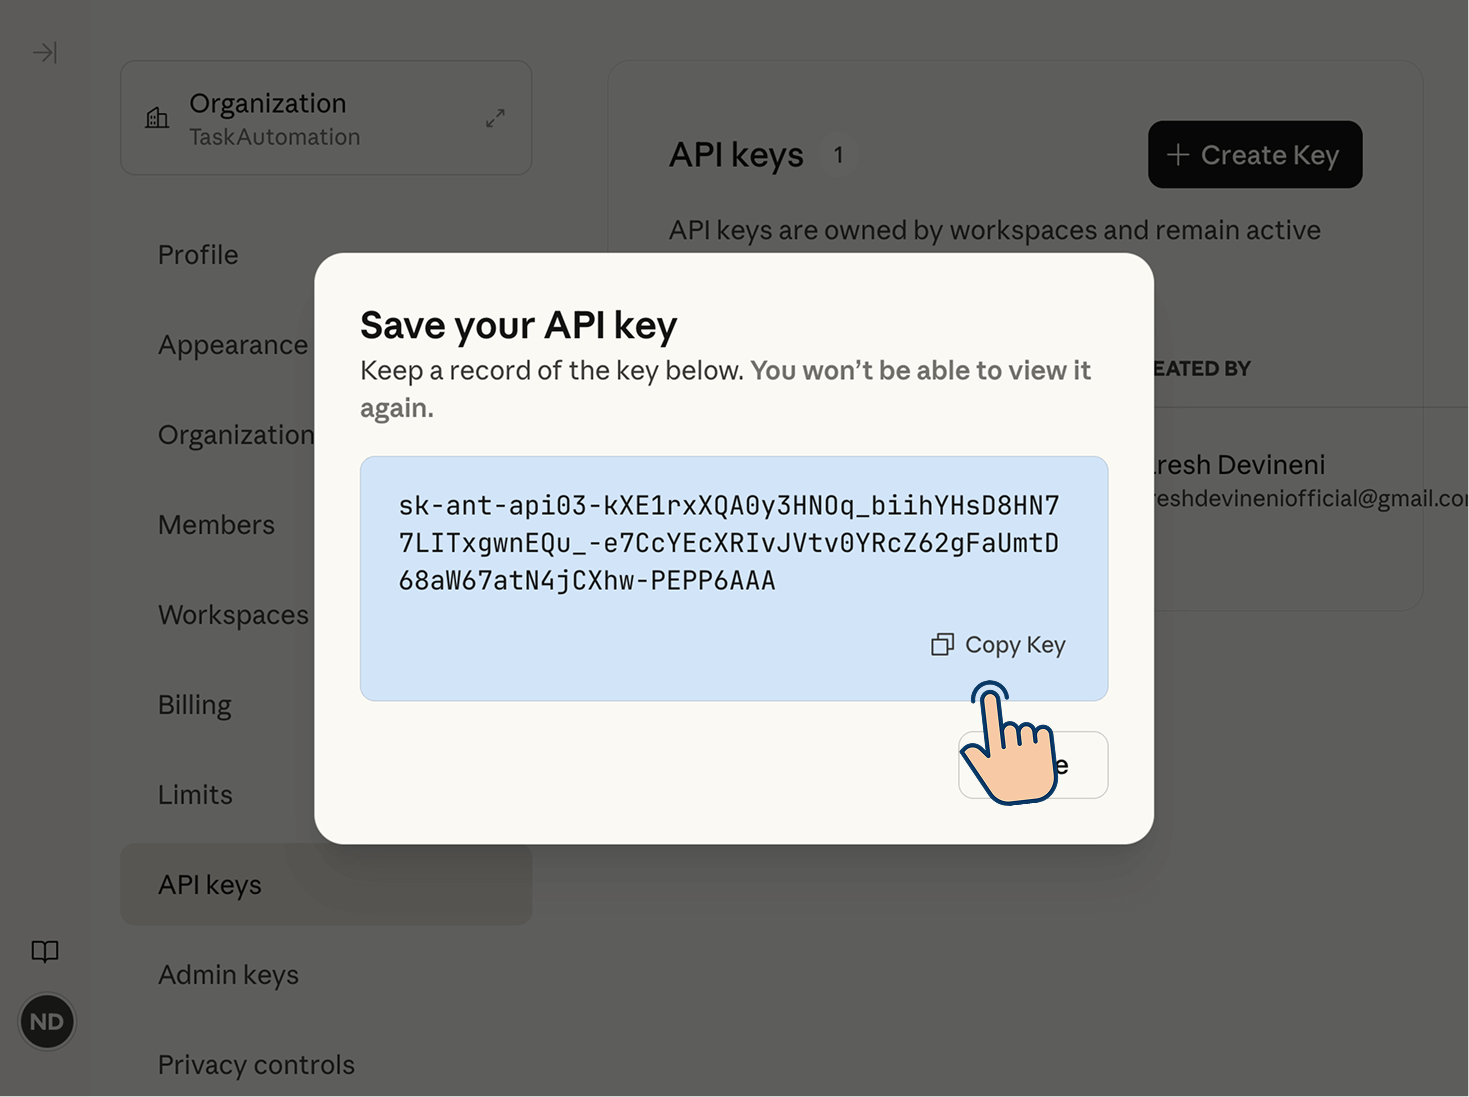
After that, come back to the n8n's credential creation pop-up and paste the key:
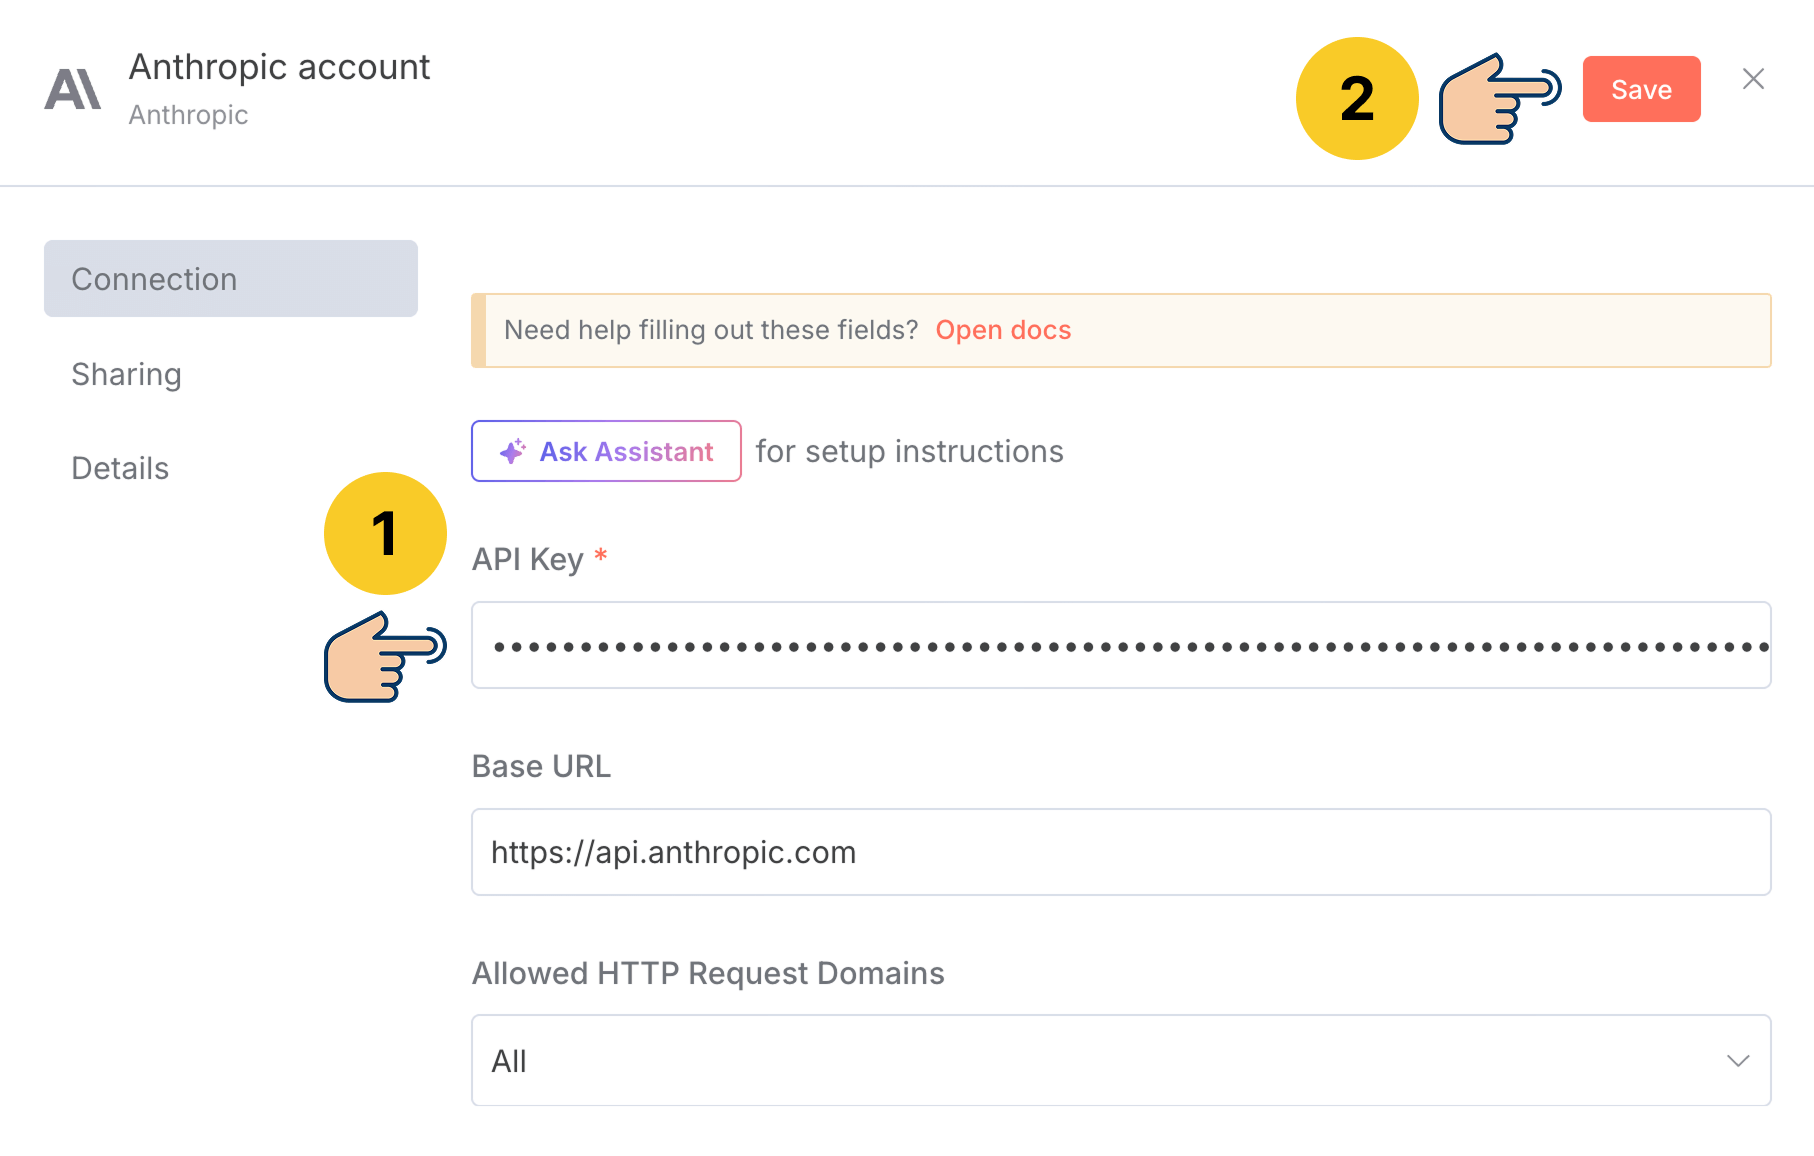
Finally, save the settings to test the API connection.
And if all goes well, n8n indicates that the connection test was successful:
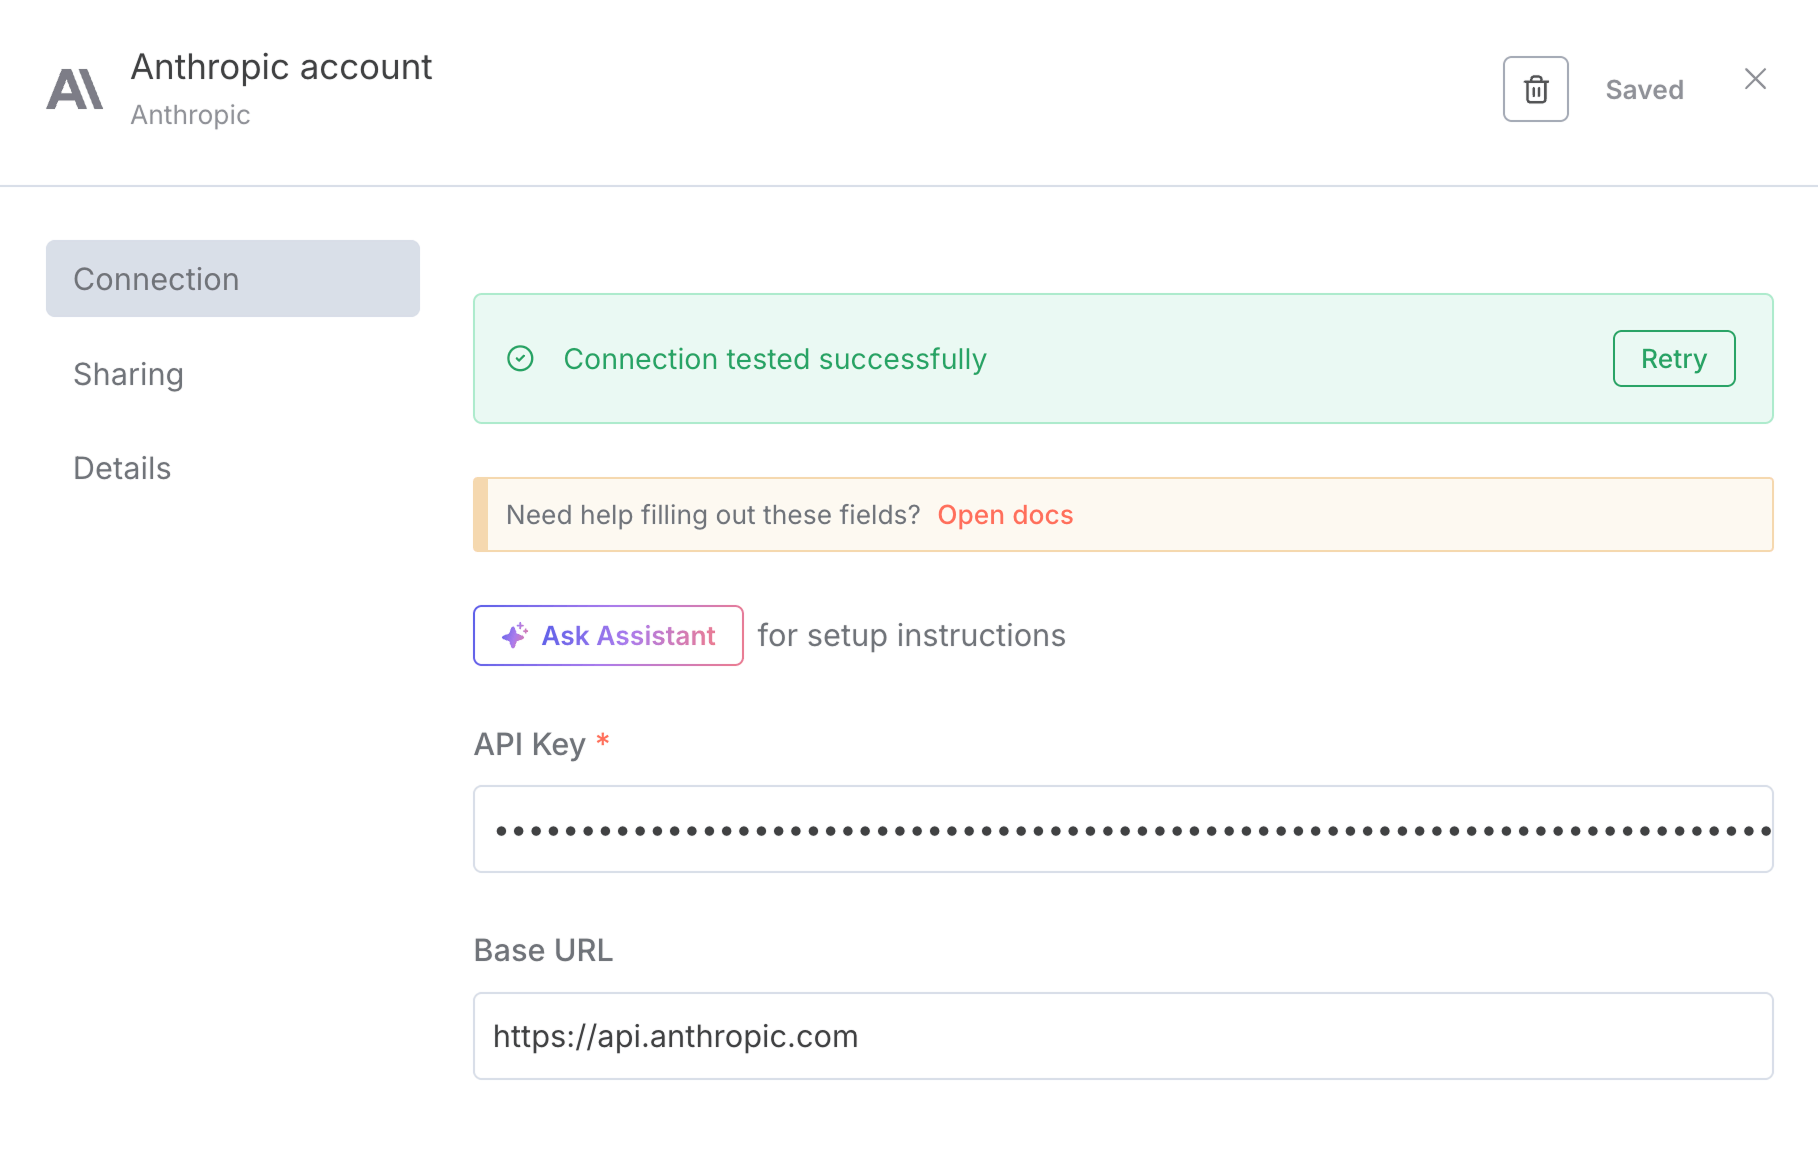
In my case, the connection is successful.
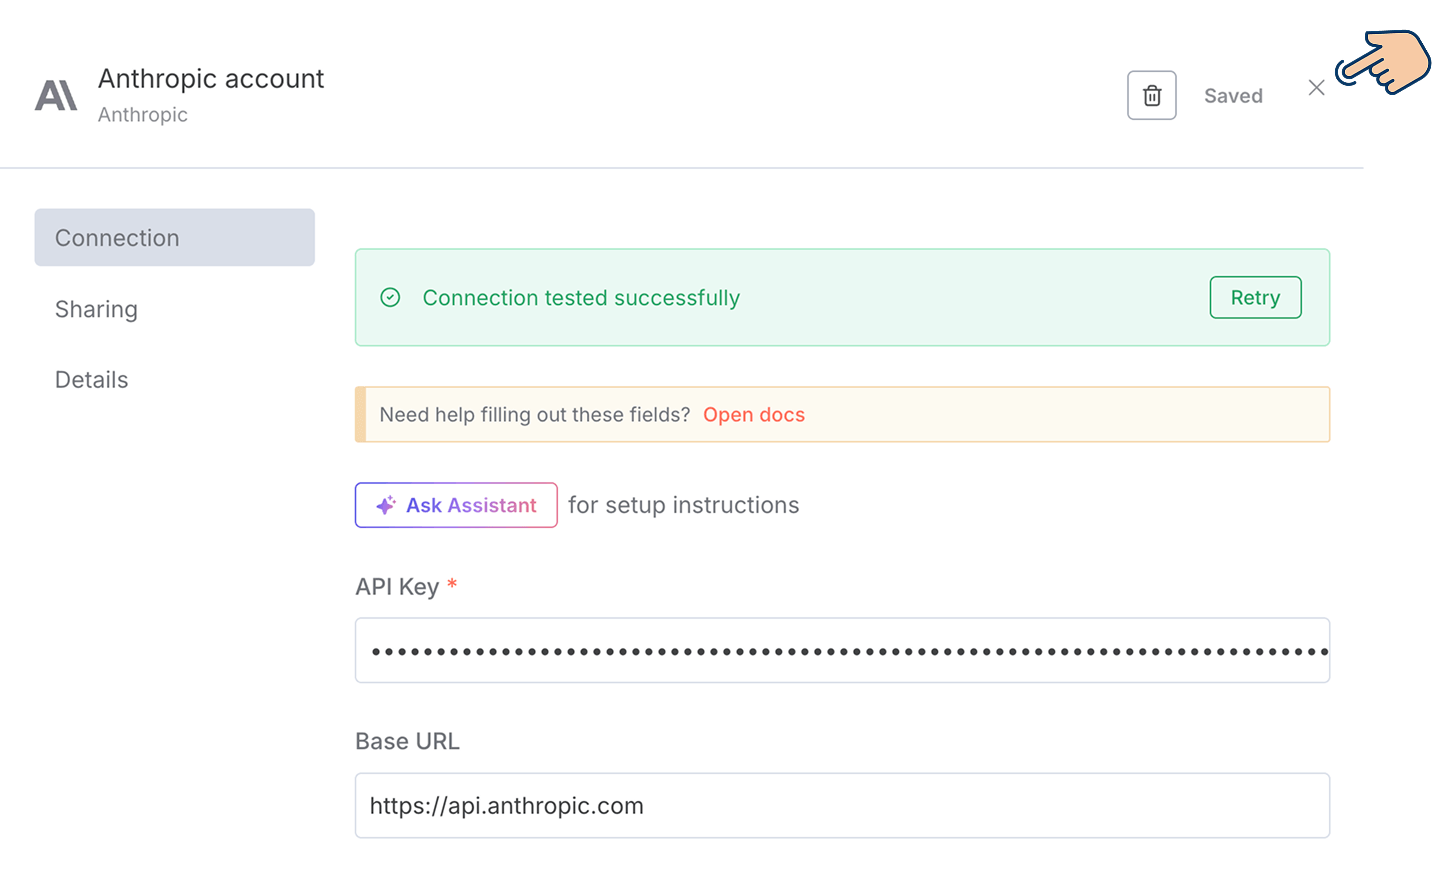
This means that we can now use the Claude AI Model of the Anthropic platform without ever leaving n8n.
Next, we need to configure the other options to utilize the Anthropic API properly
So, close the credentials pop-up so that we can access other setup options of the Anthropic-n8n connection:
Next, we need to choose a version of Claude's AI model for generating the article from the table of contents:

Claude Haiku 4.5 is a small AI model that is cheaper and faster when compared to Claude Sonnet 4.5.
But I like the content that Claude Sonnet 4.5 generates.
So, I will pick the Claude Sonnet 4.5 for the AI Model.
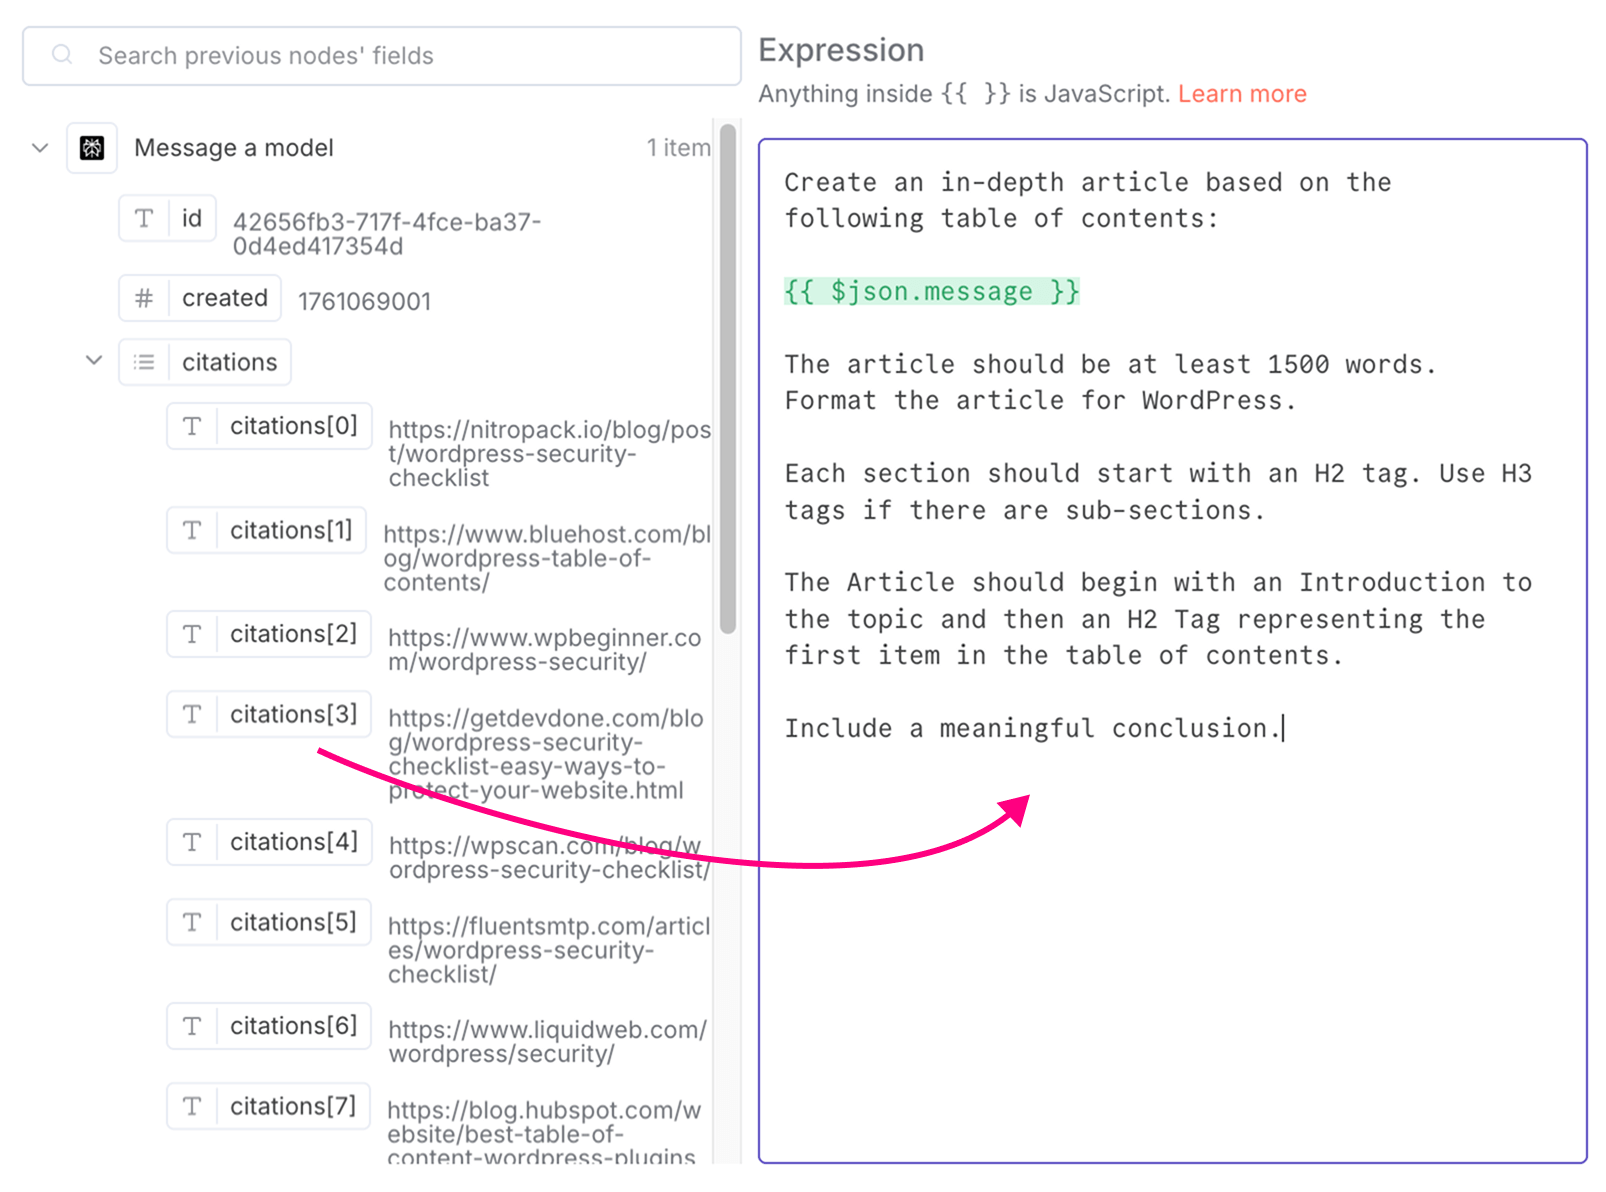
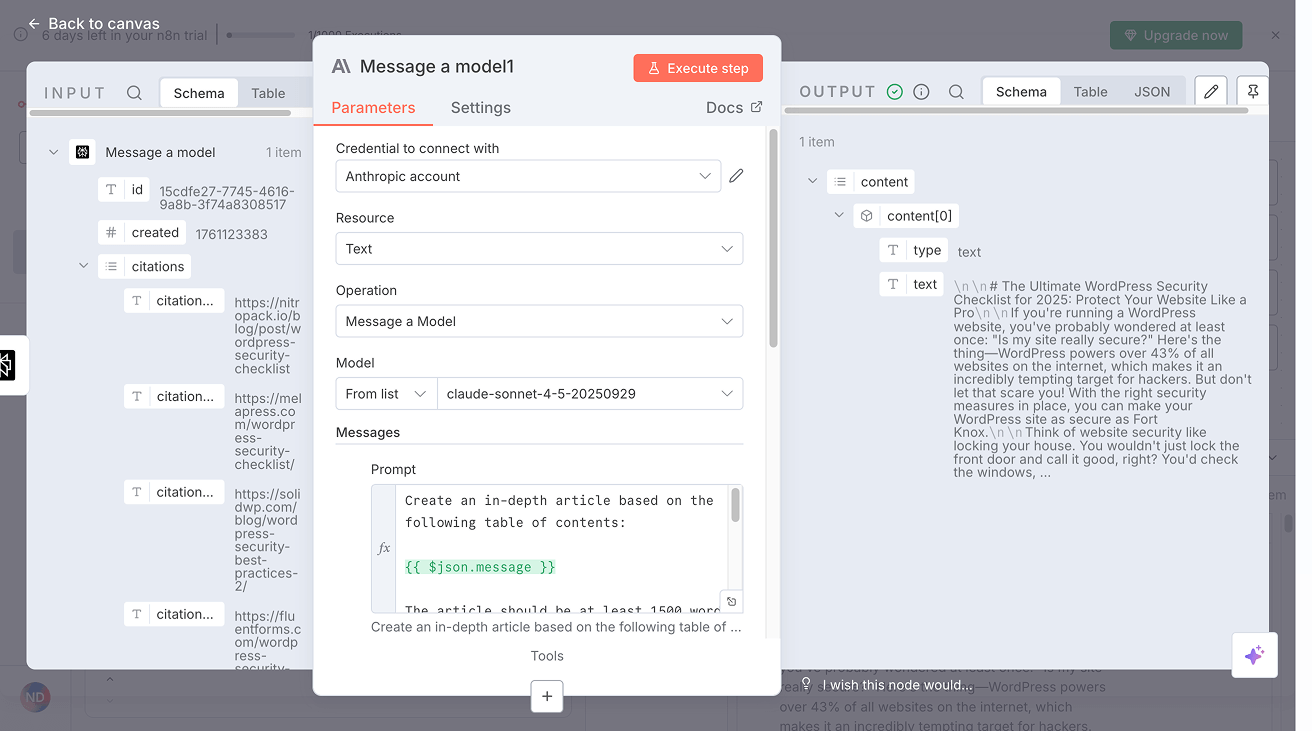
Next, as usual, we need to use the "Message" box for typing the prompt that will generate the article for us, and here is a basic prompt I am going with:
[Placeholder for table of contents]
The article should be at least 1500 words. Format the article for WordPress.
Each section should start with an H2 tag. Use H3 tags if there are sub-sections.
The Article should begin with an Introduction to the topic and then an H2 Tag representing the first item in the table of contents.
Include a meaningful conclusion.
If you notice, I have put a placeholder for the table of contents.
We need to replace this placeholder with a table of contents generated by the Perplexity node (previous node):
If you remember, the table of contents is in the message property of the Perplexity node's output data:
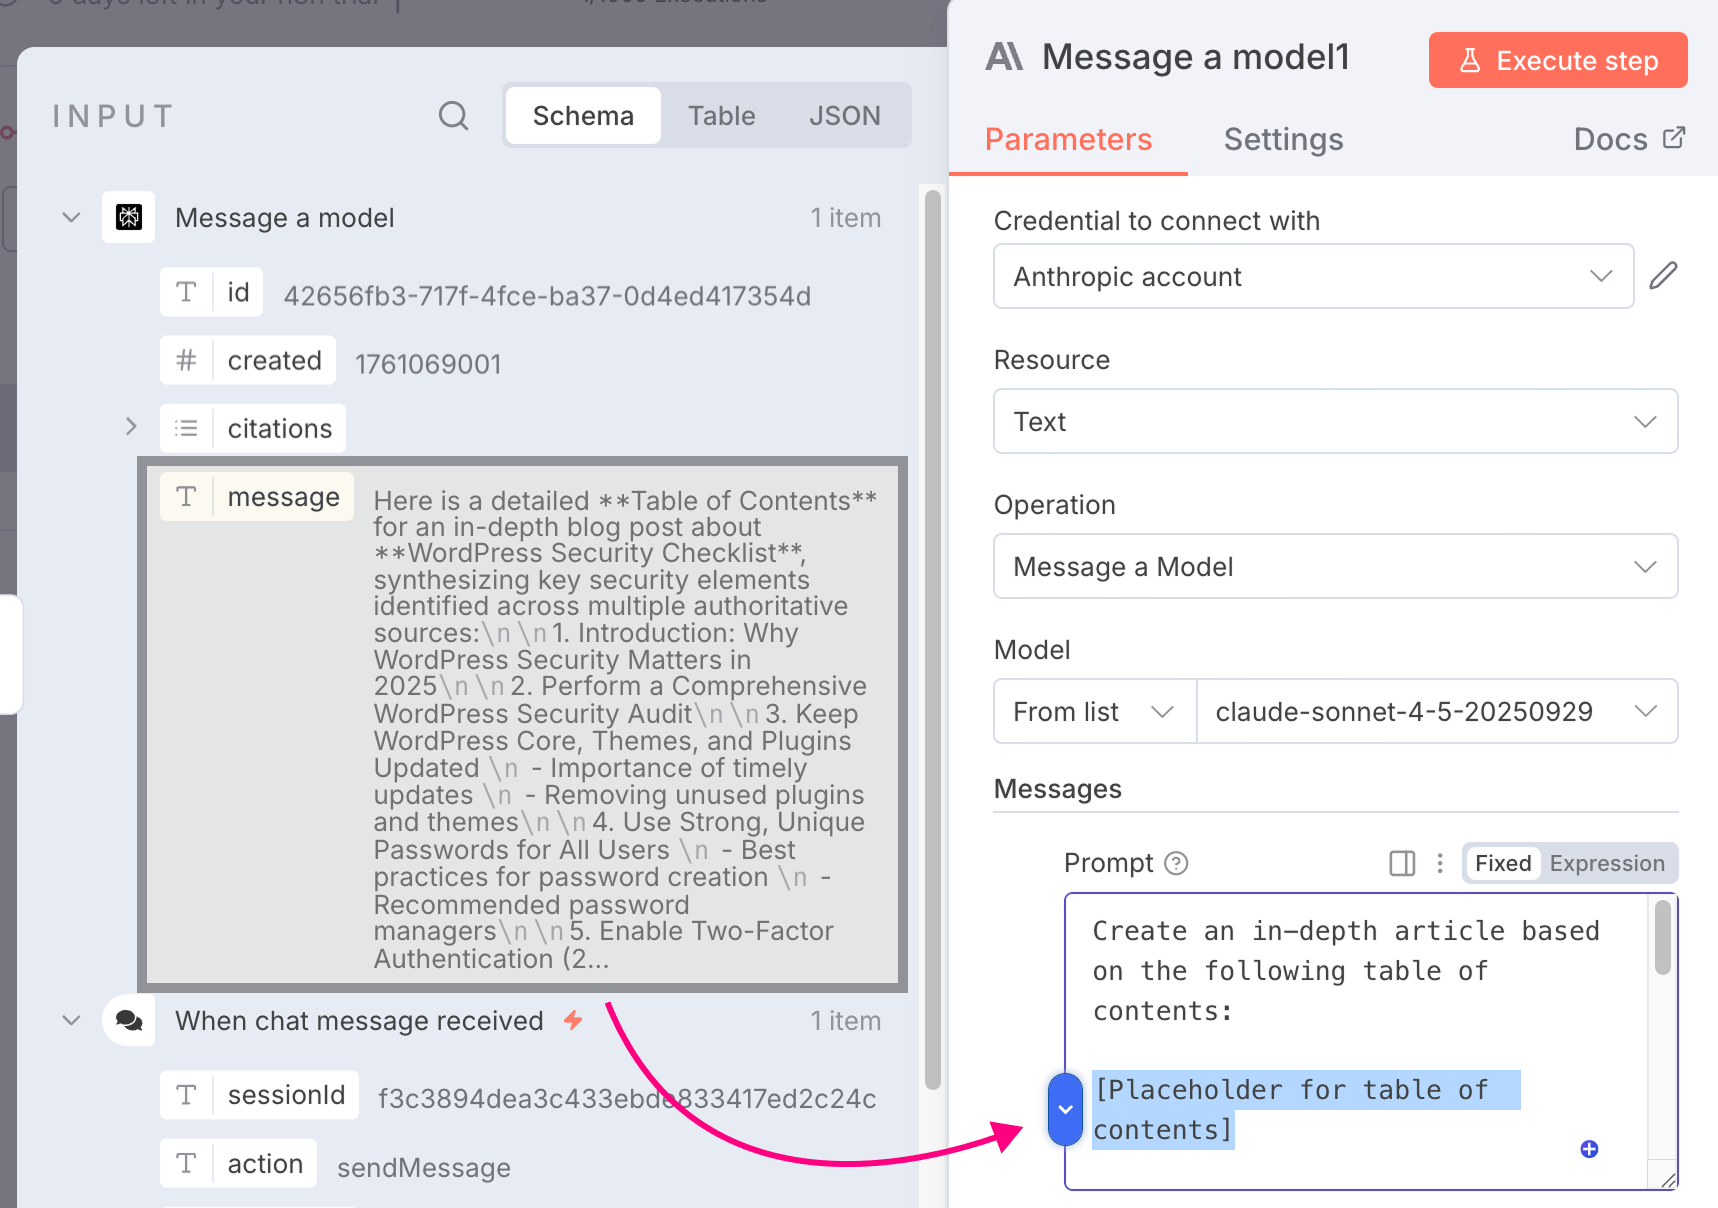
So, delete the placeholder and drag the message property from the Perplexity node into the "Prompt" box of Anthropic:
That's all.
We have now successfully embedded the table of contents that Perplexity generated into our prompt.
And n8n also processed message property in real-time, and you can see the final prompt by clicking on the little editor expander icon:
The expander icon is for expanding the editor for further refinement and for viewing the processed result of the dynamic values inside the editor.
For example, the expanded view of the editor will help you see the processed result of the dynamic JavaScript expression inside our prompt:
And while being on the expanded editor, you can also modify the prompt by dragging any input data property from any of the previous nodes:
Anyway, I think:
- The table of contents generated by Perplexity AI looks good
- The overall prompt for generating the article looks good, too
So, next, I will choose a role for the prompt.
And I am gonna go with the "user" role once again because we are asking the AI model to generate an article for us.
Again, it is just like logging into Claude and asking it to generate an article.

Next, I want to generate the article in my tone of voice.
To achieve it, we need to add one more message with the "Assistant" role.
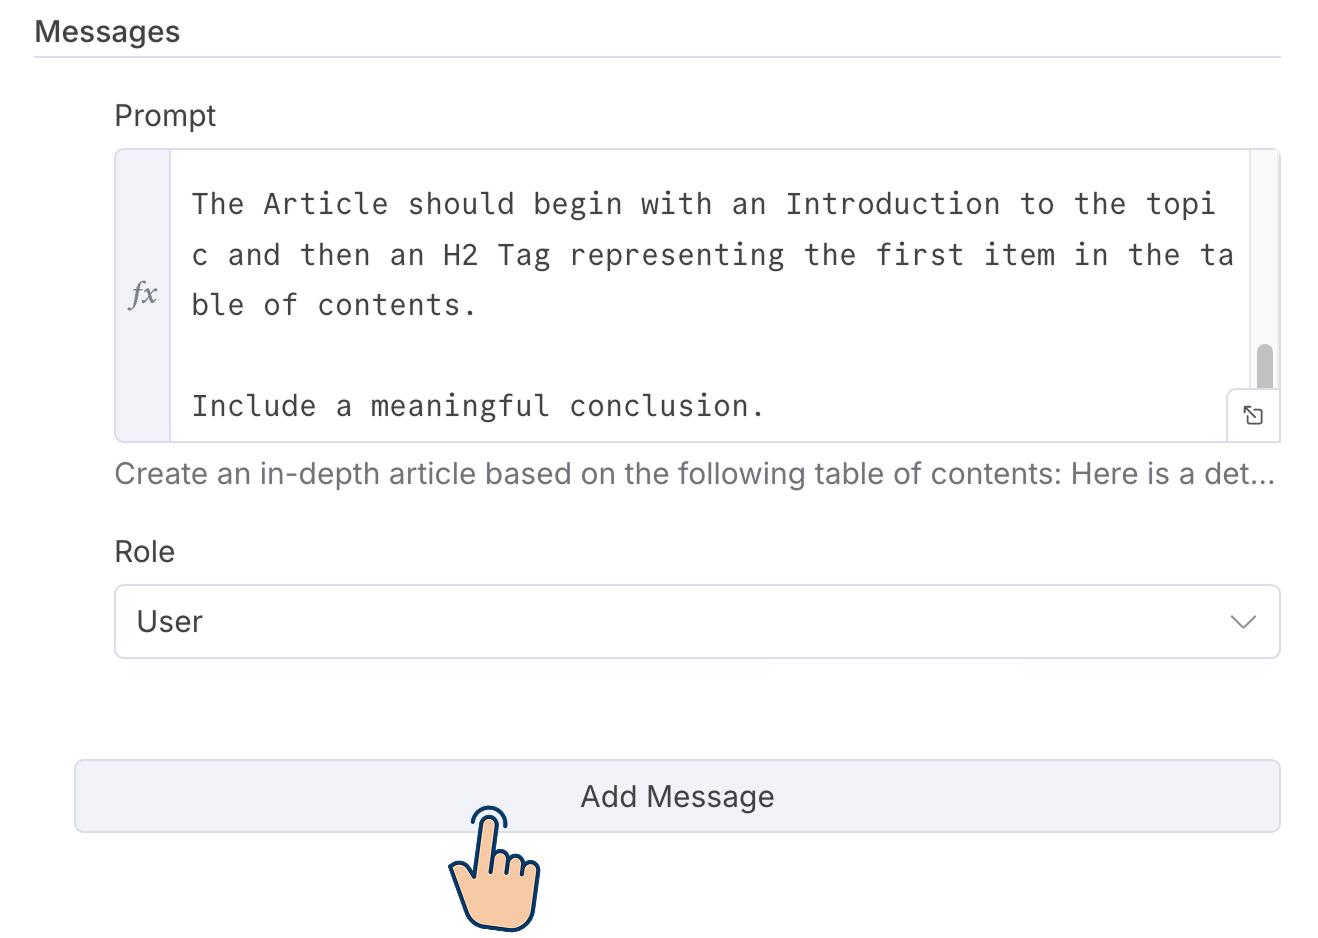
So, click on the "Add Message" button that is located right underneath the existing message with the "User" role.
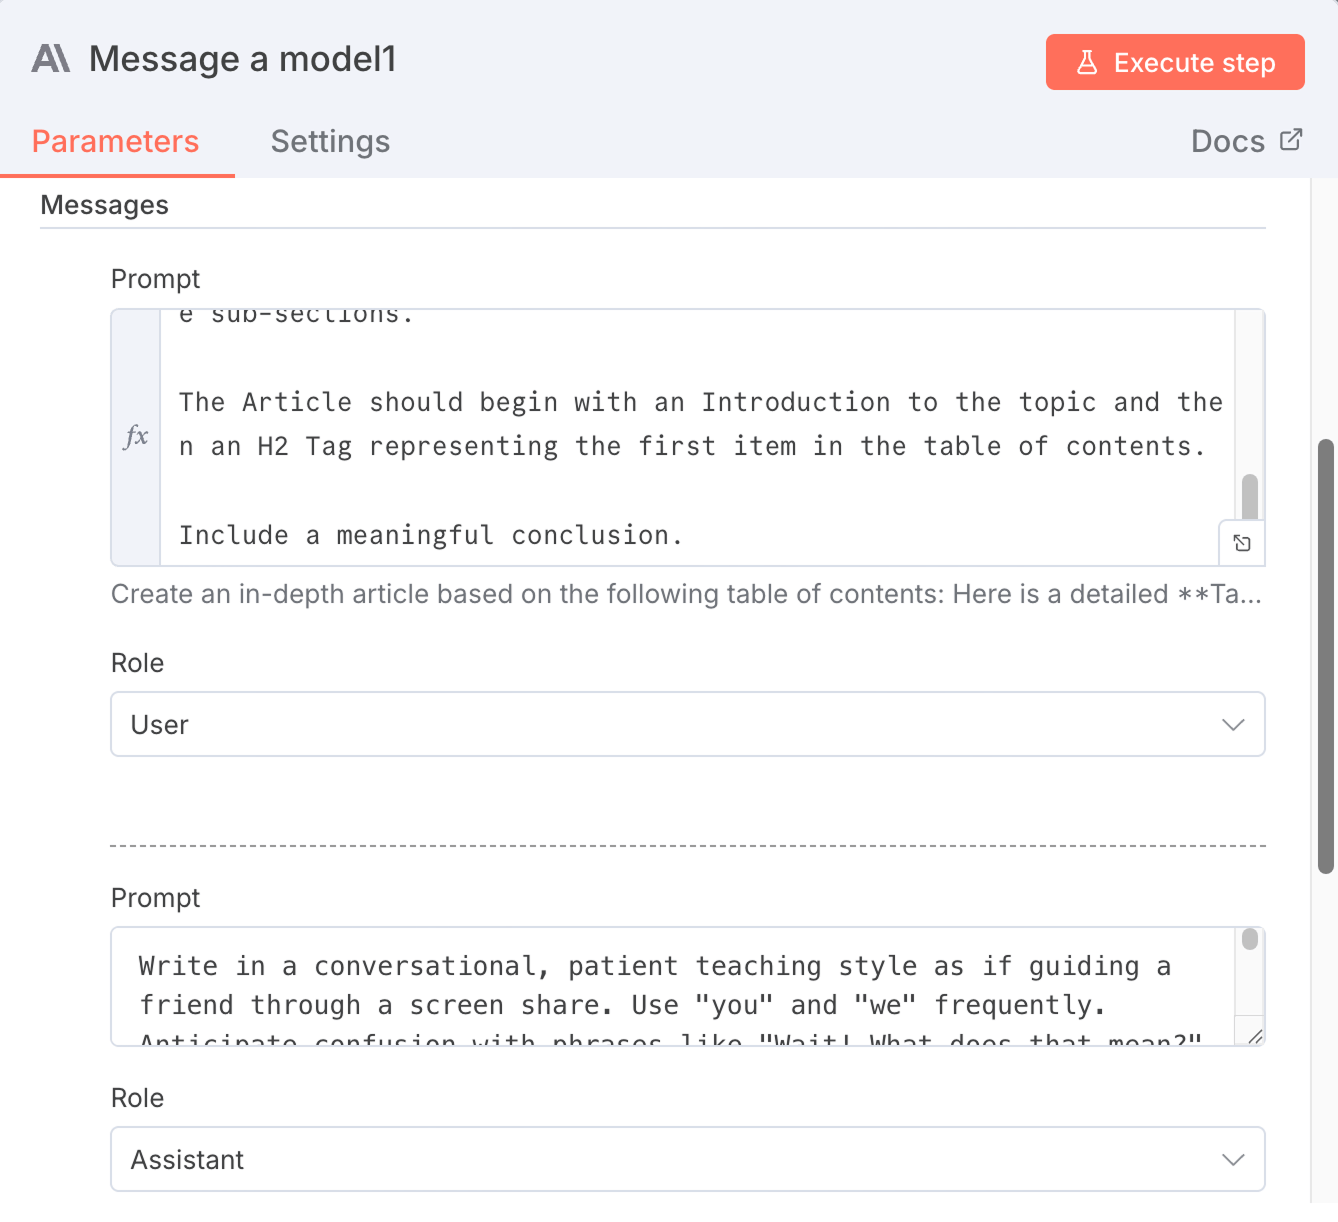
Next, put the following prompt inside the new message box:
As you can see, I want the article to have my tone of voice.
And for the role of the message, pick the "Assistant" because this role will help us change the tone of the article:
That's all.
Here is what my message configuration looks like:
Finally, enable the "Simplify Output" option and execute the node to test the result:
In my case, the execution was successful, and n8n populated the "Output" panel of the Anthropic node with an AI-generated article:
And the article reads basic.
But there is a good reason for that.
Since this lesson focuses on learning n8n rather than creating a professional-quality article, I have given a simple prompt for generating the table of contents and the article itself.
And basic prompt = basic result.
So, if you don't like the output of the article, you need to spend a good amount of time on crafting a detailed prompt.
The effort you put into the prompt makes all the difference.
Got it. But hey, I noticed that the Anthropic node has an option to add tools to it, and it is not present on the Perplexity node. Why is that?
Good observation.
The Anthropic node is an "AI Agent" node. It is not a normal node like the Perplexity node.
Having said that, it is optional to utilize the agentic capabilities of an AI agent node in n8n.
And discussing AI Agents is out of scope for this article. We will discuss that in an upcoming lesson.
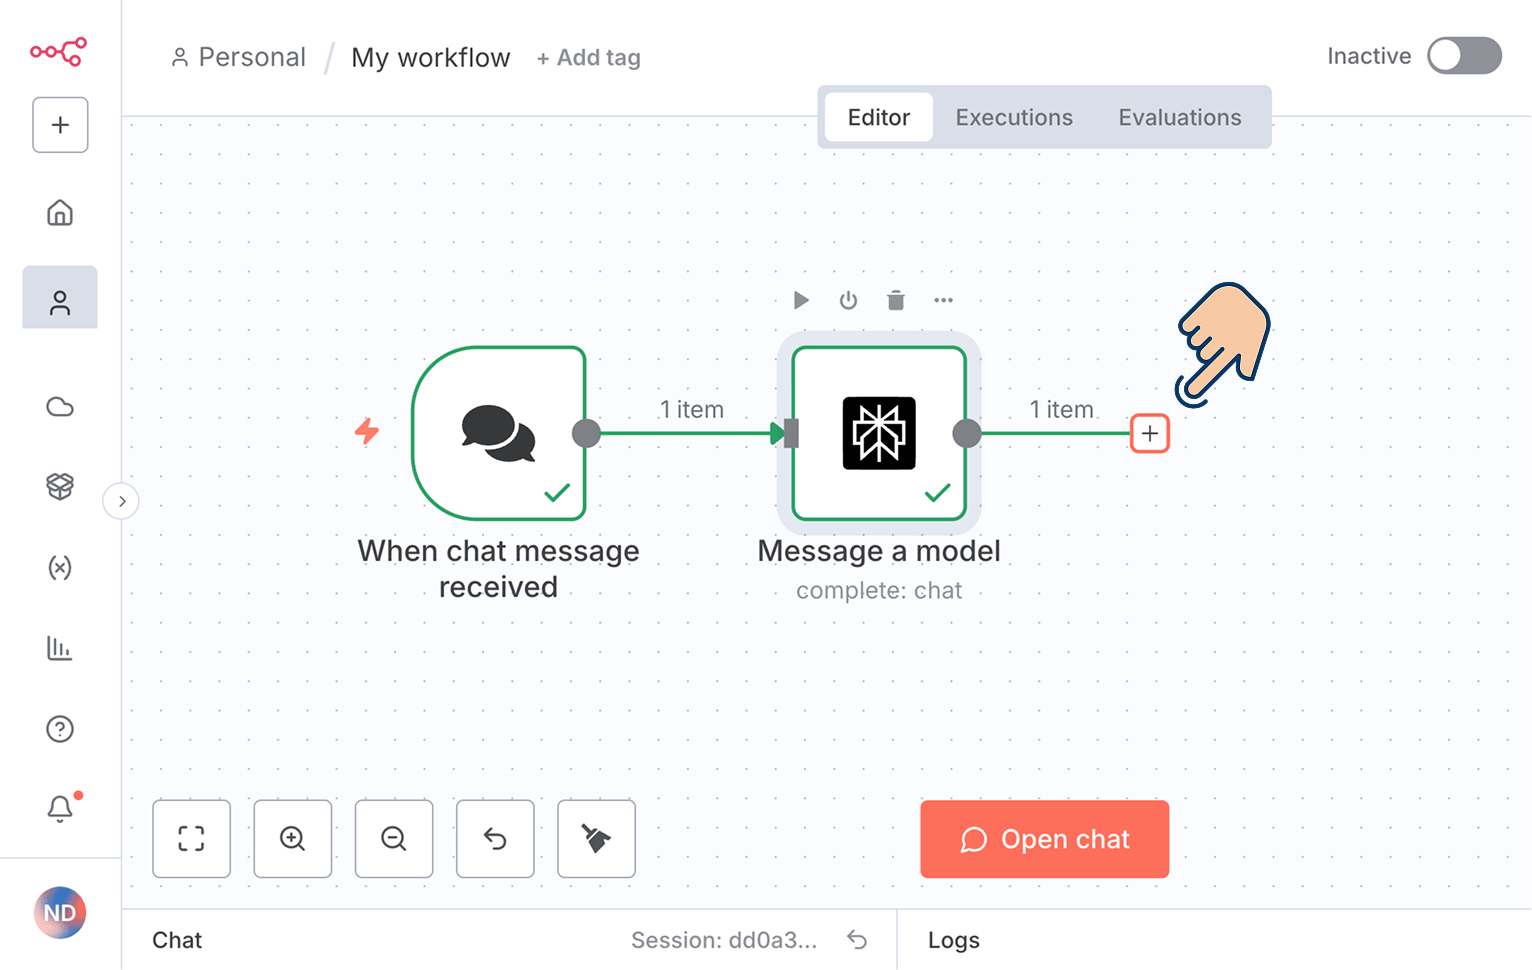
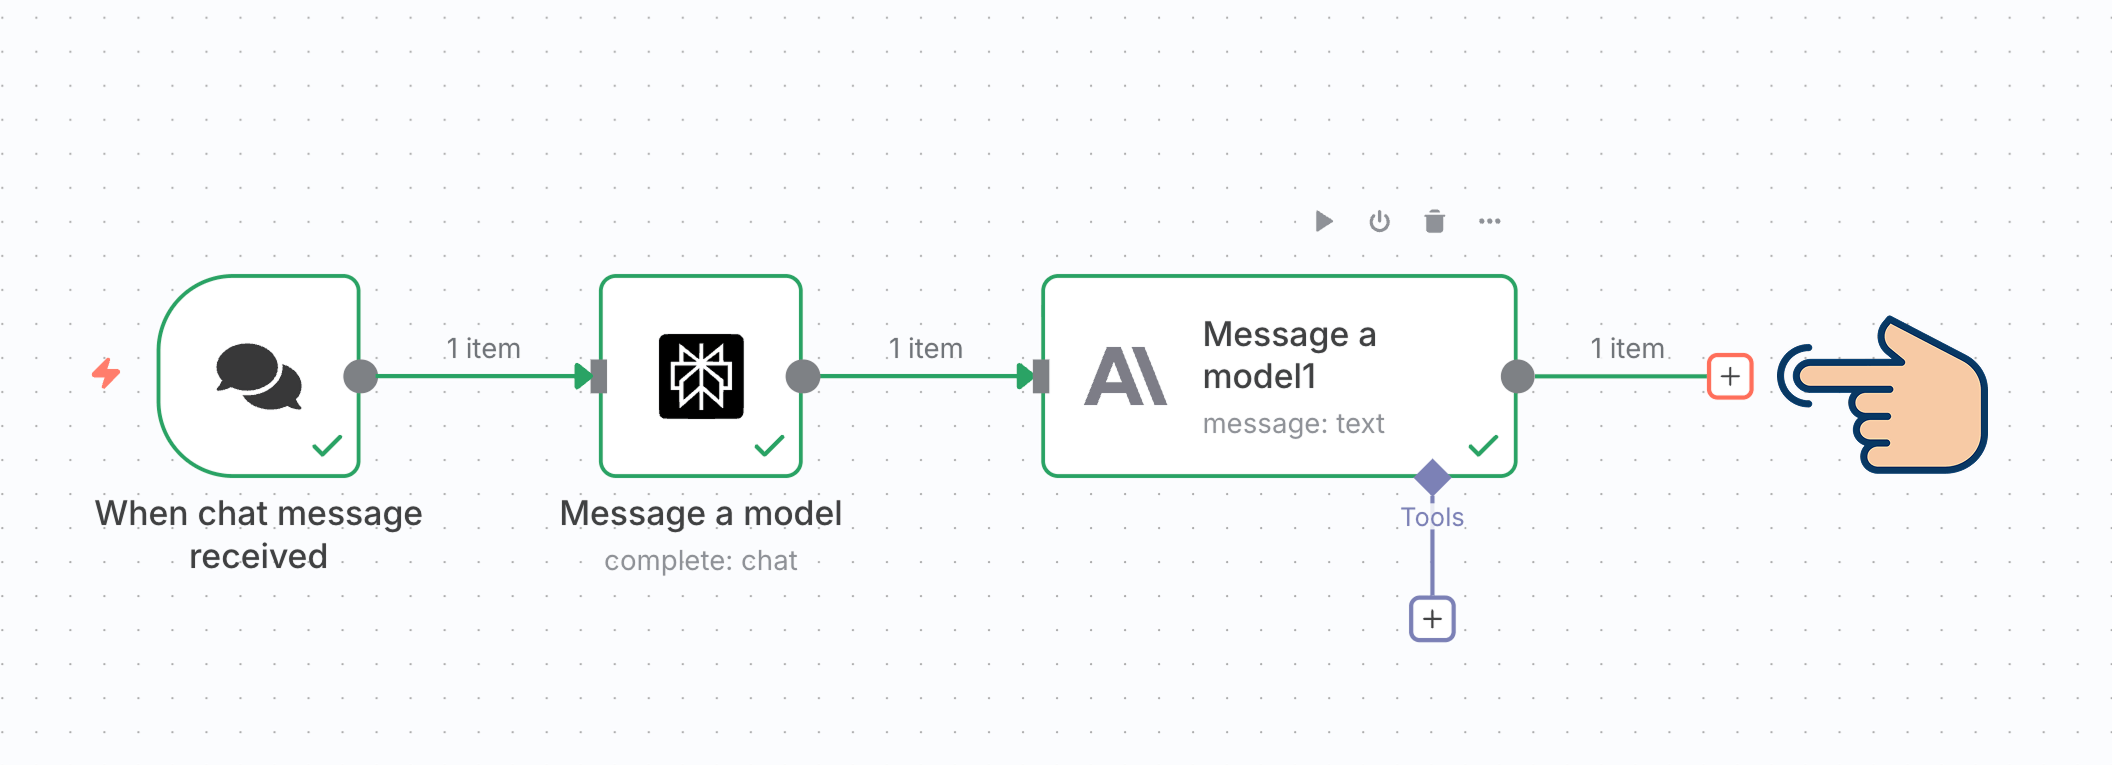
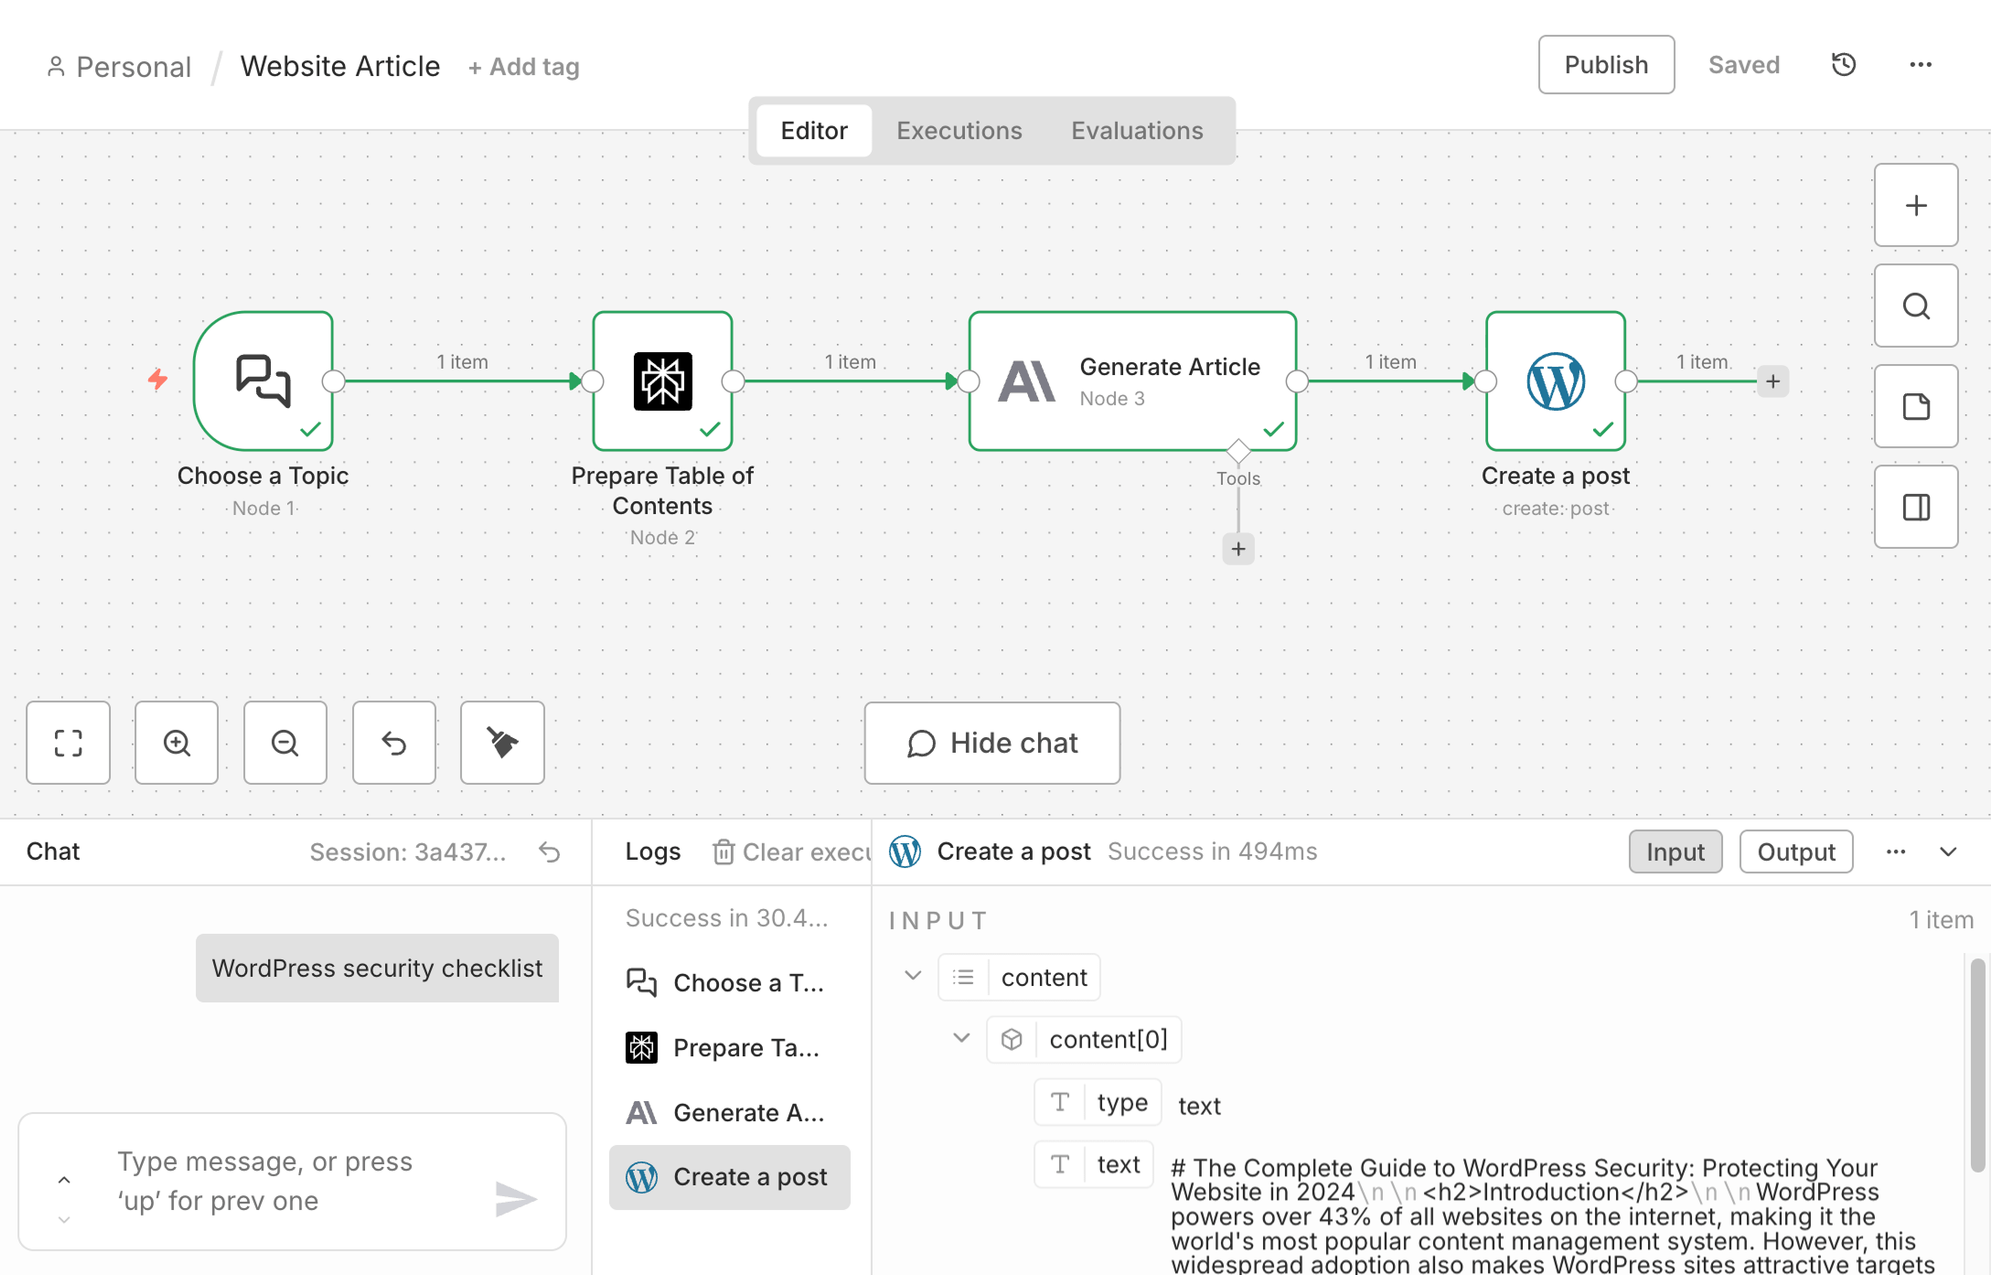
Anyway, here is the progress we made so far:
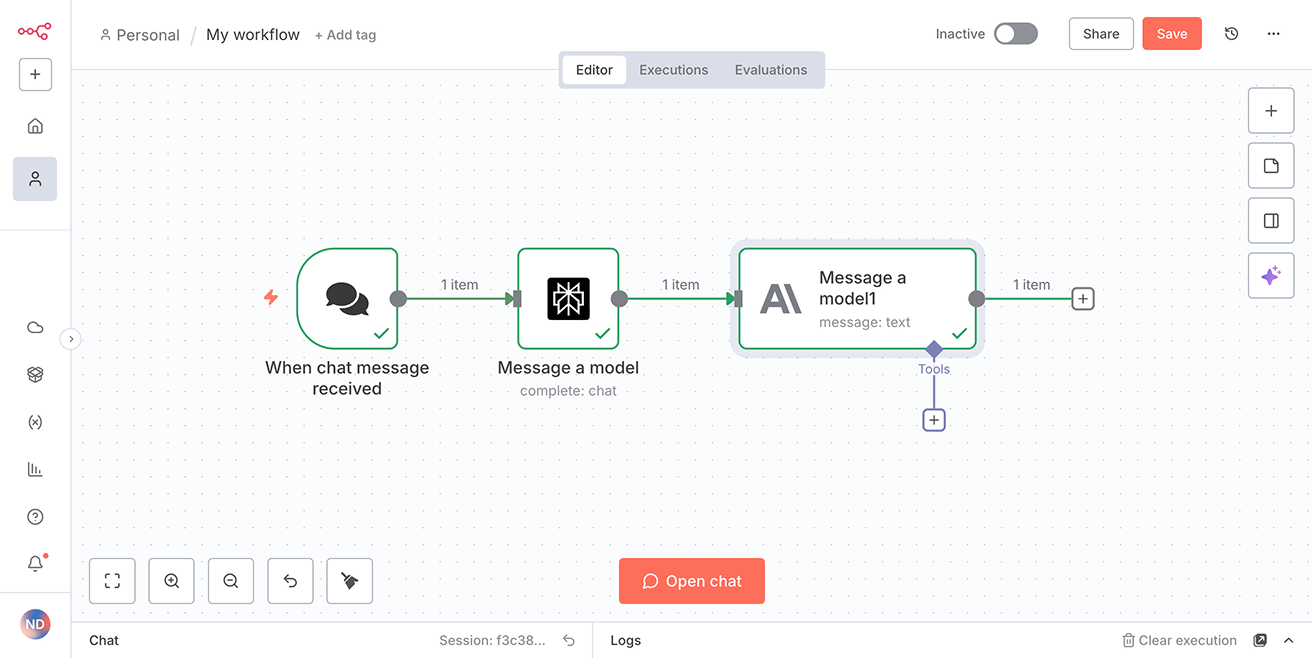
We've built an intelligent content generation pipeline that generates an article based on the topic provided:
- We initiated the process using the "When chat message received" trigger node to capture the topic for the article.
- Next, we connected with Perplexity API using their "Message a model" node to generate an organized table of contents from the topic.
- After that, we connected to Anthropic's API and generated an article using their Claude AI model by providing a table of contents generated using the Perplexity API.
Next, let's move forward to the last step of our automation.
How to publish the article generated by Claude to your favourite CMS
If you don't have a WordPress site, take it as a challenge to finish the automation by connecting to any CMS API you prefer.
You have already learned how to connect with two different APIs (Perplexity and Claude).
So, connecting with another API is not going to be hard.
But if you decide to follow along with me, click on the "Add node" button yet again:
And search for the "WordPress" platform:
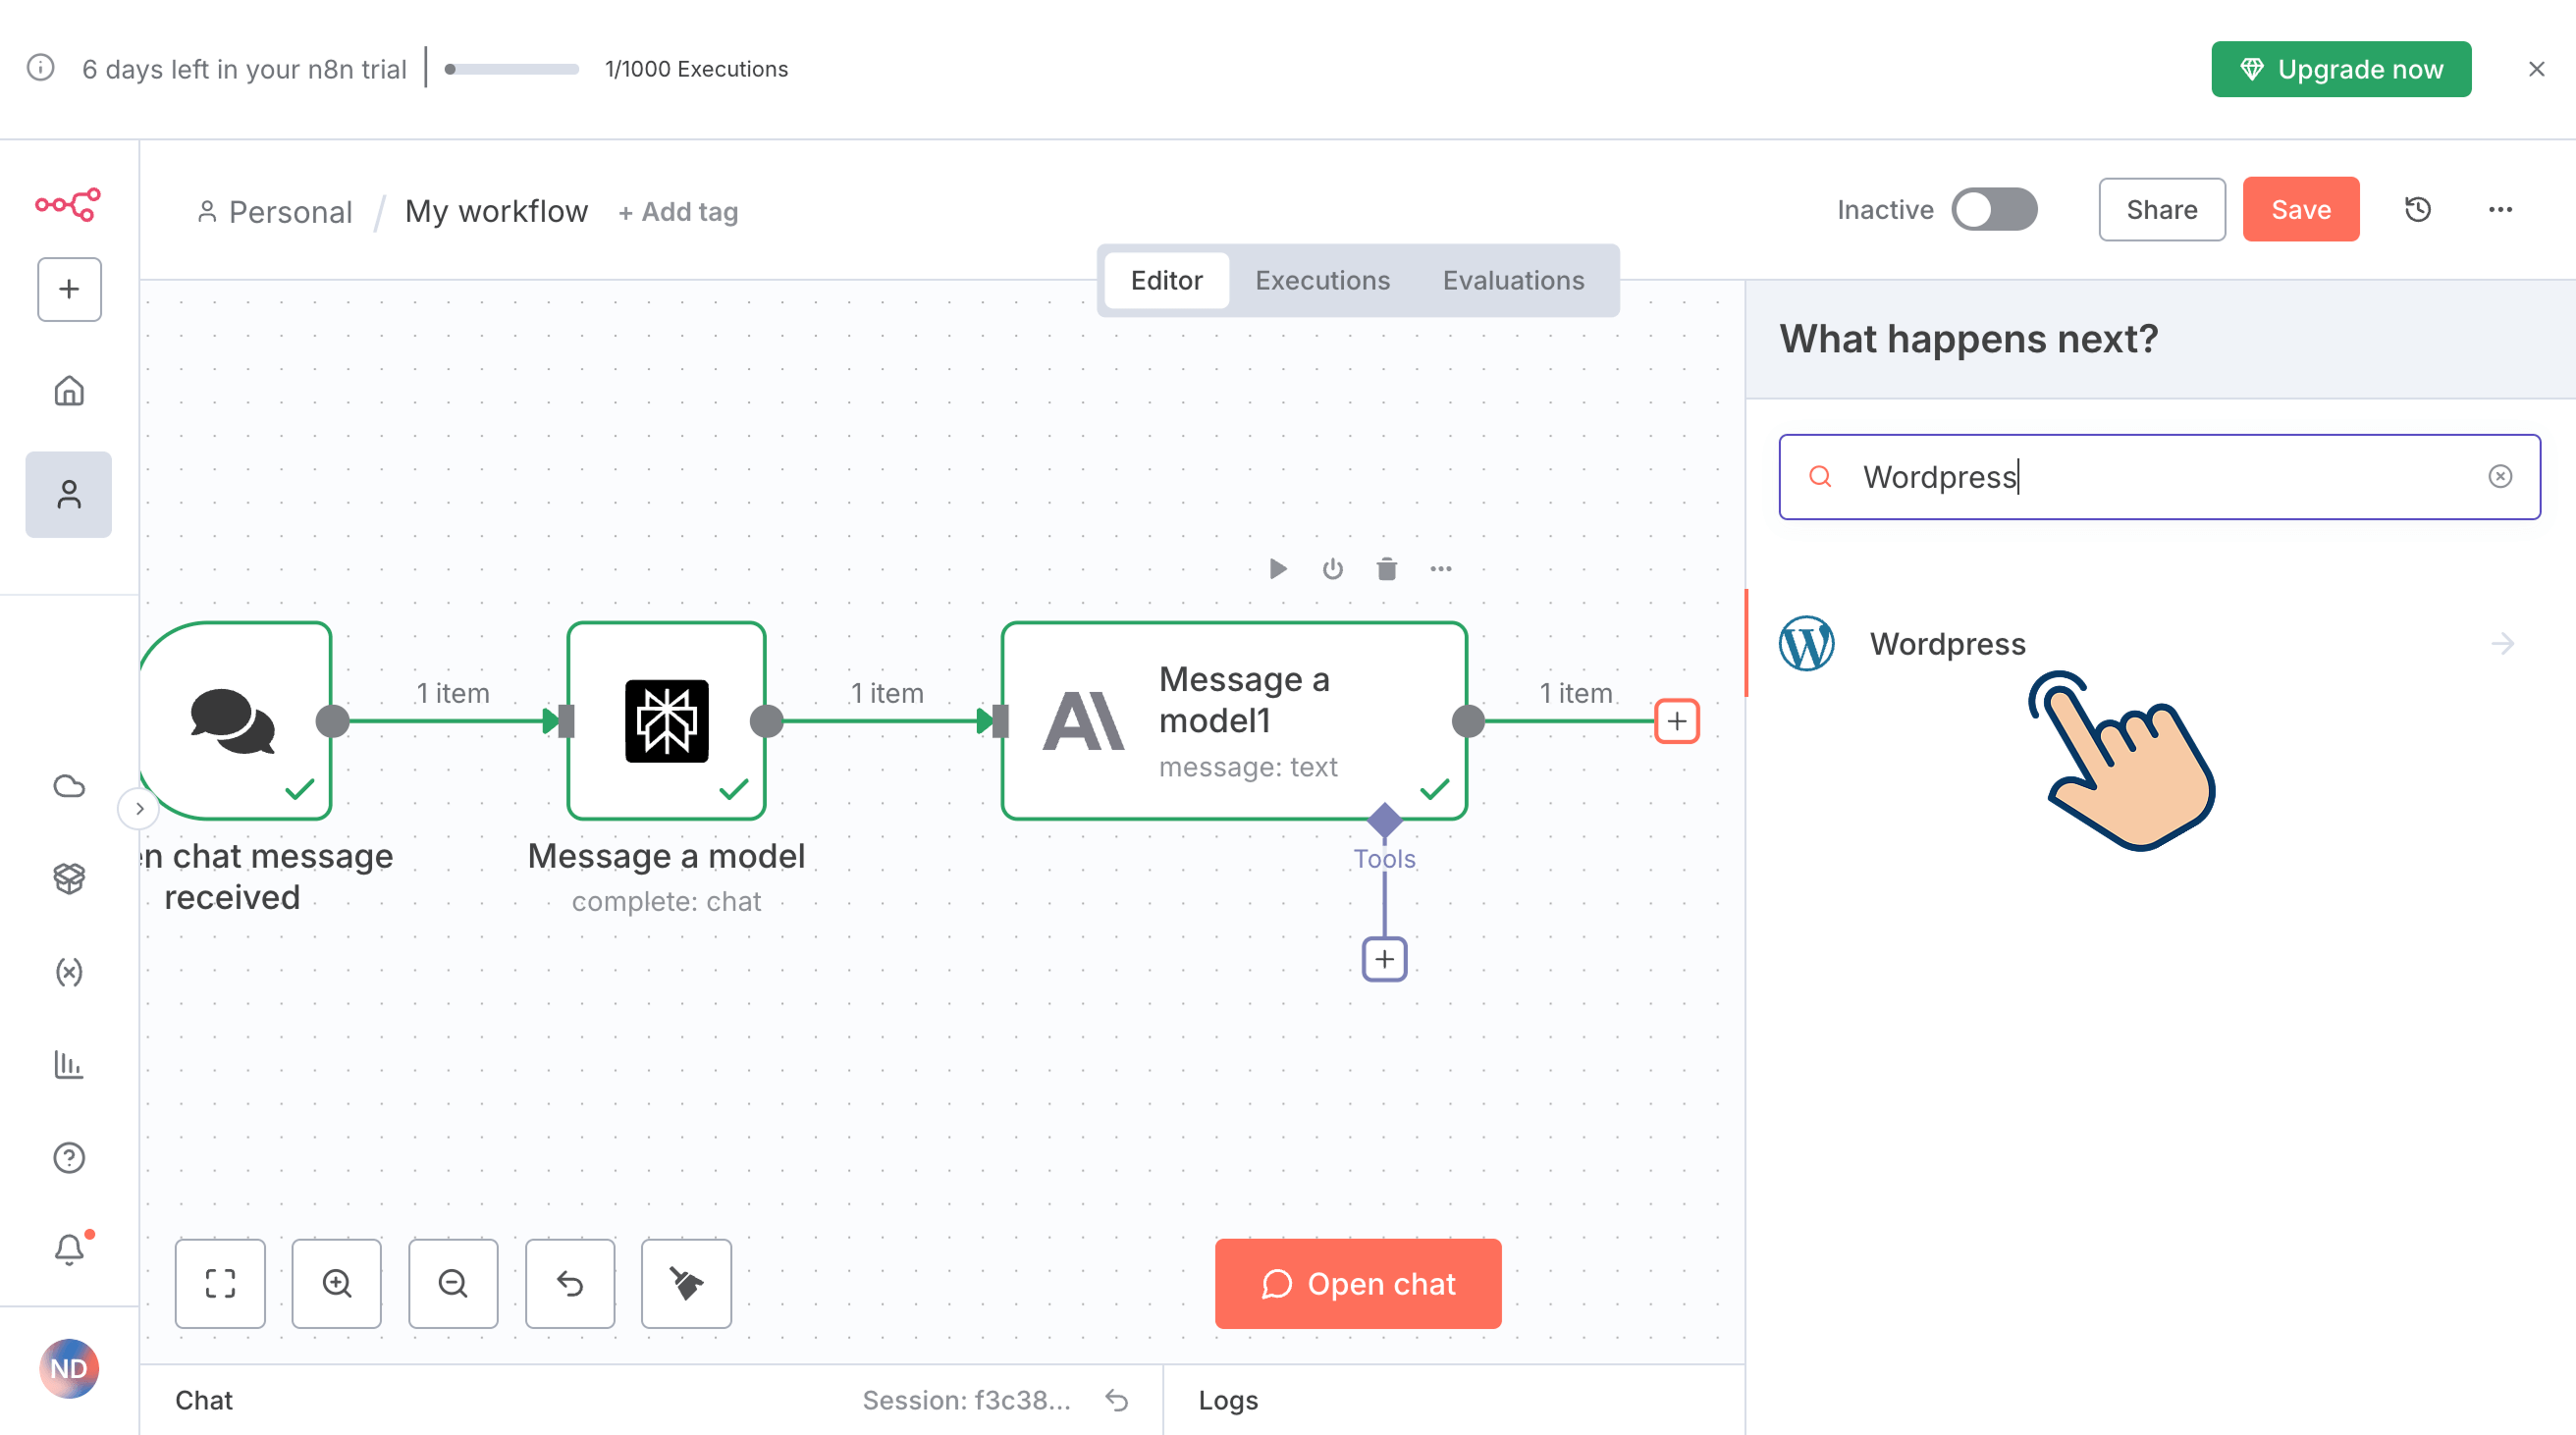
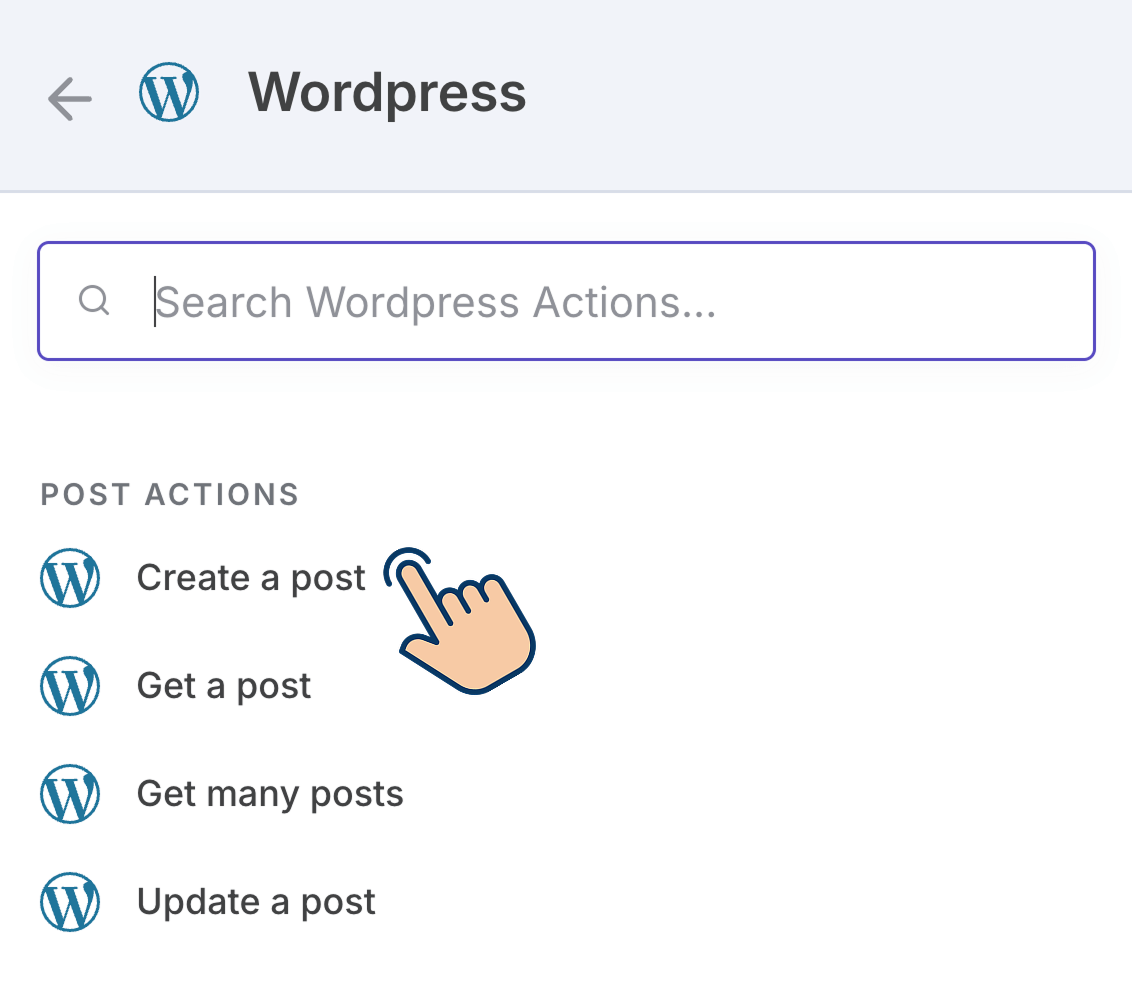
Next, pick the "Create a post" node because we are trying to create a blog post:
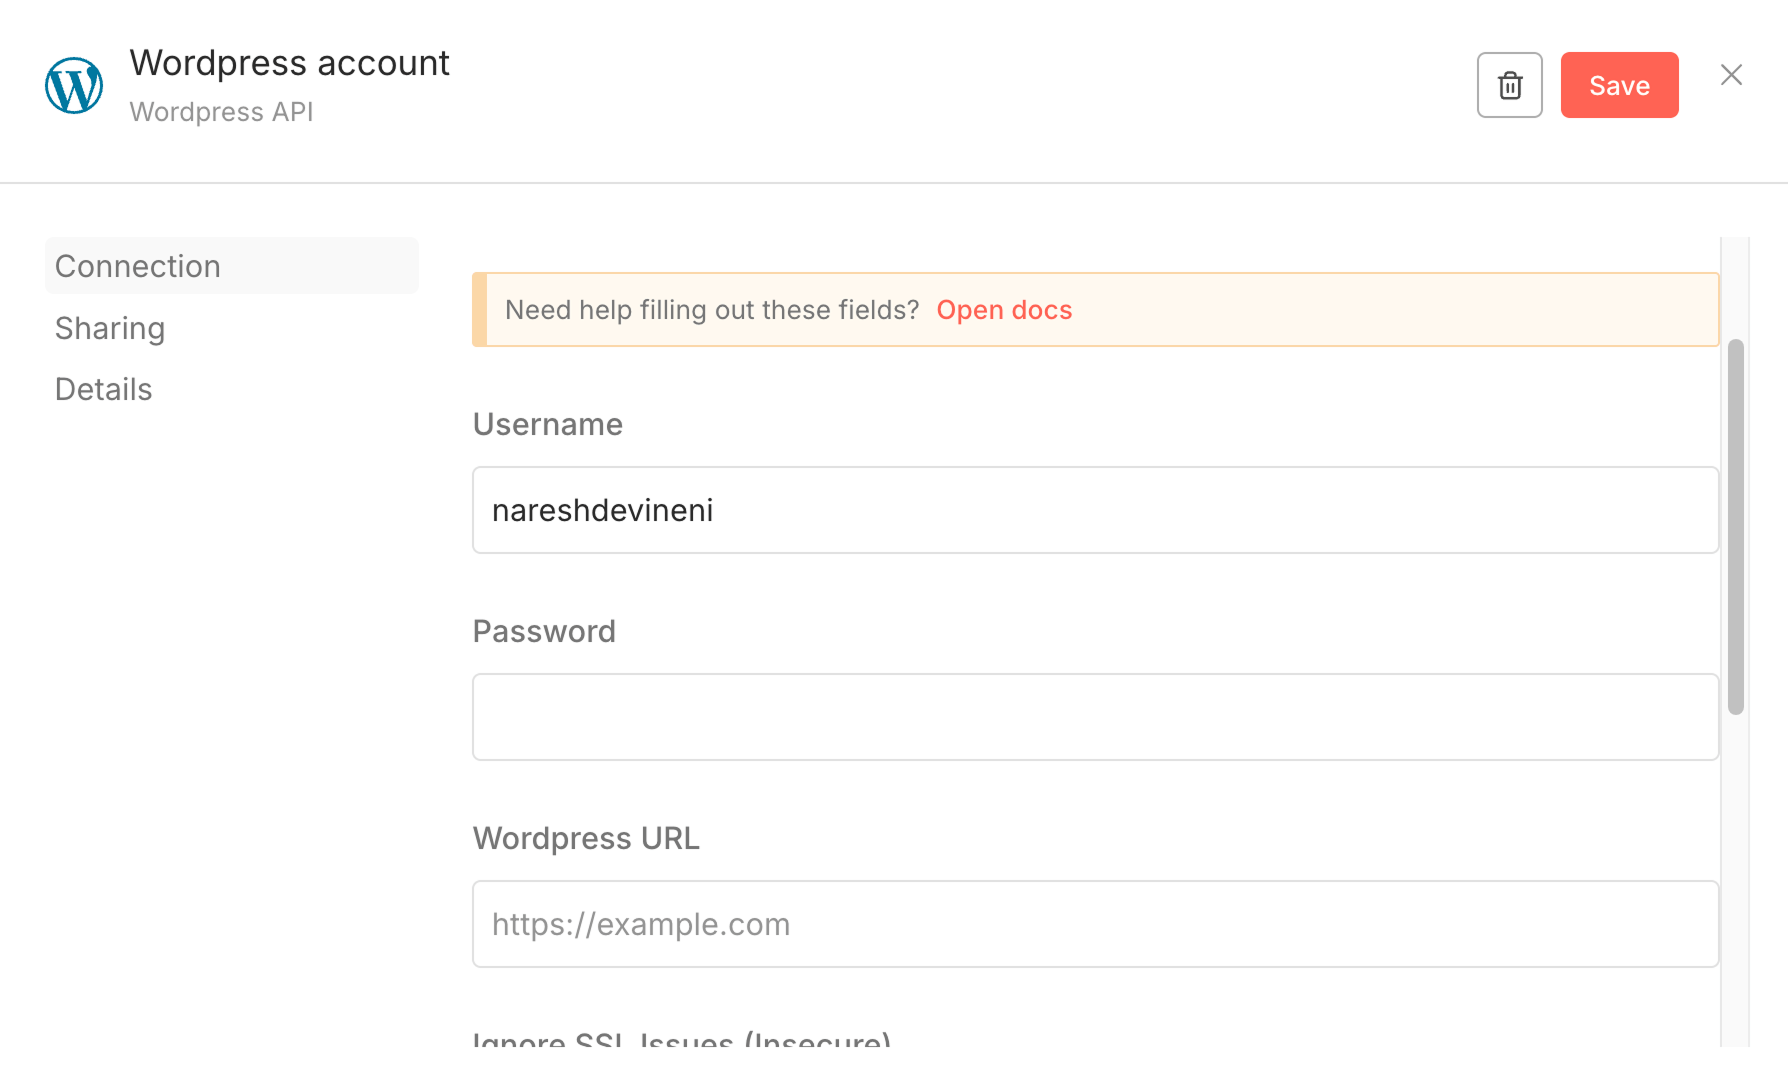
Next, to connect with the API of your WordPress site, click on the "Create new credential" button as usual:
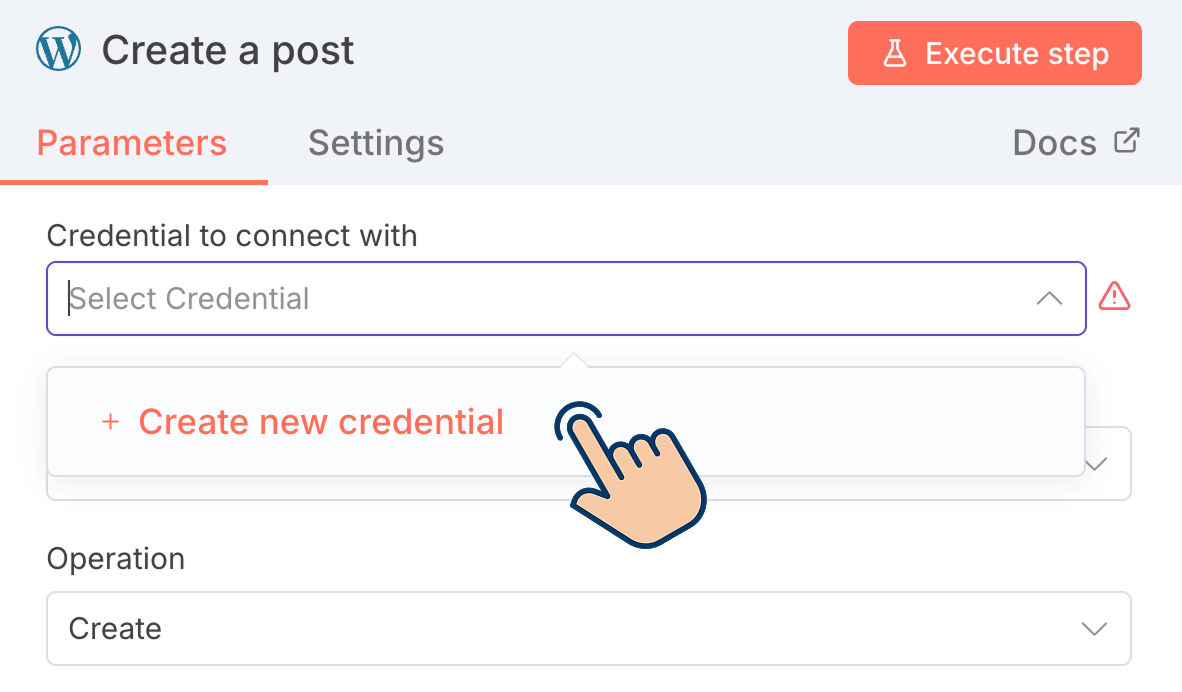
It takes you to the screen where you can enter the API credentials.
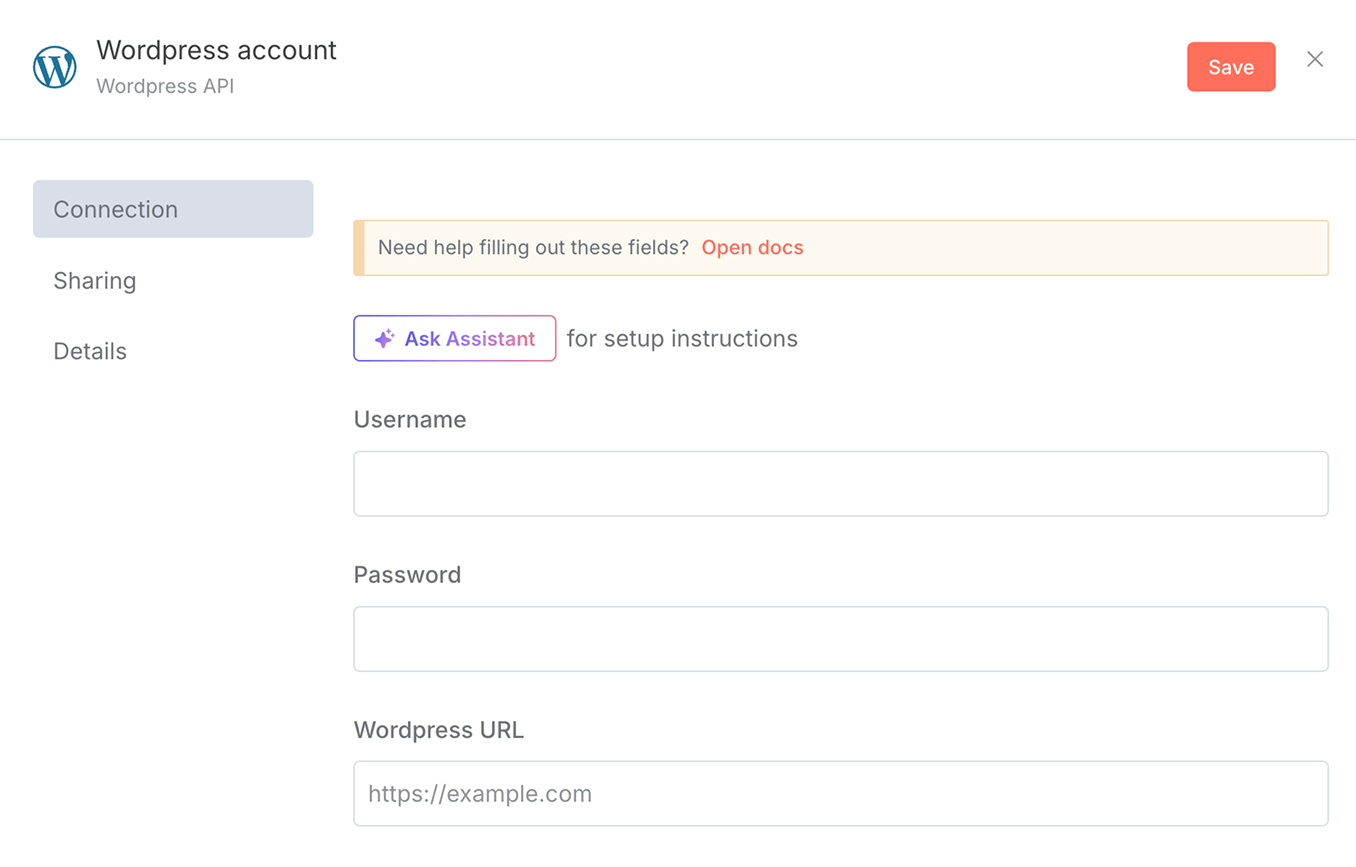
Now, the thing is, creating API credentials for a CMS like WordPress is slightly different from that of other services.
Unlike creating an API key, we need to provide the following values as credentials for accessing your WordPress site via API:
- Username of an admin account from your WordPress site
- Application password
- WordPress site's URL
Password?
I know what you are thinking. But that is not the case. Don't worry.
We are not talking about your main account password. It is not safe to share it with anyone, and the n8n team knows this.
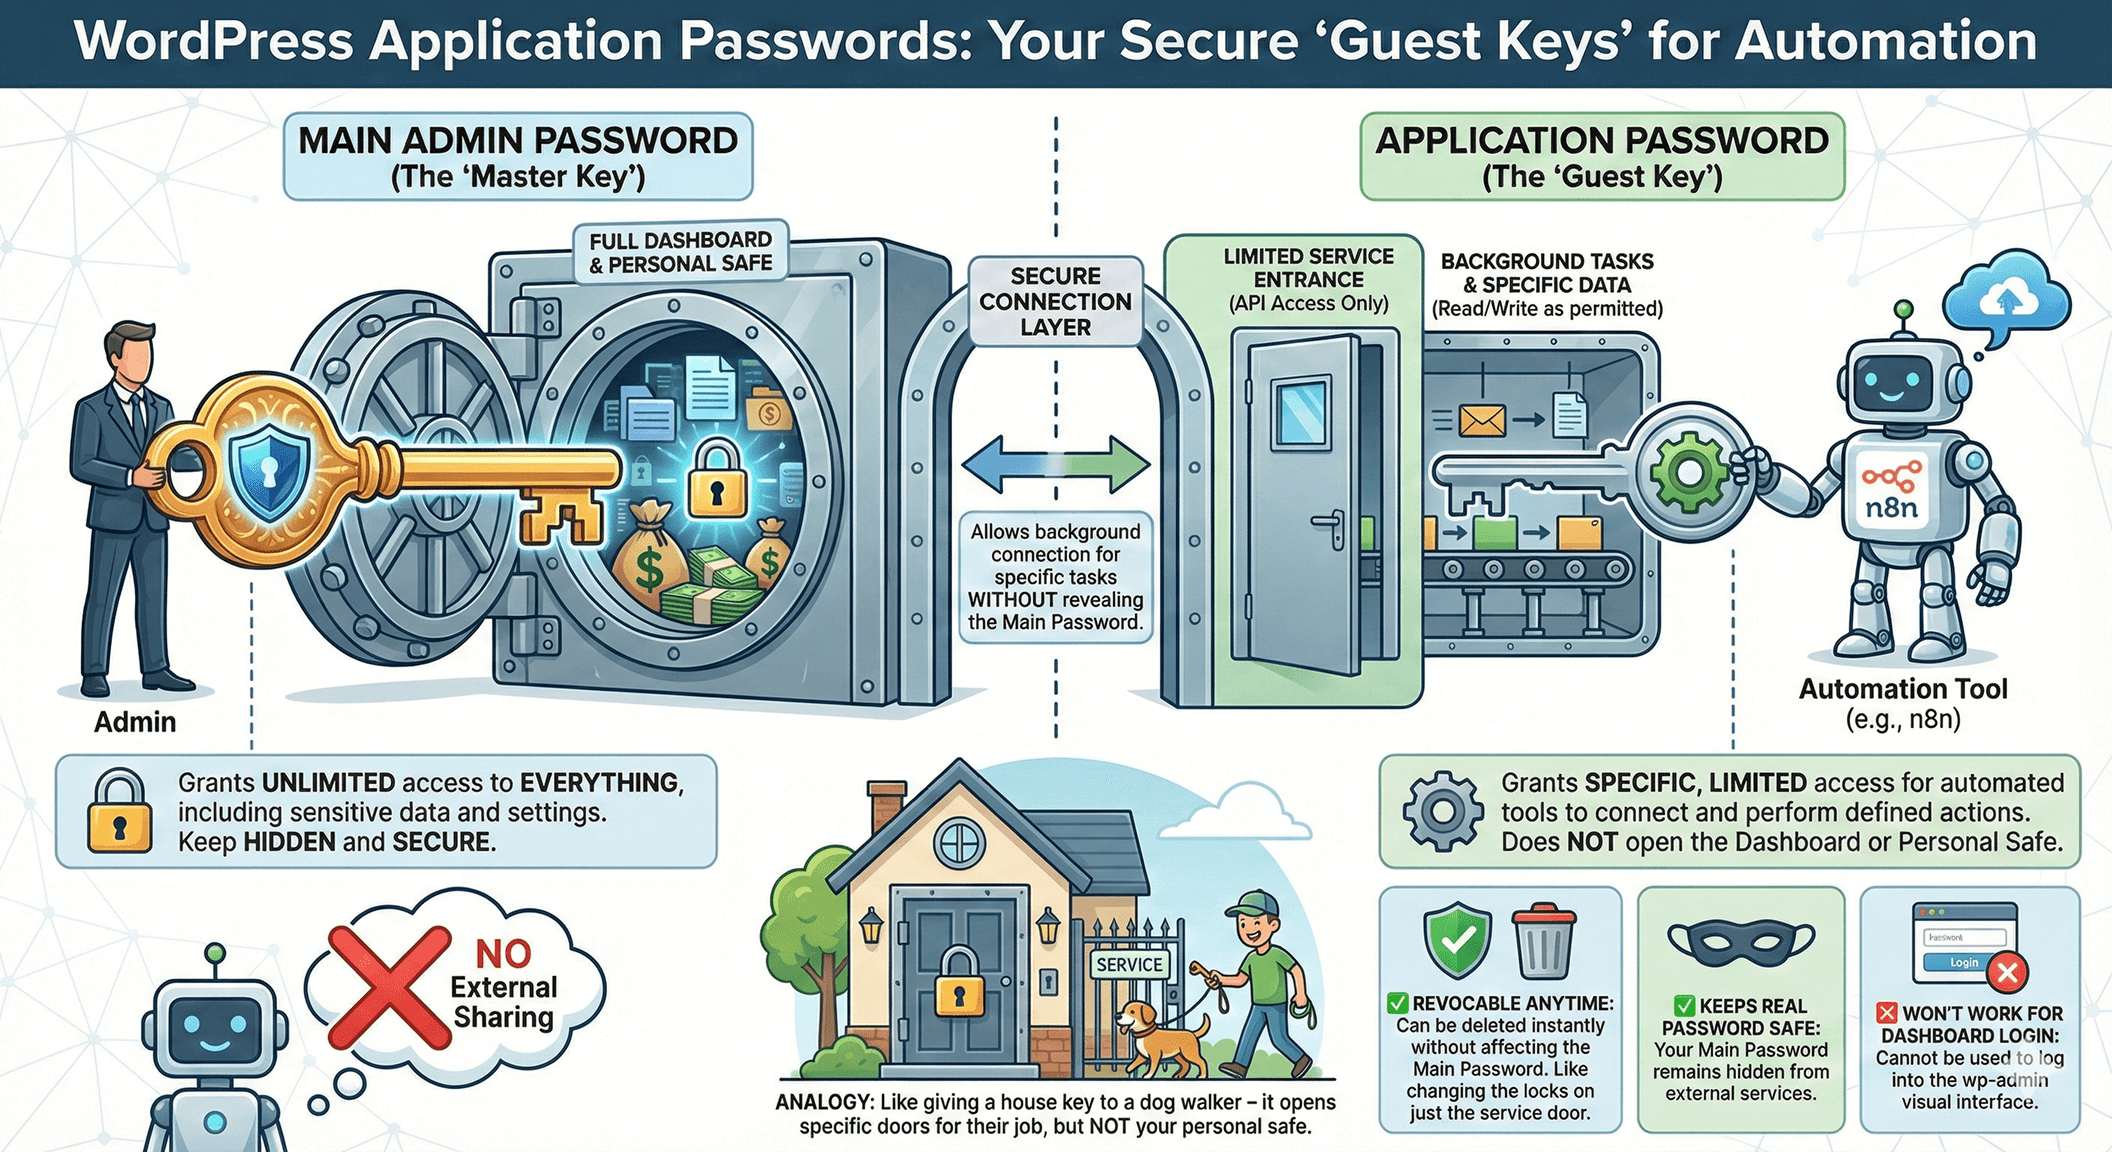
An application password for your admin account is different from your main password.
We cannot use an application password to log into the WordPress dashboard.
An application password is similar to an API key; WordPress just uses different terminology.
In other words, application passwords let other apps and tools connect to your WordPress site safely. They work like special "guest passwords" that:
- Allow automation tools like n8n to access your site in the background
- Keep your real password hidden and safe
- Can be deleted anytime without affecting your main password
- Won't work if someone tries to log into your website's dashboard
Think of it like giving a house key to a dog walker - it opens specific doors but not your personal safe.
Anyway, let's quickly get these credentials so that we can publish the AI-generated article.
How to find the username of your WordPress admin account
To get the username of your admin account, first, log in as admin to your WordPress site.
This will take you to the Admin dashboard of your site.
Next, from the admin menu on the left, go to:
Users -> ProfileThis will take you to the screen where you can edit the details of your admin account.
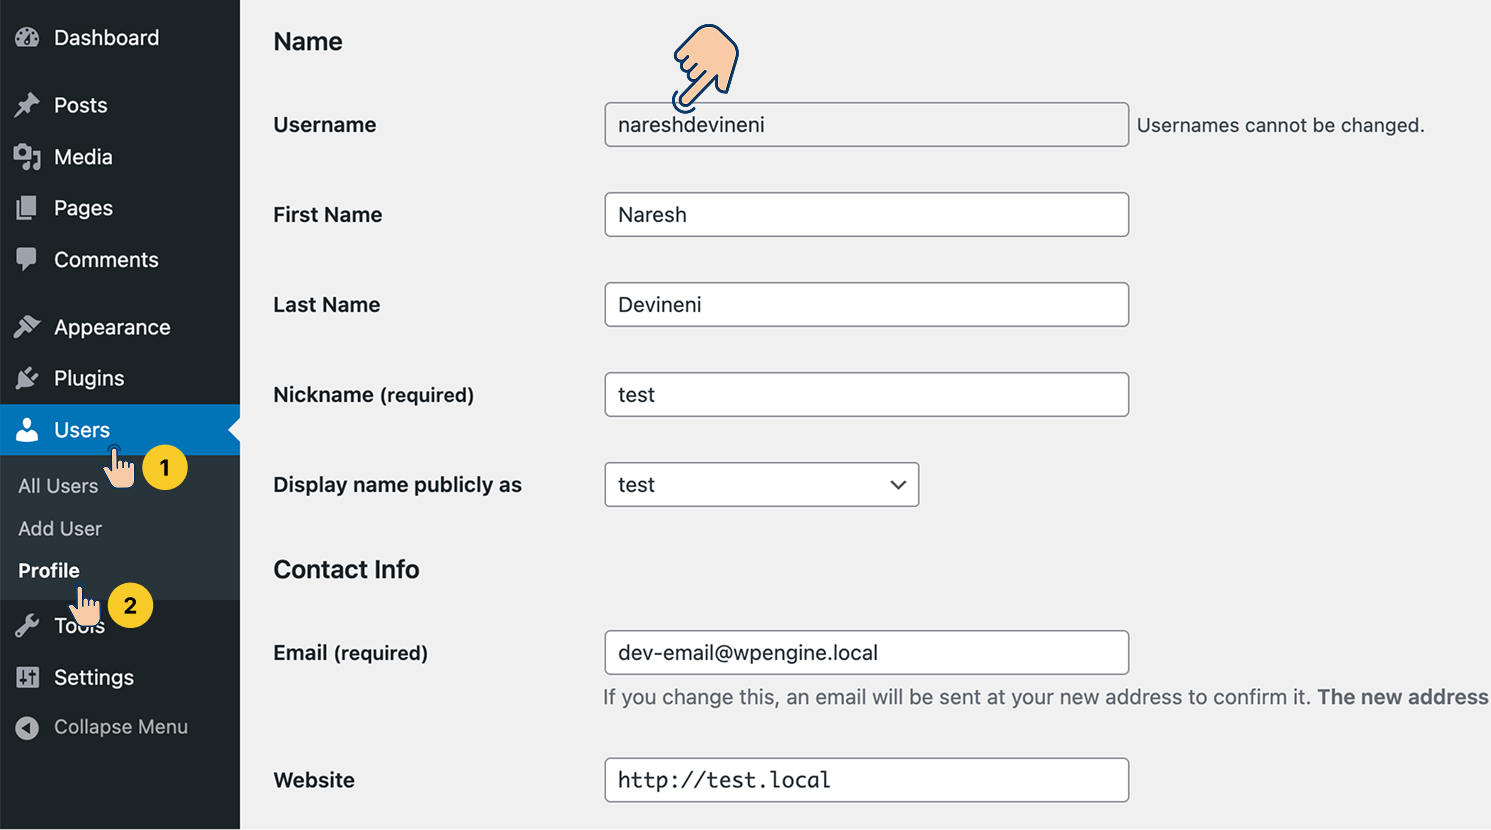
Next, scroll until you find the "Name" section, and copy the username.
Then, go back to the n8n automation and paste it into the "Username" field:
Next, to get the application password, go back to the "Profile" screen of your WordPress admin dashboard.
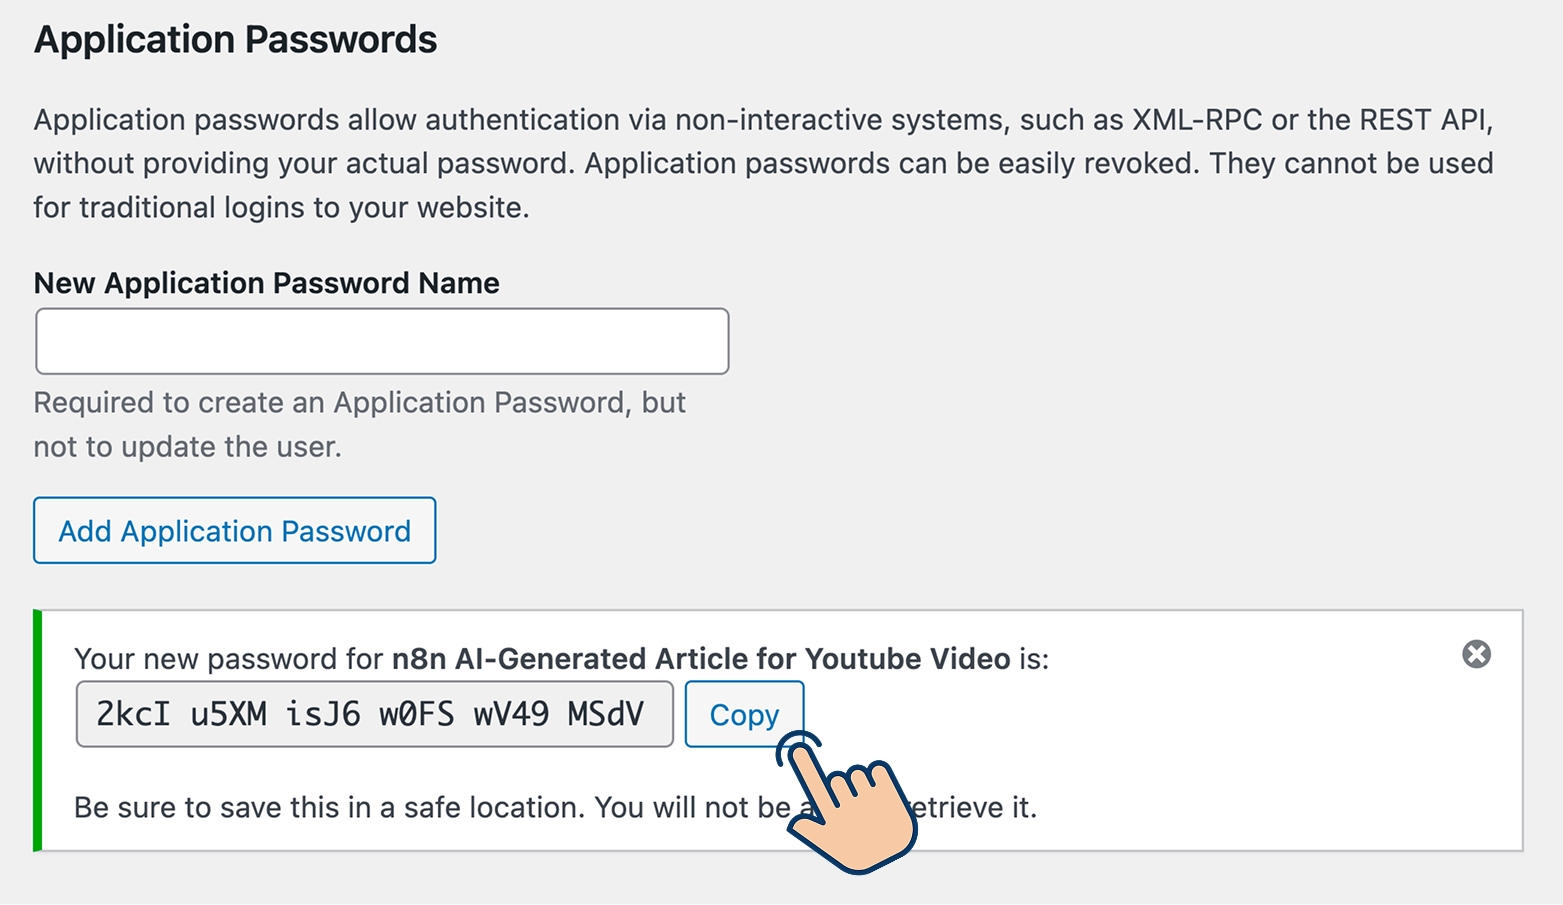
Scroll to the bottom section of the screen until you find the "Application Passwords" section:
Next, provide a recognizable name for the application password.
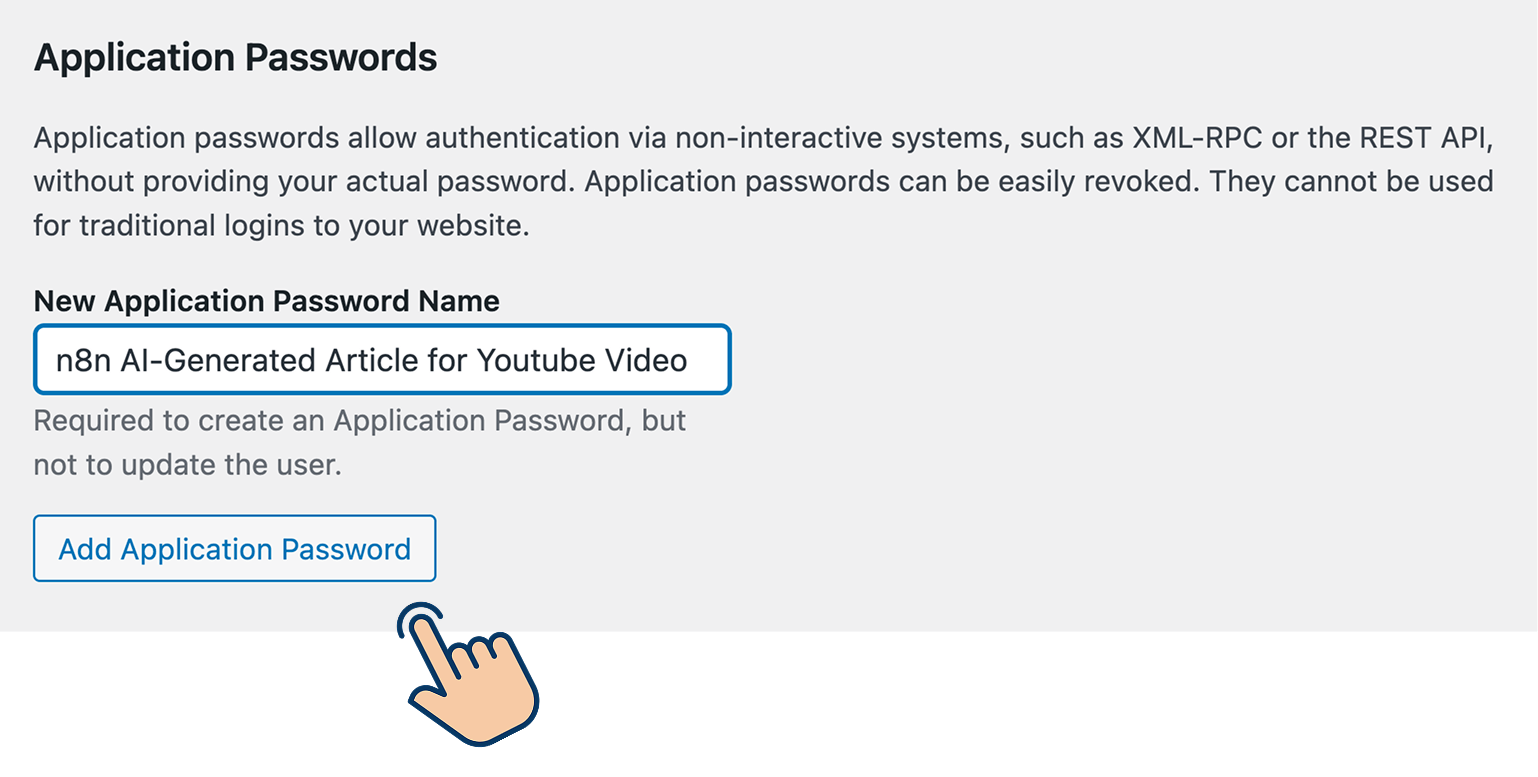
It is just like naming your API keys.
Naming your application passwords in a descriptive way will help you remember why you created each one in the first place.
Anyway, once you name it, click on the "Add Application Password" button to generate an application password.
Next, copy the application password generated:
And paste it inside the n8n's credential popup:
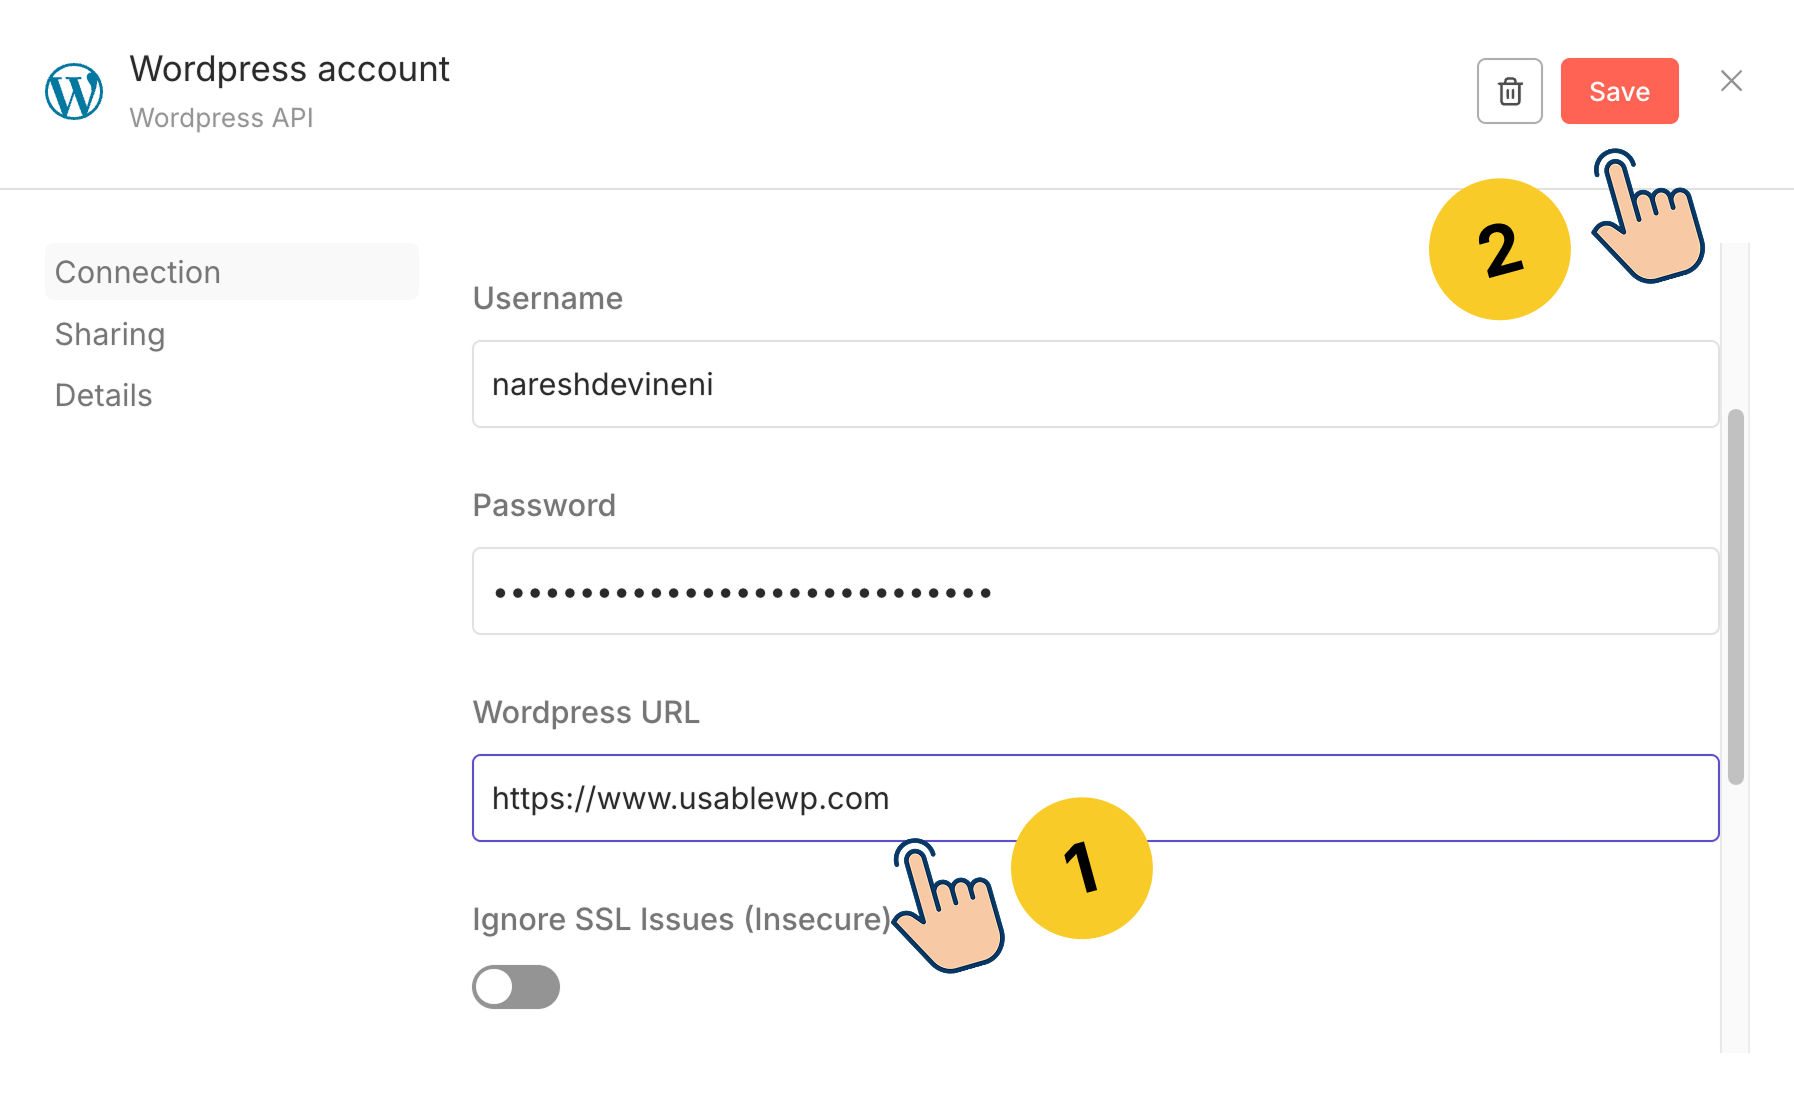
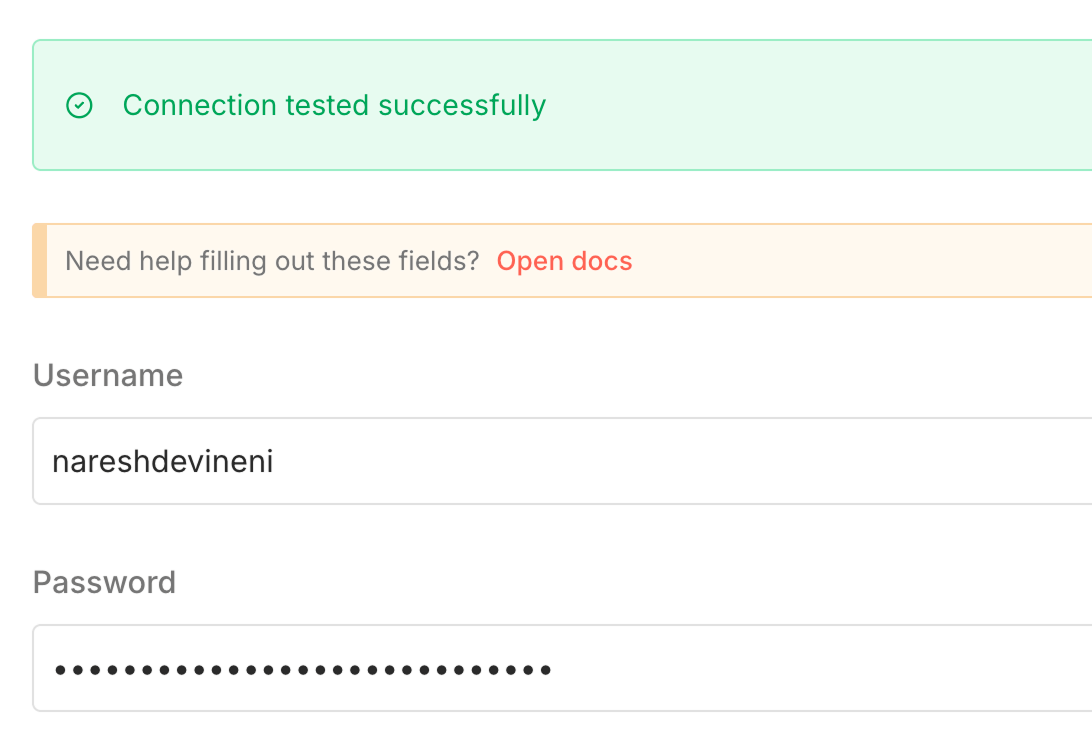
Finally, click on the "Save" button to test the credentials and save them.
If all goes well, you should see this "Connection tested successfully" message:
Anyway, now that we have successfully created credentials, close the credentials pop-up so that we can continue to configure other WordPress node options.
Next, we need to set the "Resource" type
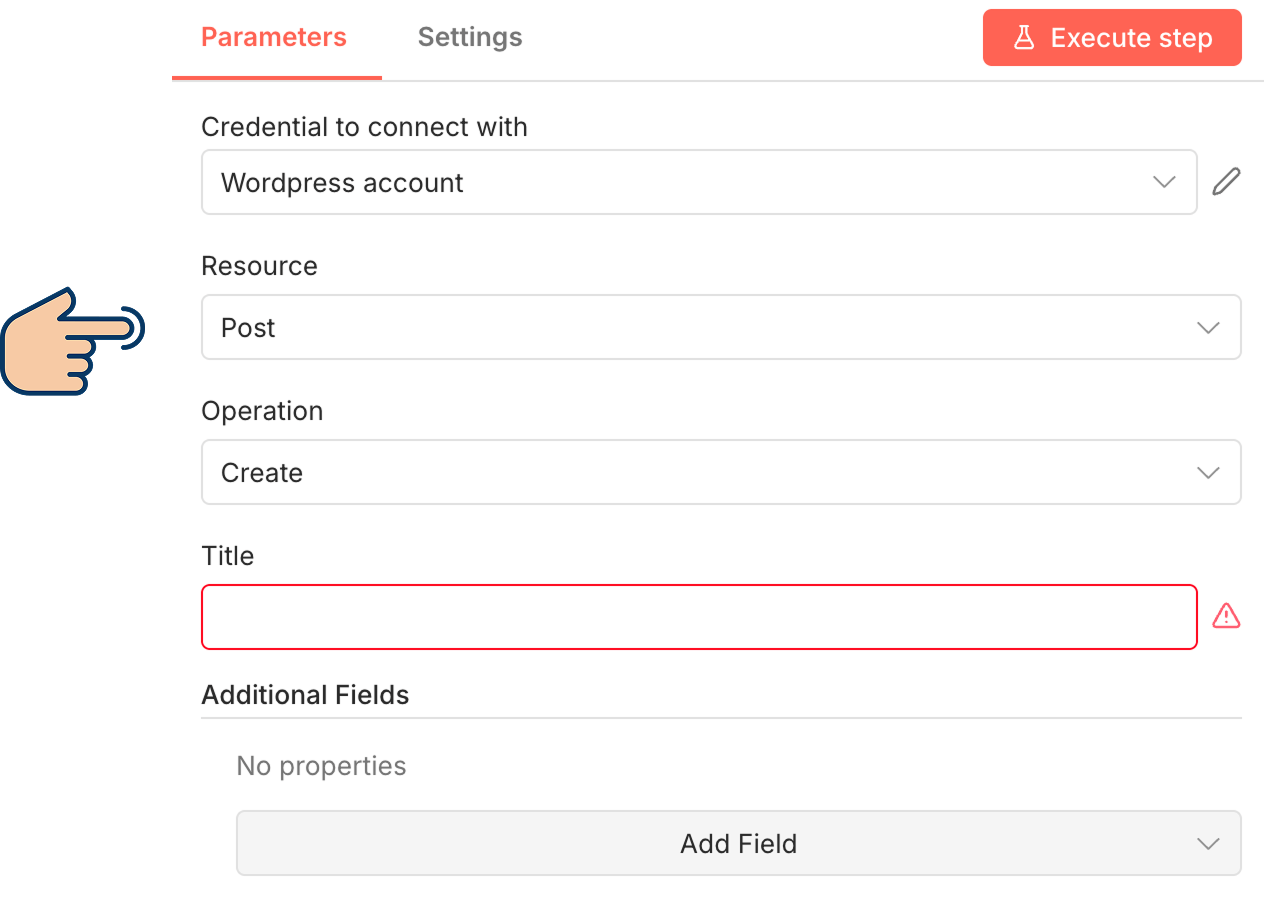
The "Resource" option will help us choose the post type for our content.
By default, WordPress ships with three resource types:
- Post - used for creating blog posts
- Page - used for creating static pages such as About Us, Contact Us, etc.
- User - used for creating a new user with a role such as administrator, contributor, editor, etc.
In our case, we are generating an article to use as a blog post.
So, for the "Resource" option, choose "Post".
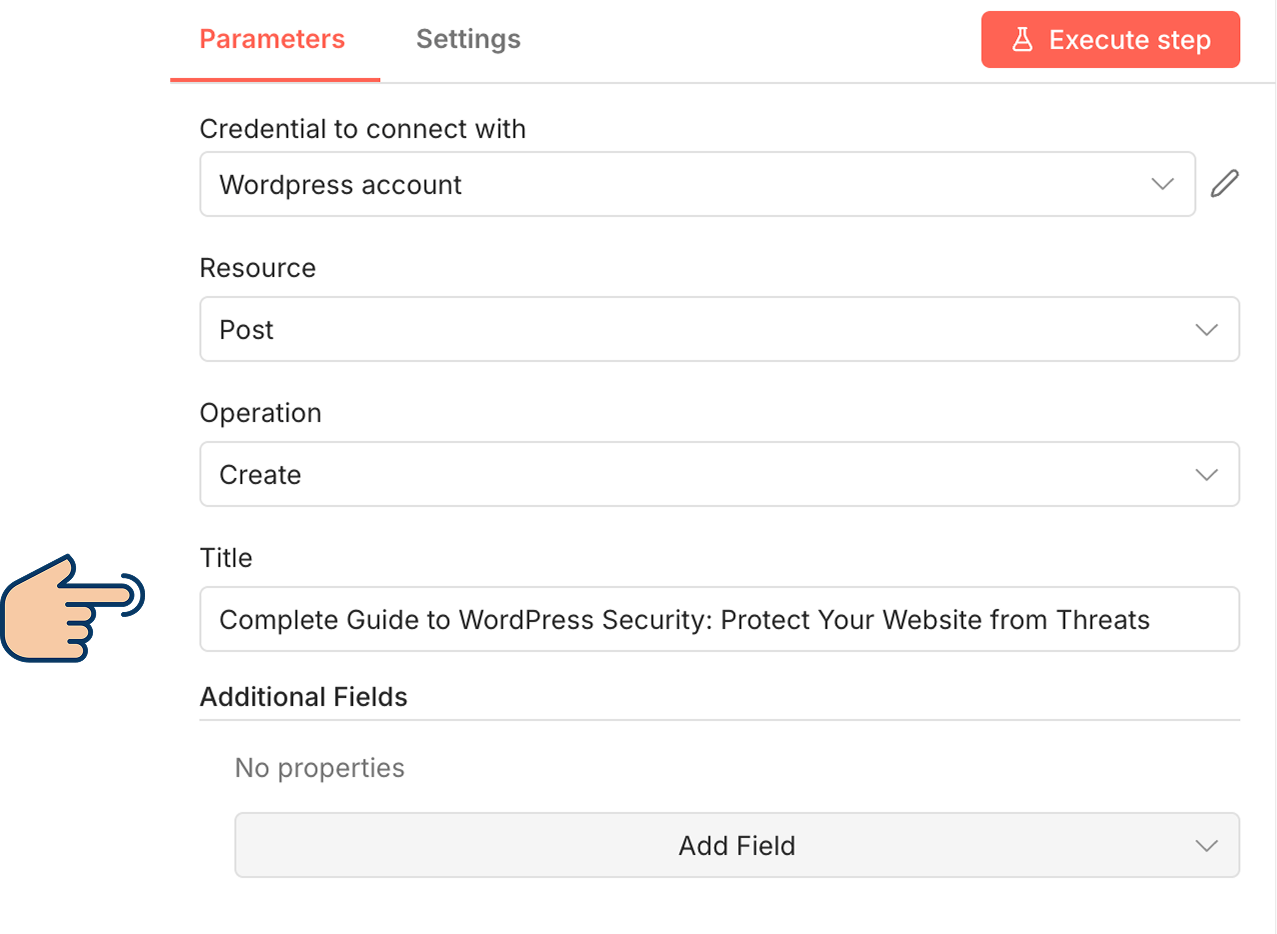
Next, we need to set the "Operation" type
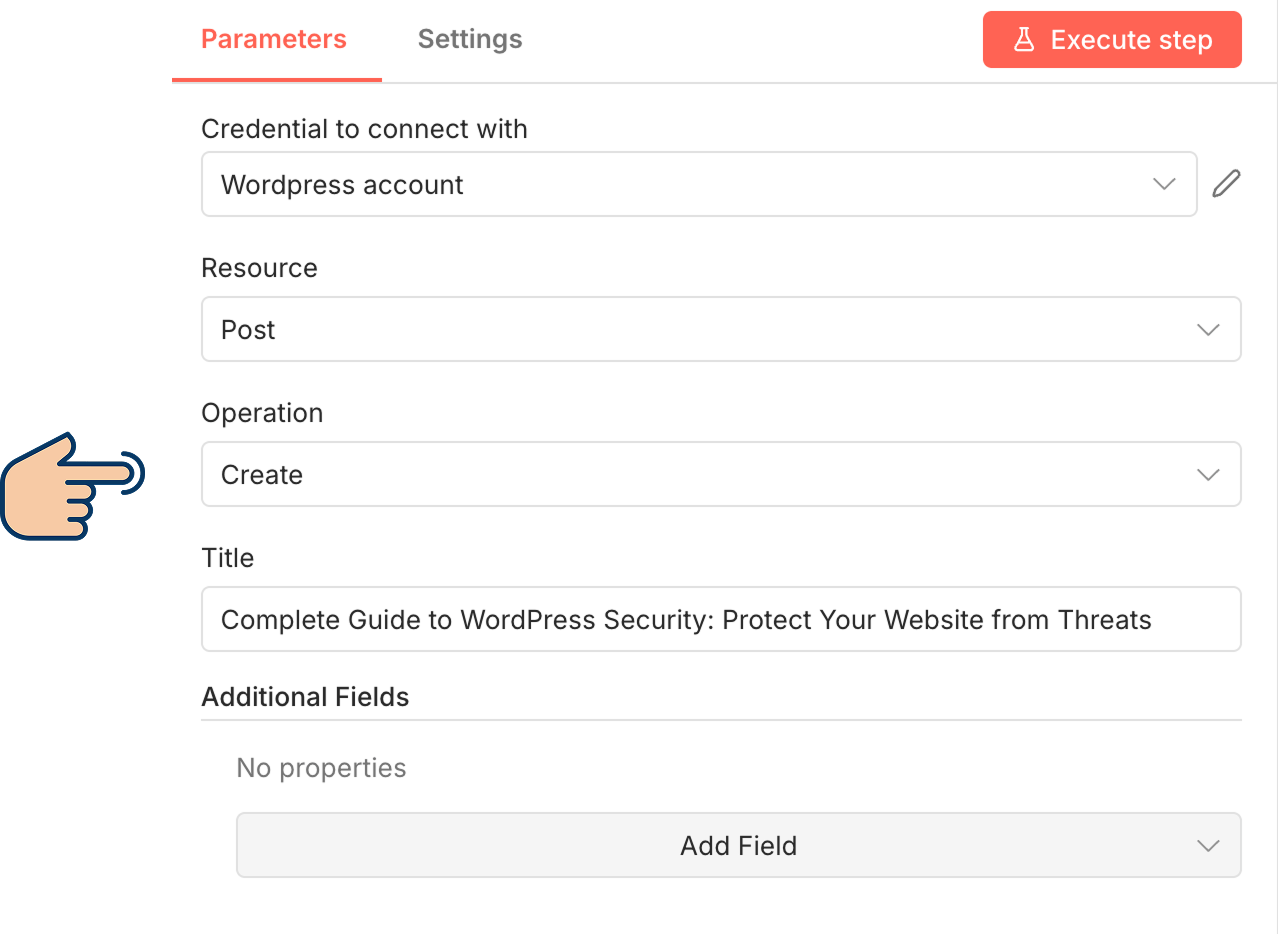
We are creating a blog post, right?
So, we should choose "Create" for the operation.
Next, it is mandatory to enter the title of the post.
We could have automated the generation of the title, too.
But I overlooked it.
I am sorry about that.
Anyway, we can always tweak the automation to fix the planning mistakes.
We will fix this mistake towards the end of this lesson.
For now, I will enter the title manually.
For example, "Complete Guide to WordPress Security: Protect Your Website from Threats."
You can enter any title of your preference.
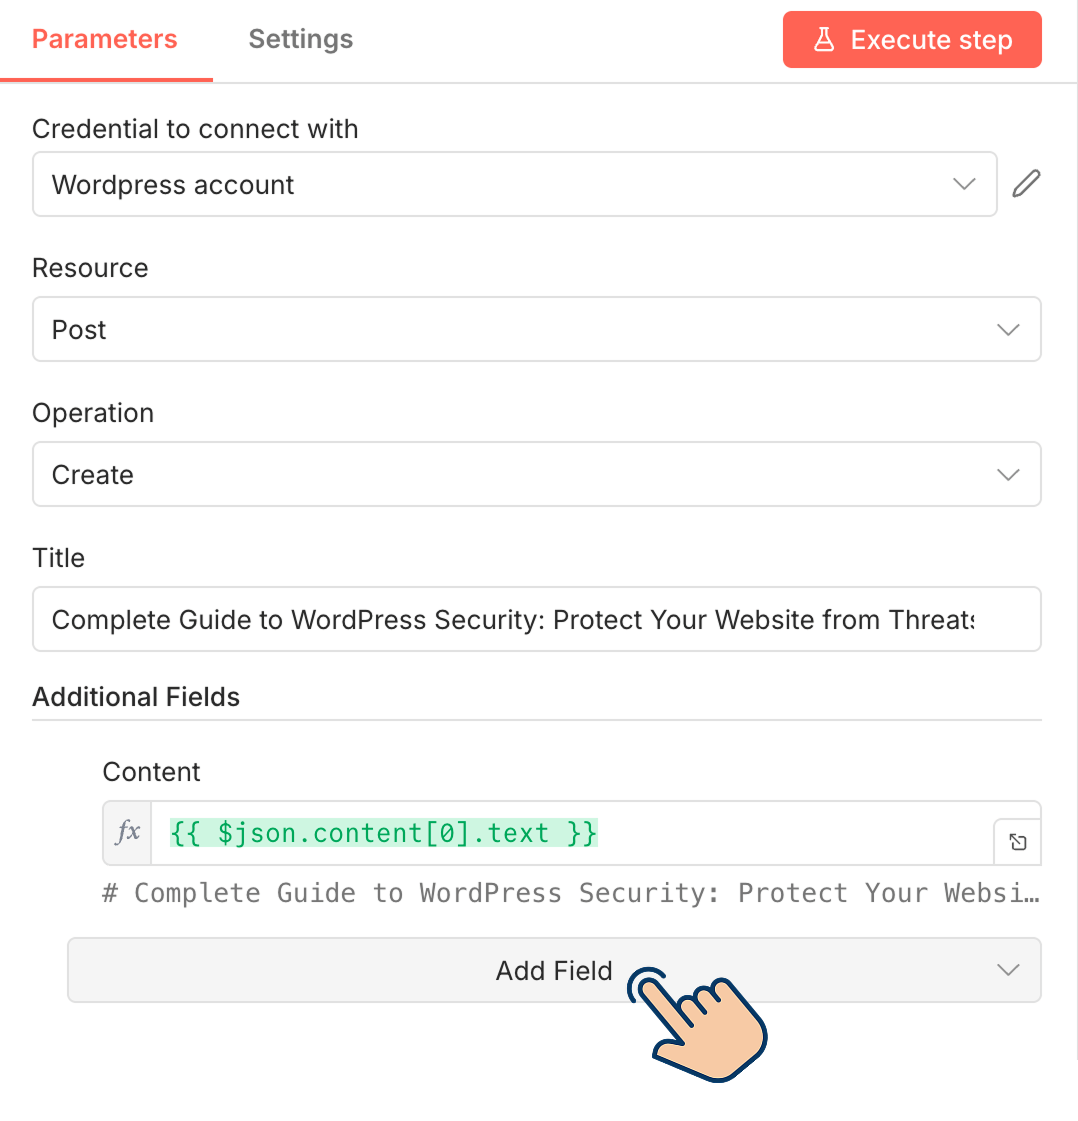
Next, we should provide the AI-generated article from the previous node (Claude's node) as the main content for our WordPress post.
To achieve this, click on the "Add Field" button located under the "Additional Fields" section:
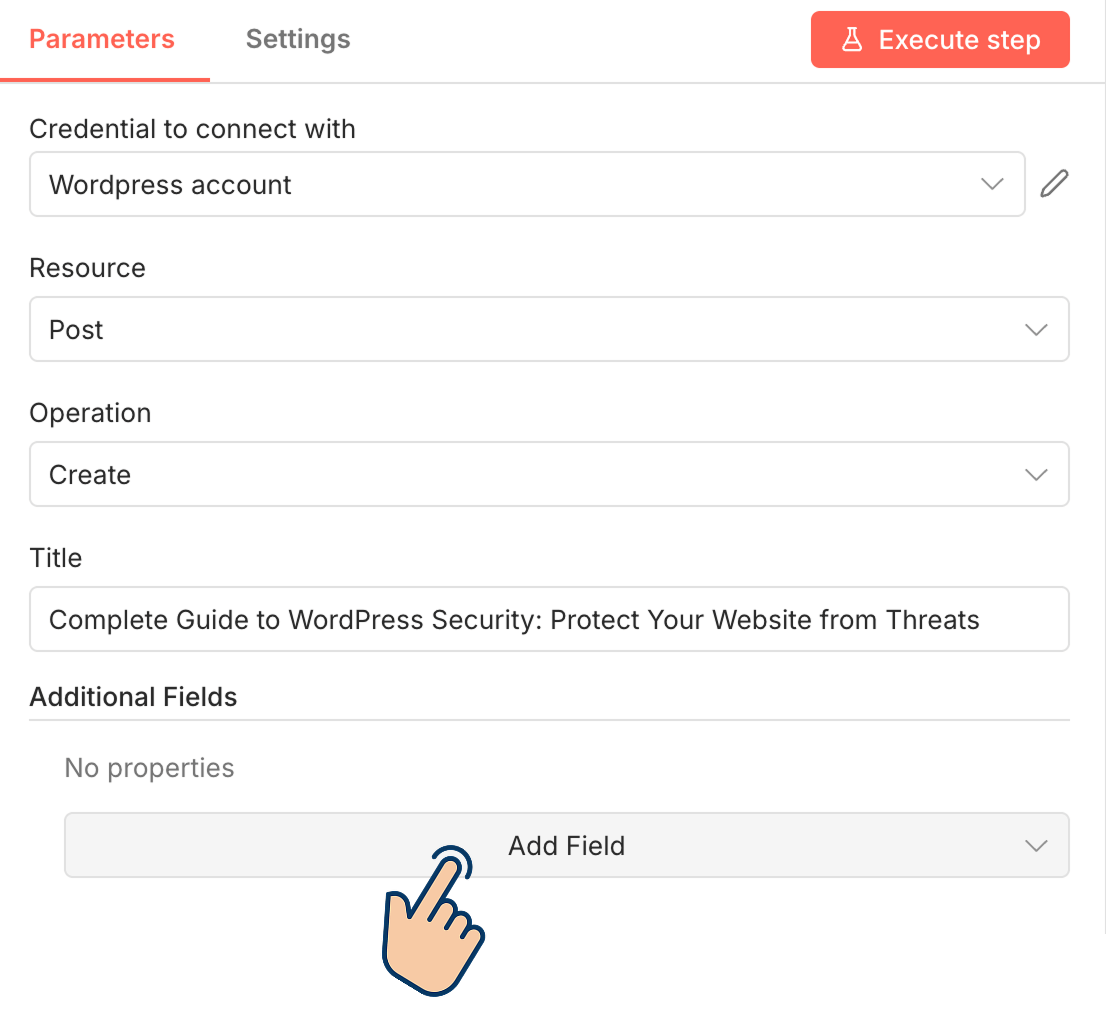
And select the "Content" field:

Next, if you notice, the "Input" panel for the WordPress node has access to the article generated by the Claude node:
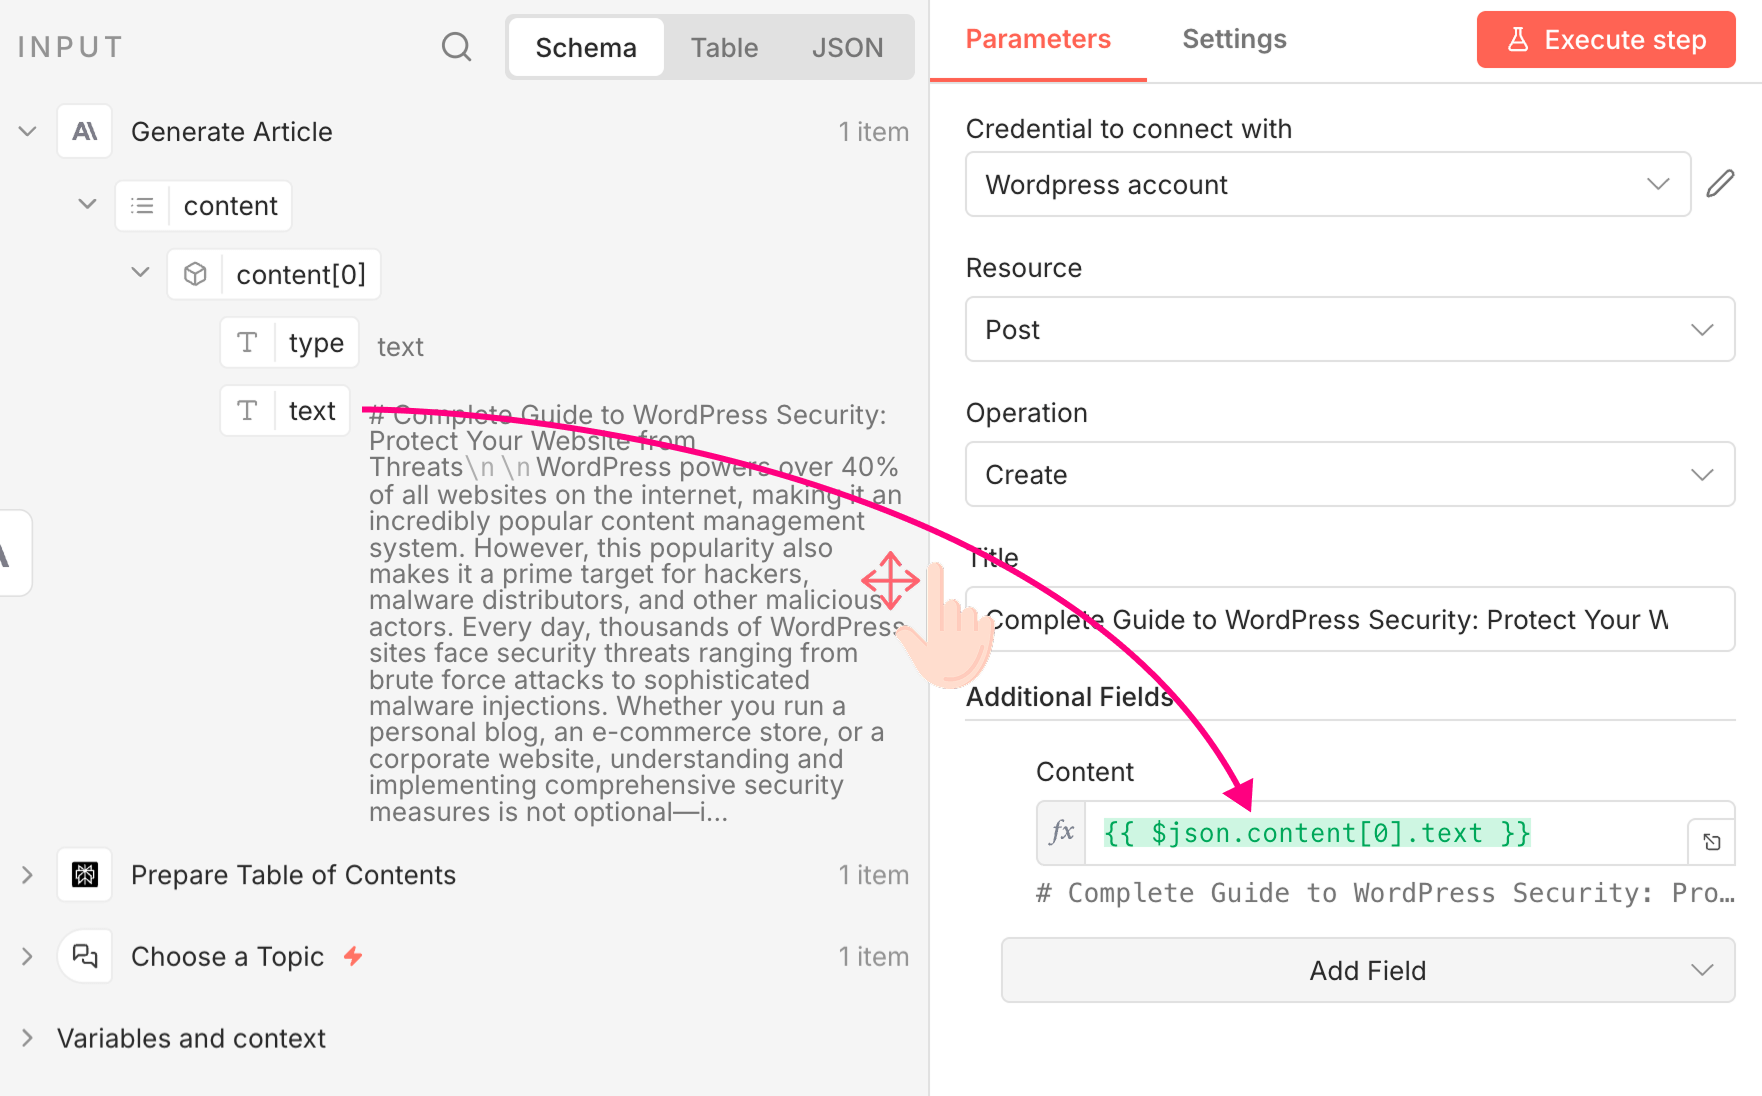
To be precise, the article's content can be accessed via the "text" property of the Claude node.
So, as usual, drag and drop that "text" property into the "Content" field of the WordPress node.
That's all.
If you now hit the "Execute Step" button of the WordPress node, if all goes well, a blog post should get drafted inside your WordPress dashboard.
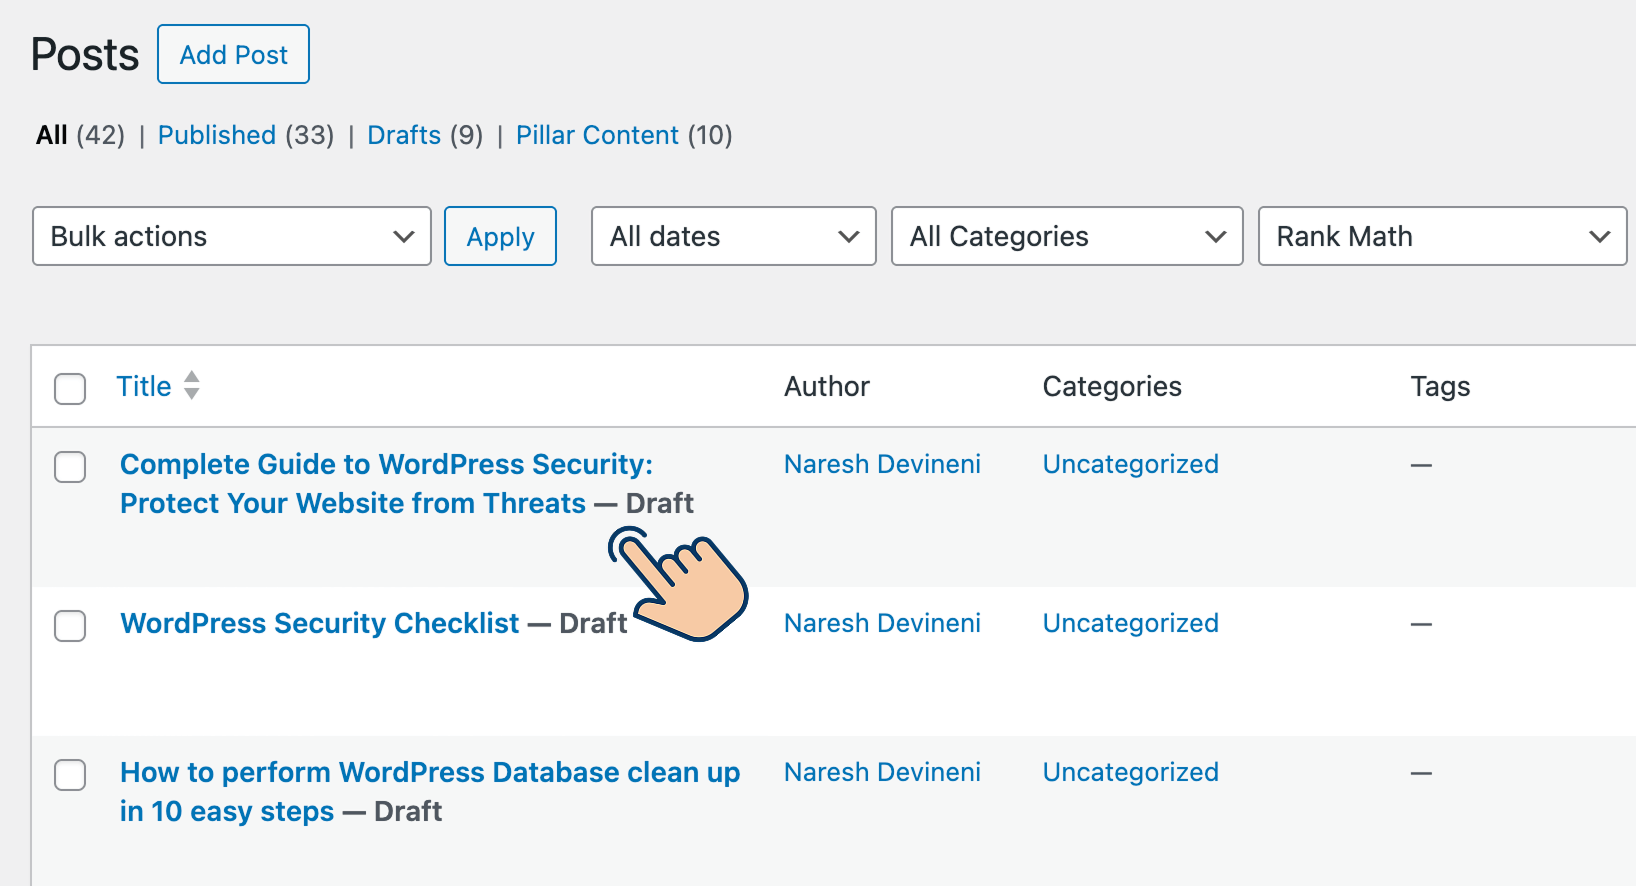
Also, whenever you run this automation, articles are posted in a "Draft" state by default.
This will help you manually edit the AI-generated content to fit your SEO and brand needs.
It is recommended to add a human touch to AI-generated articles by at least fact-checking the content.
But if you want to publish the post directly for whatever reason, we need to add one more field called "Status" and set it to "Publish".
To achieve this, click on the "Add Field" button:
Next, add the "Status" field and set it to "Publish":
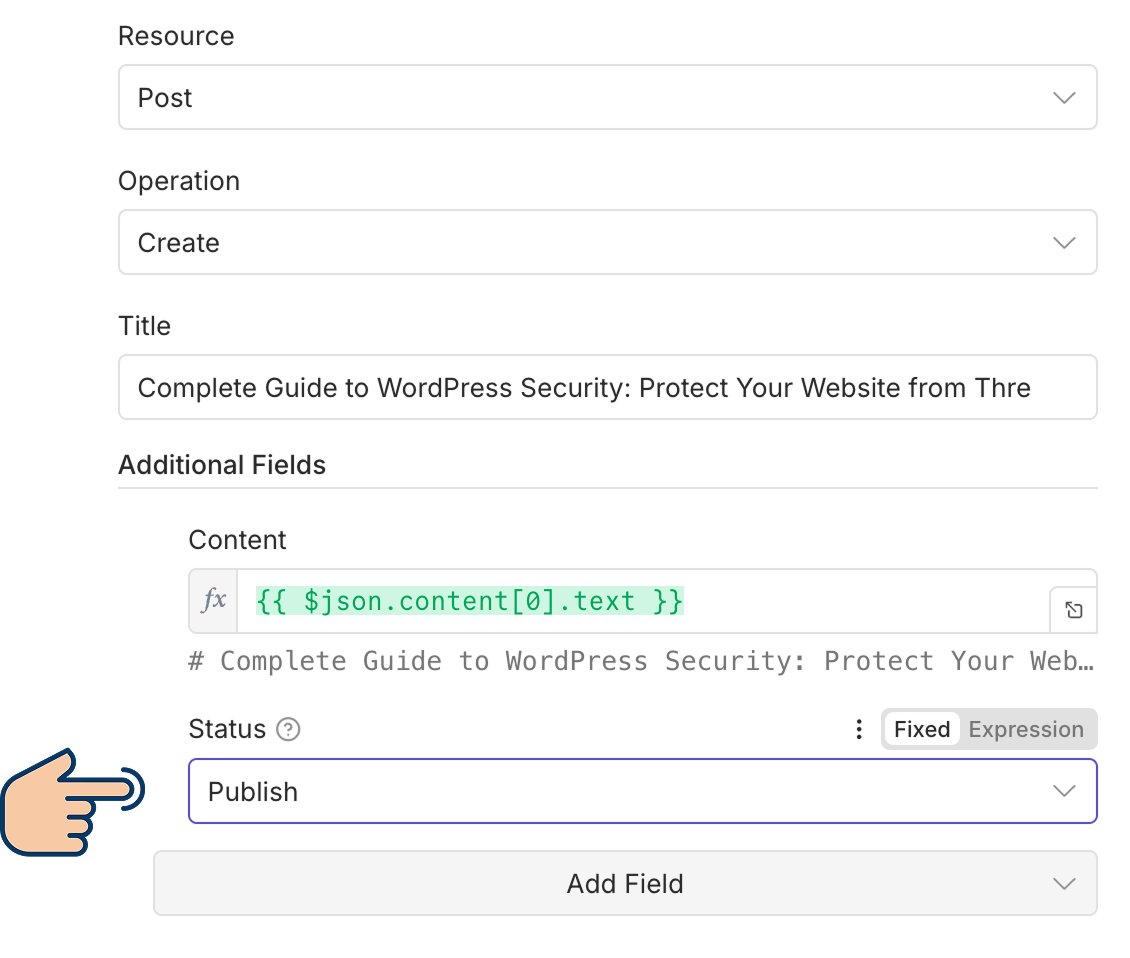
If you now hit the "Execute Step" button yet again, this time, the article will get published directly, and your visitors can access it.
That's all.
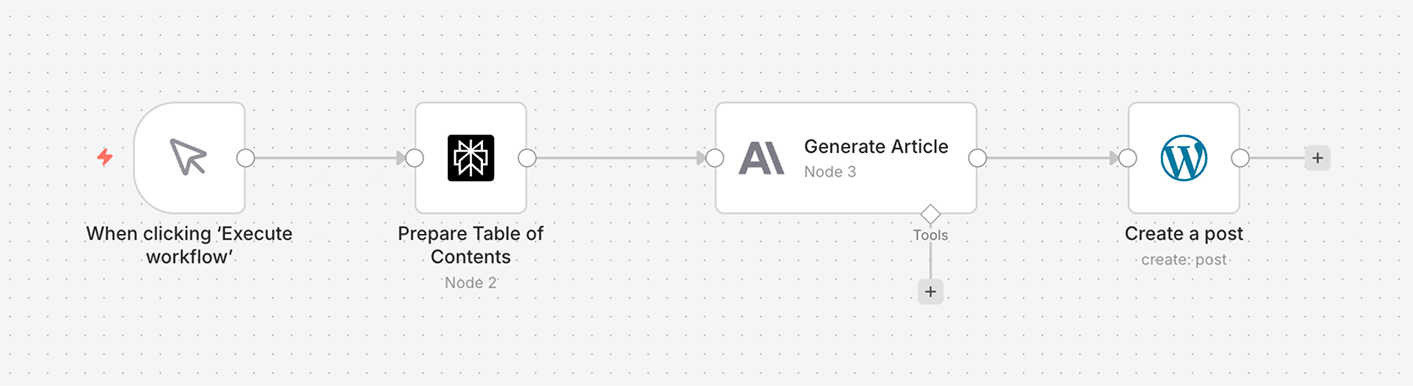
Here is the automation we have built so far:
Hey, what if I want to generate multiple articles at the same time? I want to generate a list of articles for an entire month in a single go. Also, I want AI to generate titles, too. Not just content. I also want to track the status of each article.
Great question, and got it!
It makes sense. Let's work on that right away.
How to provide a list of topics as input to our workflow automation
The automation we have built so far was designed to accept one topic as input and produce only one article.
We went with a chat node to trigger the automation for this very reason.
When we were providing one topic at a time and writing the title manually, the chat node made sense.
But with the new requirement, it no longer works for our needs.
If you want to generate a list of articles, we should provide a list of topics.
And whenever you want to provide a list of topics to an automated workflow, we need to use a spreadsheet with each row representing a topic.
For example:
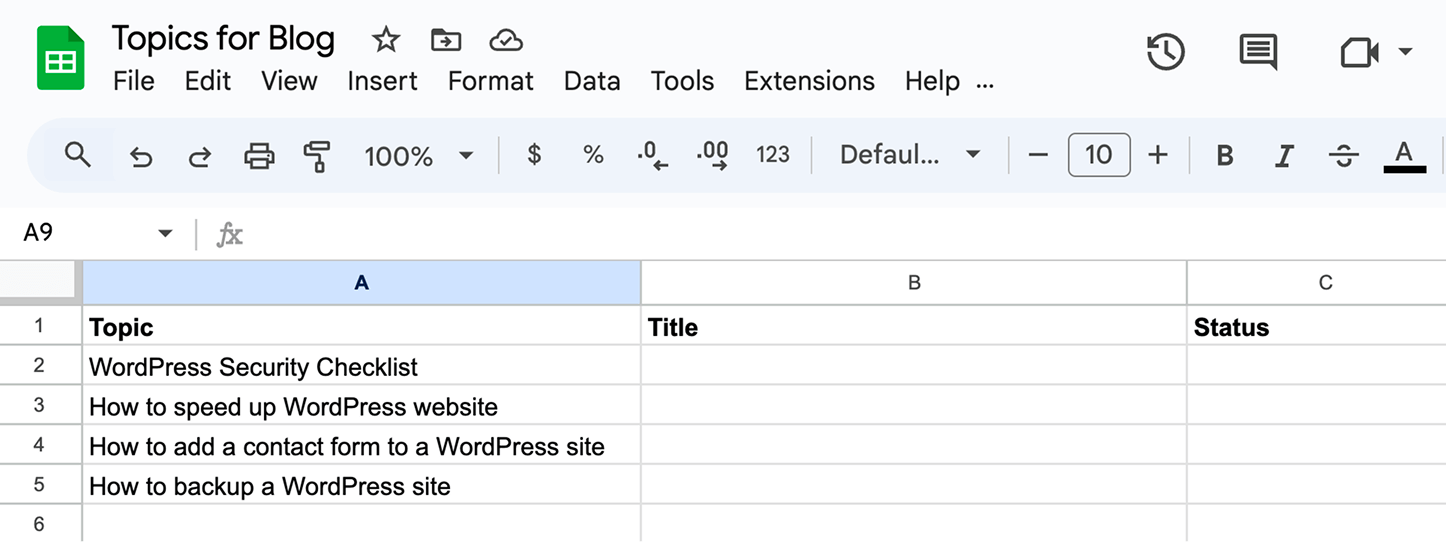
If you observe the above spreadsheet, there are three columns:
- Topic - Each row of the sheet represents a topic
- Title for each article
- Status for each article. Possible values are draft and published.
We only need to fill in the topic for each article so that our automation will fill in the Title and Status as part of the article generation process.
Next, we need to provide this spreadsheet as input to our automation.
So, first, create this spreadsheet in Google Sheets.
If you're feeling lazy, just download this CSV file and import it to your Google Sheets account:
I will go with Google Sheets for the purposes of this lesson.
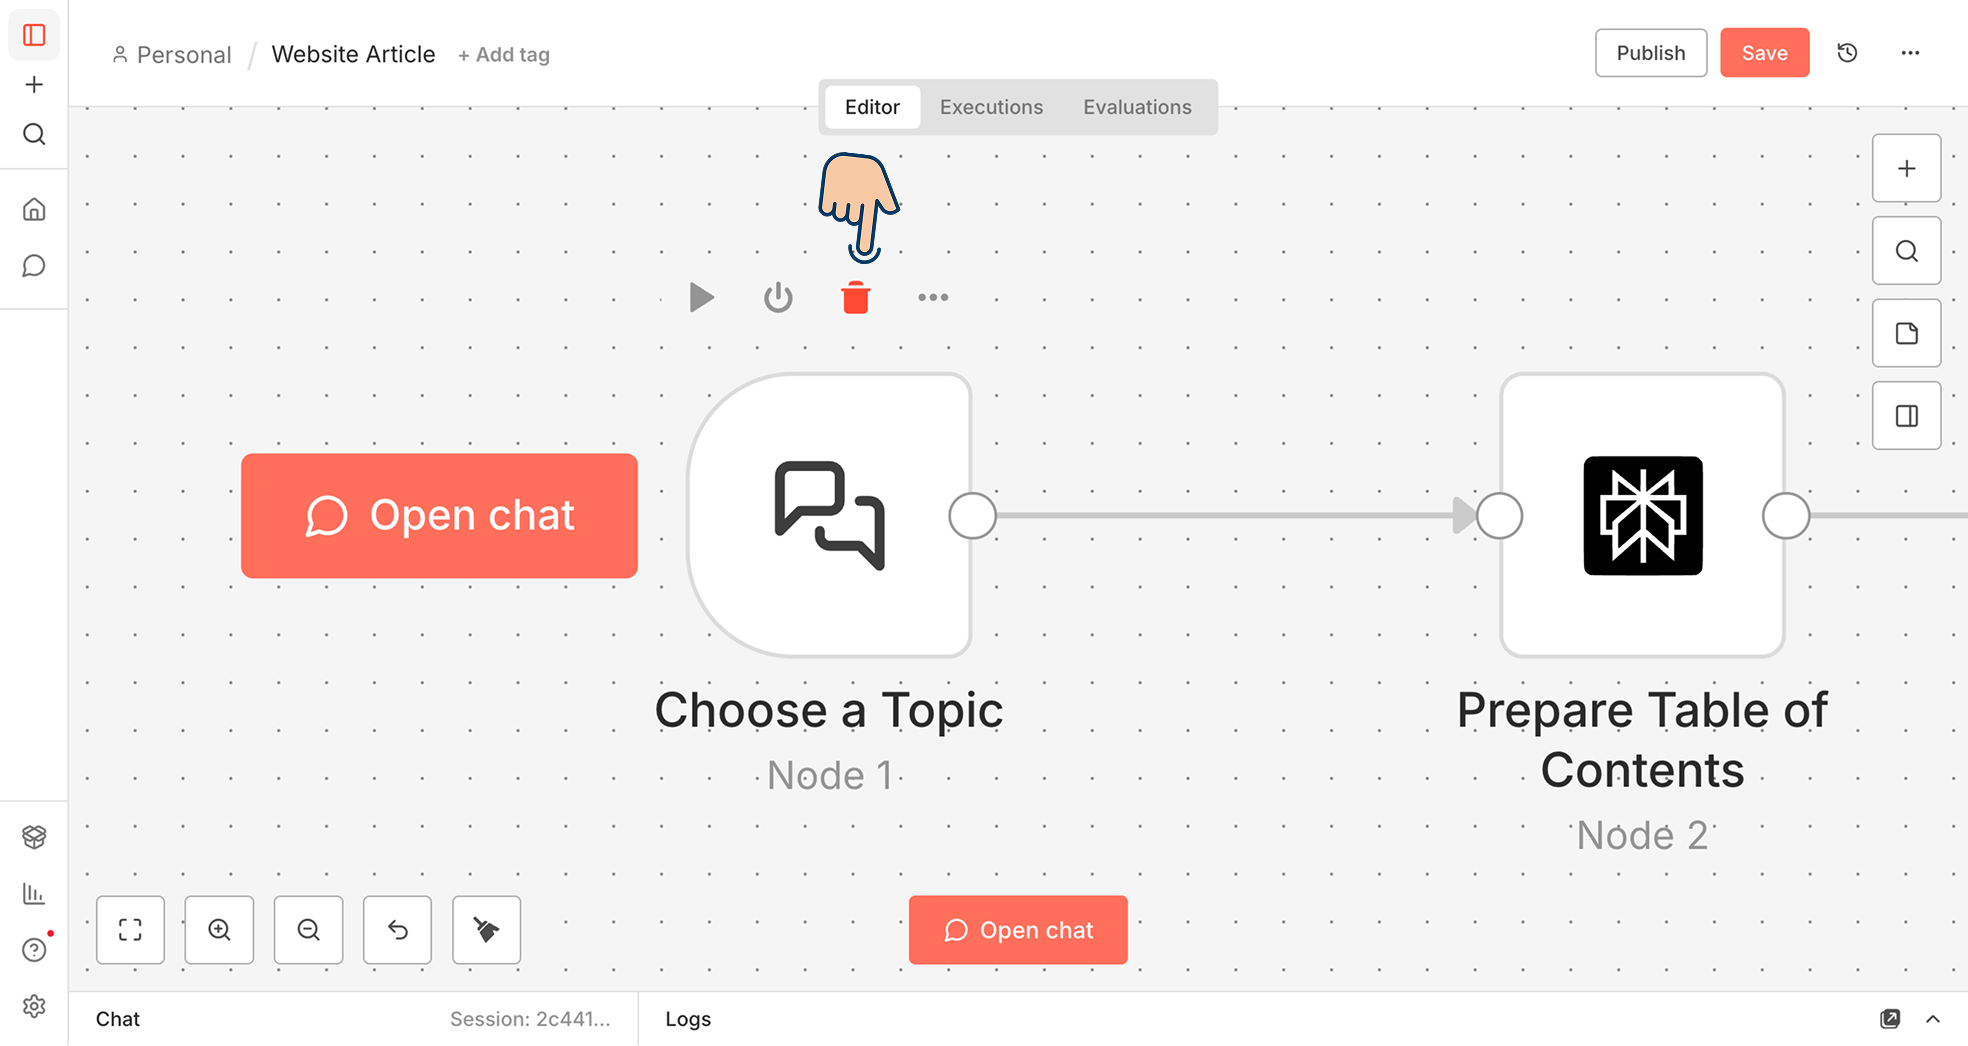
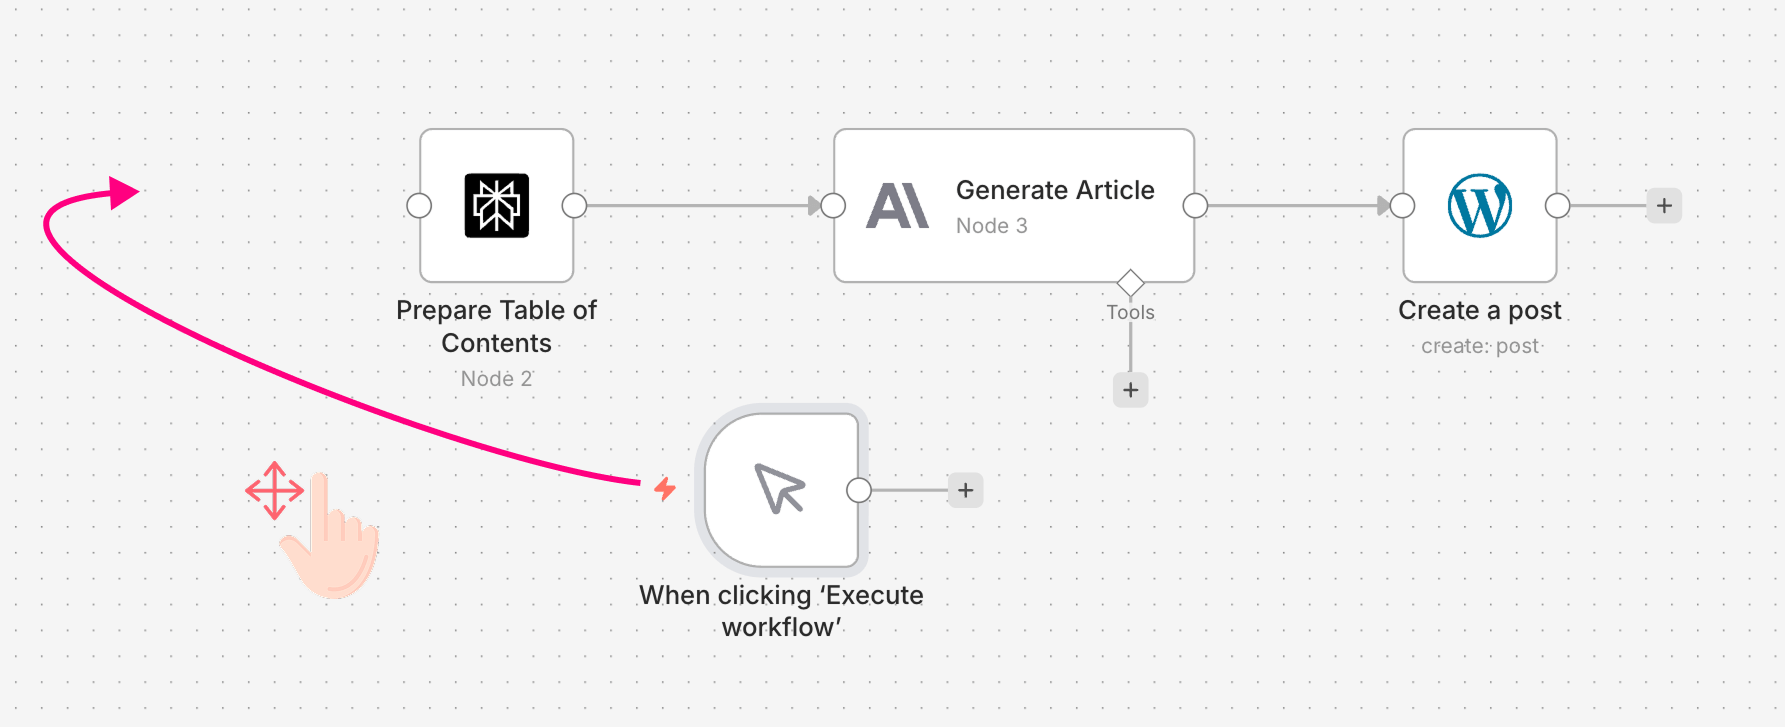
Next, we need to delete the "Chat" node as the trigger and replace it with a manual trigger.
This will lay the foundation for accessing and reading our spreadsheet data as soon as automation is triggered manually.
To delete the "Chat" node, hover your cursor over it and click the trash icon.
After the deletion, there is no way to trigger the automation anymore.
To fix this, we need to add the manual trigger node.
So, open up the nodes panel by clicking on the "+" button located on the top-right-hand corner of the screen.

Search for the "Manual Trigger" and add it to the automation pipeline.
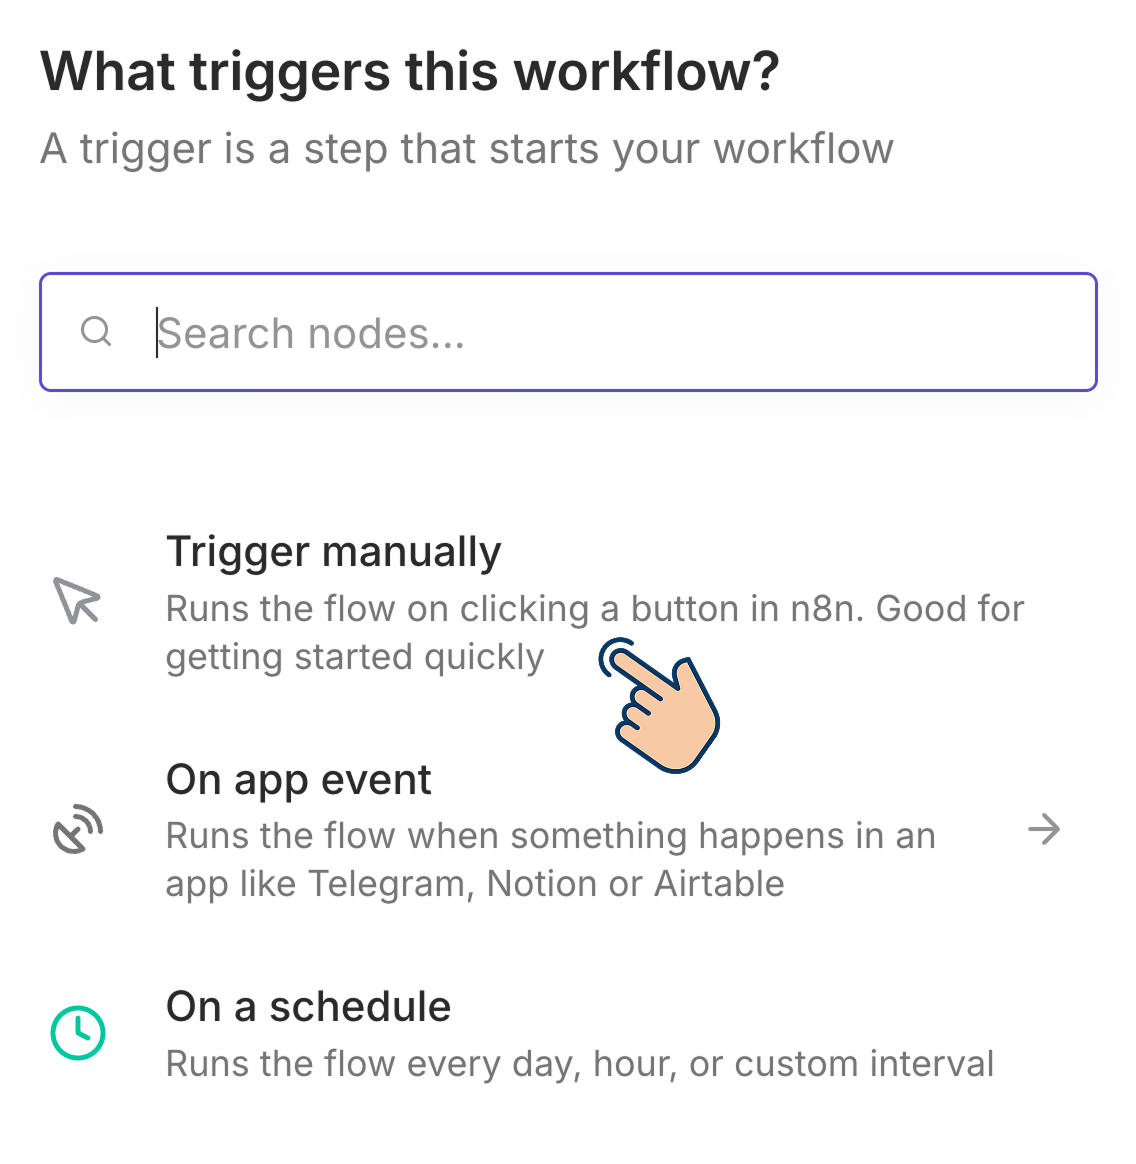
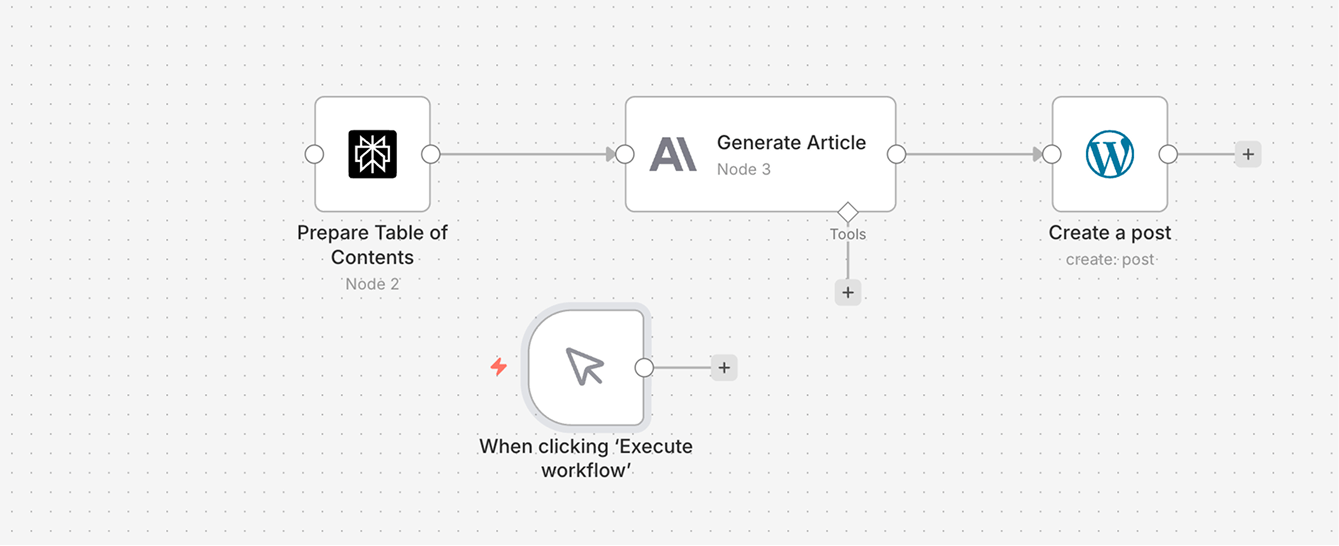
And as you can see, the manual trigger node is now added to our automation.
But the problem is, n8n doesn't automatically connect the manual trigger to the rest of the automation.
We have to do it manually.
So, drag the manual trigger to the beginning of the automation pipeline:
Next, we need to connect it with the Perplexity node.
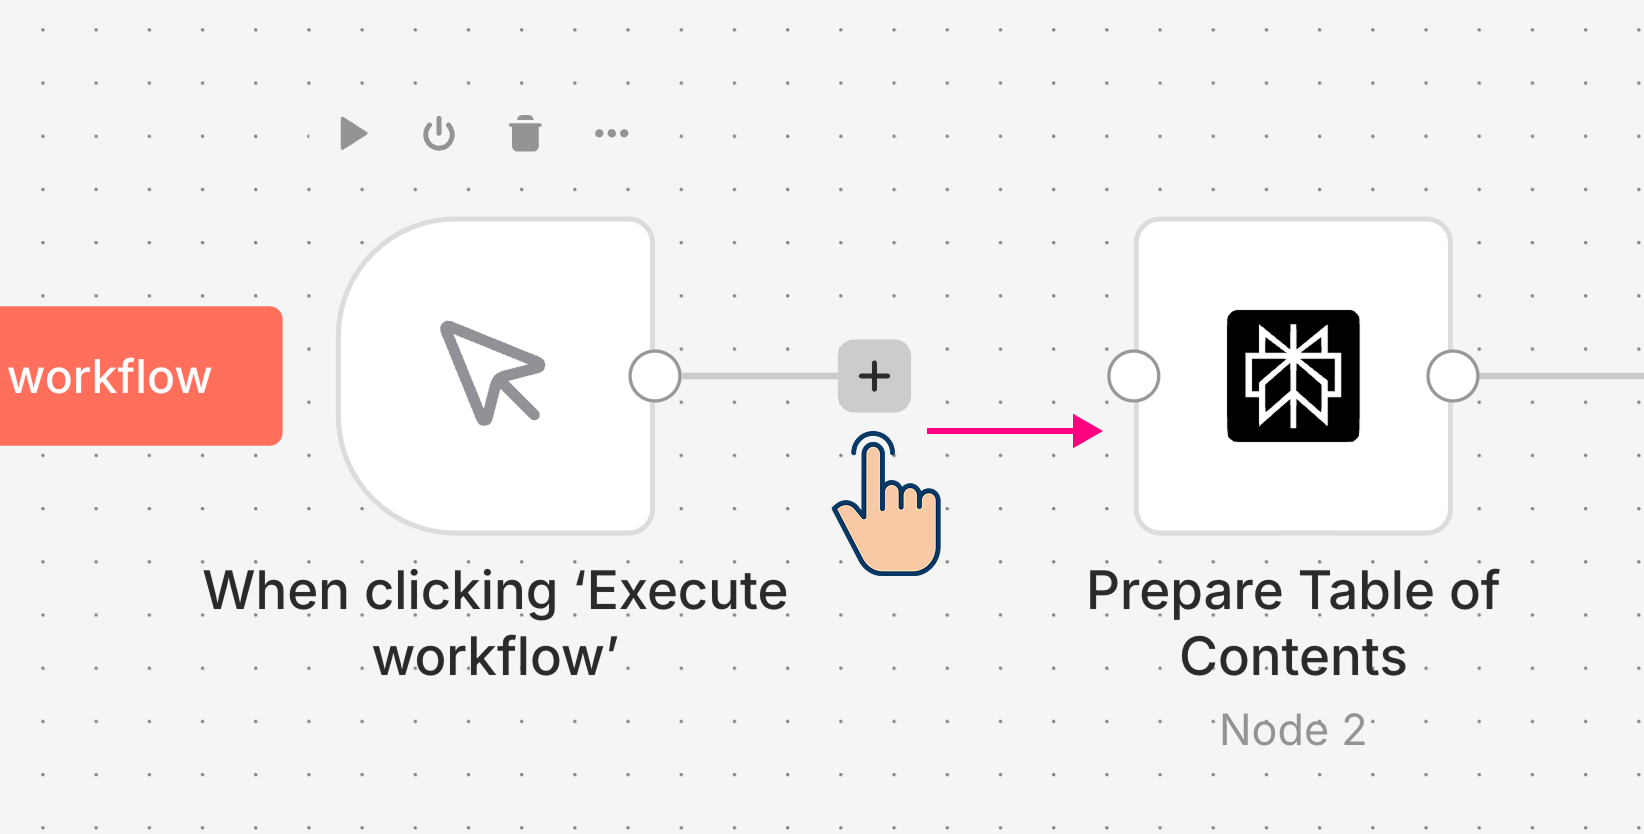
To do this, click and drag the "Plus" icon of the manual trigger to the right until it attaches to the Perplexity node.
That's all.
We have now successfully attached a manual trigger to start our automation.
But we are not done yet.
With the chat node deleted, now, there is no way to provide a topic to our automation.
A manual trigger will not let us provide any input to our automation.
It is just useful for triggering the automation.
And if you remember, the Perplexity node expects us to provide a topic so it can generate a table of contents for the article.
So, right after the manual trigger, we need to retrieve topics from our spreadsheet and provide them as input to the Perplexity node one by one.
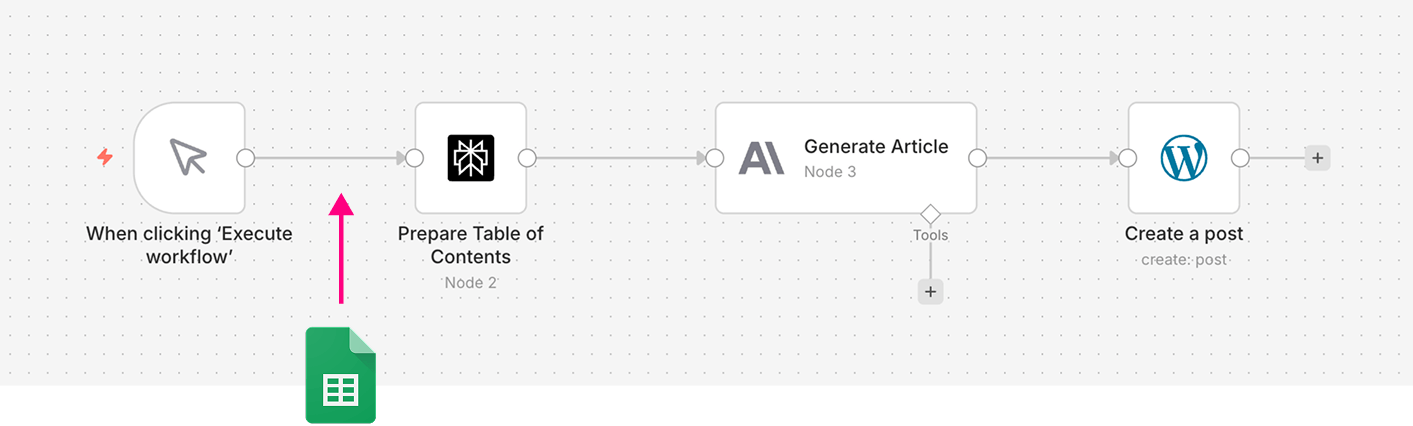
In other words, we should add the Google Sheets node in between the manual trigger and the Perplexity AI node.
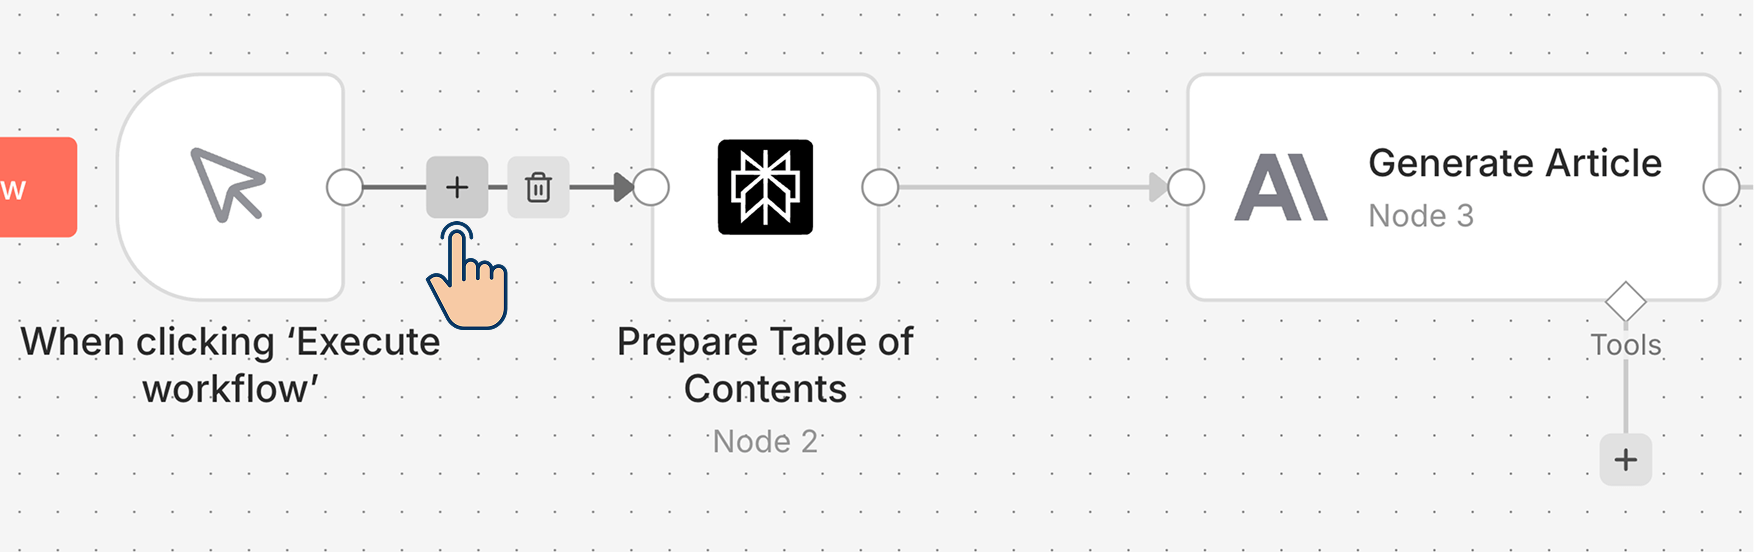
To achieve this:
- Put your cursor on the connector line located between the manual trigger and the Perplexity node
- And click on the "Add Node" button
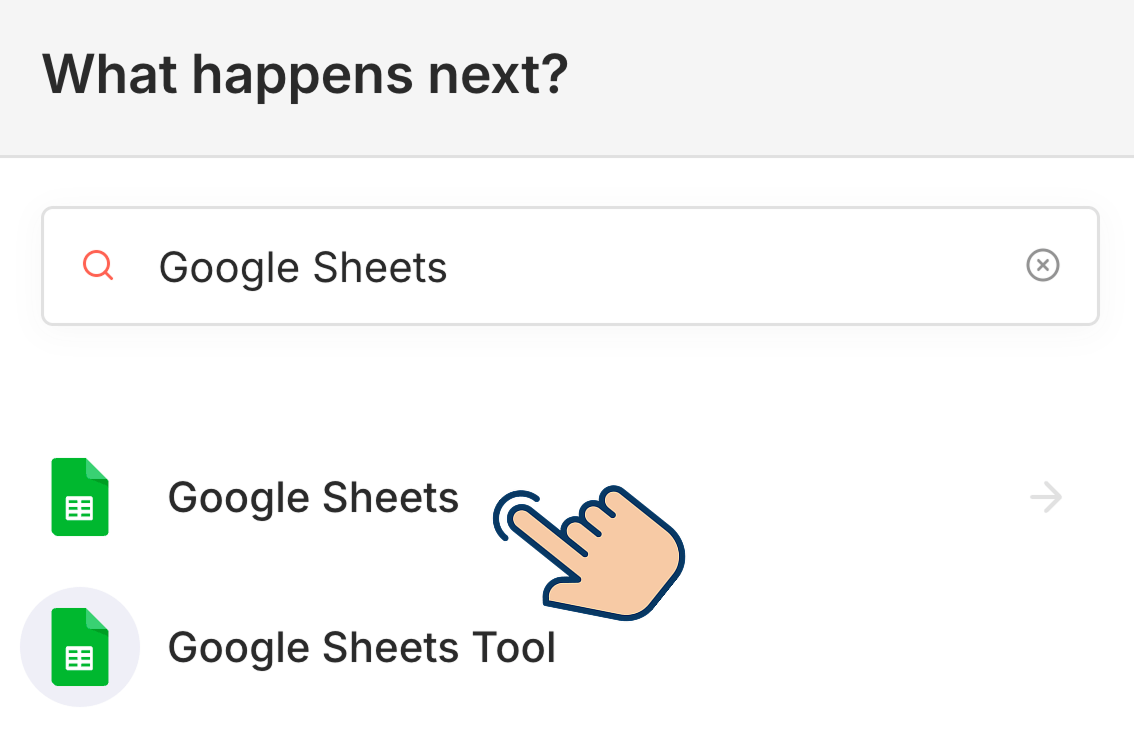
Next, search for "Google Sheets" and click on it to access its nodes:
Now, we want to read the list of topics from our spreadsheet, right?
So, search for the "Get Row(s) in sheet" node and add it to our automation:
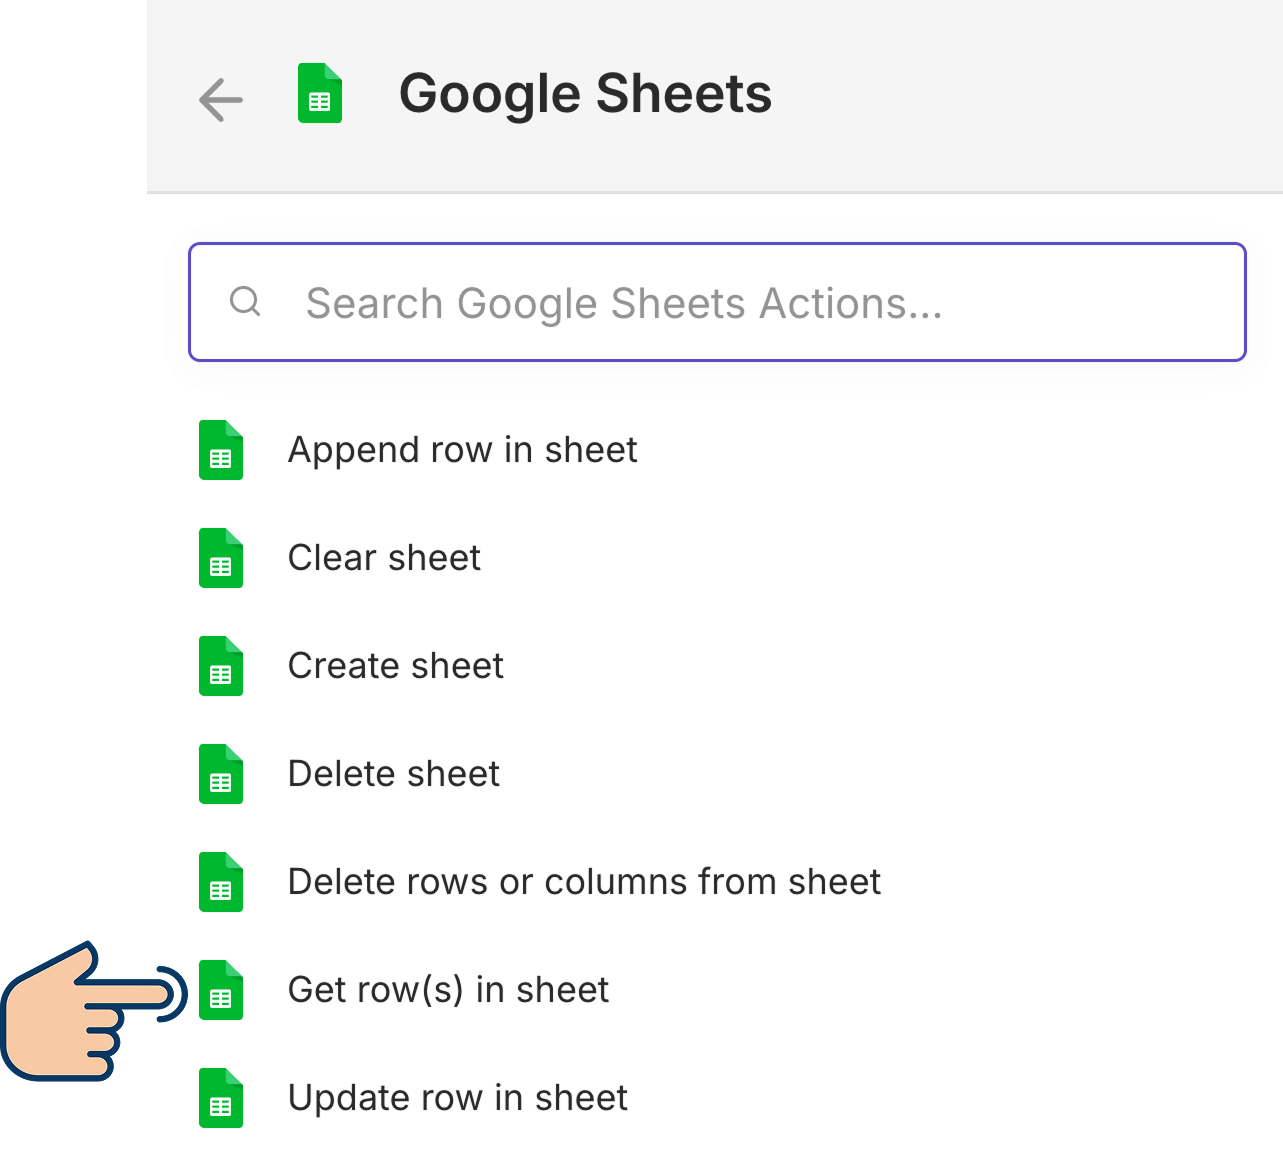
The Get Row(s) node will help us read all the rows of our data from a specific sheet in Google Sheets.
Anyway, as usual, as soon as you add the Get Row(s) node, n8n will ask you to enter your Google Sheets API credentials.
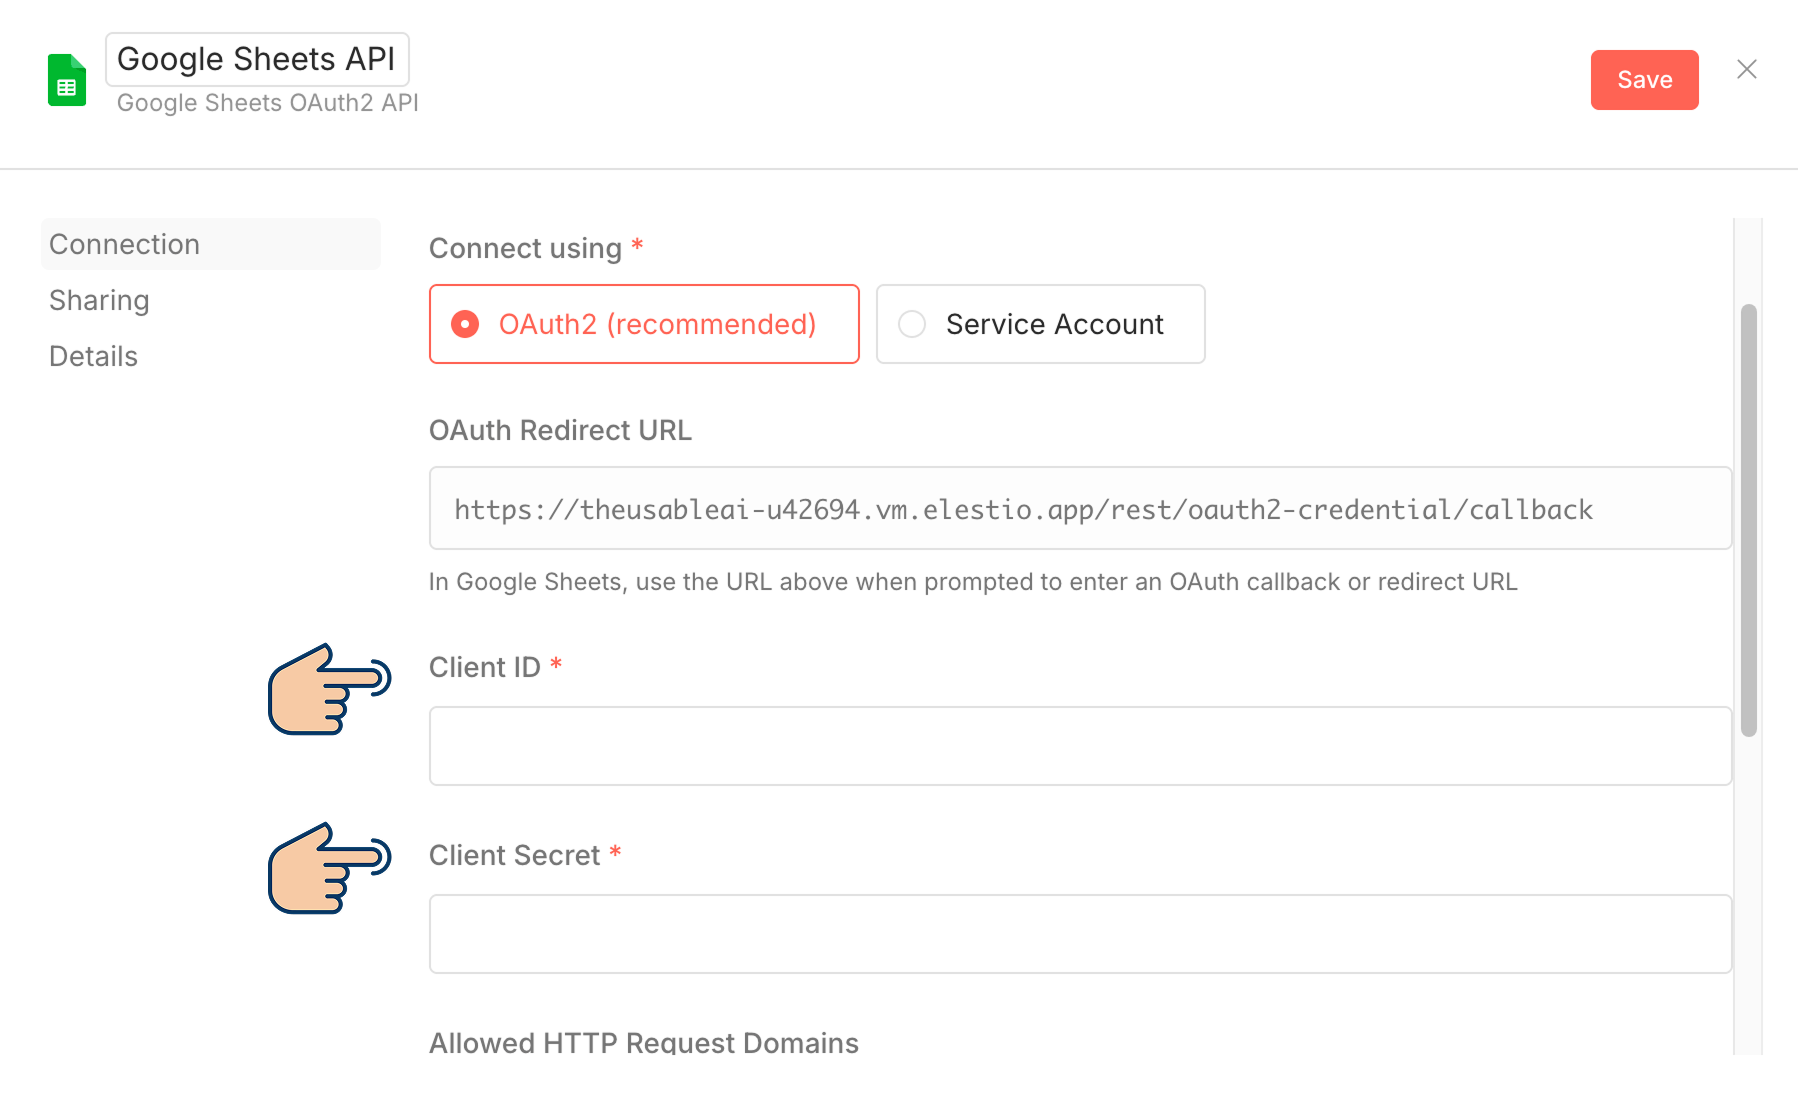
Hey, wait! What are Client ID and Client secret?
Good question!
So far, we have worked with two types of API access verification:
- API Key authentication - Perplexity AI and Claude AI forced us to create API Keys to access their services.
- Application password - WordPress required us to create an application password to access its functionality via the API.
Similarly, Google forces us to use OAuth 2.0 authorization (Client ID and Secret Key) to access its services like the Google Sheets API.
Although it is a more secure approach, OAuth 2.0 authorization is just another way for API access verification. Just remember that.
Anyway, I have written an in-depth article about how you can get API credentials for a Google Sheets account and a couple of other Google APIs:
Please read the article, create Google Sheets credentials, add them to the Credentials screen, and come back here.
I will wait here until you complete the process.
...
...
...
Are you done?
Yep!
Great!
Now, let's configure the remaining options so that we can access the topic list from Google Sheets and provide it as input to Perplexity AI.
Simply put, next, we need to select the document, that is, the spreadsheet with the topic list.
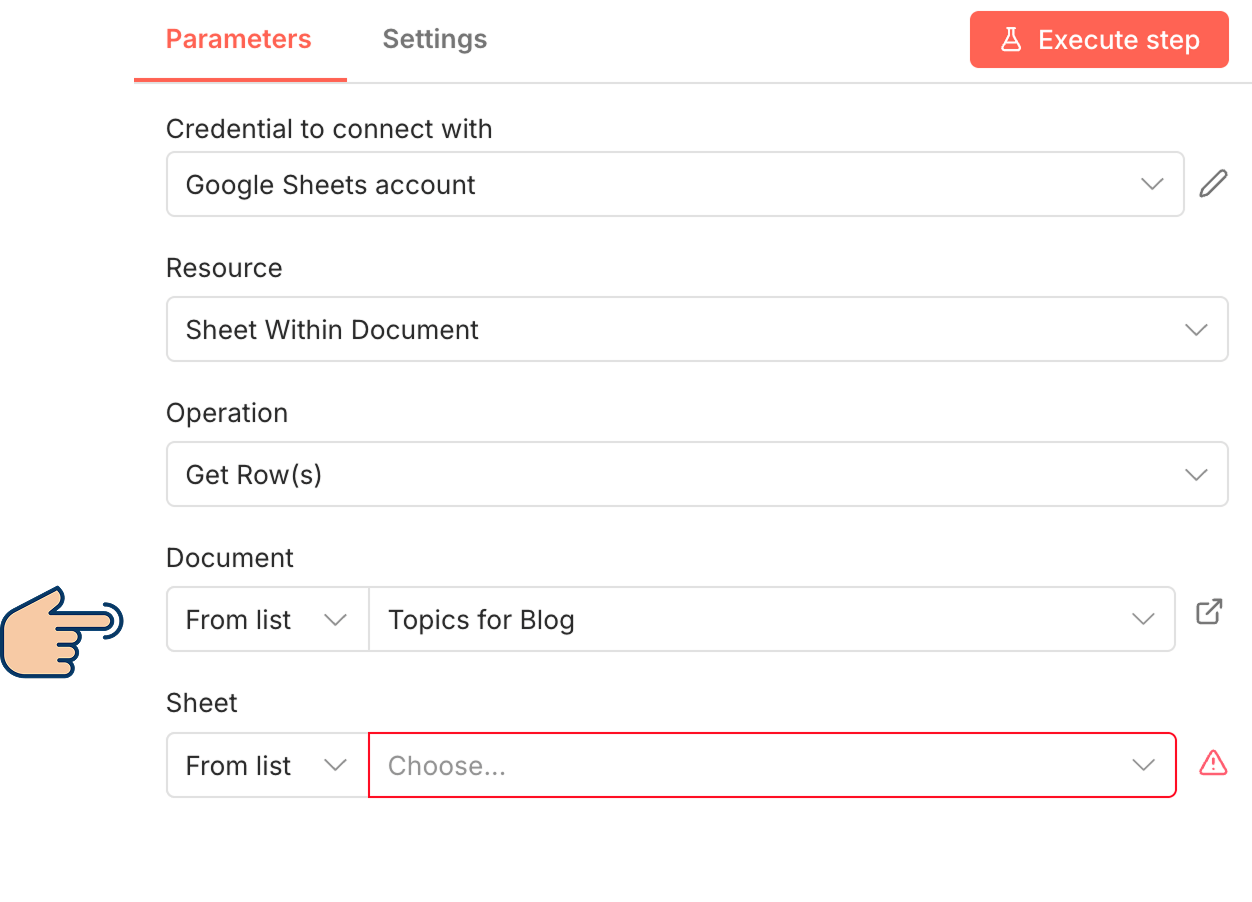
In my case, I added the topic list of "Topics for Blog" spreadsheet:
So, I selected it for the document.
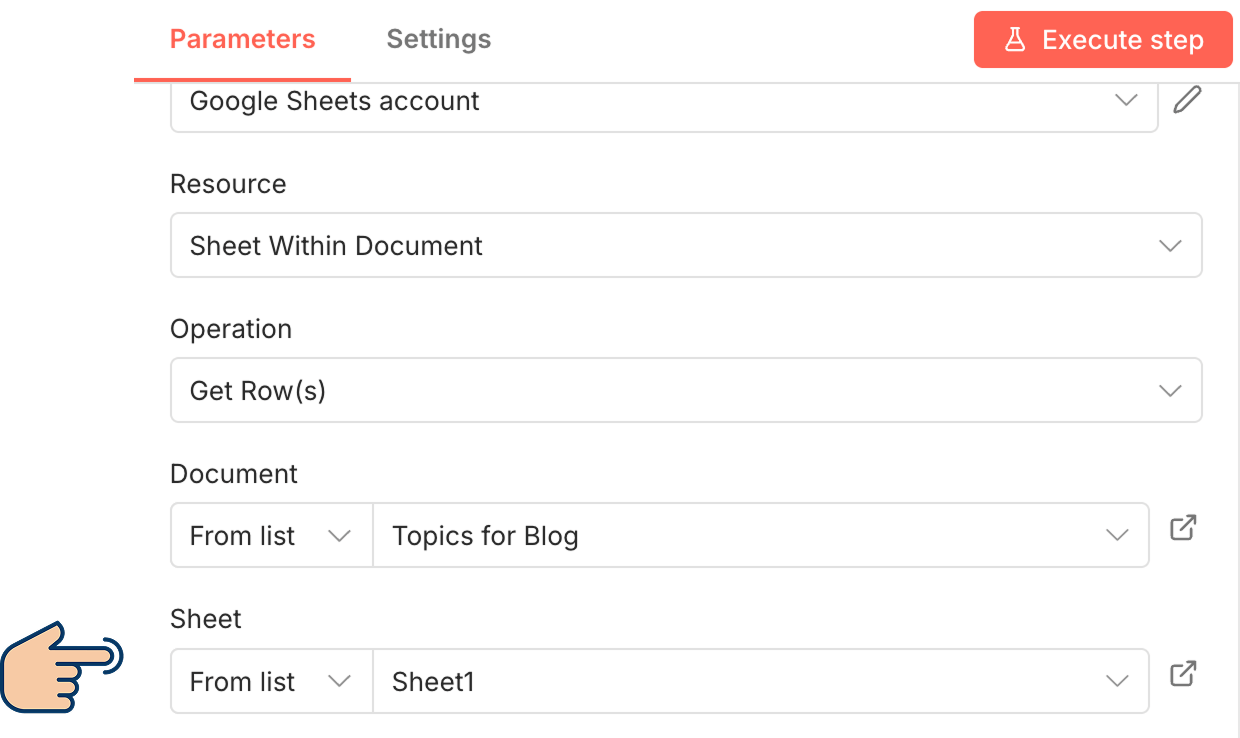
Next, the topics were inside "Sheet 1" of my spreadsheet.
So, I selected it for the sheet:
That's all we need to do for now.
If we now click the "Execute Step" button on the Google Sheets node, you should see the topic data in the node's output panel:
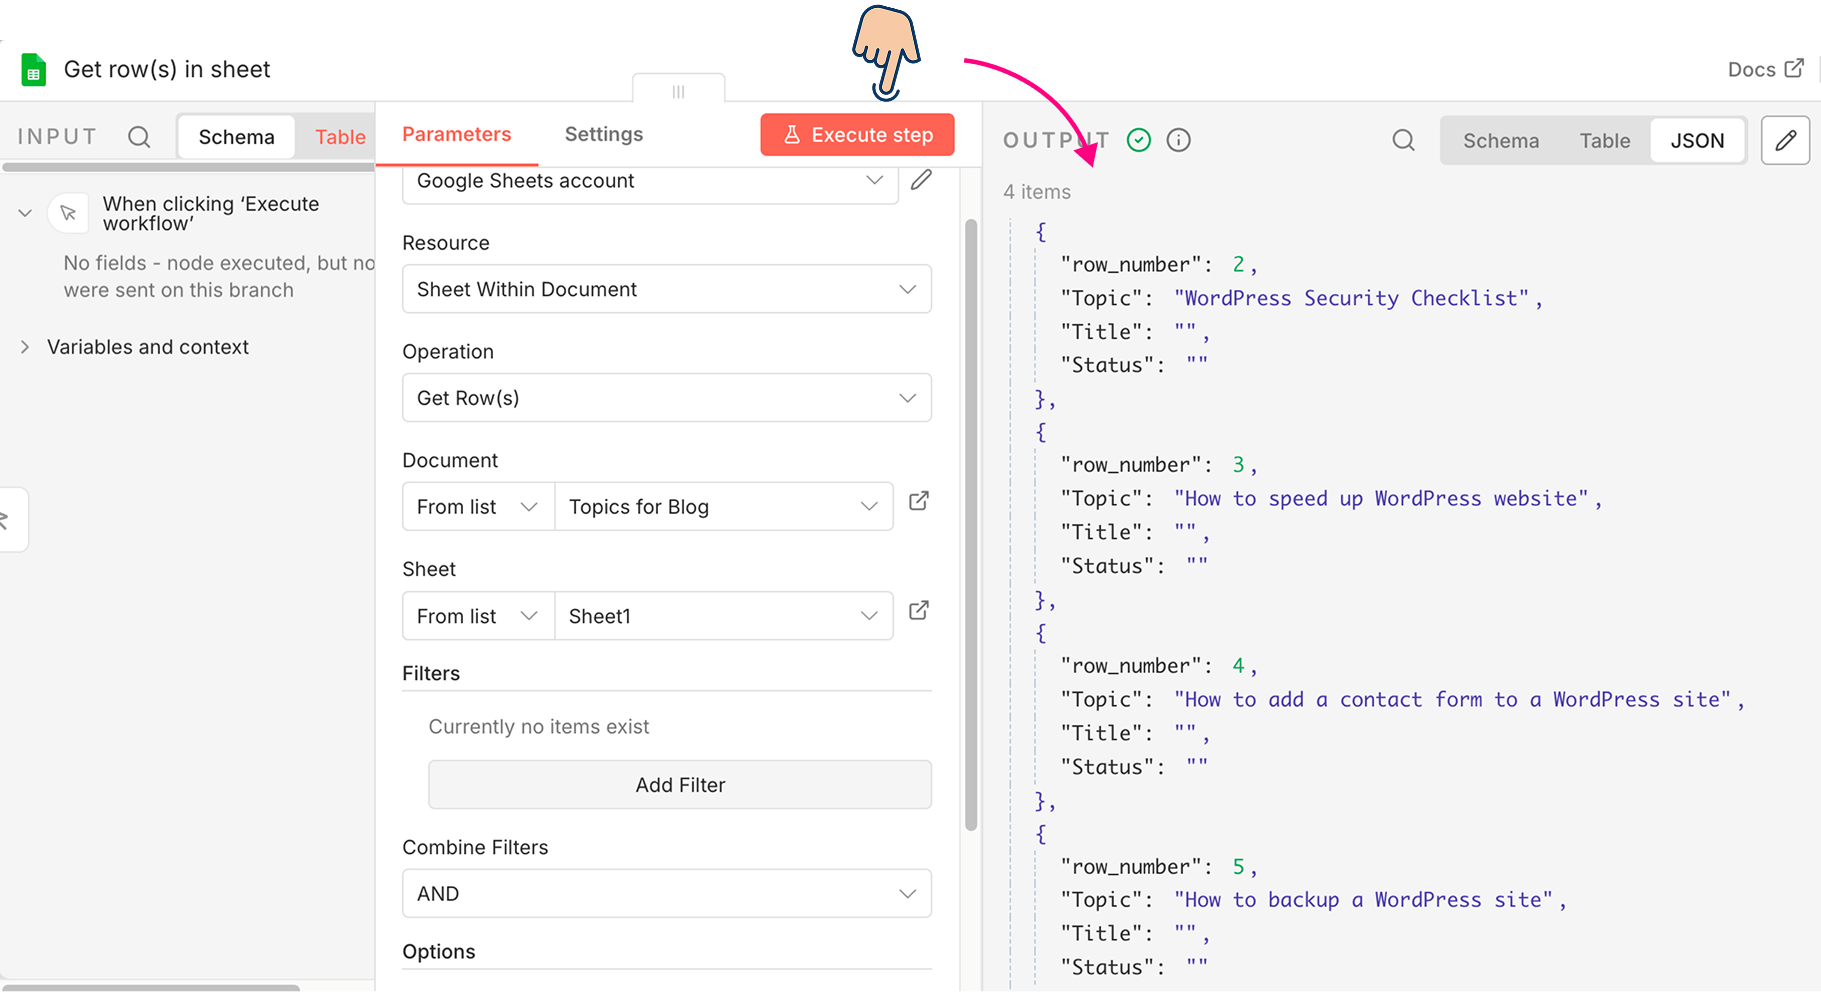
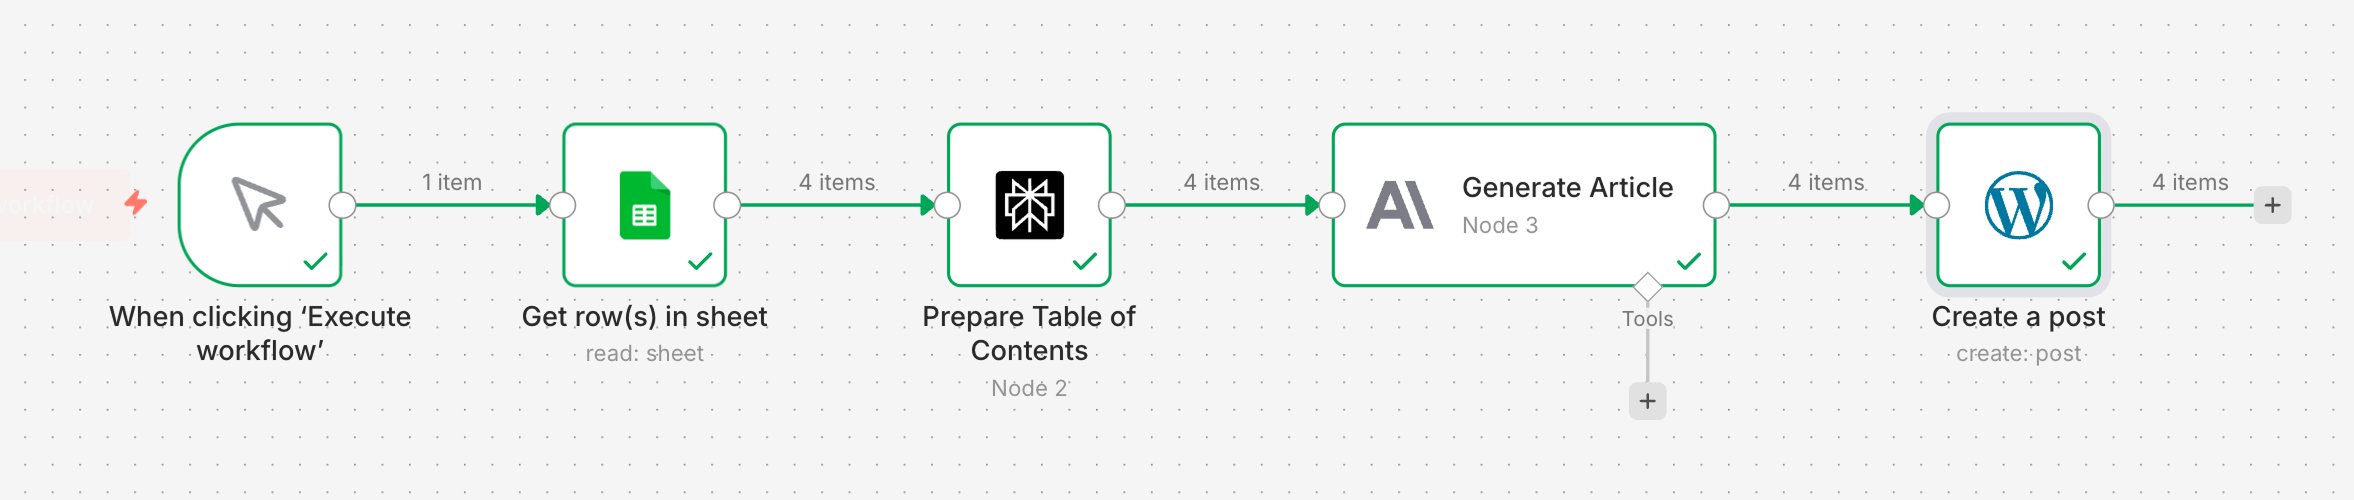
If you notice, my spreadsheet has four topics, and I can see all of them in the node's output panel.
This also means that:
- All four topics will be provided to Perplexity AI, and it will generate a table of contents for all four topics.
- Next, all four unique tables of contents will be provided to Claude, and they will generate four unique articles.
- Finally, all four articles will be posted to the WordPress site as drafts.
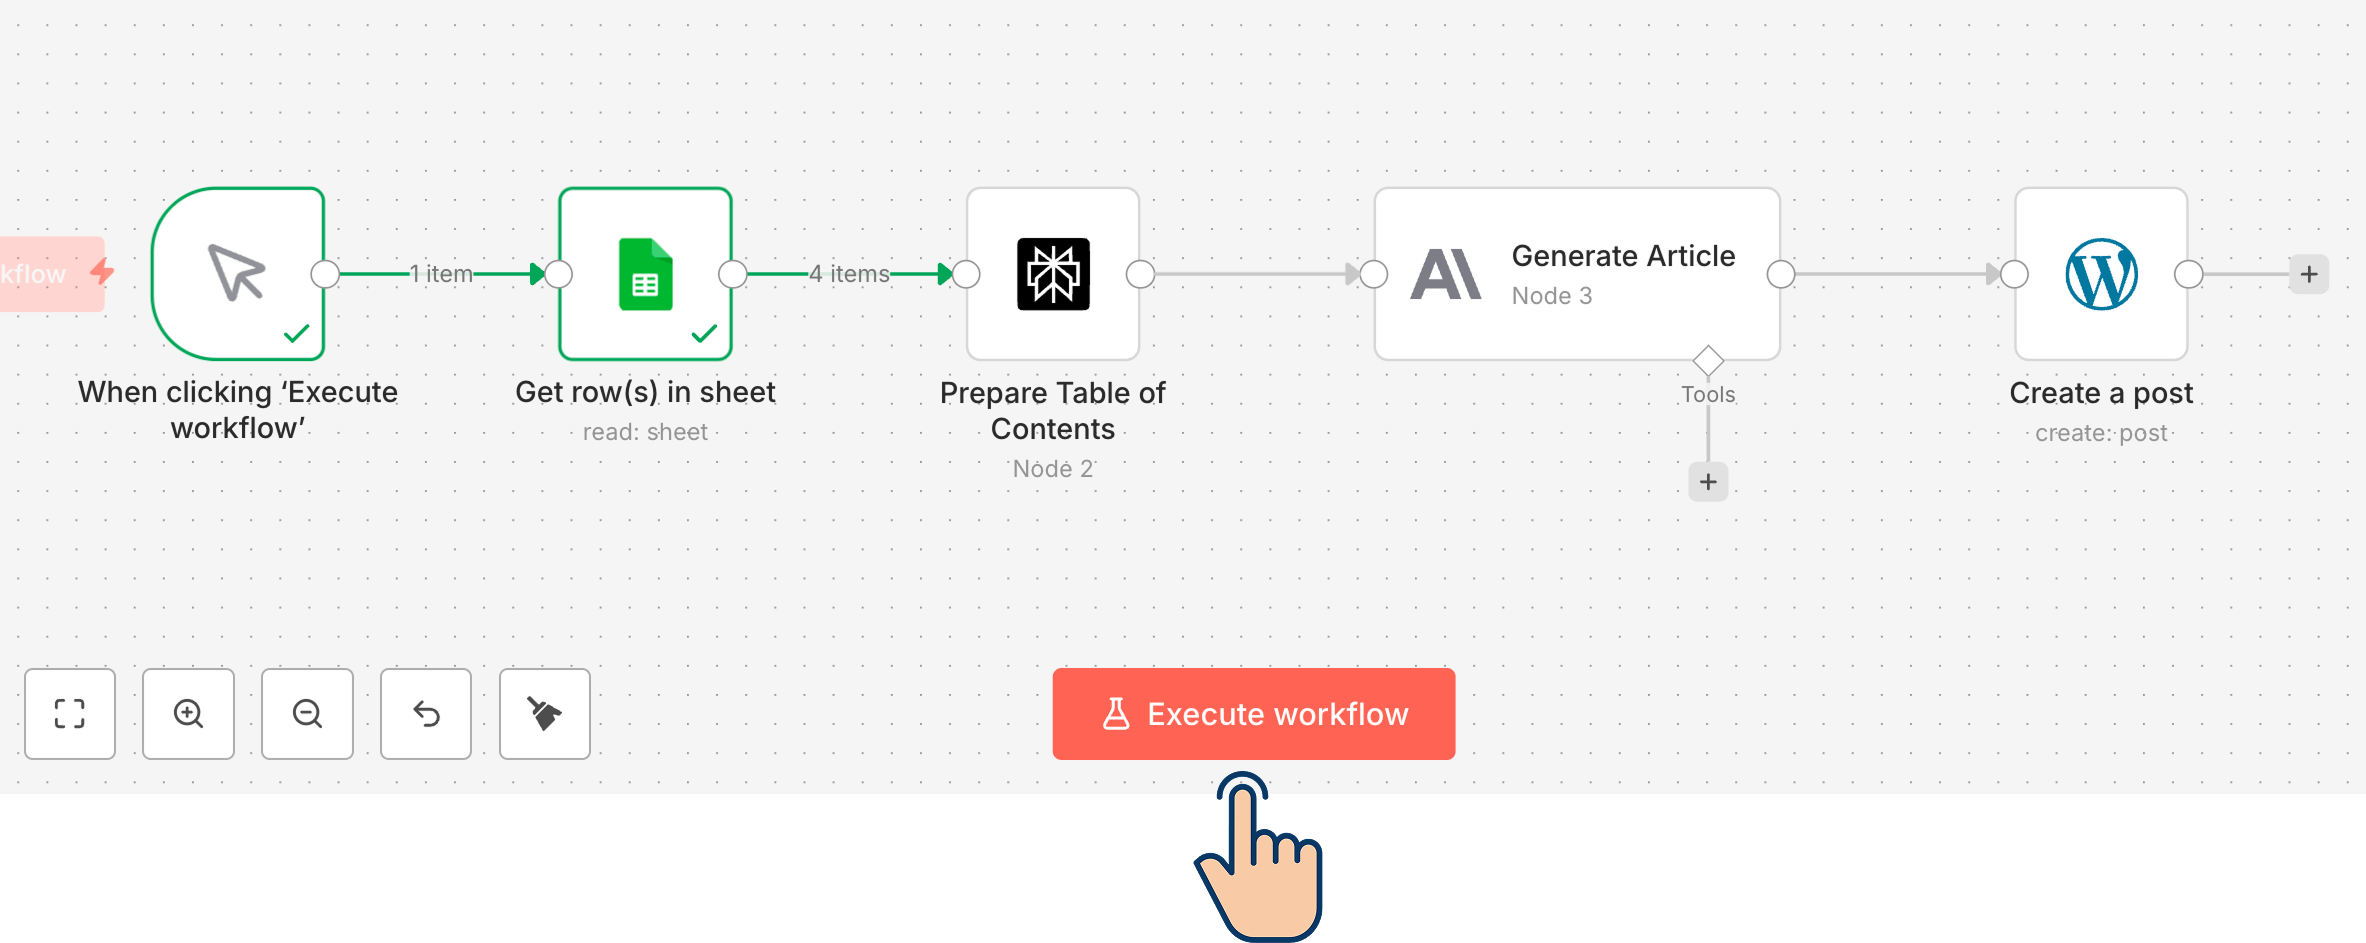
Come on, let's test this out by running the entire automation and see what happens.
With a manual trigger, you need to click on the "Execute Workflow" button to run the automation:
In my case, everything went well, and four unique articles are now posted to my WordPress site:
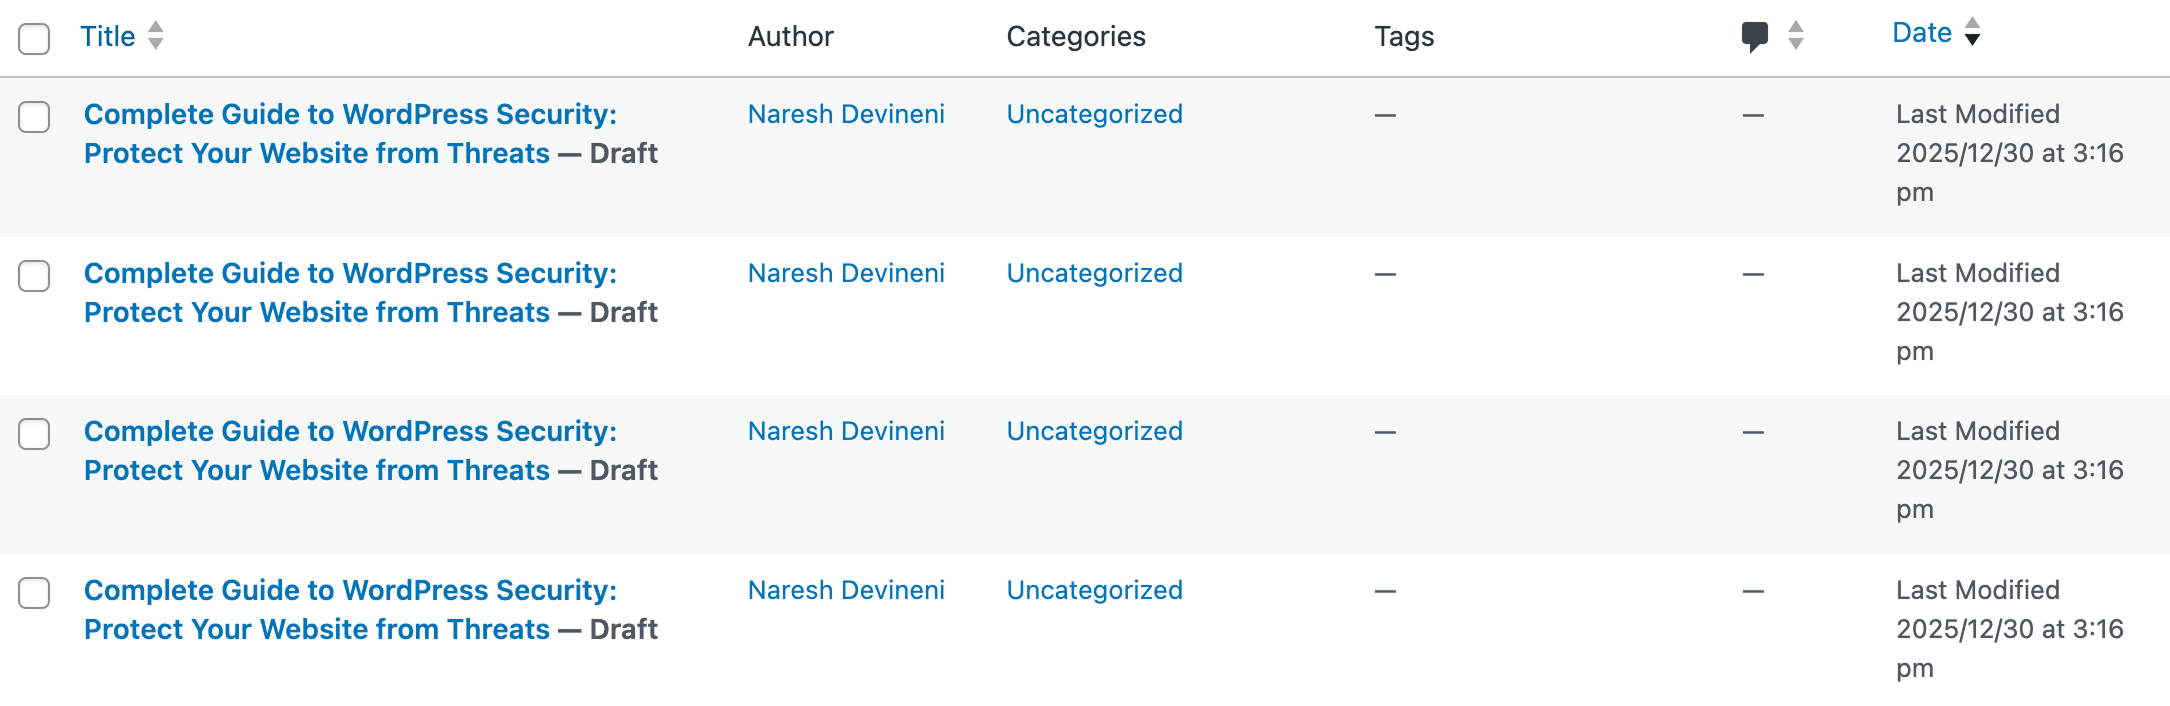
And bang!
There is one tiny problem in our automation.
Although we succeeded in generating four unique articles for the topics provided, our automation duplicated the same title for all those articles.
Any idea why?
Yep, I remember that we hard-coded the title previously.
Correct! I am glad that you are aware of the problem already.
But yes, we hard-coded the title inside WordPress's "Create a post" node:
This is why all four articles got posted with the same title.
And this is a challenge I want you to fix.
The Challenge: Generate a unique title for each article generated by Claude and use it dynamically inside the WordPress node
If I did my job of teaching you n8n correctly, you shouldn't have any problem solving this challenge.
Solve this problem and let me know in the comments.
Call me crazy, but I am not going to provide the solution for this challenge 🤣
You should figure it out somehow.
Until next lesson...Bye for now 😄