WhatsApp n8n integration: The ultimate guide

Just to be on the same page:
n8n can automate workflows, and WhatsApp is where many businesses communicate with customers.
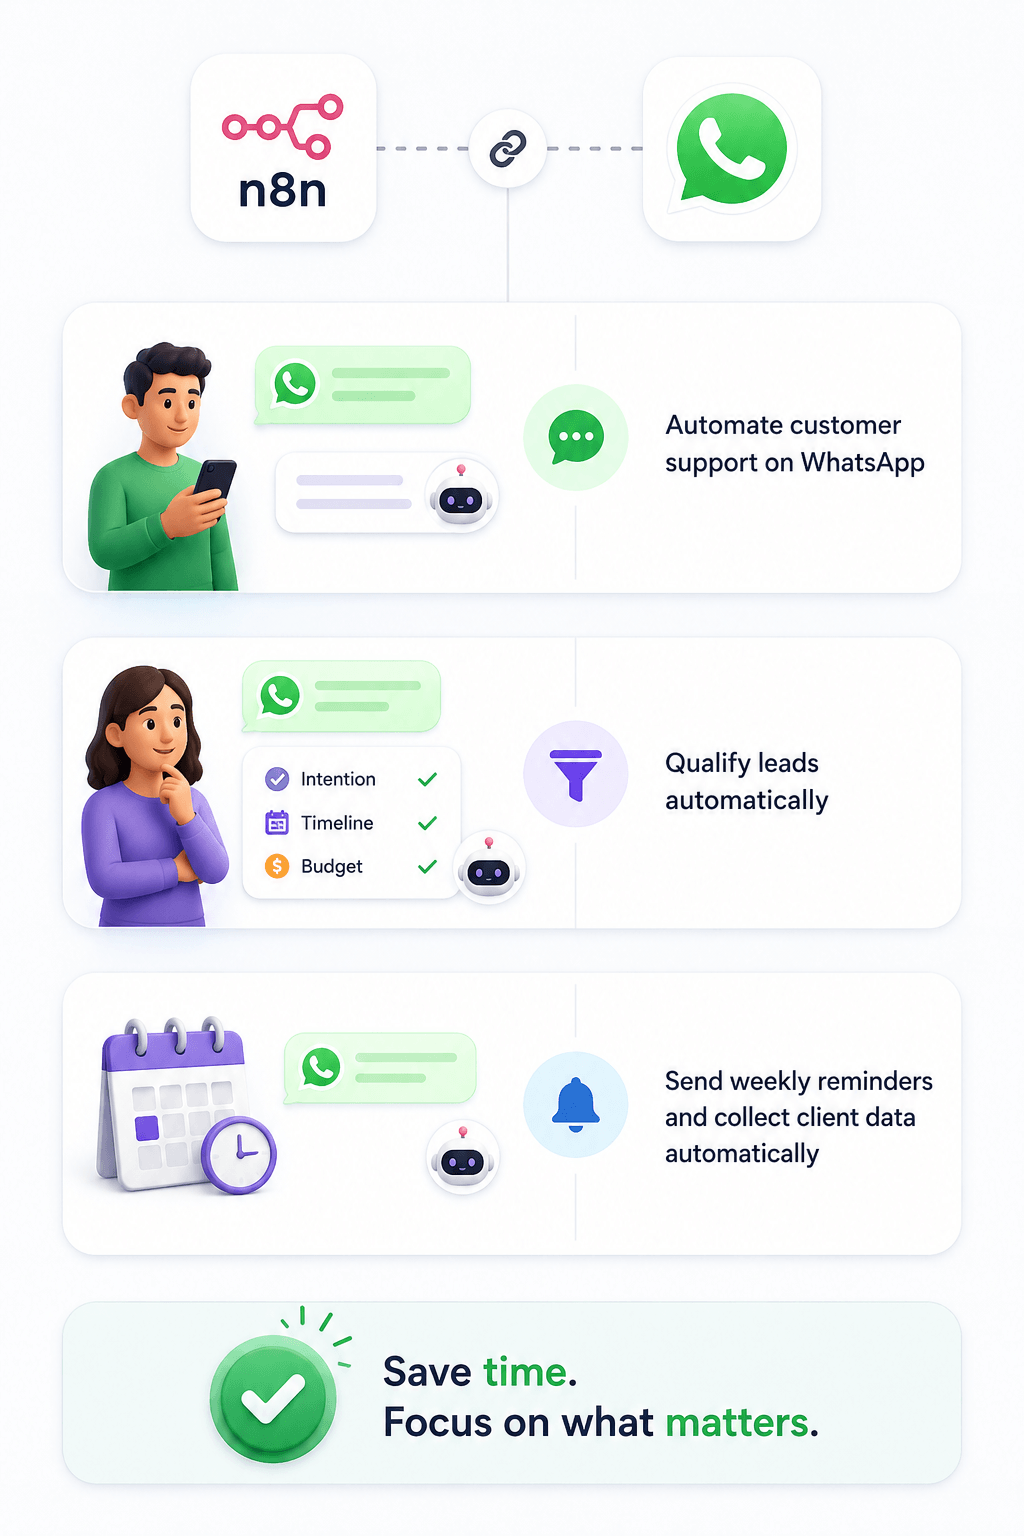
And by connecting n8n with WhatsApp, you can automate:
- Customer support
- Lead qualification
- Reminders
- The list goes on and on
But now comes an important question.
How do we connect our WhatsApp account with n8n?
How do we send messages inside WhatsApp using n8n, even though they are two different applications?
Simple.
We can connect n8n with WhatsApp through the WhatsApp Cloud API.

Woah! Woah! Slow down! What's an API?
Ah, forgot to explain that :D
What's an API and a WhatsApp API?
An API (Application Programming Interface) is like a bridge that lets two different applications talk to each other and share functionality.
Actually, you can understand the role of an API better when you realize when you need it and when you don't.
You don't need an API when you're okay using a service in its own ecosystem.
For example, you don't need WhatsApp Cloud API when you're comfortably getting your work done inside the WhatsApp mobile or desktop app.
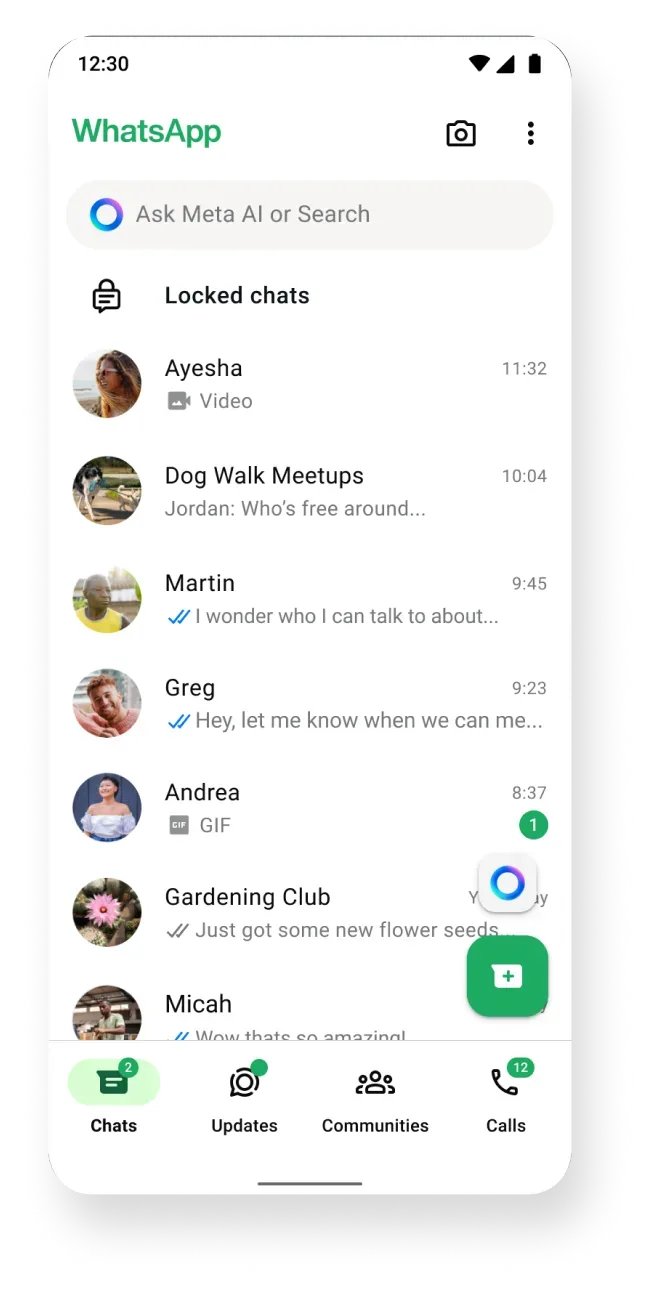
But you DO need an API when you want to achieve something beyond the service's default functionality.
For example, although you can send and receive messages using the WhatsApp mobile app, you can't use an AI agent to respond to your customer queries automatically.
This AI Agent feature isn't available inside WhatsApp's mobile app.
You need to borrow this AI Agent functionality from a tool like n8n.
This means you need to manage your WhatsApp messages with n8n.
But because n8n and WhatsApp are different software and companies, you need to use the WhatsApp Cloud API to allow n8n to access and manage your WhatsApp messages.
In other words, WhatsApp Cloud API acts as a bridge between WhatsApp and n8n, allowing you to use an AI agent to respond to your customer queries.
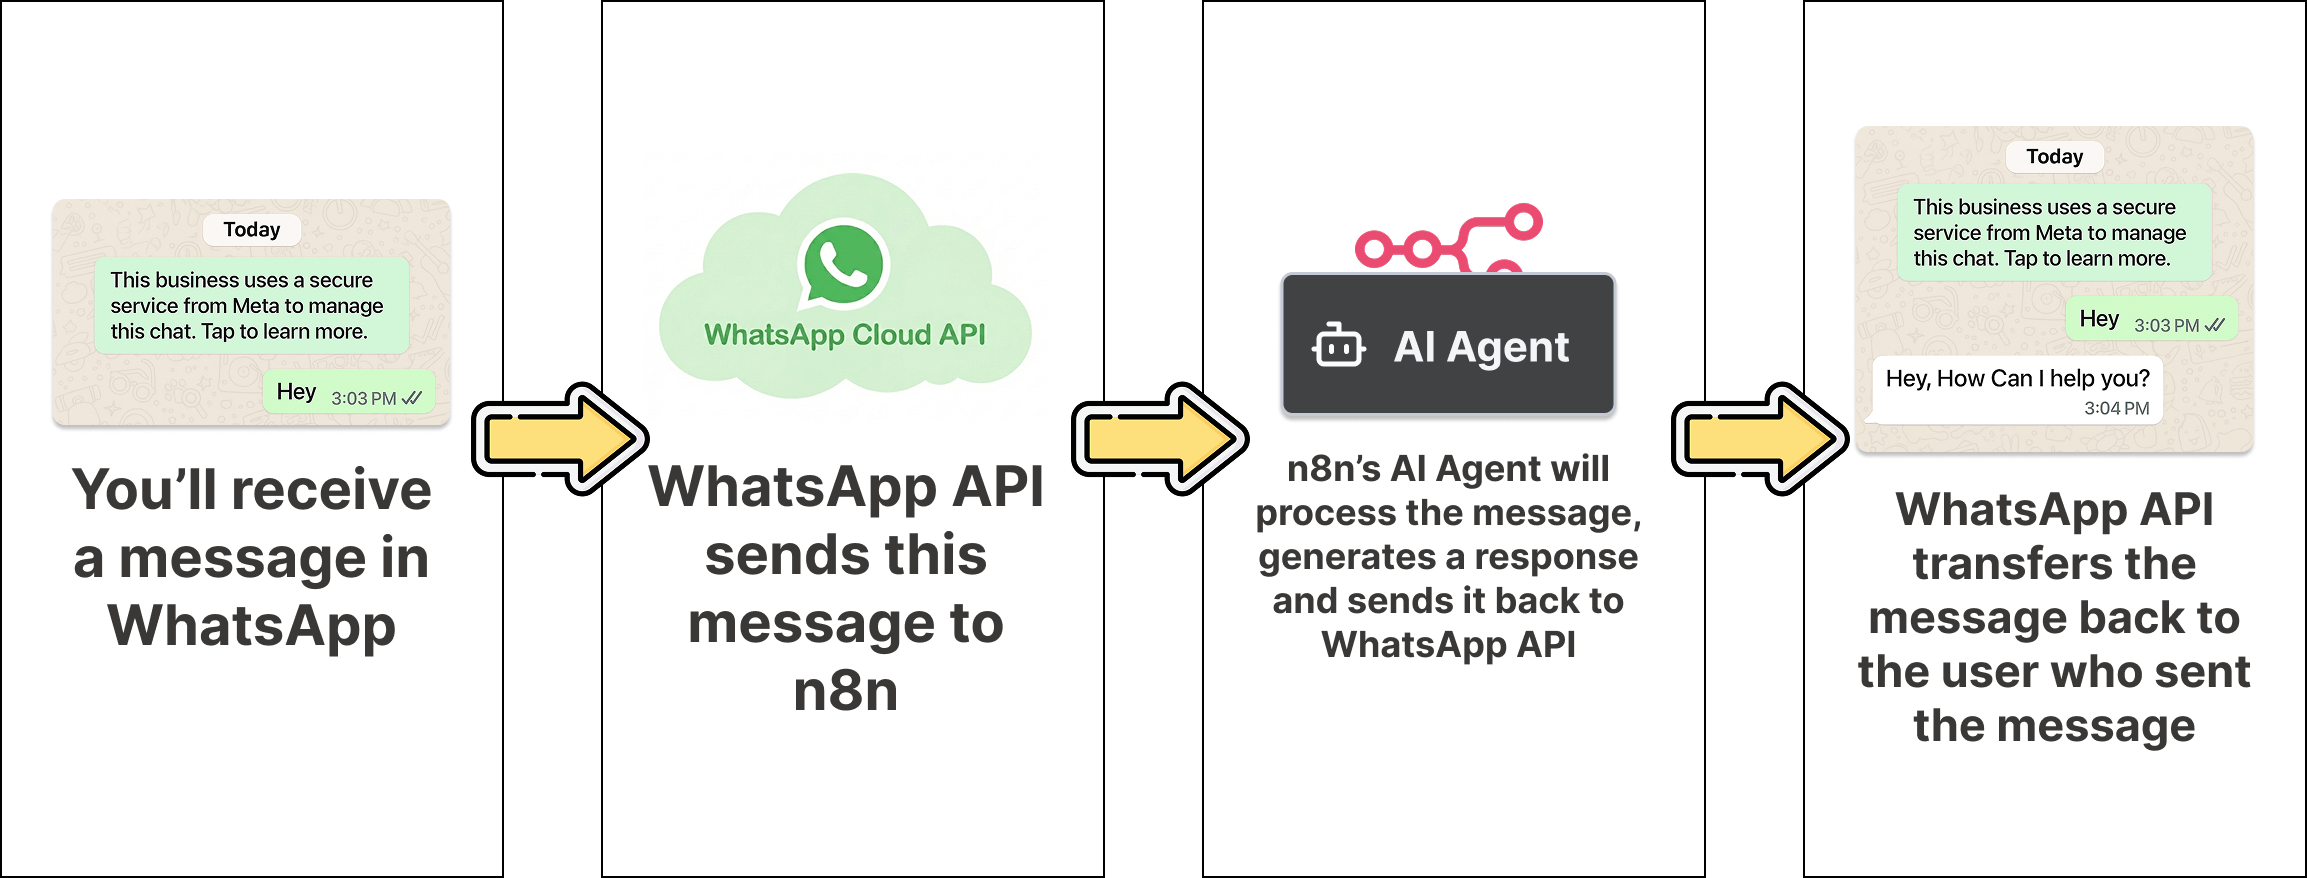
Alright! Now that you understand the purpose of a WhatsApp Cloud API or any API usage in general, next, let's see...
How to get access to WhatsApp Cloud API
Just to recap, with the WhatsApp Cloud API, you can link WhatsApp to n8n and automate customer conversations.
And you can achieve this in two ways:
- The direct way - Using the Meta platform to get access to the WhatsApp Cloud API.
- The indirect way - Using third-party services like Twilio or software like GoHighLevel to indirectly use the WhatsApp Cloud API.
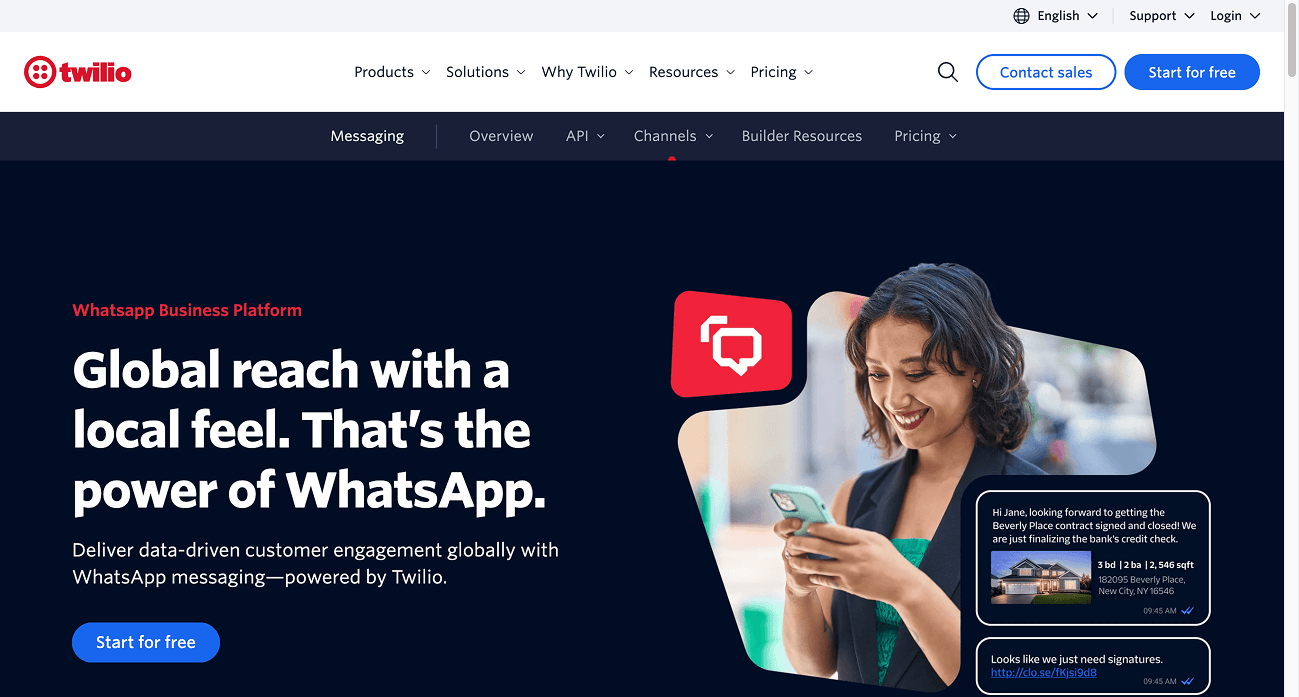
People use services like Twilio to indirectly use WhatsApp Cloud API because the direct way has a strict Meta verification process that most businesses fail.
But if you can crack it, the direct way is the best way because it reduces dependency on third-party services like Twilio just for using the API.
So, in this lesson, first, we will see how to integrate WhatsApp and n8n using the direct method, that is, using the Meta platform to get access to the WhatsApp Cloud API.
The direct method - Using the Meta platform to get access to the WhatsApp Cloud API.
We can achieve this in nine detailed steps:
- Create a Meta developer account and an app
- Create a business portfolio as part of the app creation process to provide your business details to Meta
- Create a system user for your Business Portfolio, assign it to the app, and generate an access token for later use.
- Create a WhatsApp business account (WABA), add a phone number to it, and verify it.
- Assign the system user to the WhatsApp business account with full permissions.
- Register the Phone number and subscribe to the WhatsApp Business Account webhook.
- Integrating WhatsApp with n8n using the system user's access token, App ID, and its secret.
- Verify your business.
- Add a payment method to your WhatsApp Business Account (WABA).
Finally, integrate the WhatsApp Cloud API with n8n only if all the above steps are successful.
Come on, let's dive in.
Step 1: Create a developer account on Meta and then create an app
We must create an app inside our Meta developer account to be able to use Meta APIs such as Facebook, Instagram, and WhatsApp Cloud API.
In our case, we want to create an app to use the WhatsApp Cloud API.
And for creating an app, you need to access your Meta Developer account first.
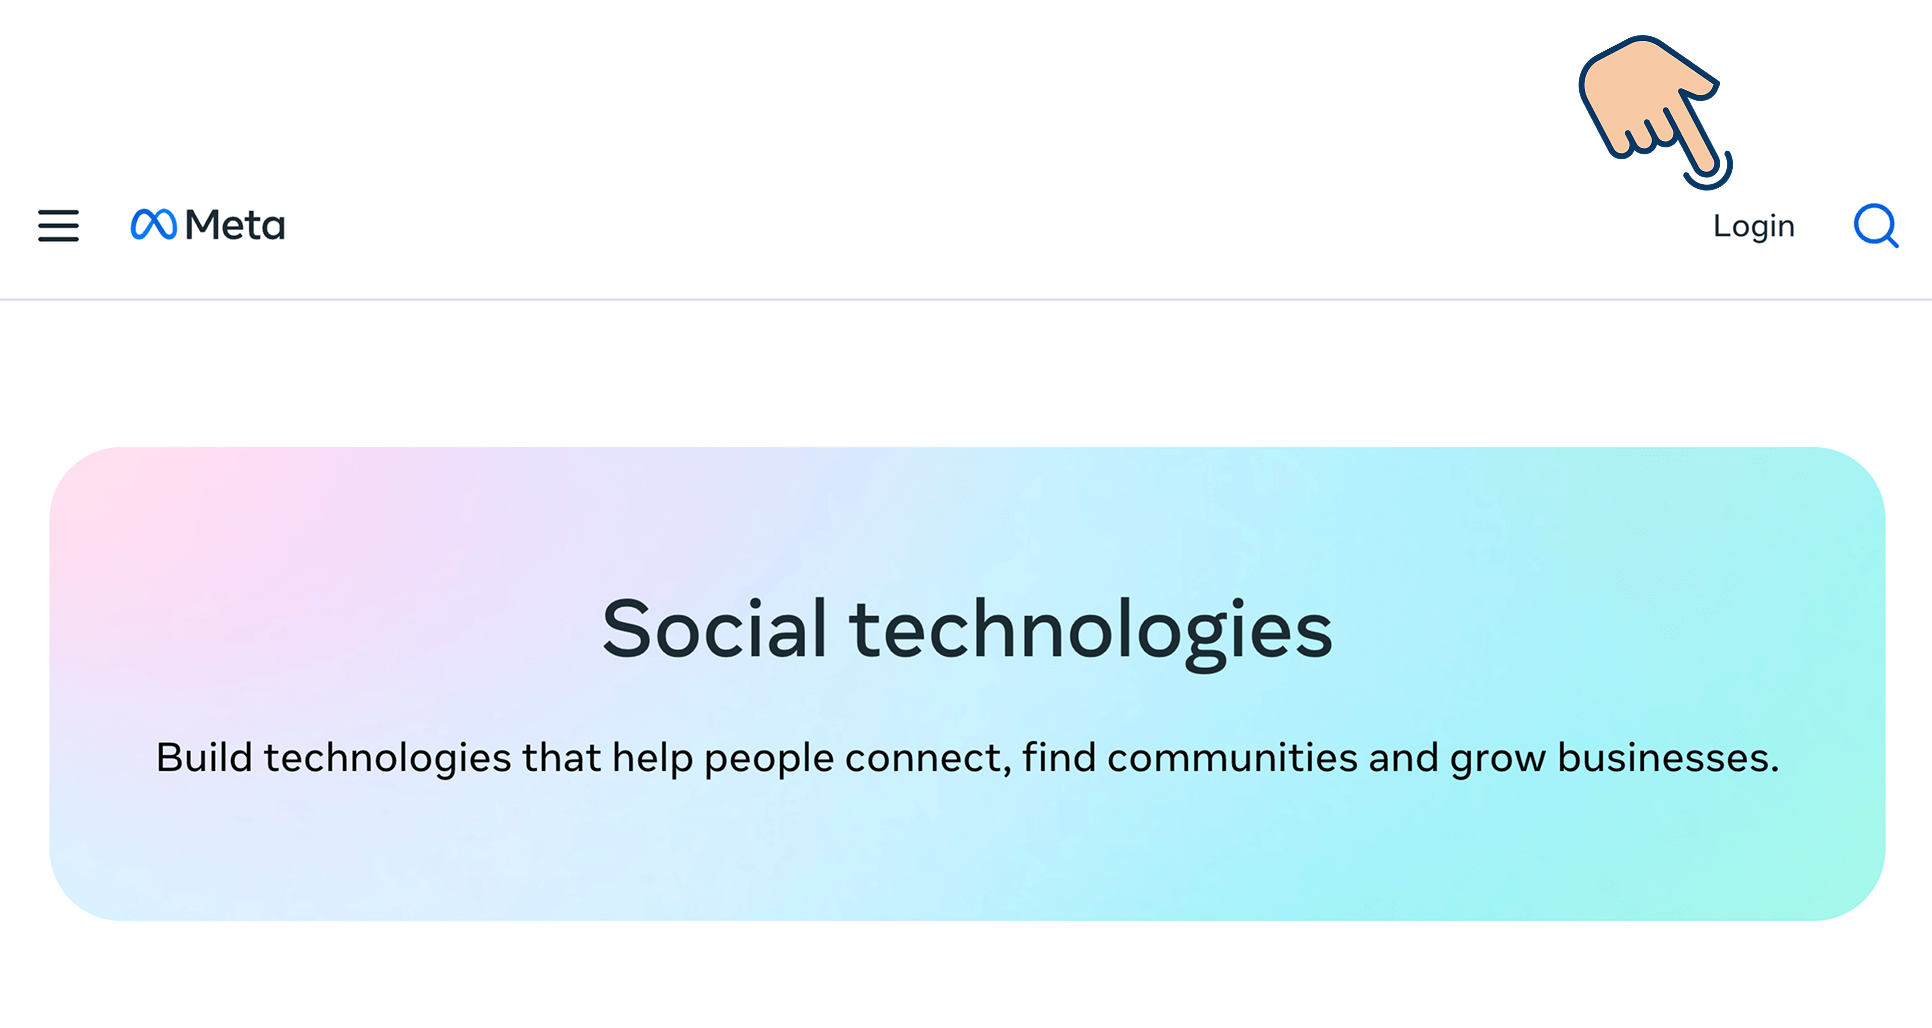
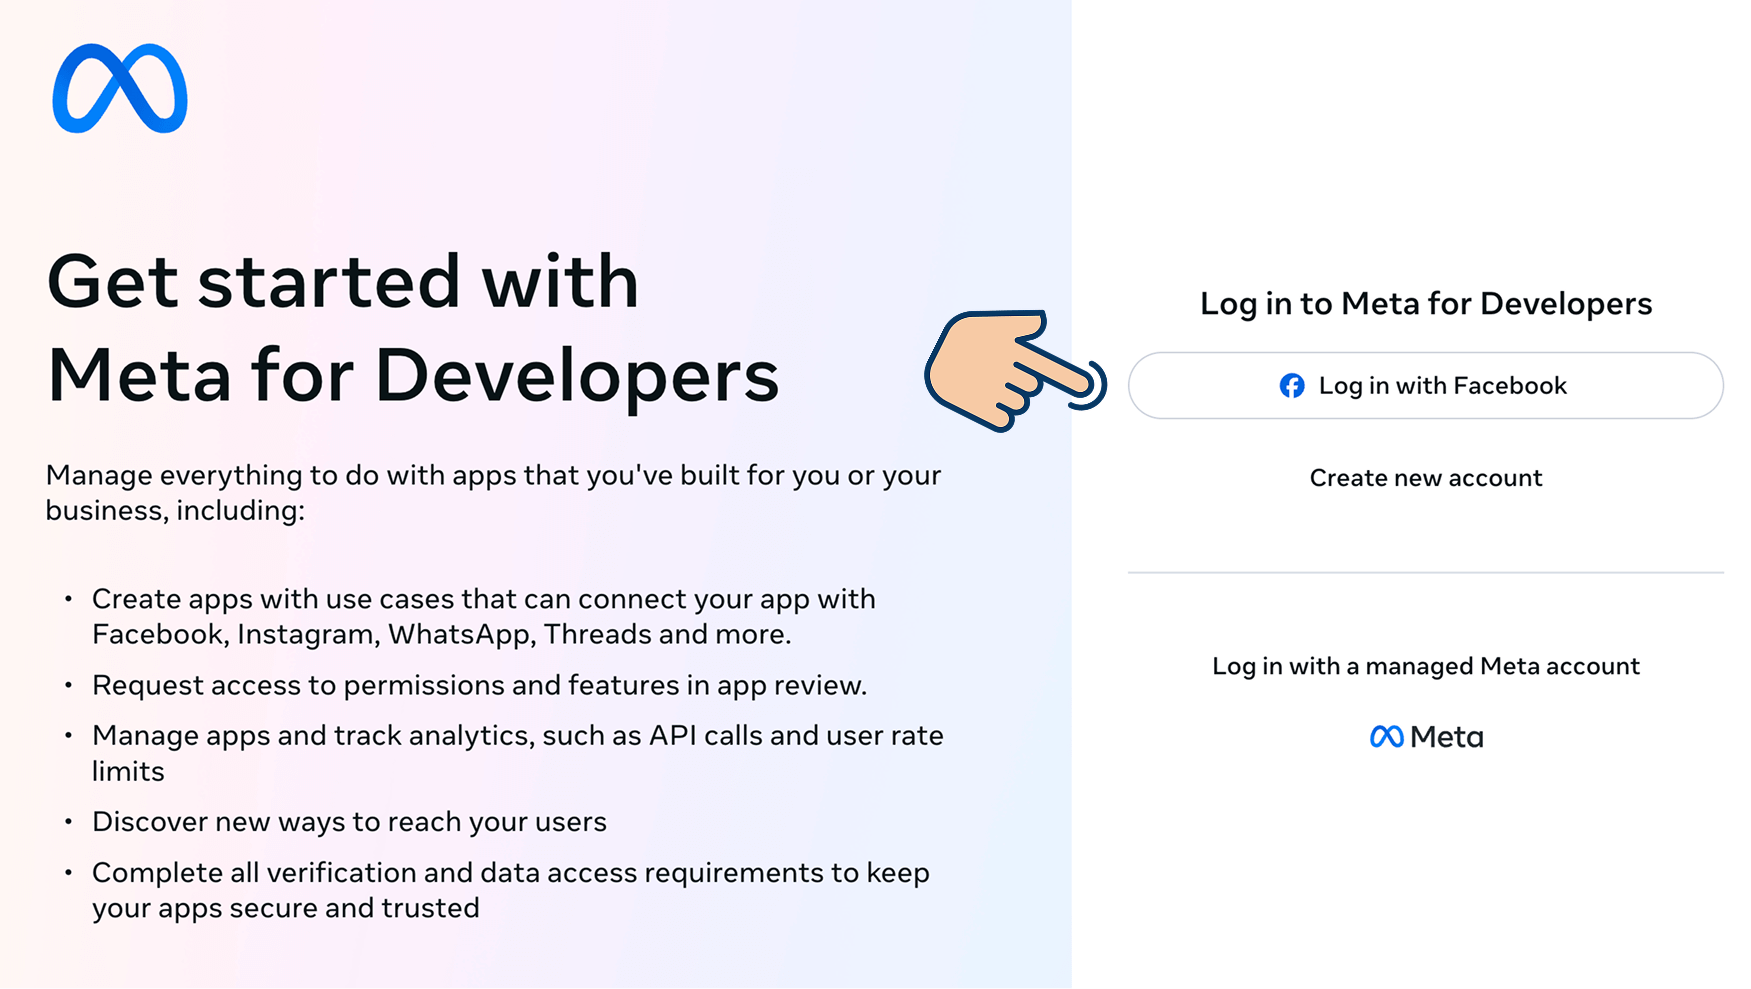
So, go to Meta's Developer site and click on the "Login" button located in the top-right-hand corner:
Next, click on the "Login with Facebook" button:
But I don't have a Facebook account.
Unfortunately, you can't access Meta's Developer account without a Facebook account because Meta API access often involves managing Facebook Pages, Ad Accounts, etc.
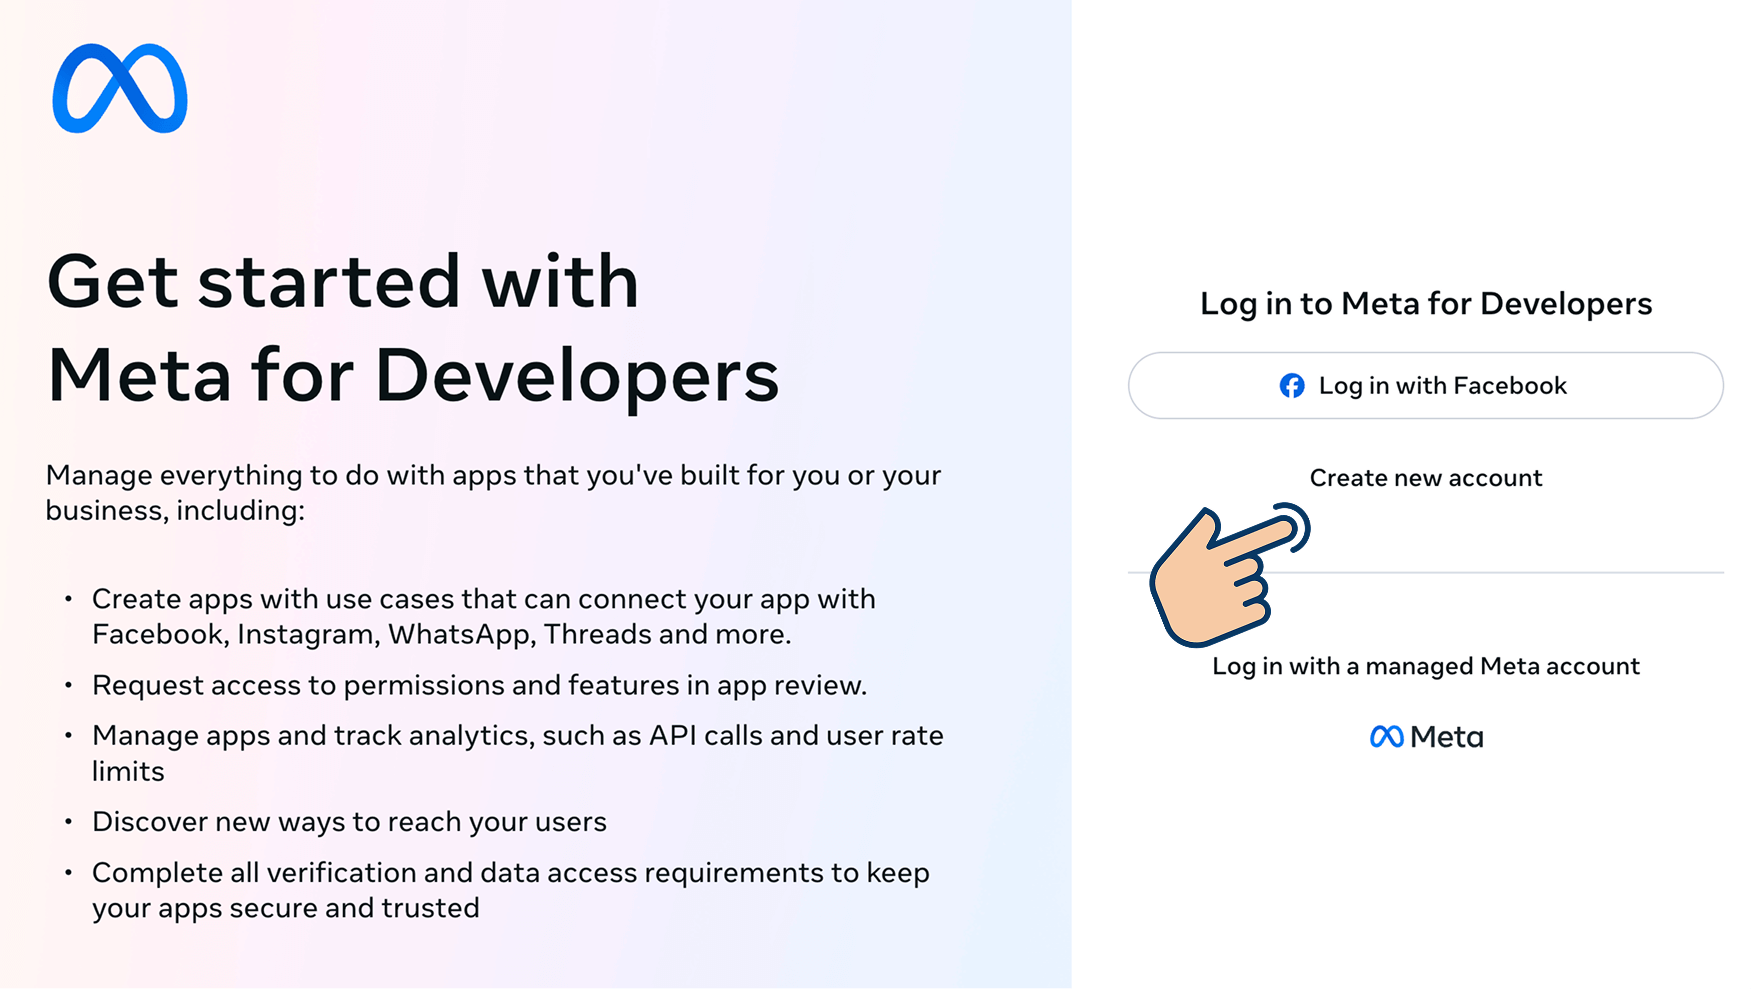
So, if you don't have a Facebook account yet, sign up for it by clicking on the "Create new account" button from the same screen:
Or go to:
Once you sign up for a Facebook account and log into it, come back to: https://developers.facebook.com/


Next, click on the "Get Started" button located in the top-right-hand corner of the screen:
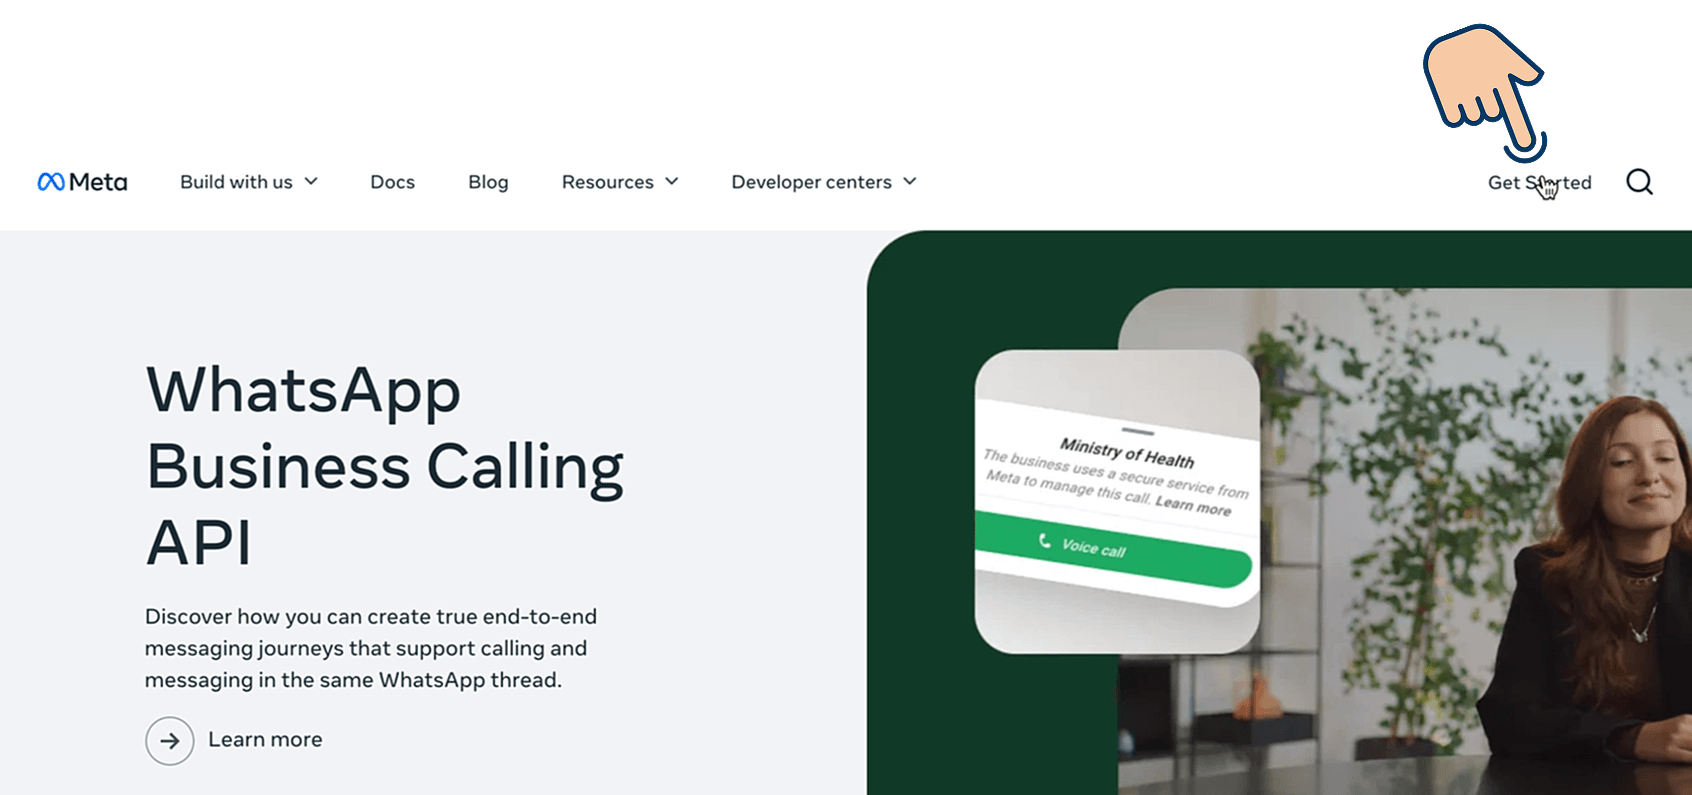
This will take us to the "Create a Meta for Developers account" screen.
Simply put, a registration screen for a developer account.
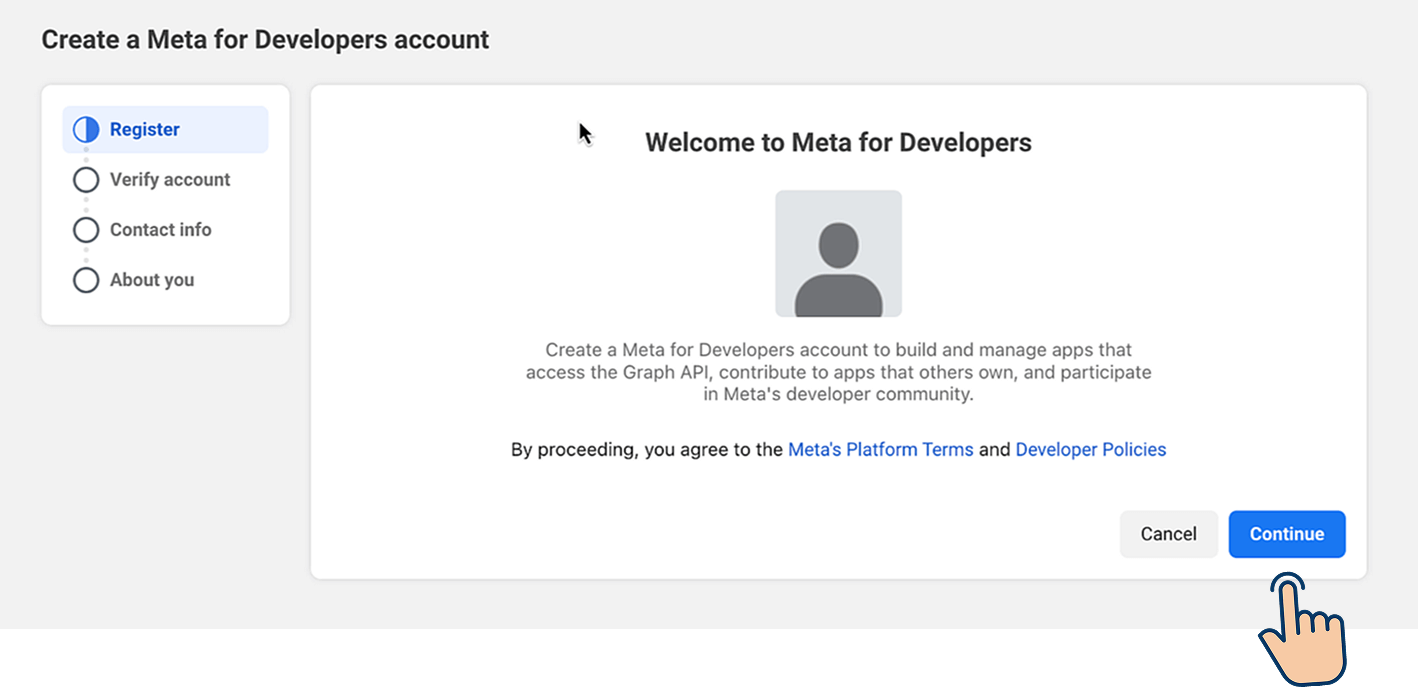
The registration process involves four steps.
Step A: Begin the registration by clicking the "Continue" button
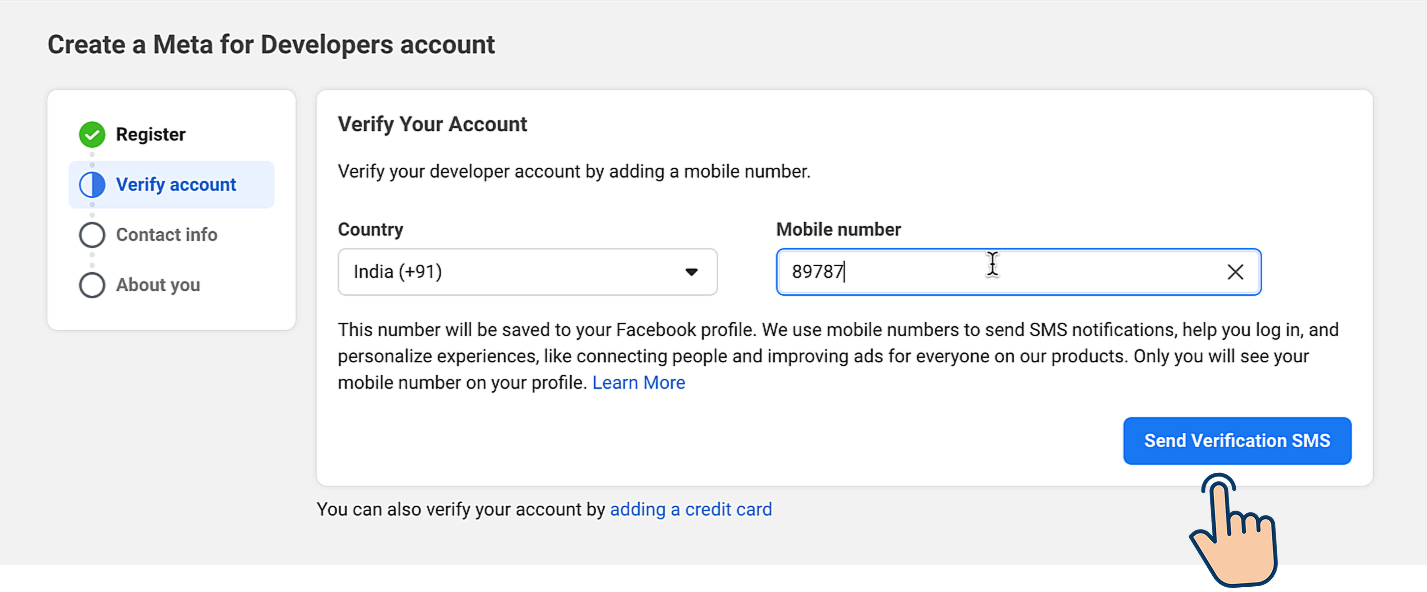
Step B: Verify your account
You can verify your developer account by adding a mobile number:
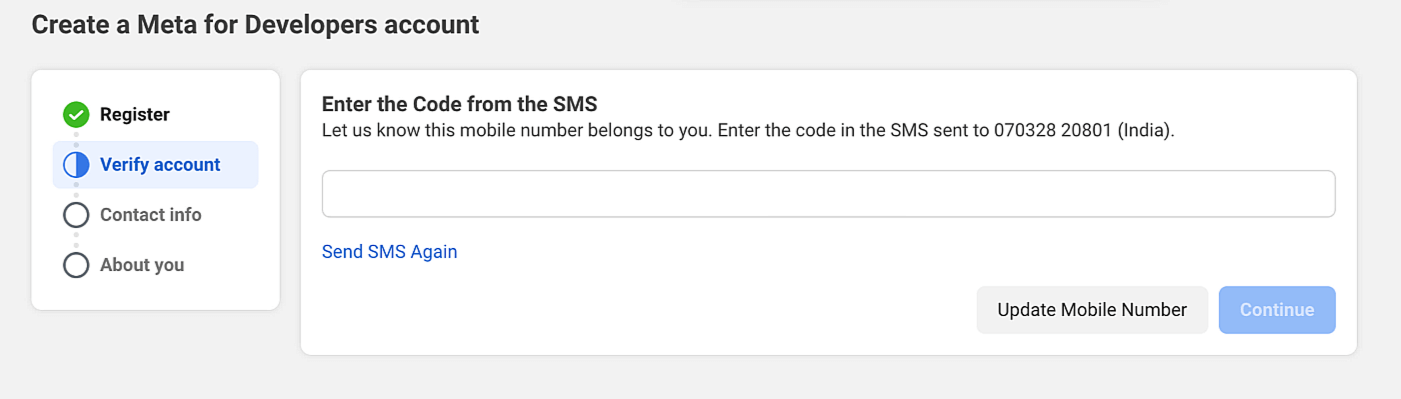
And then sending an OTP via SMS to perform the verification:
Once the verification is done...
Step C: Confirm the email address that you want to use with Meta Developer account
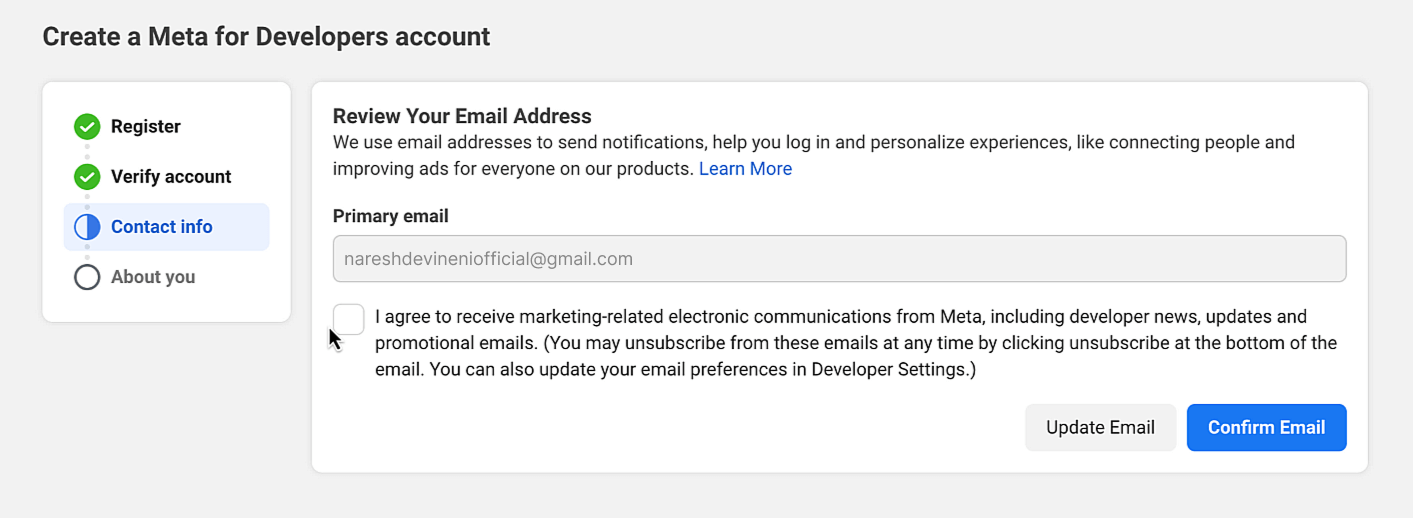
The email gets automatically picked from your Facebook account.
Finally...
Step D: Choose a role that describes you the best and complete the registration process
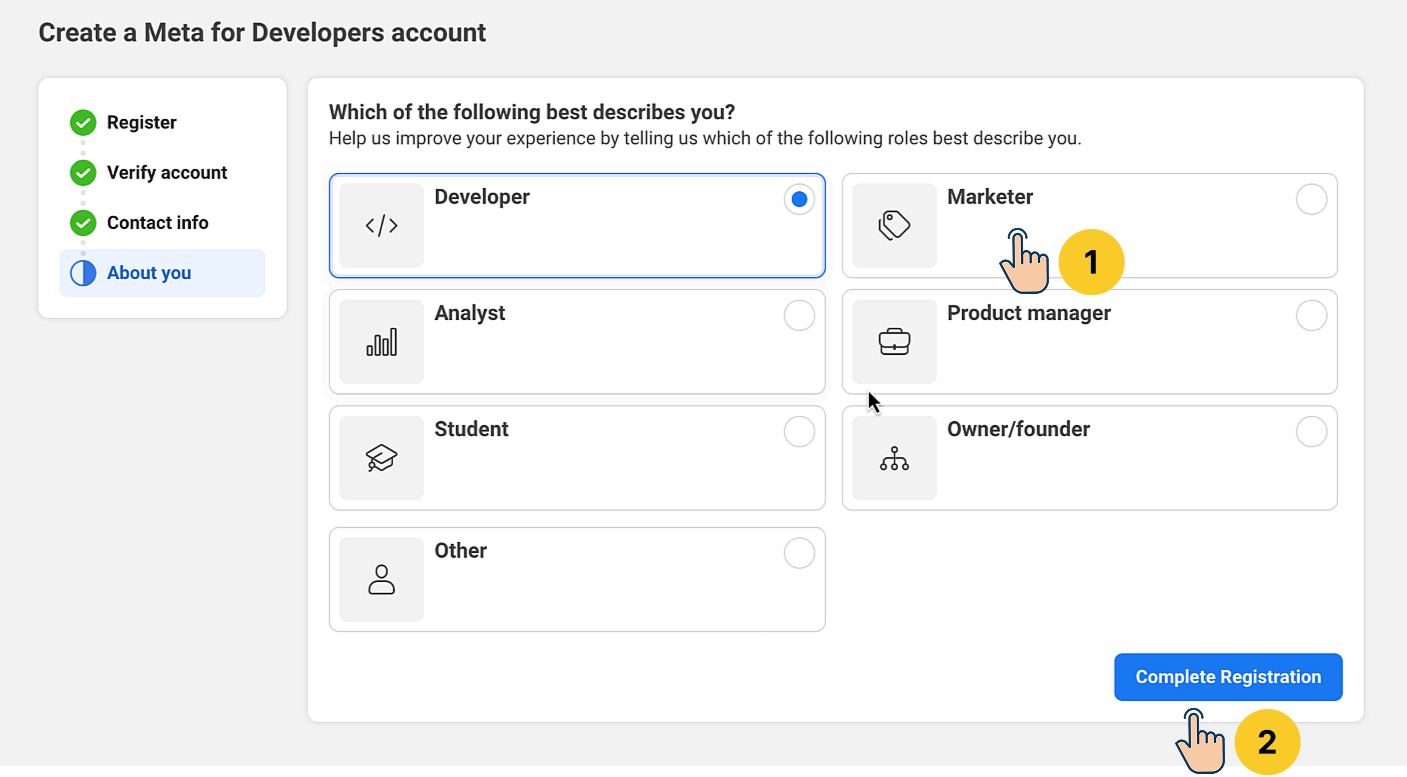
You can choose any role, and choosing one over the other will not impact the registration process.
For example, I am primarily a coder, so I chose "Developer" for the role.
And, once you choose the role, click on the "Complete Registration" button to finish the process of creating a developer account for Meta.
Once the registration is complete, you will be taken to the "Apps" screen:
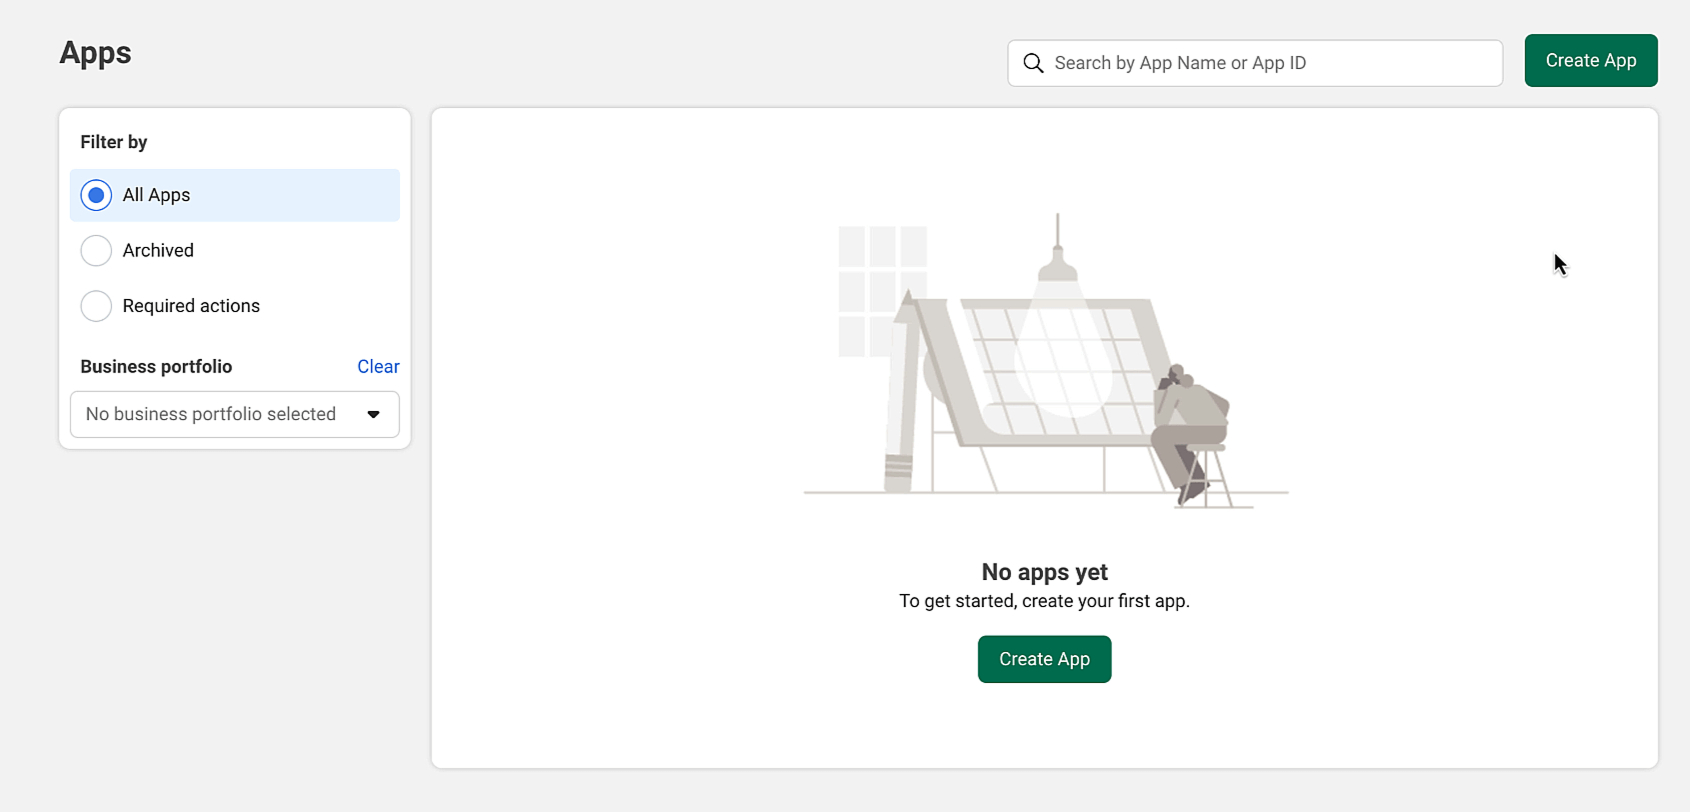
Next, we need to create an App for using the WhatsApp Cloud API.
So...
How to create an app and business portfolio for using WhatsApp Cloud API
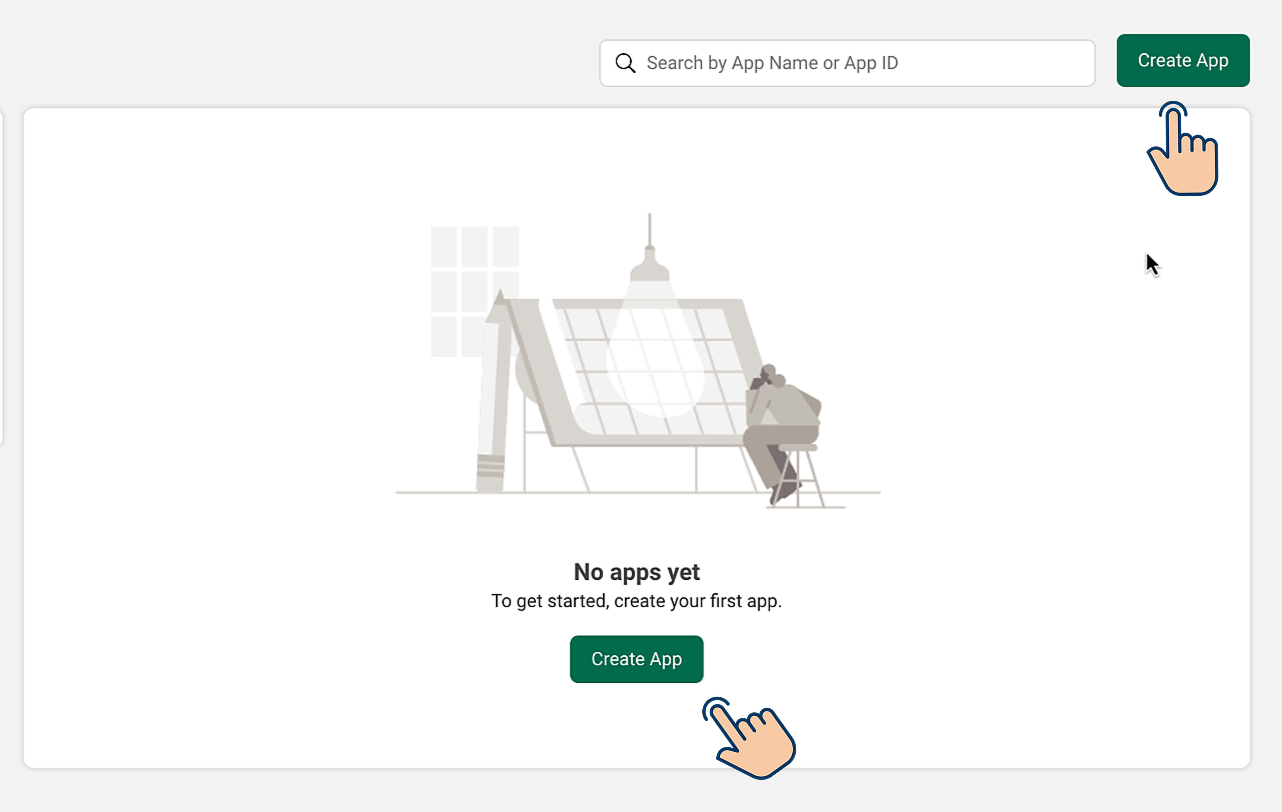
To achieve this, start by clicking on the "Create App" button.
You can find this button at the center of the page or on the top-right-hand corner of the screen.
Next, you might get greeted with this pop-up that says "There's a new way to create apps with Meta":
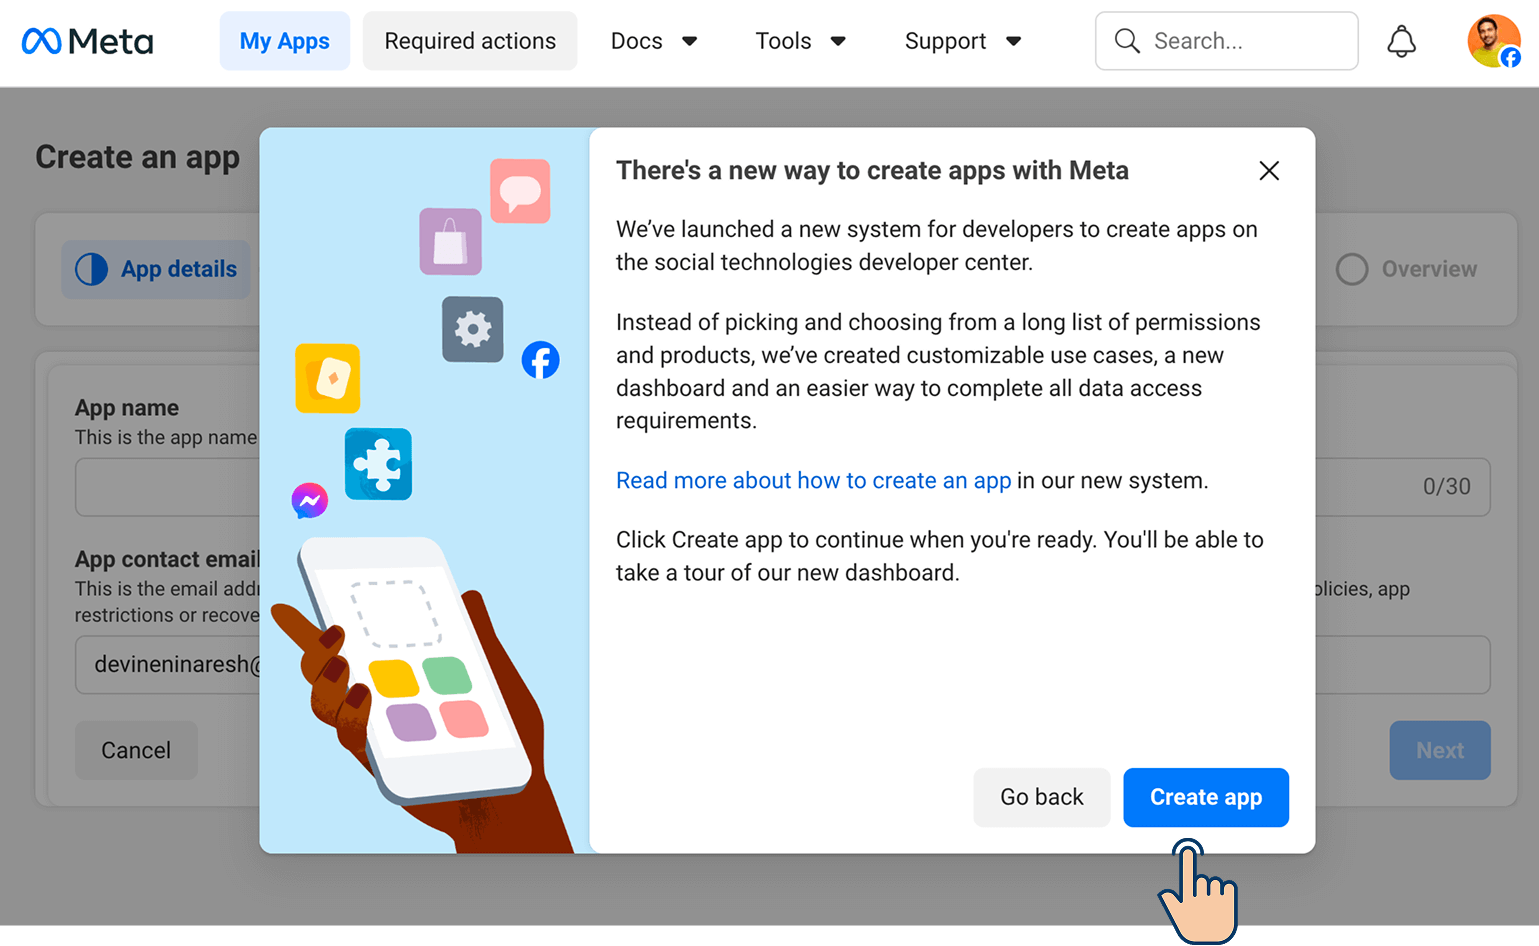
If you see this, click on the "Create App" button one more time to close the pop-up.
You'll now be taken to the "Create an app" screen.
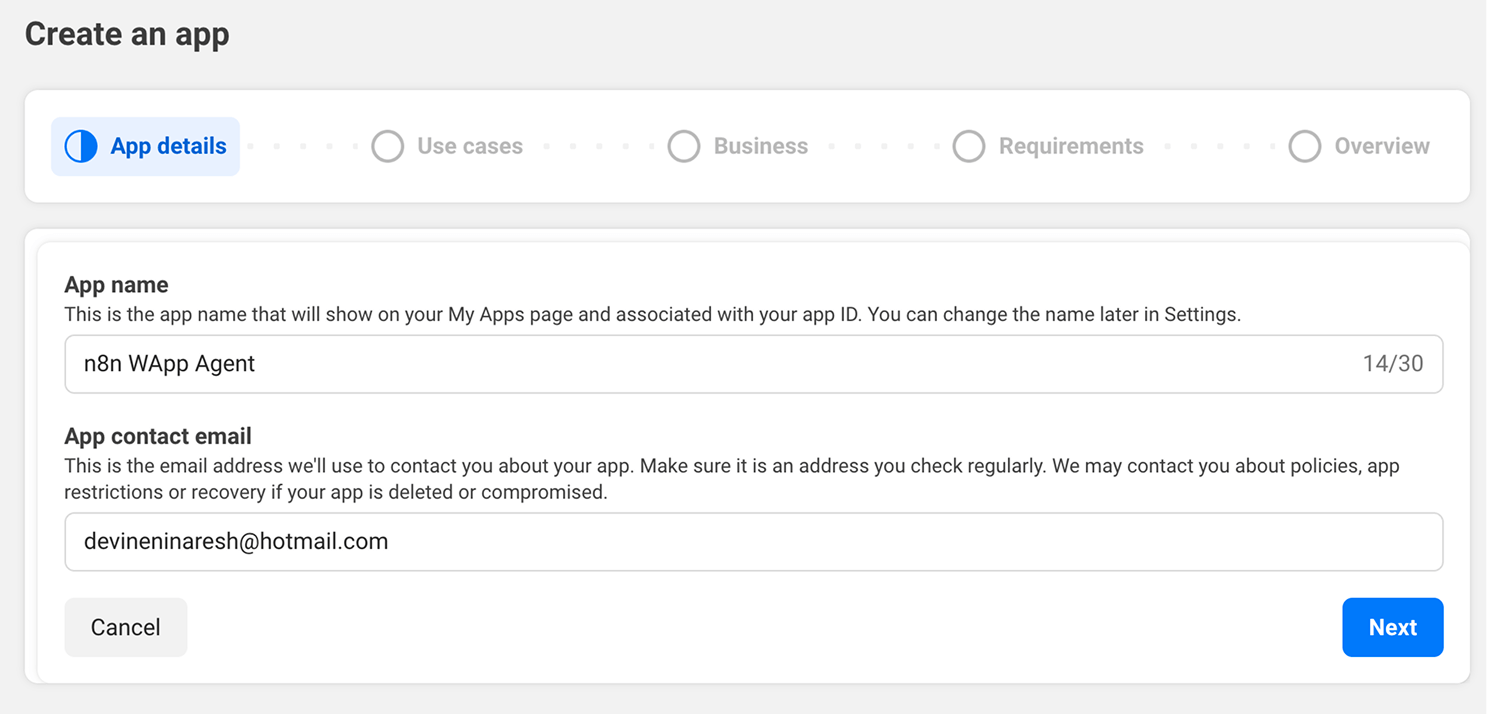
If you notice, the app creation process is divided into multiple steps again.
Let's start with providing the app details.
First, enter a name for the app.
You should be able to recognize the purpose of creating this app by just looking at the app name.
For example, I went with "n8n WApp Agent" because I am creating this app to integrate the WhatsApp API with n8n.
Meta will throw an error if you do so. So, use shortcut names.
For example, I often use "WApp" for WhatsApp and "IG" for Instagram when providing app names.
Simply put, instead of "n8n WhatsApp Agent", I just type "n8n WApp Agent".
Next, enter an email address that you regularly use. This is important because Meta might contact you about policies and app restrictions.
You always have to stay alert to comply with Meta's policies and app restrictions to be able to perform n8n automations in an uninterrupted way.
So, keep an eye on the provided email's inbox.
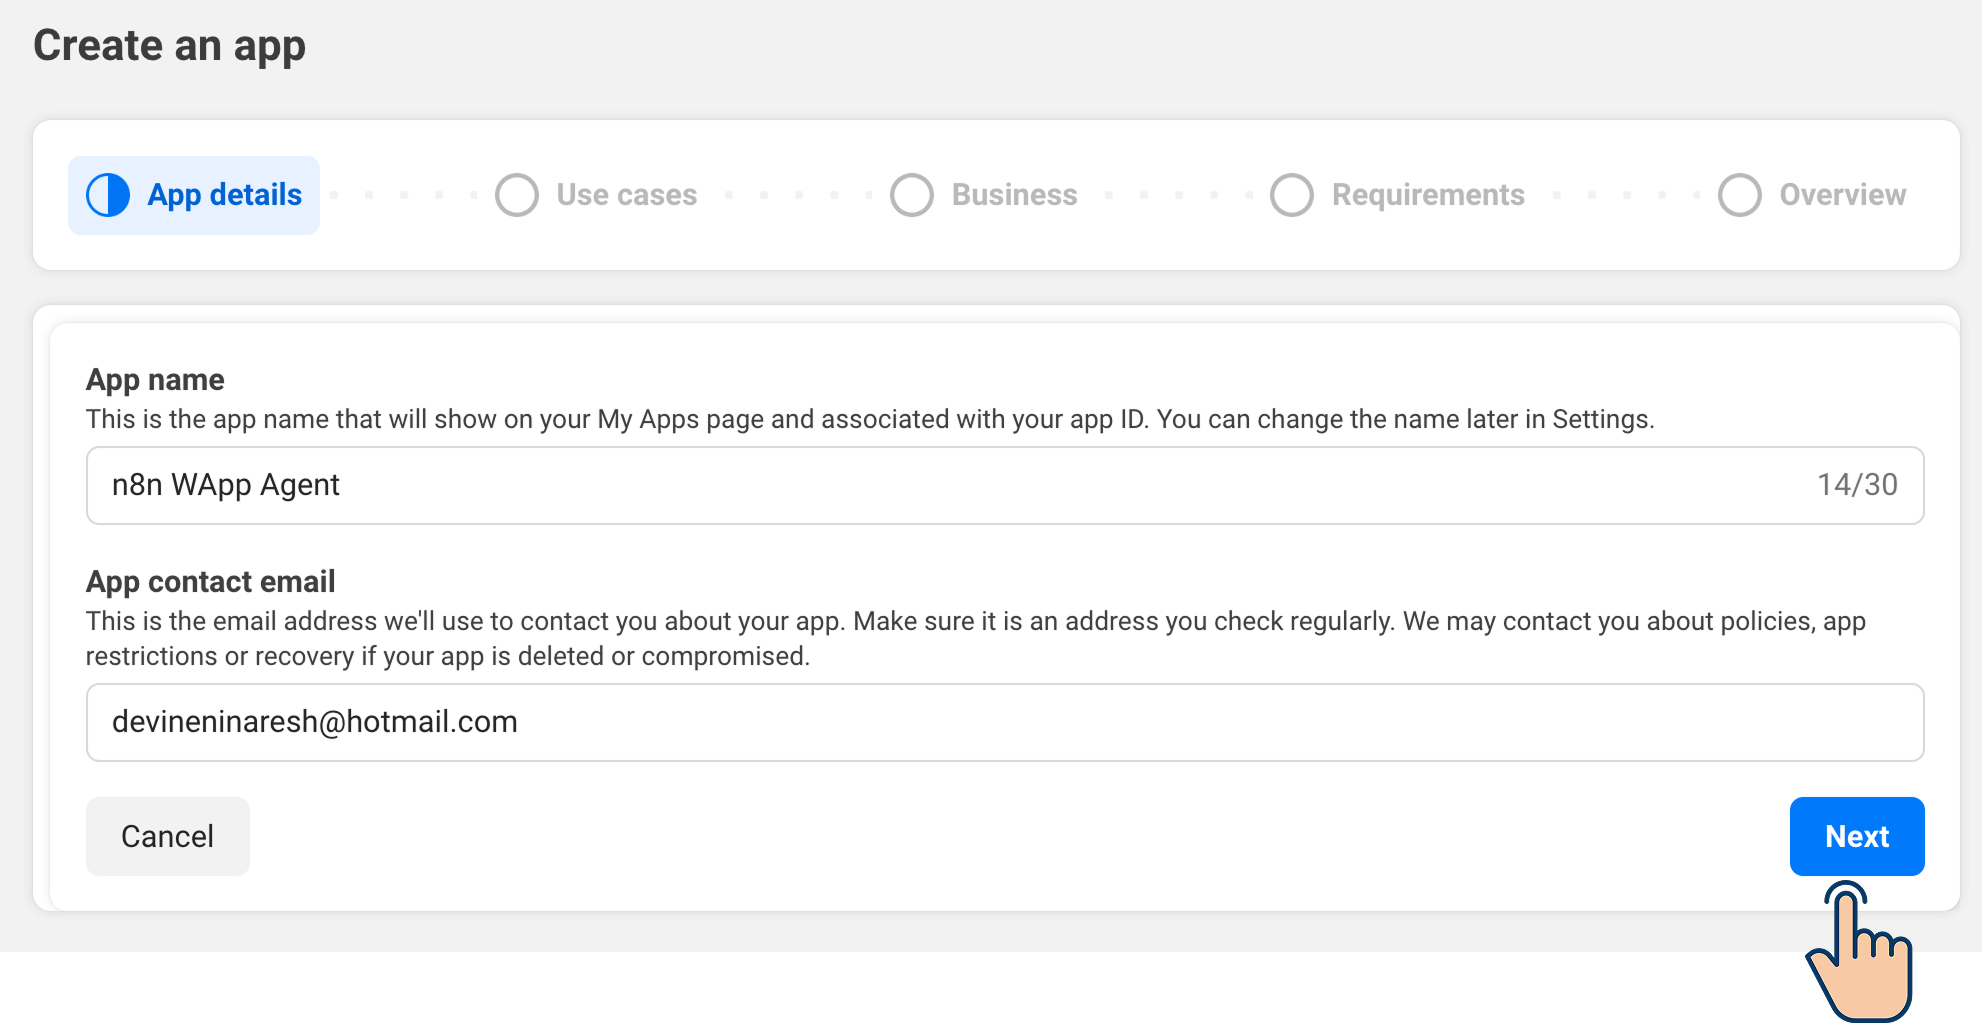
Anyway, click on the "Next" button to move to the next step.
Select a use case for creating this app
If you notice, there are many use cases to pick from.
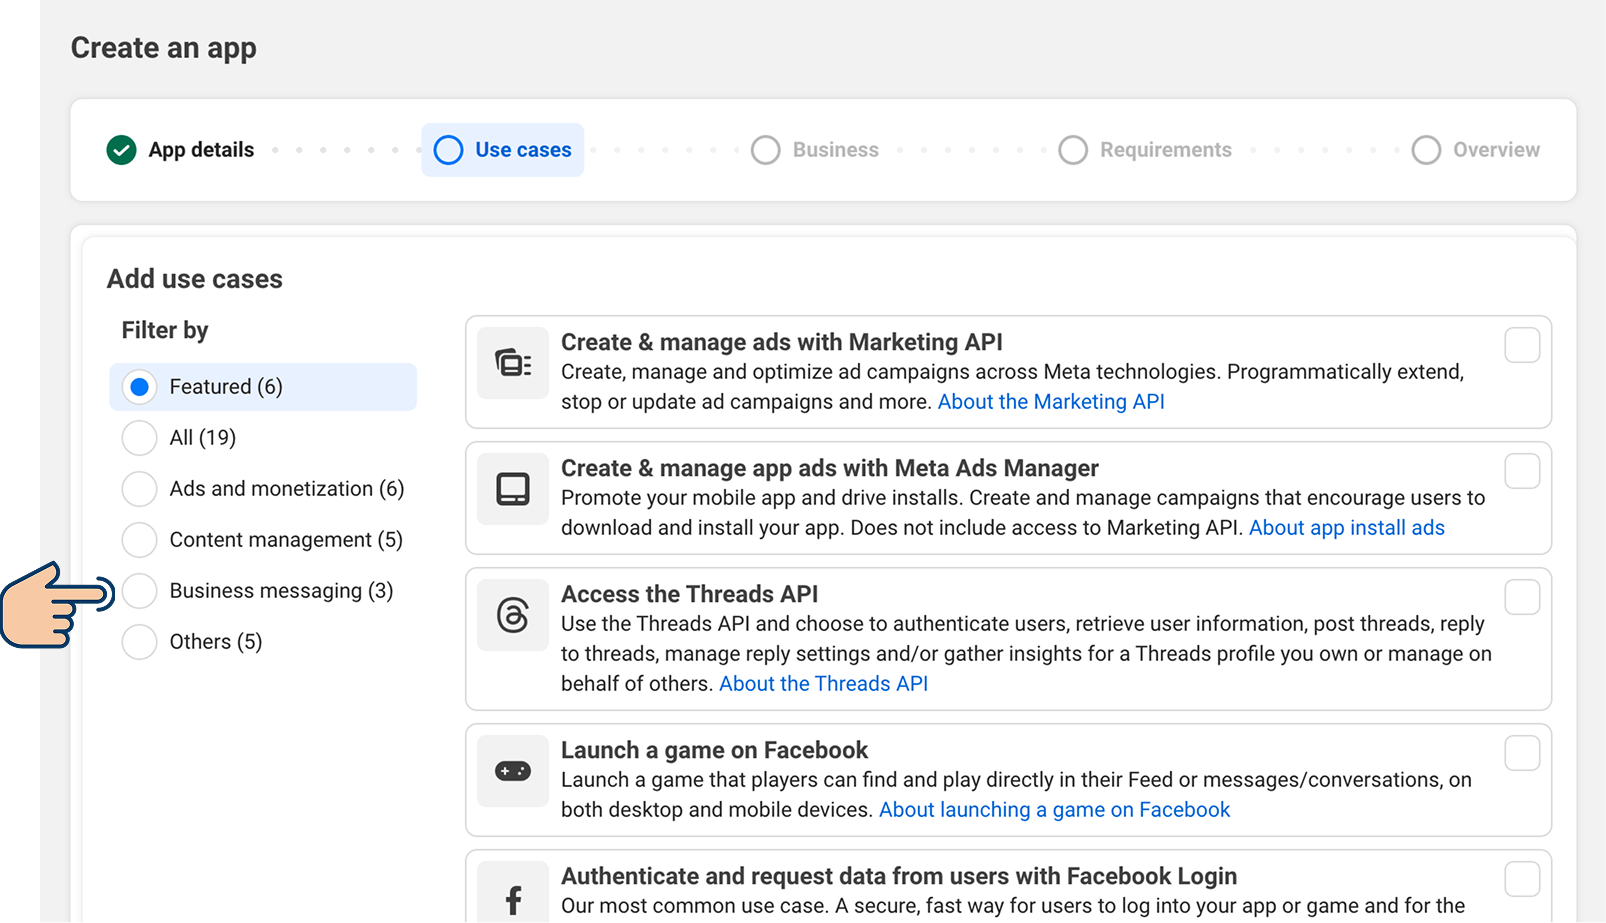
We are interested in the "Connect with customers through WhatsApp" use case.
So, click the "Business messaging" filter located on the right-hand side of the screen.
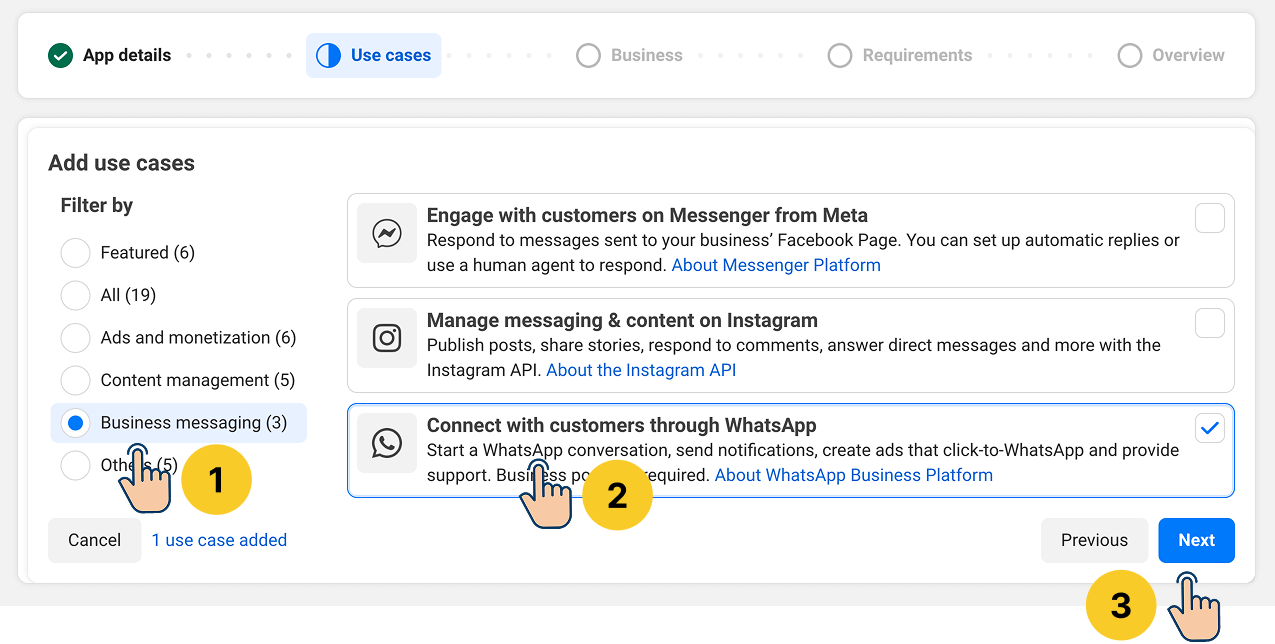
And then select the "Connect with customers through WhatsApp" option and click the "next" button.
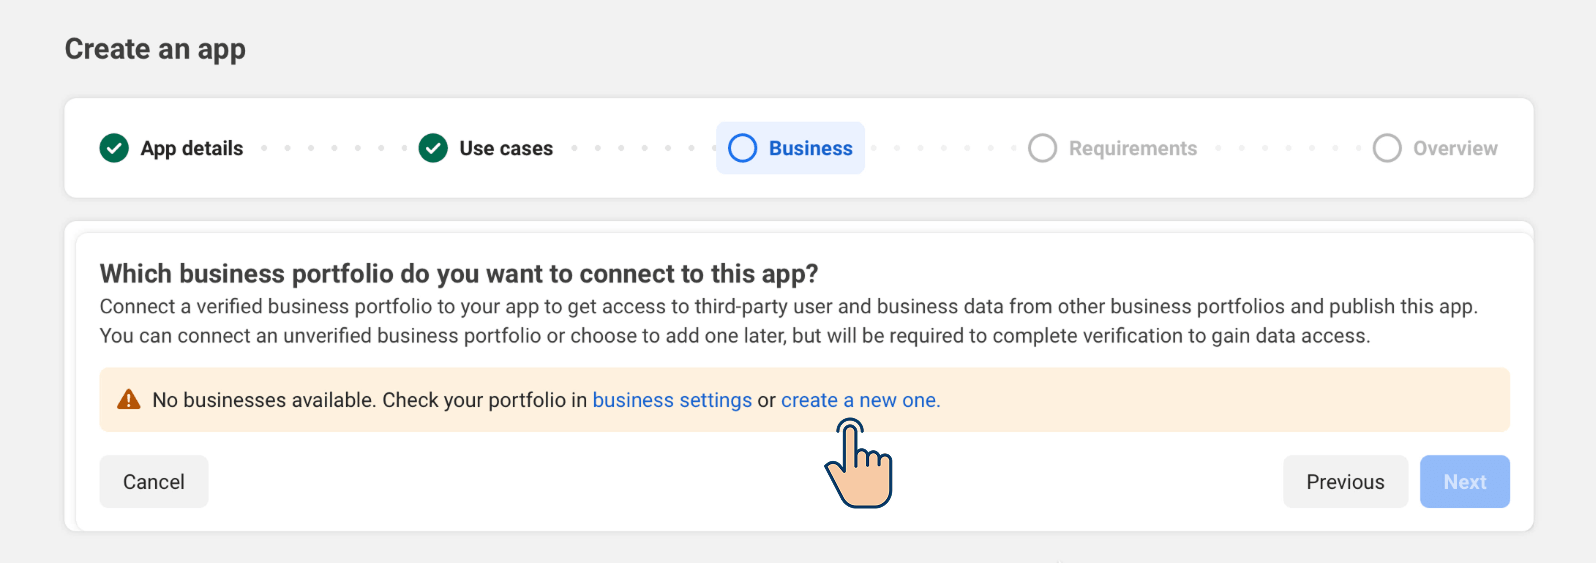
As soon as you click the "next", you will be asked to select a business portfolio.
If this is not the first time you have created a business portfolio, you can select any of the existing portfolios:
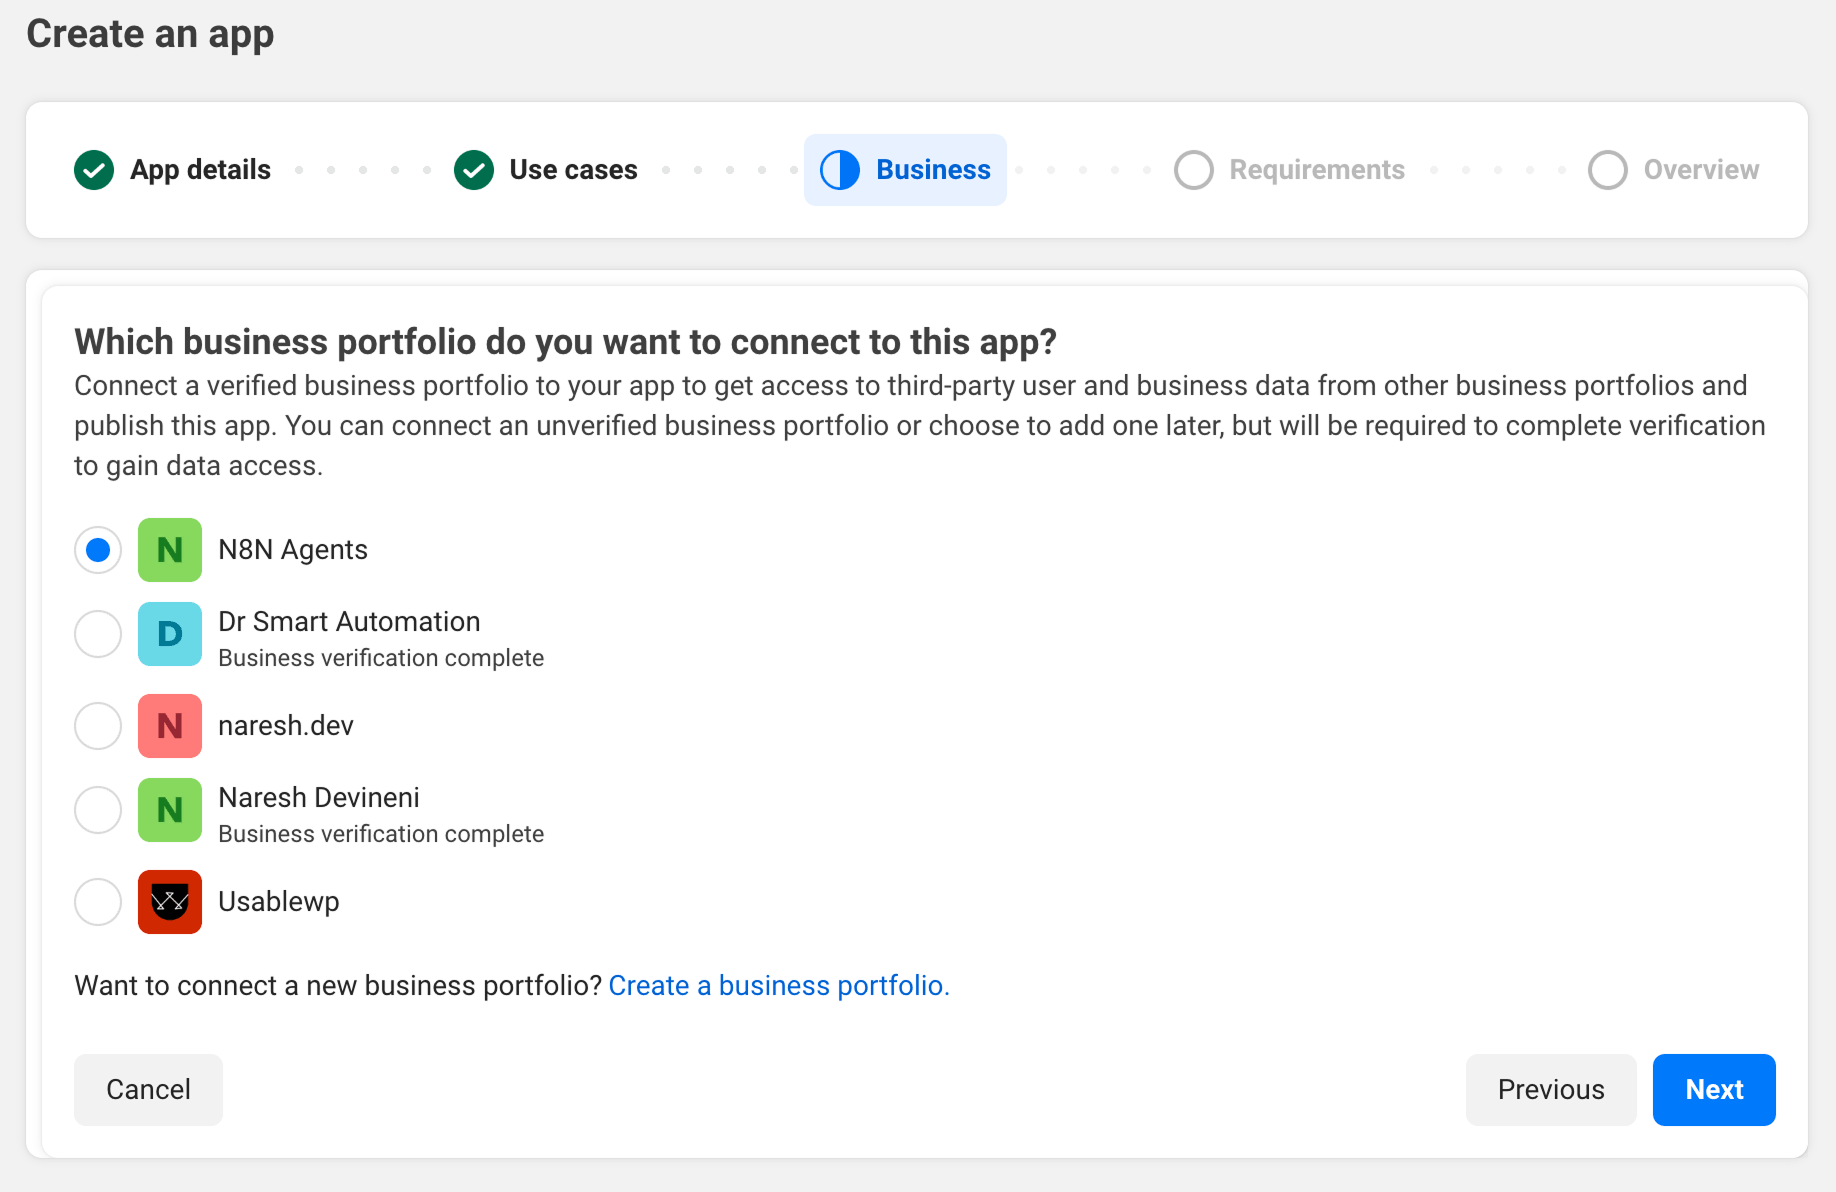
But in my case, I have no business portfolio created yet.
So, I need to create a new one.
Step 2: Create a business portfolio as part of the app creation process to provide your business details to Meta
But before we create a new business portfolio, we need to understand why we are creating one.
Among other things, a business portfolio is what lets us add and manage the three pieces we need to connect WhatsApp to n8n:
- The details of our business (or our client's business)
- The WhatsApp account, and the phone number that lives inside it
- The system user who will let n8n reach the WhatsApp Cloud API on our behalf
Simply put, without a business portfolio, we cannot access the WhatsApp Cloud API.
So, let's create one now.
To do so, click on the "create a new one" link.
This will bring up a pop-up:
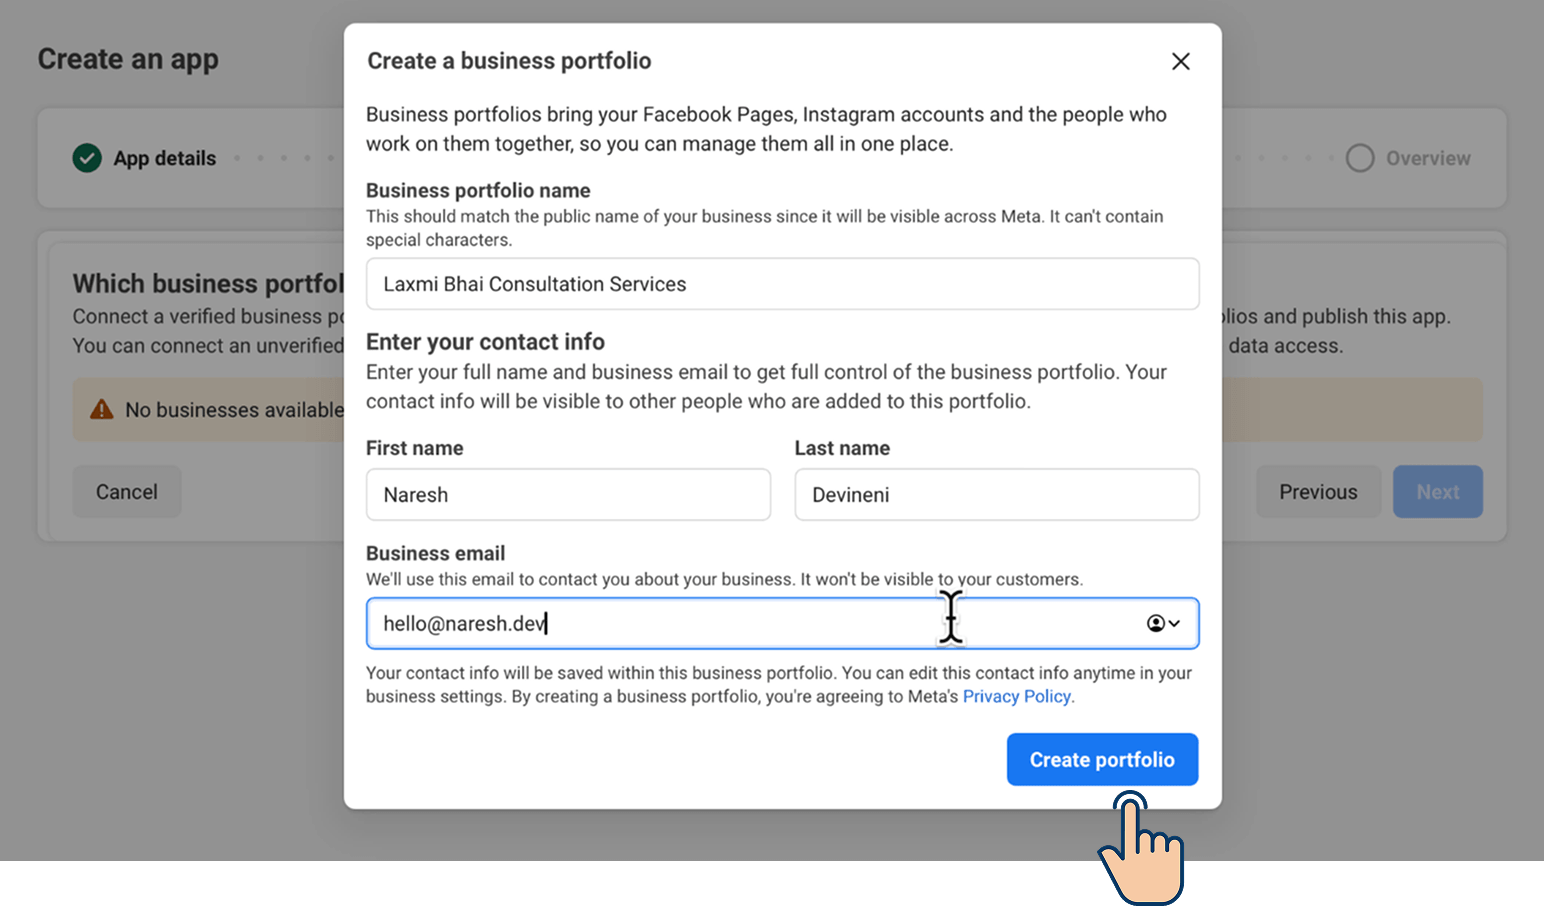
- Enter a name for your business portfolio and fill in your contact details
- Finally, click on the "Create portfolio" button
Next, we need to verify the business portfolio we just created.
So, click on the "Start Verification" button.
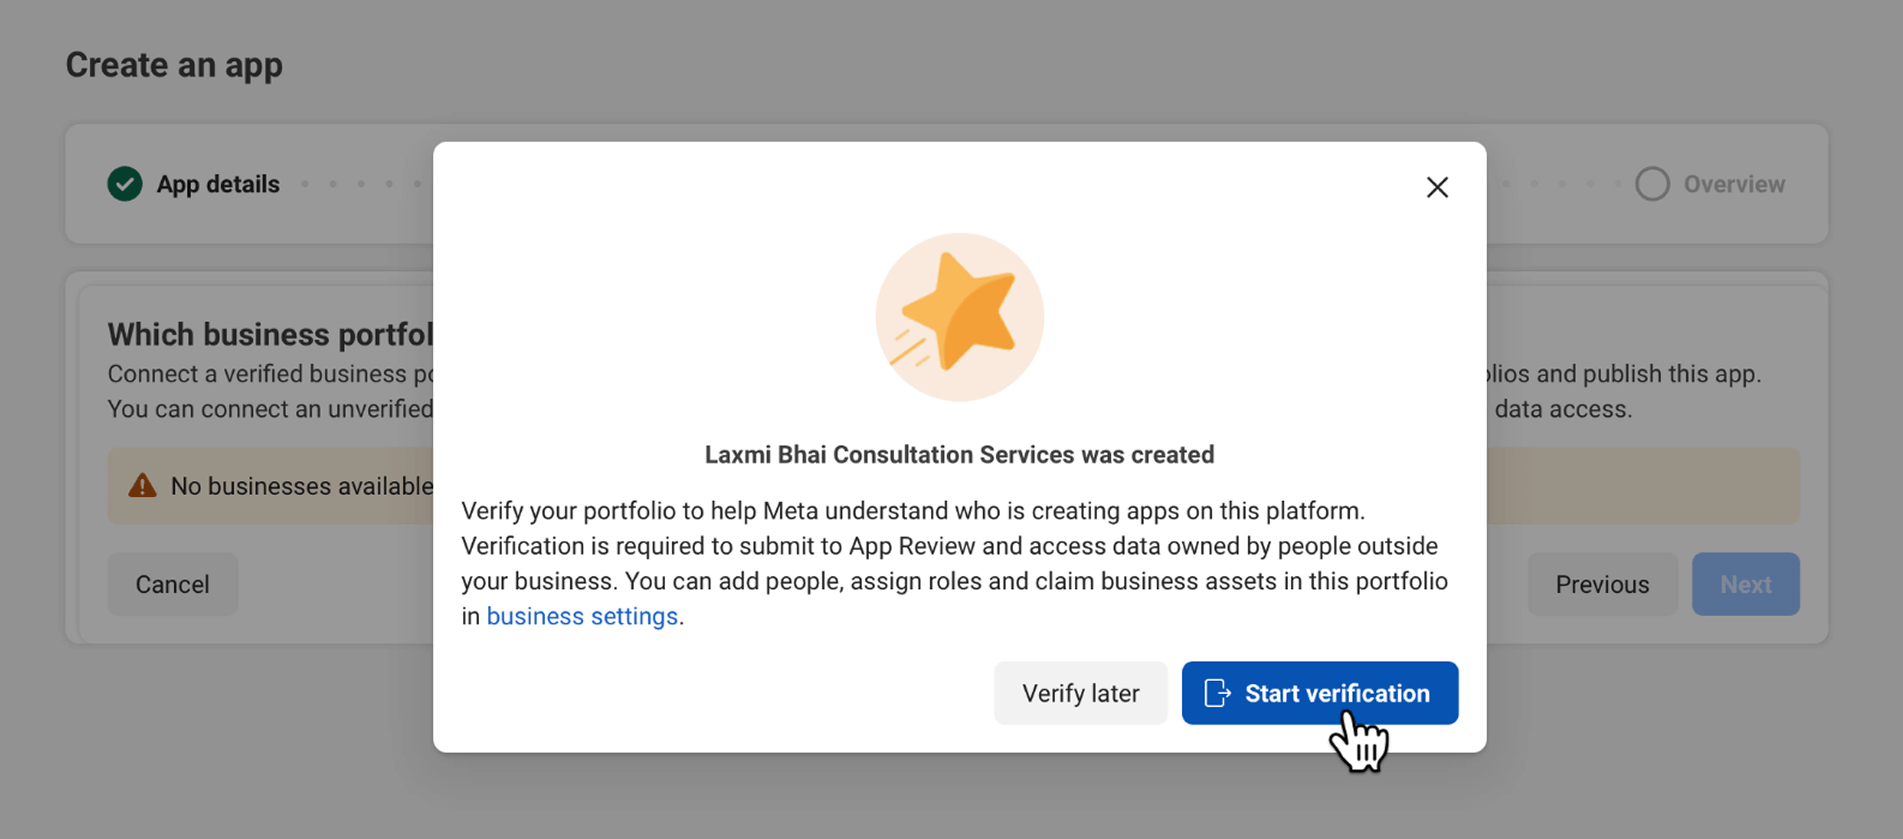
This will now take us to the business portfolio settings on business.facebook.com.
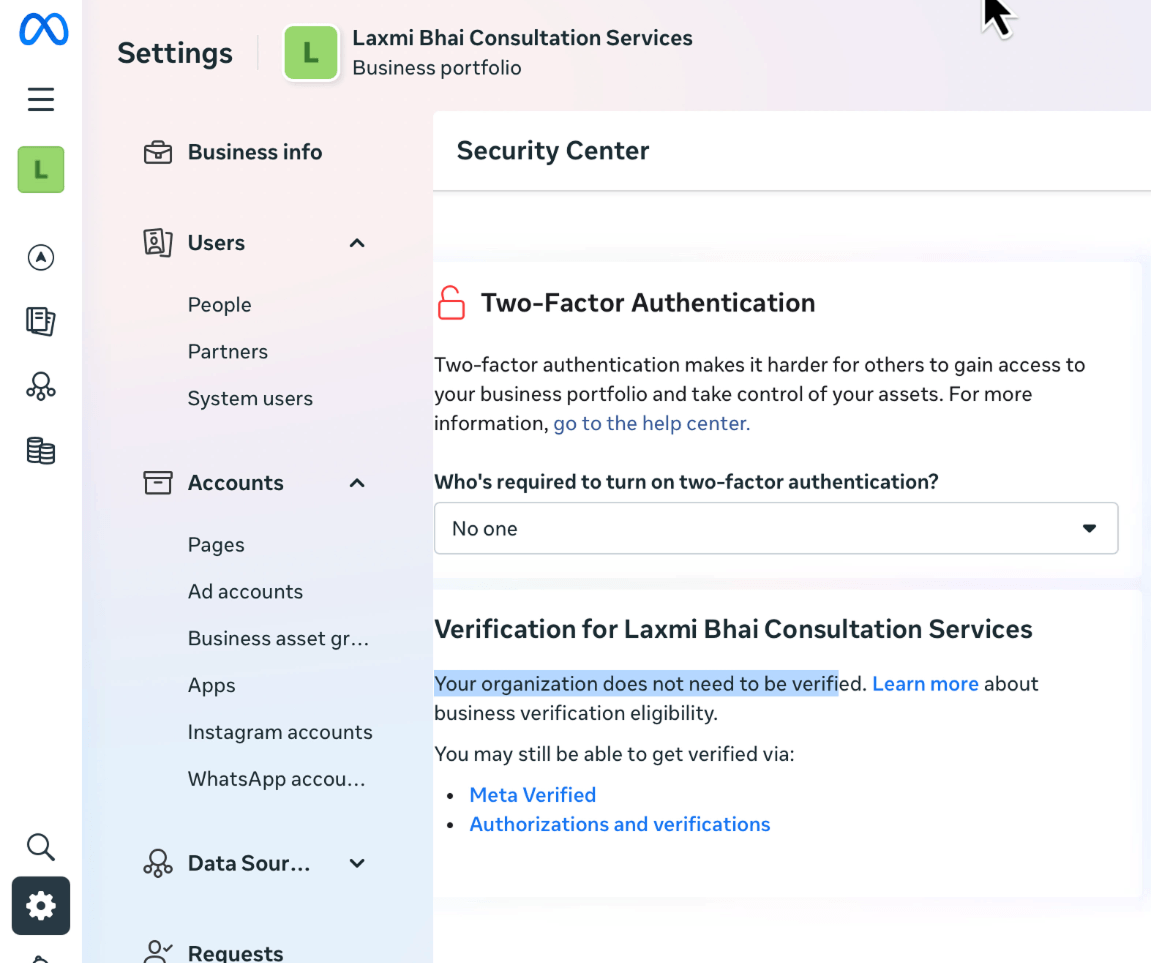
And you will see a message that says that our portfolio does not need to be verified.
This message is temporary, and Meta will change this requirement by the time we finish integration between WhatsApp and n8n.
So, we will once again visit the verification step at the end.
For now, let's go back to developers.facebook.com and finish the app creation process.
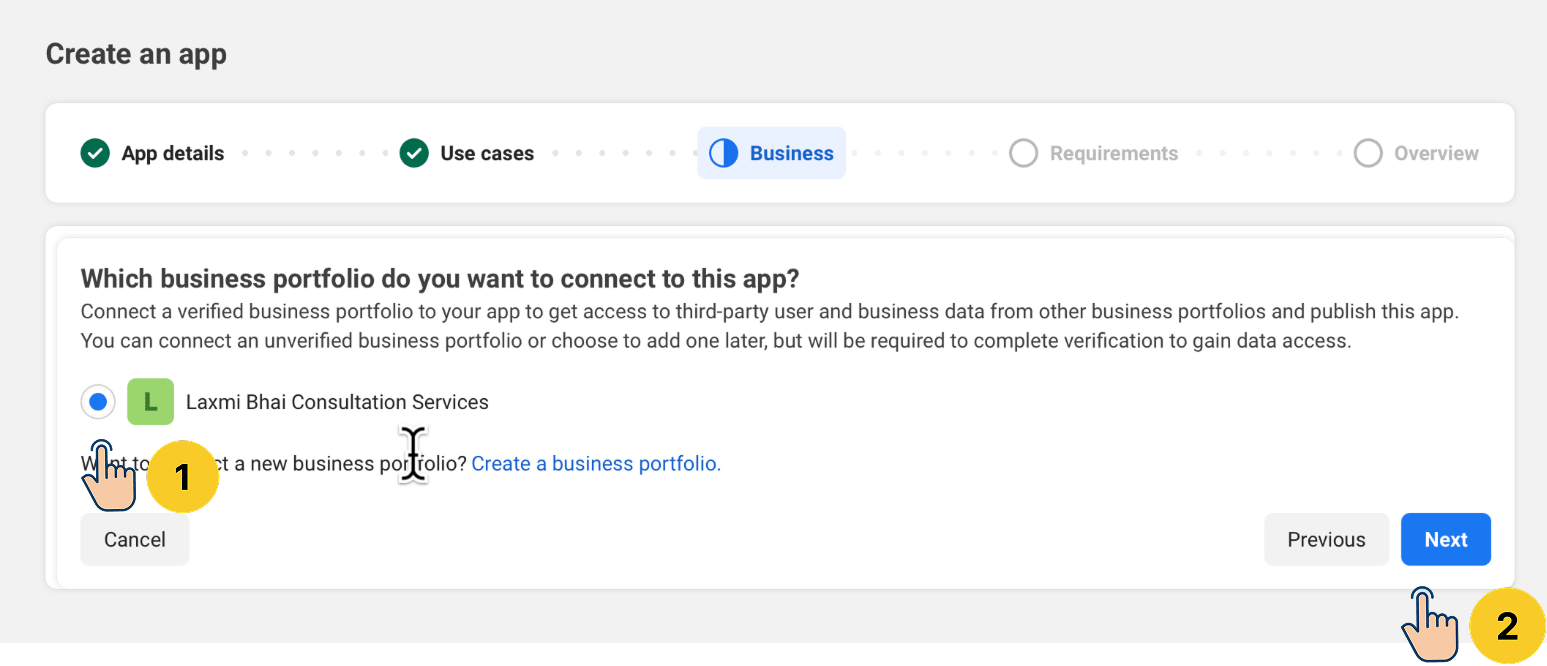
First, you will notice that the "Business" step now lists the business portfolio we just created.
So, choose the new portfolio and click the "Next" button.
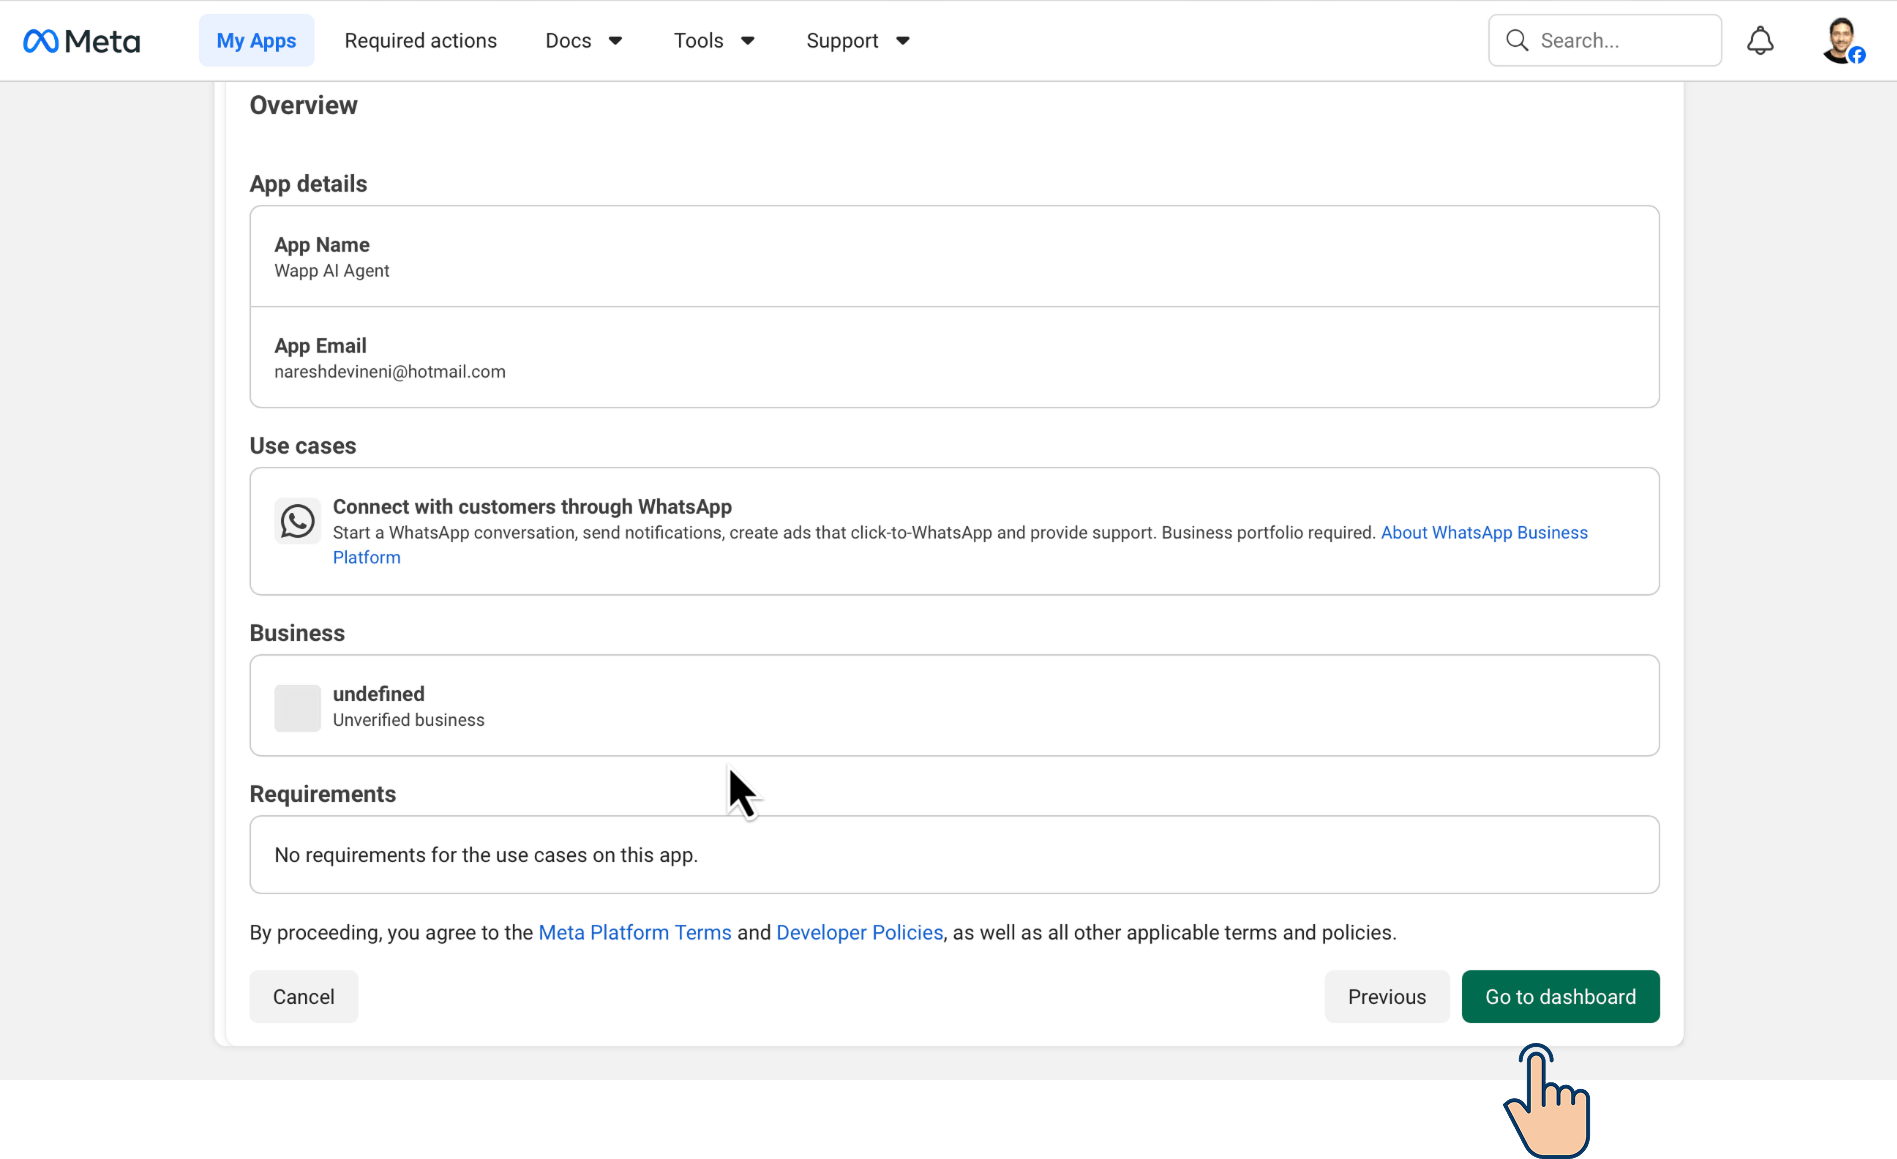
Finally, go through the details you have provided so far and click on the "Go to dashboard" button:
You will now be taken to the app's dedicated dashboard.
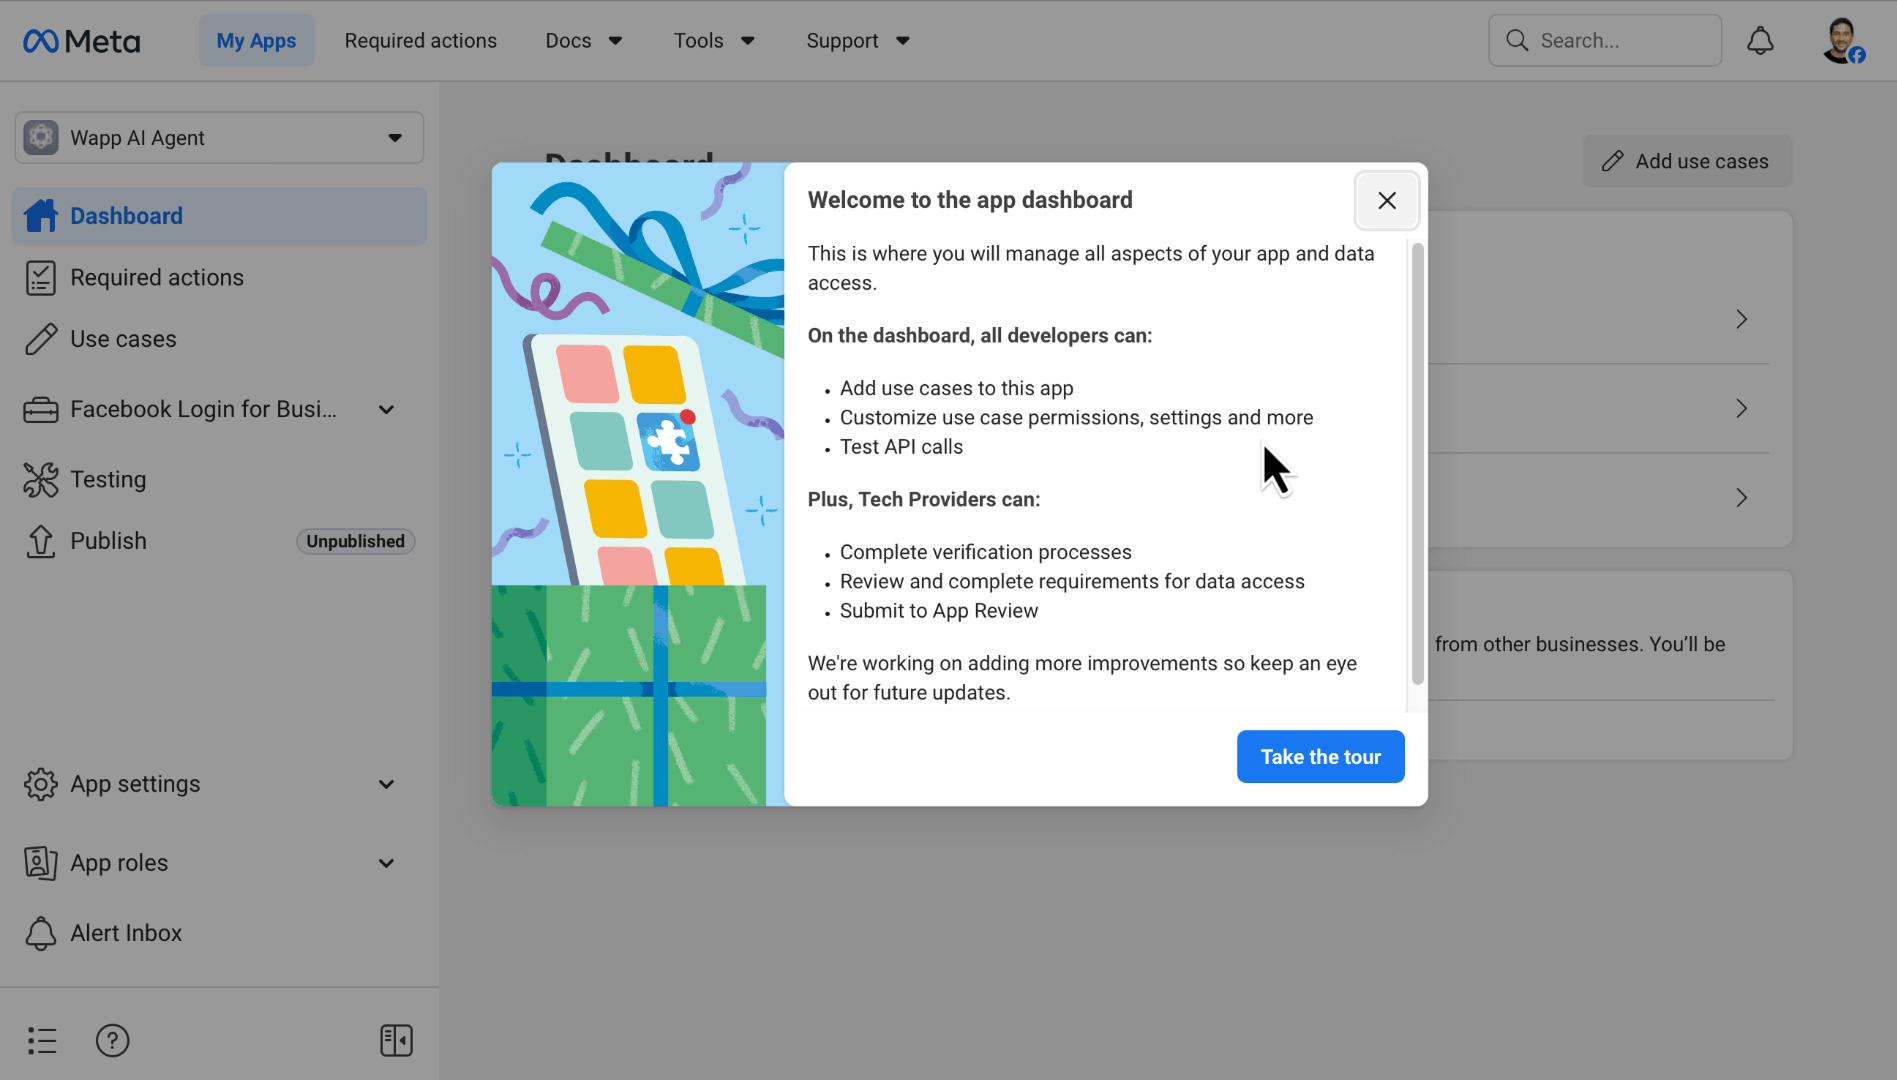
For starters, you might get asked to take the tour of the App dashboard.
At the time of writing this article, clicking the "Take the tour" button only closes the pop-up.
So, go ahead and click on it.
Also, we are not yet done with the app creation process.
To finish the process, go to the "Use cases" screen:
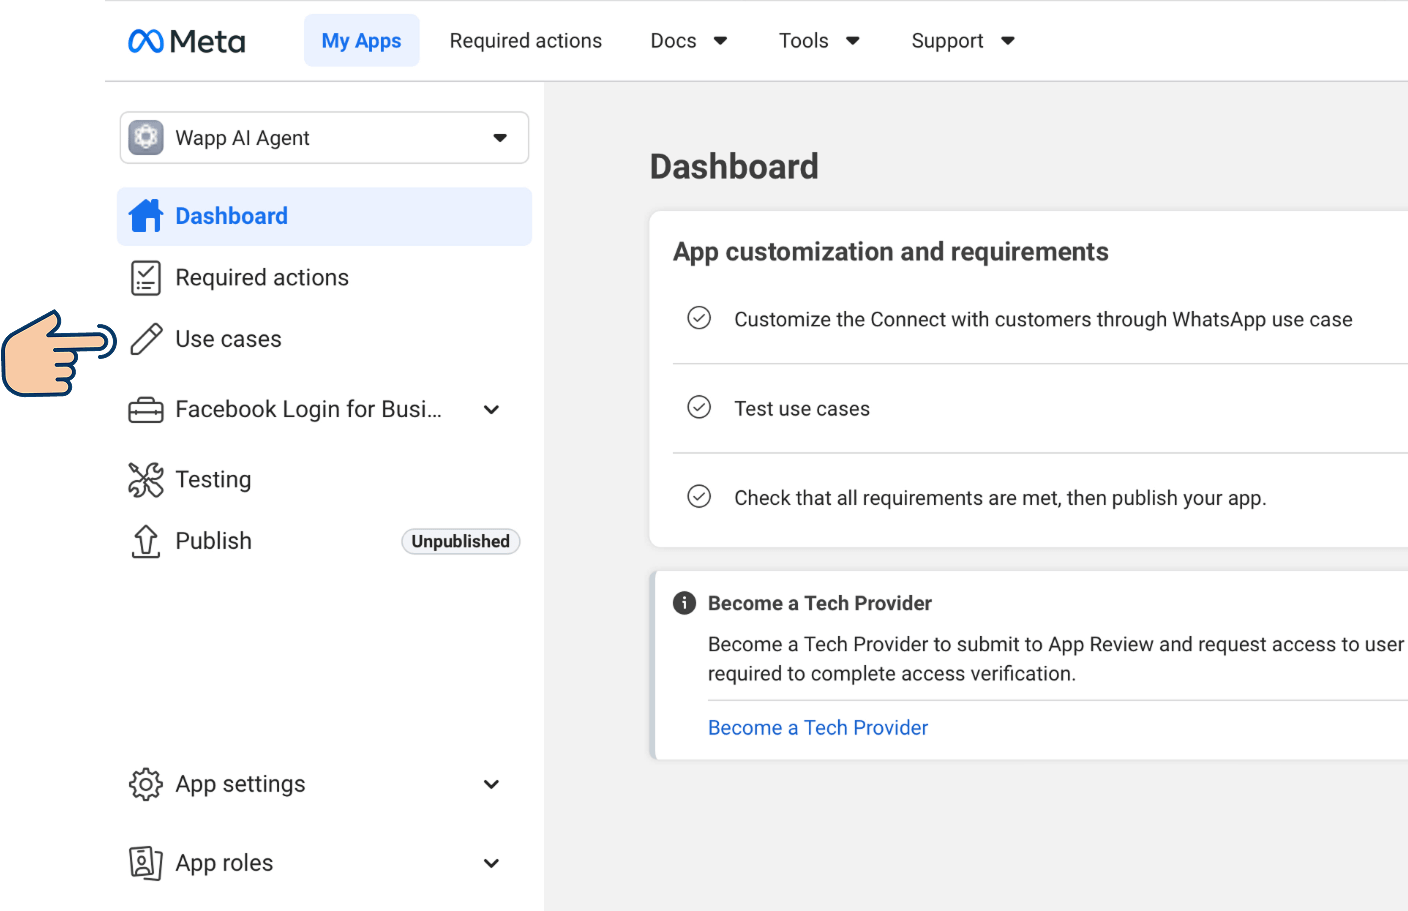
It contains the use case we chose during the app creation process.
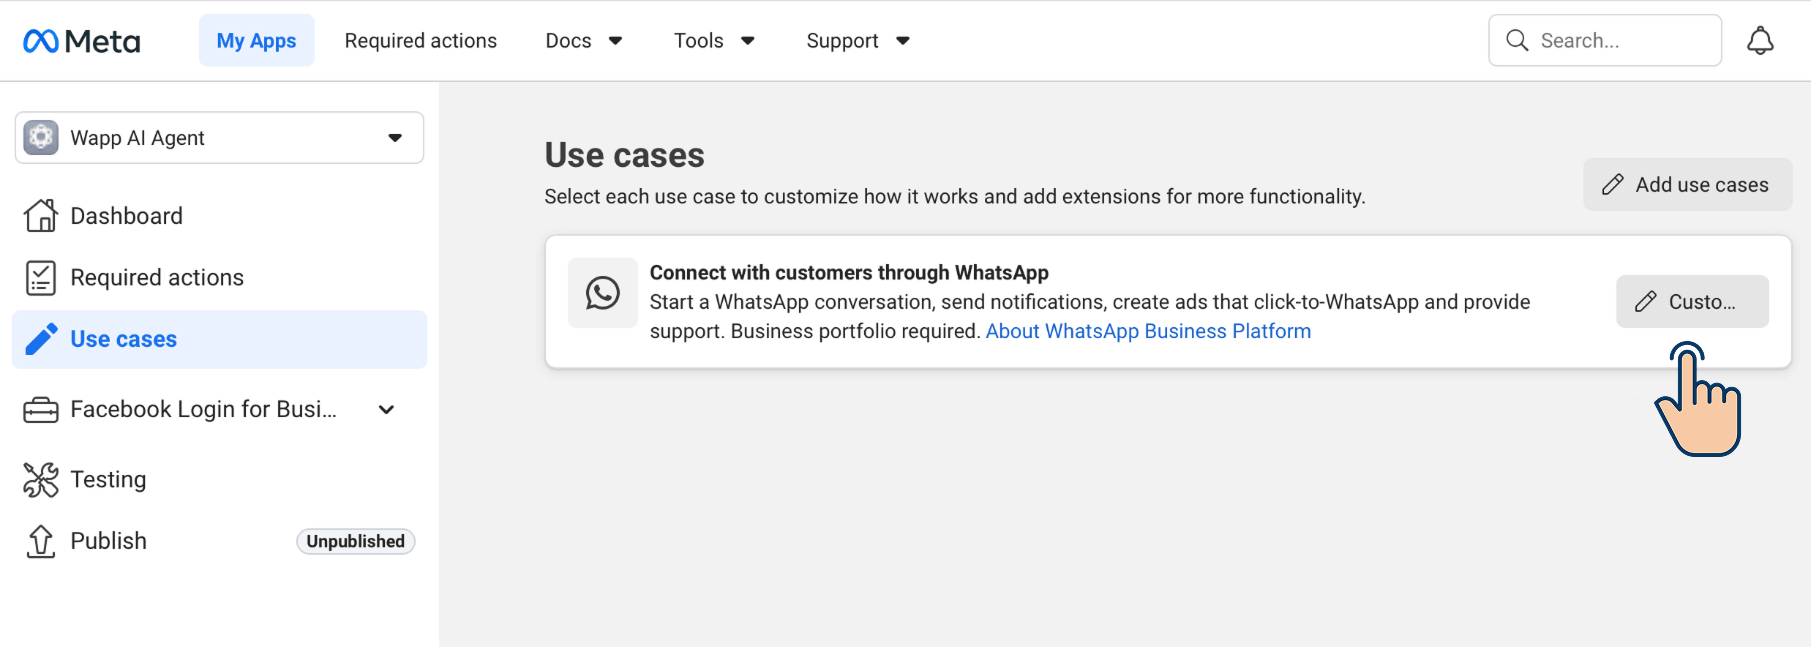
Click on the "Customize" button of our use case.
Next, make sure you are on the "Quick Start" tab inside the customization screen and then click on the "Continue" button:
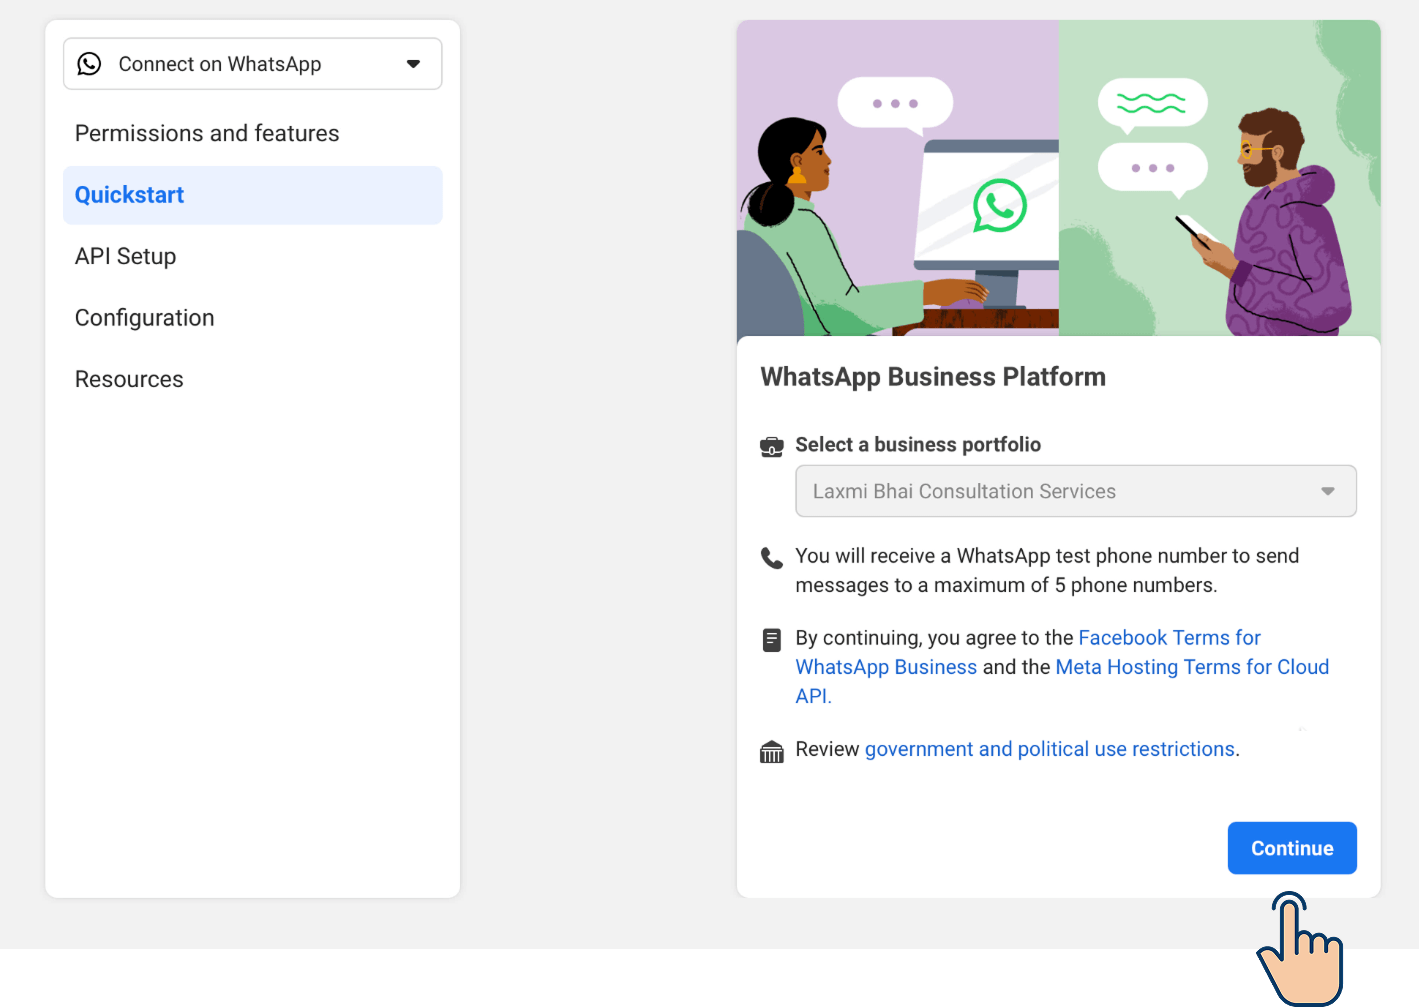
If you click on the "Continue" button, two things happen:
- The app creation process will be finished
- You'll receive a test phone number to test the WhatsApp Cloud API
To be honest, we will not be using the test phone number. We will be using a real one.
So, I will go ahead and click on the "Continue" button.
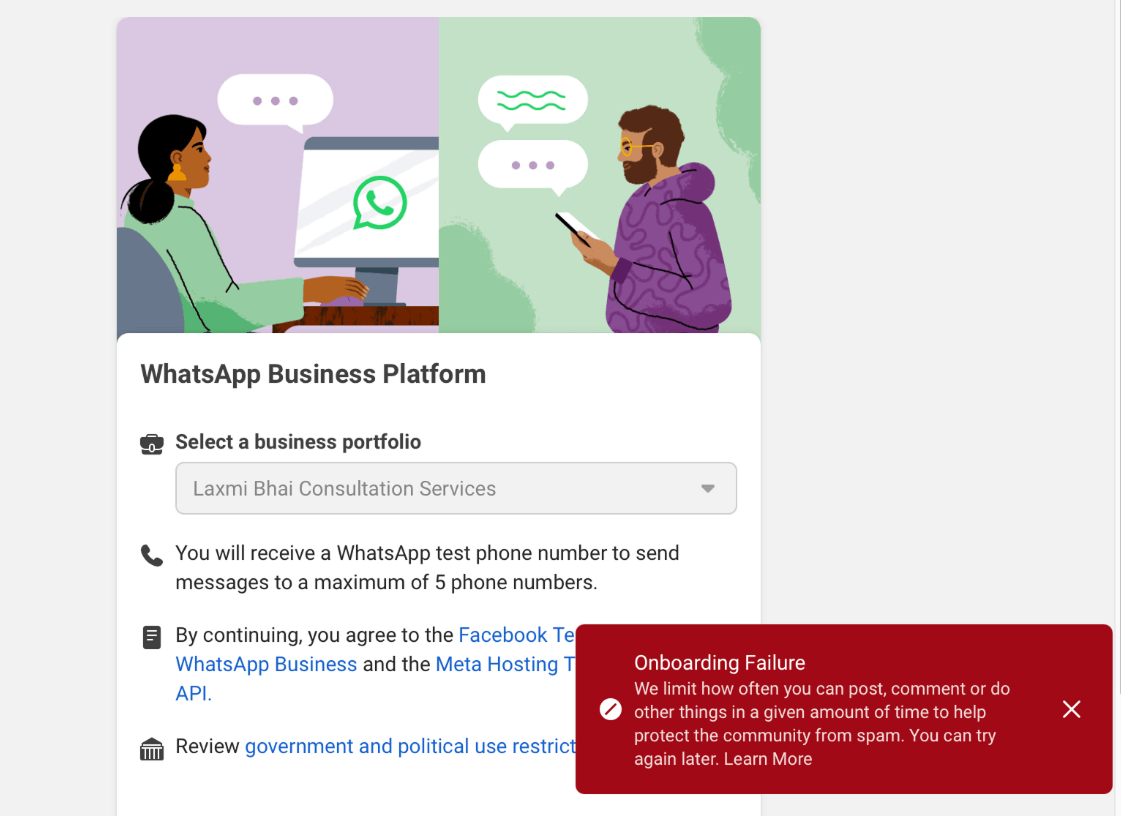
And bang!
Onboarding failure.
One possible reason for this is that I created a new Facebook account for this tutorial and immediately started working to gain access to the WhatsApp Cloud API.
So, Meta thinks I am a spammer.
But don't worry.
When I tried hitting the "Continue" button once again after waiting for 5 minutes, I didn't receive the error, and the onboarding process was successful.
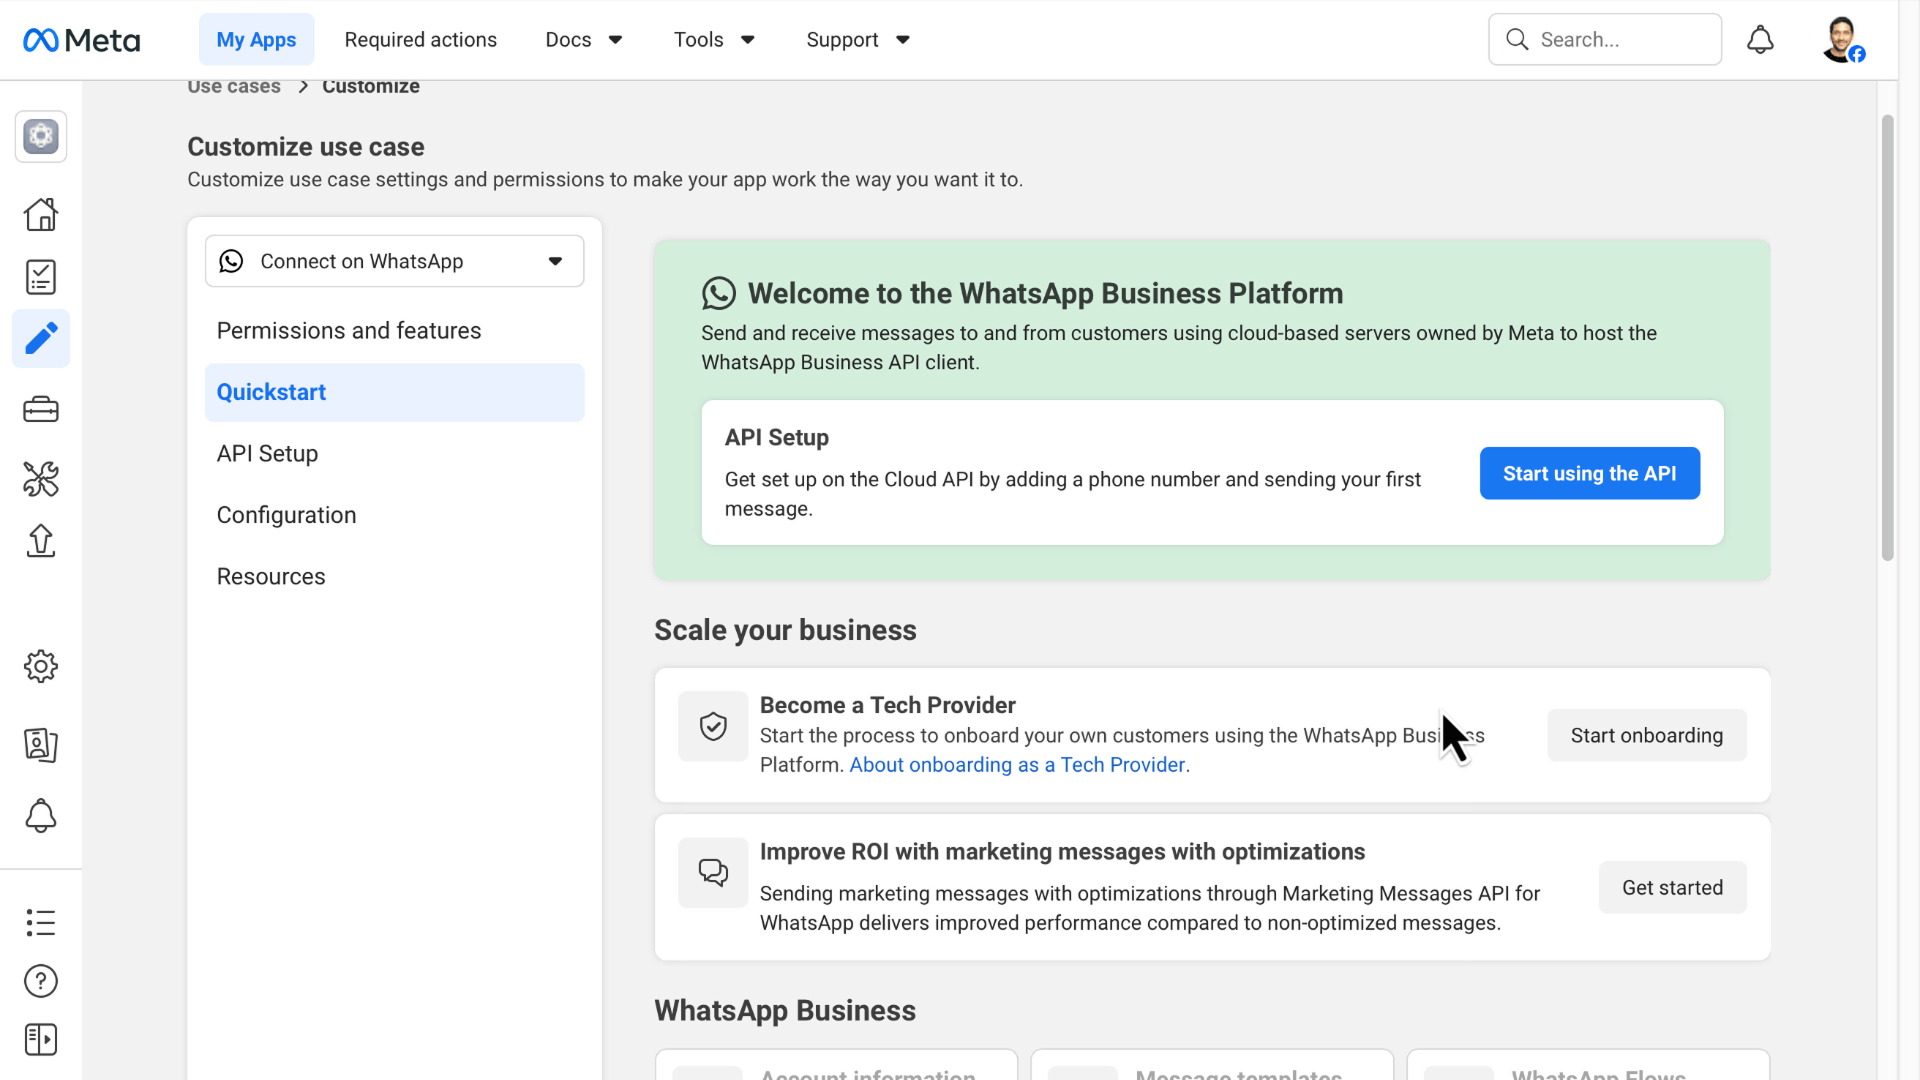
The failure got fixed automatically when I tried again after 5 minutes or more.
So, if you are getting the same error, please be patient, wait for 5 minutes or 15 minutes or more, and try again.
That's all.
We are now done with the app and business portfolio creation process.
Next, we should link them together by creating a system user.
So...
Step 3: Create a system user for your Business Portfolio, assign it to the app, and generate an access token for later use.
So, what is a system user?
Let's just say you created an automation in n8n that sends WhatsApp messages automatically.
For example, it sends order confirmations as soon as a purchase is made by the user.
To achieve this, n8n must communicate with the WhatsApp Cloud API.
But, Meta does not allow a random n8n automation to make requests to the WhatsApp Cloud API.
Whenever a request is received, Meta needs to know who is making the request and whether they have permission to perform the requested action (sending messages).
So, how does Meta know that our n8n automation is authorized to send messages?
This is where a system user account comes in.
A system user is not a real user account. It is a special robotic account that lives inside your Meta Business portfolio.
A system user is designed specifically for tools like n8n to send authorized requests to Meta APIs, such as WhatsApp API, Instagram API, and Messenger API.
Think of the system user as the account that n8n uses when talking to Meta's APIs.
"Okay! But how does n8n use the system account? Do we have to provide any credentials?"
Yes.
Meta allows us to generate something called an access token for the system user.
An access token is a unique credential that proves the identity of the system user.
We configure n8n with this access token.
After that, whenever our n8n automation makes a request to the WhatsApp Cloud API, n8n automatically includes the system user's access token with the request.
Meta then verifies the access token before processing the request.
This tells Meta that:
- The request is coming from an authorized system user.
- The automation has permission to access the WhatsApp Cloud API.
- The automation can send and receive WhatsApp messages on behalf of the business.
Coming back to our example, n8n can now send order confirmations to the customer on behalf of your business.
That's the purpose of a system user.
Also, a system user belongs to your business portfolio rather than to you personally.
So, the automation keeps running even if your own account changes or you lose access.
We will perform this assigning when the time comes.
Alright, enough theory.
Come on, let's go ahead and create a system user.
How to create a system user inside the Meta business portfolio
To achieve this, we need to access the settings of the business portfolio we just created.
So, go to:
https://business.facebook.comNext, in the top-left corner of the screen, click on the portfolio list:
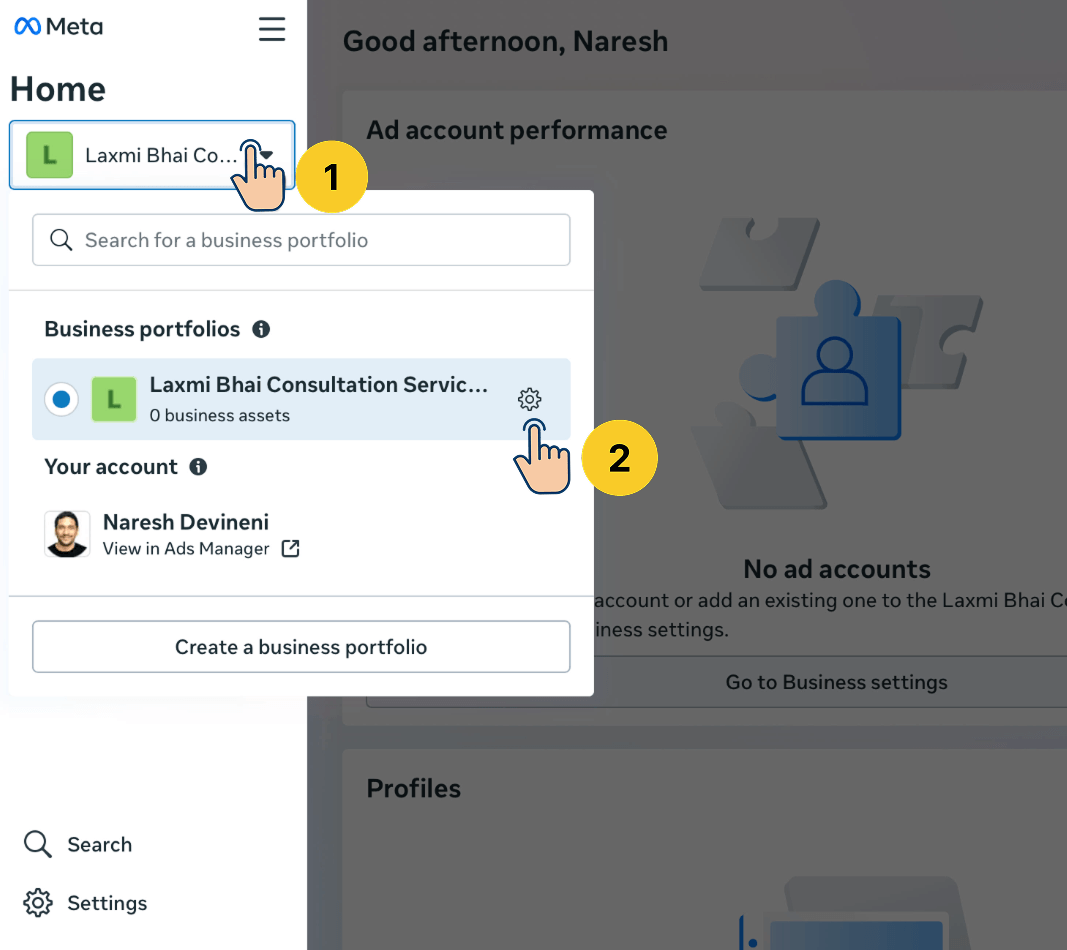
Under the "Business portfolios" section, look for the business portfolio we just created and then click on its settings button.
This will take us to the settings screen of our portfolio.
Next, click on the "System Users" link from the menu on the left.
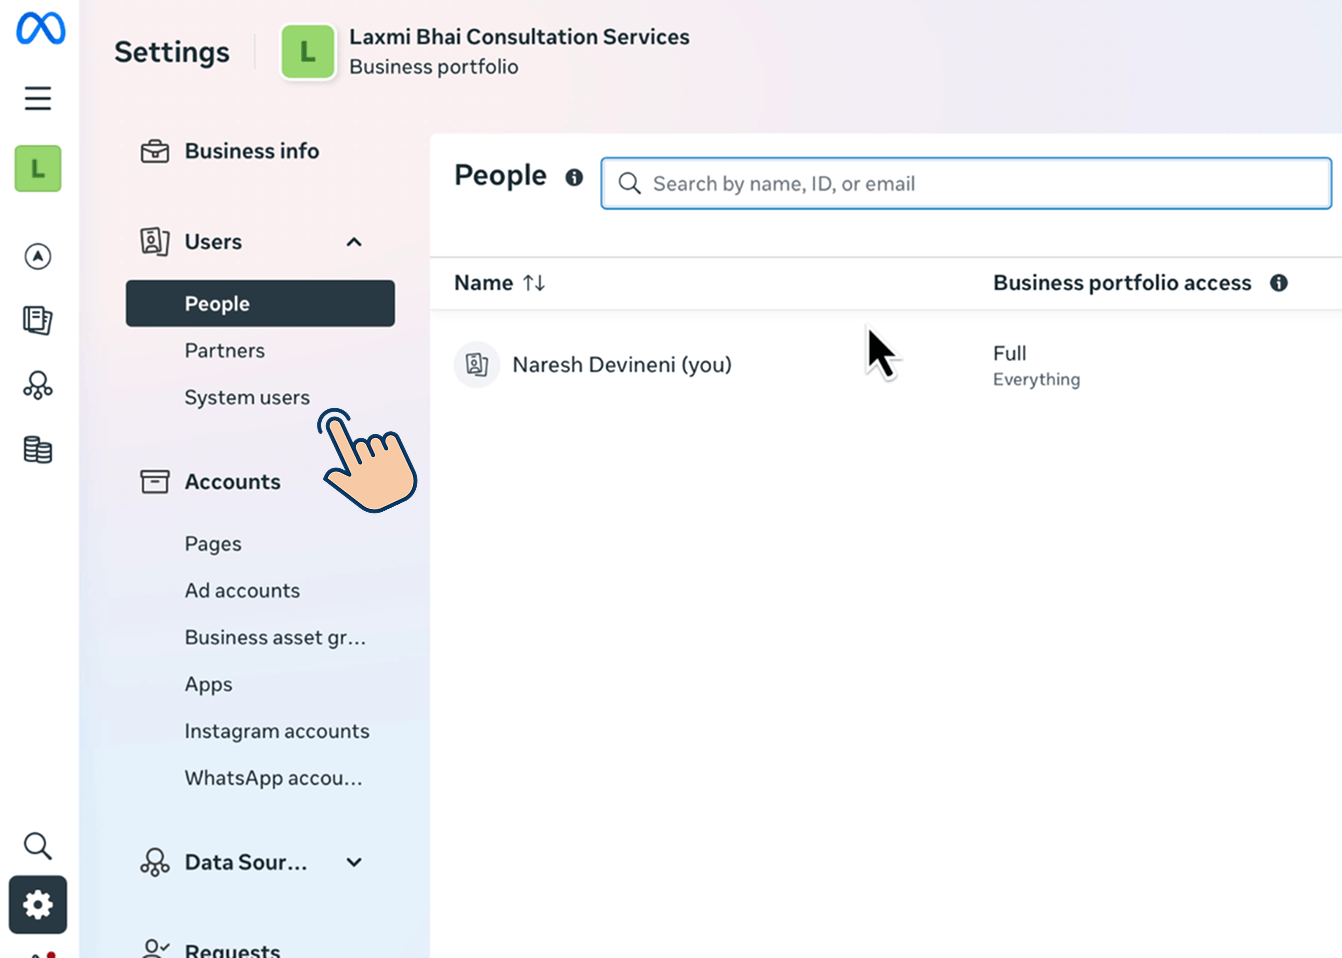
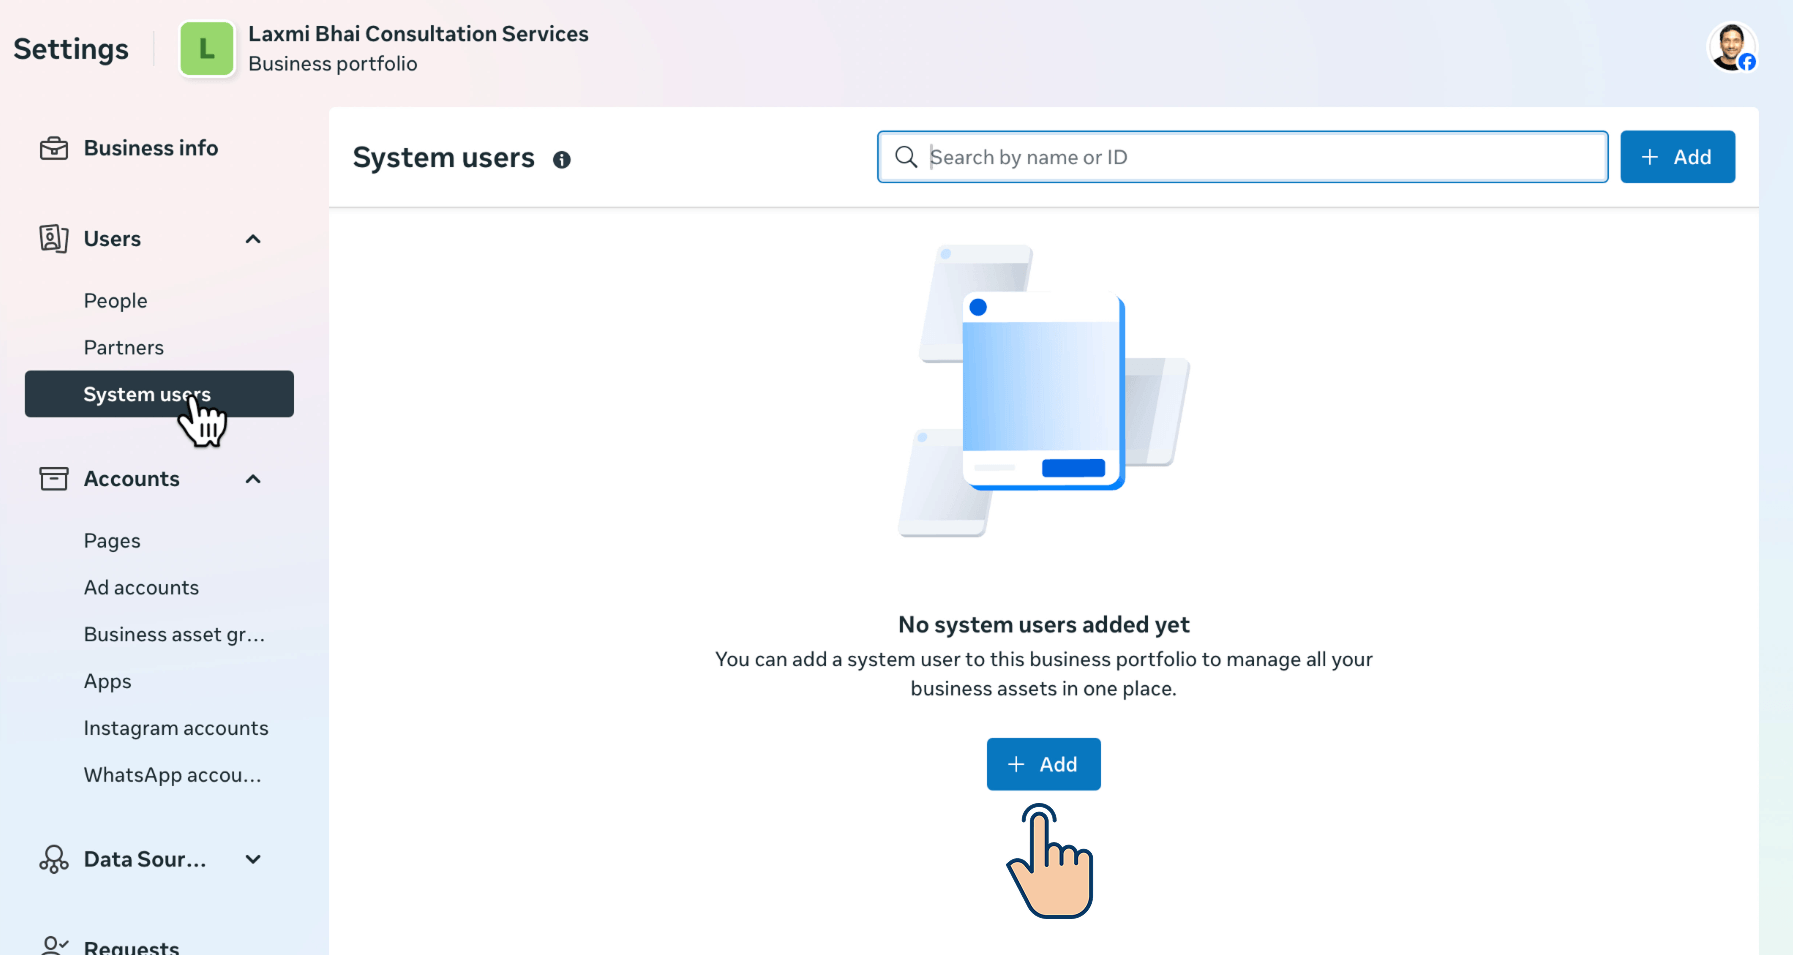
As you can see, there are no system users yet because our business portfolio is newly created.
So, let's create a new system user by clicking on the "Add" button.
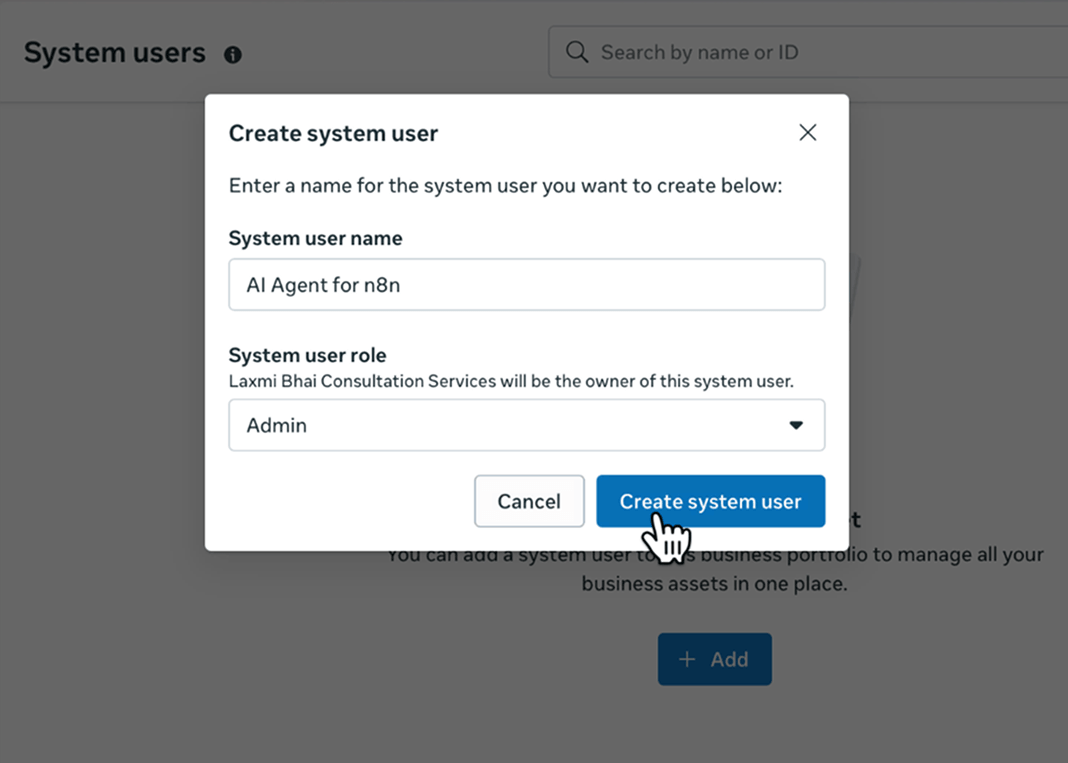
Next, give a name to your system user. You can name it anything.
For the role, you can pick either "Admin" or "Employee."
Both will work for what we're doing.
The difference is mostly about how much access the system user gets by default.
I'm going with "Admin" simply because I'm the only one managing this business portfolio, so I don't need the tighter control that the "Employee" role is designed for.
Anyway, once enter the name and choose a role, click on the "Create system user" button.
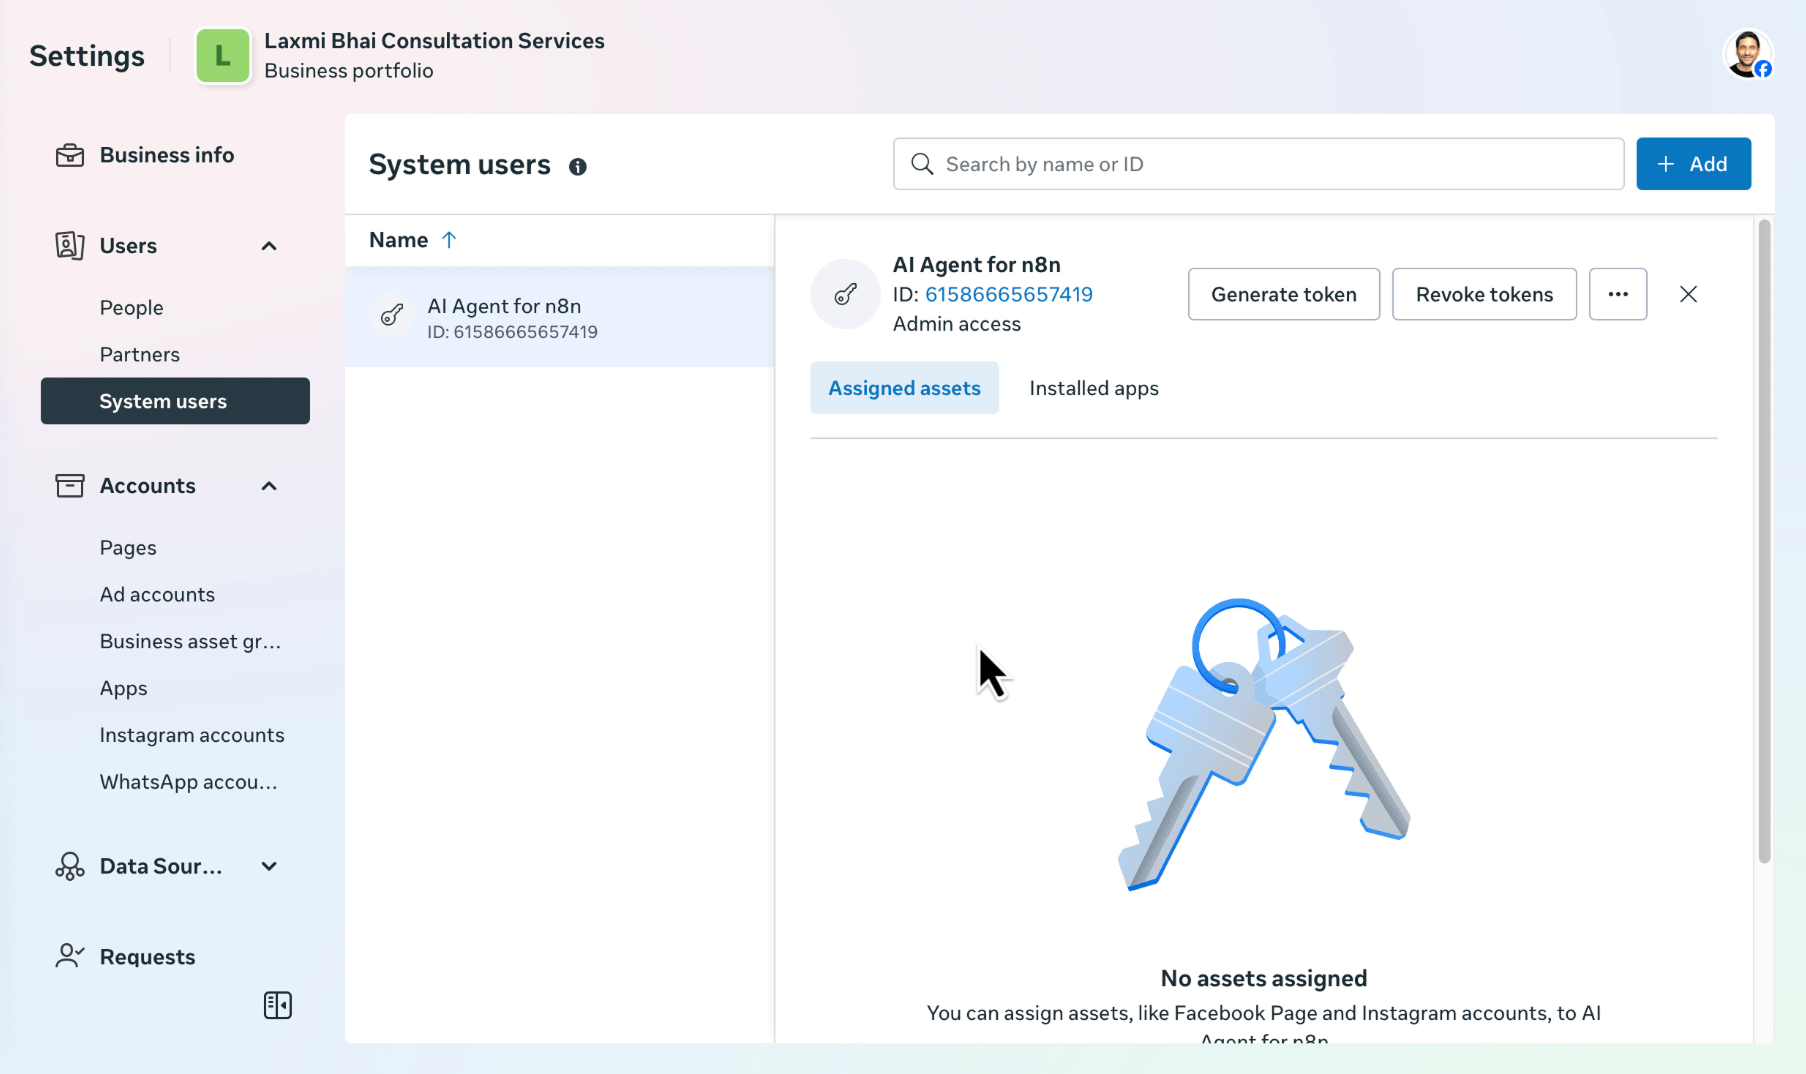
And there we go!
The system user is now created.
Next, we need to assign this system user to the app we created in step 1 with full permissions.
To do that, scroll down a little bit and click on the "Assign assets" button.
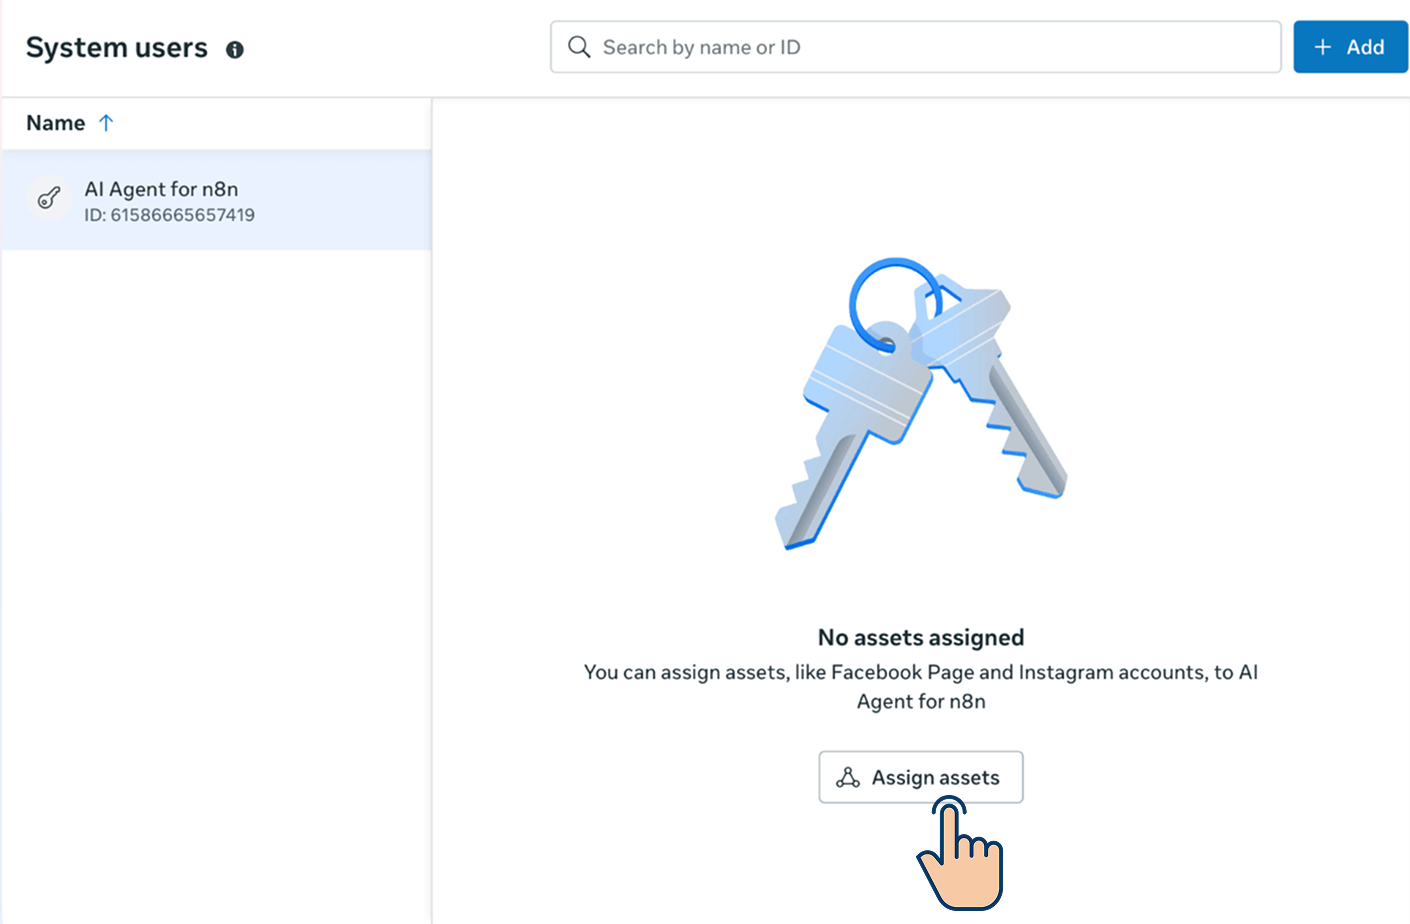
This will open a pop-up with the list of apps you created on your Facebook developer account.
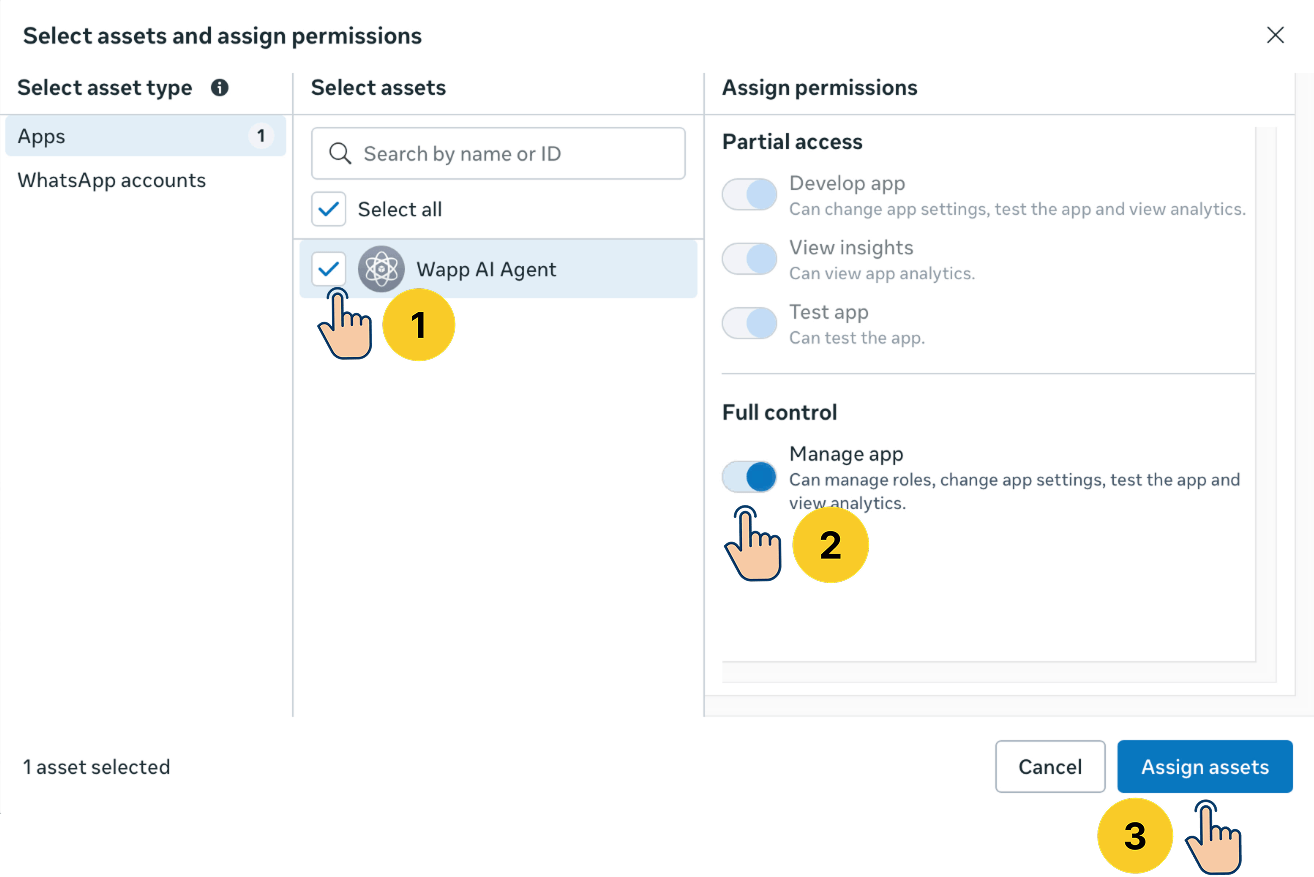
Next, from the list of apps:
- Select the app you created
- Assign full control to the system user
- Finally, click on the "Assign assets" button
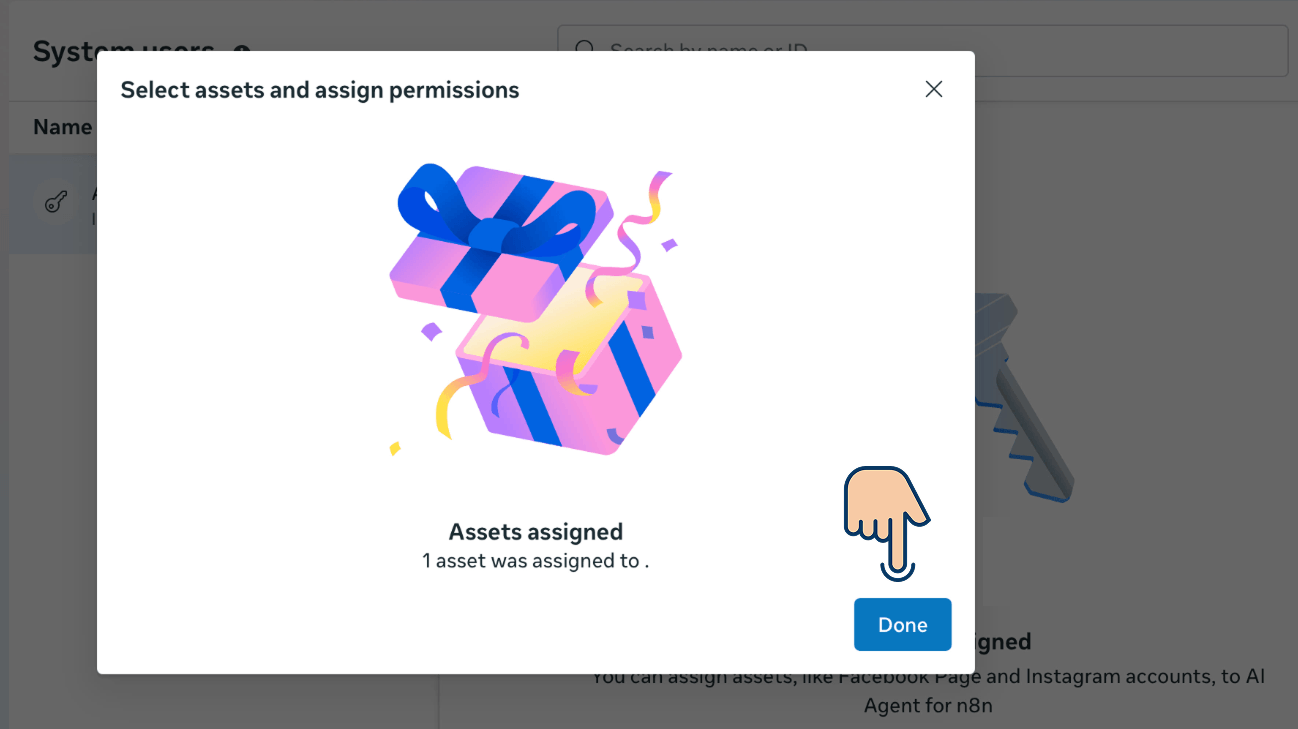
That's all.
The app is now successfully assigned to the system user.
Click the "Done" button to finish the process.
Also, while we are here on the "System users" screen, let's also generate an access token for the system user we just created.
It will help with two things:
- To register the WhatsApp Business Account (WABA) phone number in step 6
- To send WhatsApp messages via n8n in step 7
So, let's generate it upfront.
How to generate an access token for a system user
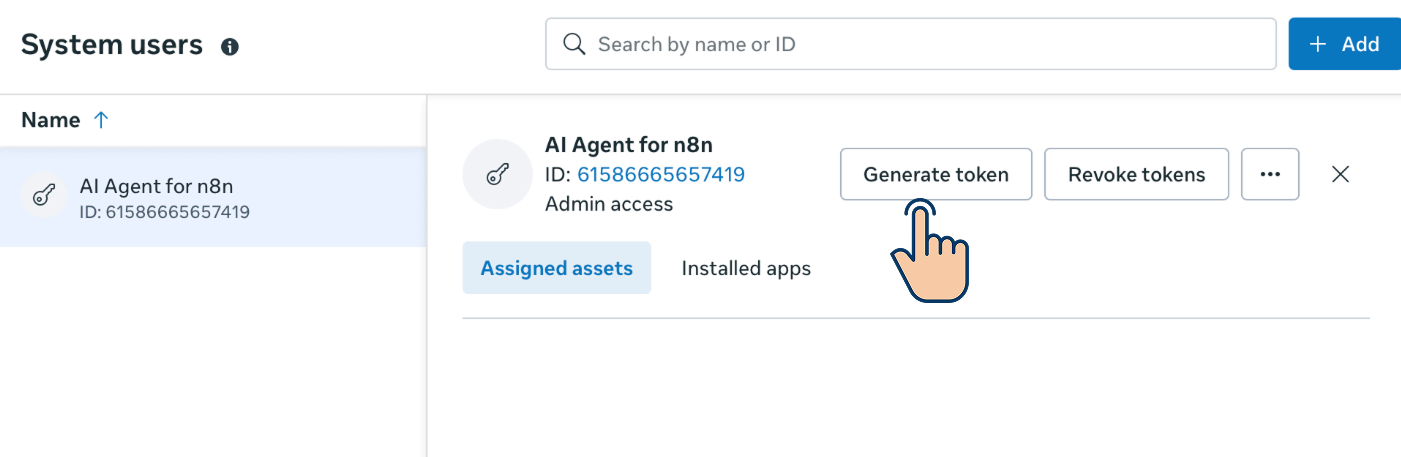
First, click on the "Generate token" button.
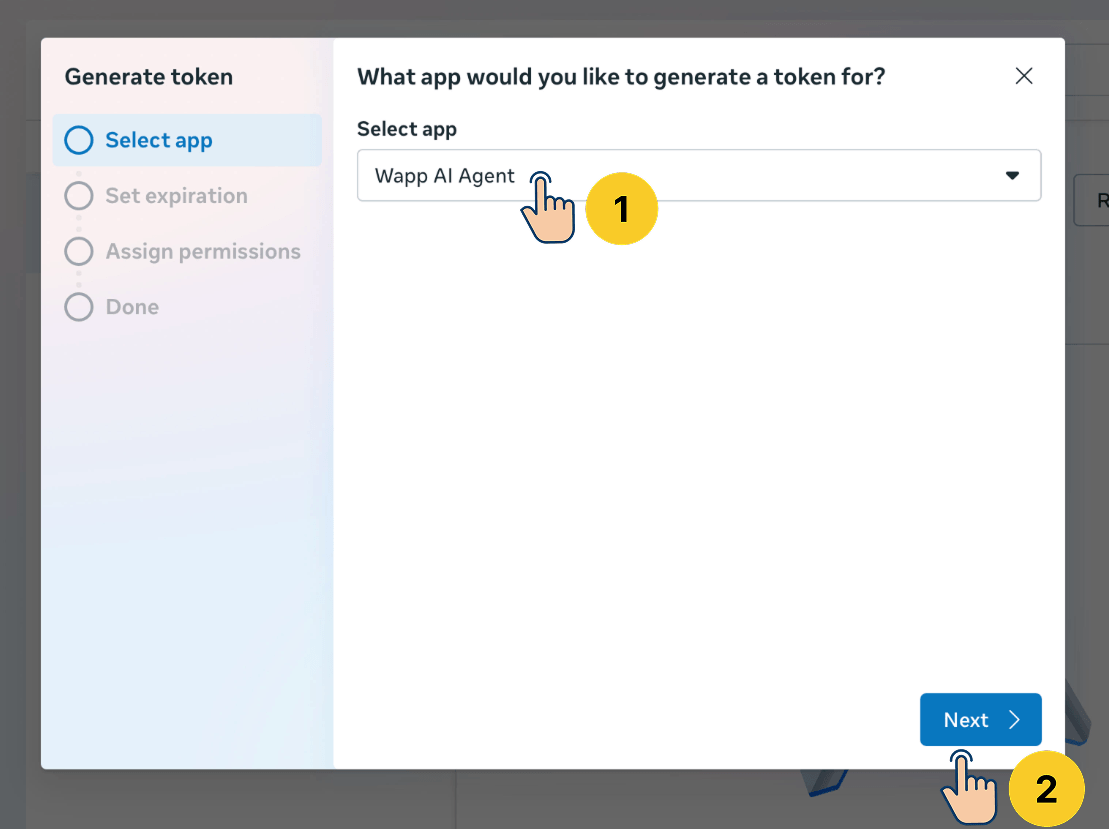
Next, select the app that we created in step 1.
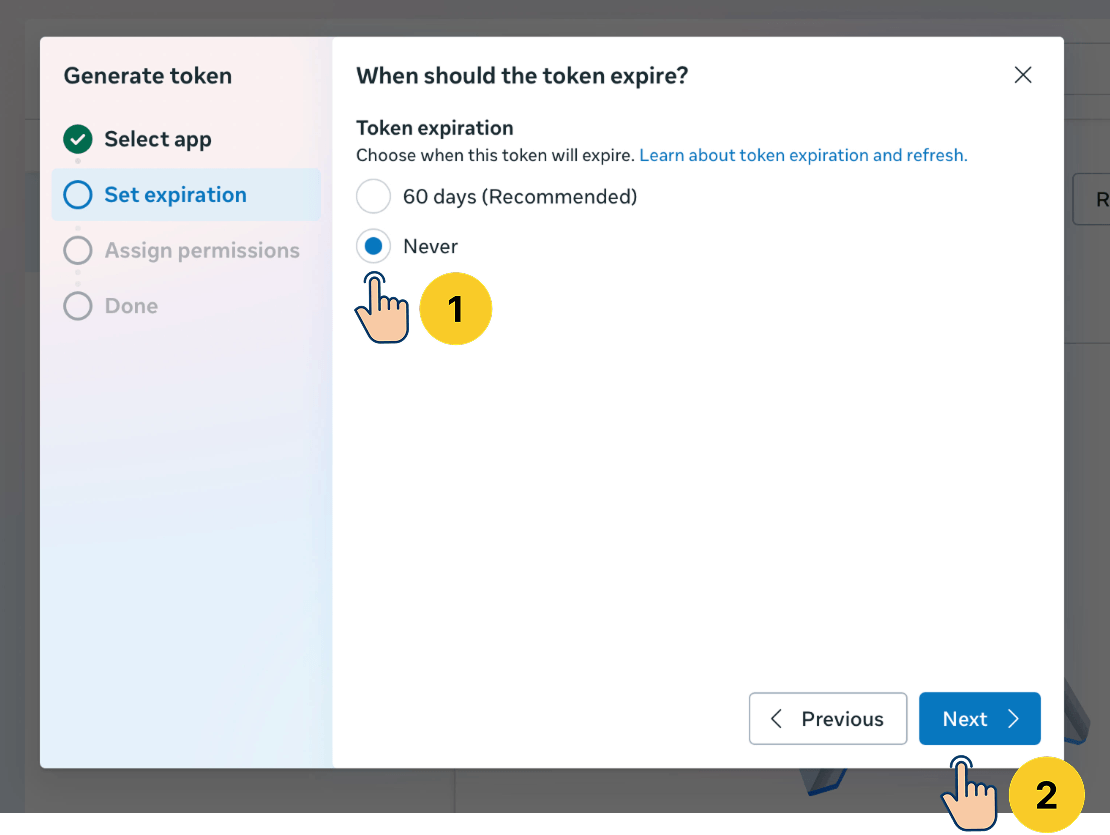
Next, set the expiration for the token.
For better security, it is recommended to set the expiration to 60 days.
But each client comes with different expectations.
If the client is technical and can manage the Meta platform and n8n on their own, they can generate the token as often as it is required for security purposes.
If the client is paying you for the maintenance of the project, you need to follow security best practices as well.
If that is the case, follow the recommendation and choose the expiry at the "60 days" option.
But if the client is non-technical, doesn't want to handle maintenance, and still expects the system to run seamlessly for a long time, choose "never" so the access token never expires.
For the purposes of this lesson, I will choose to "never" expire the token.
Next, assign the required permissions so that the access token can be utilized without any problems:
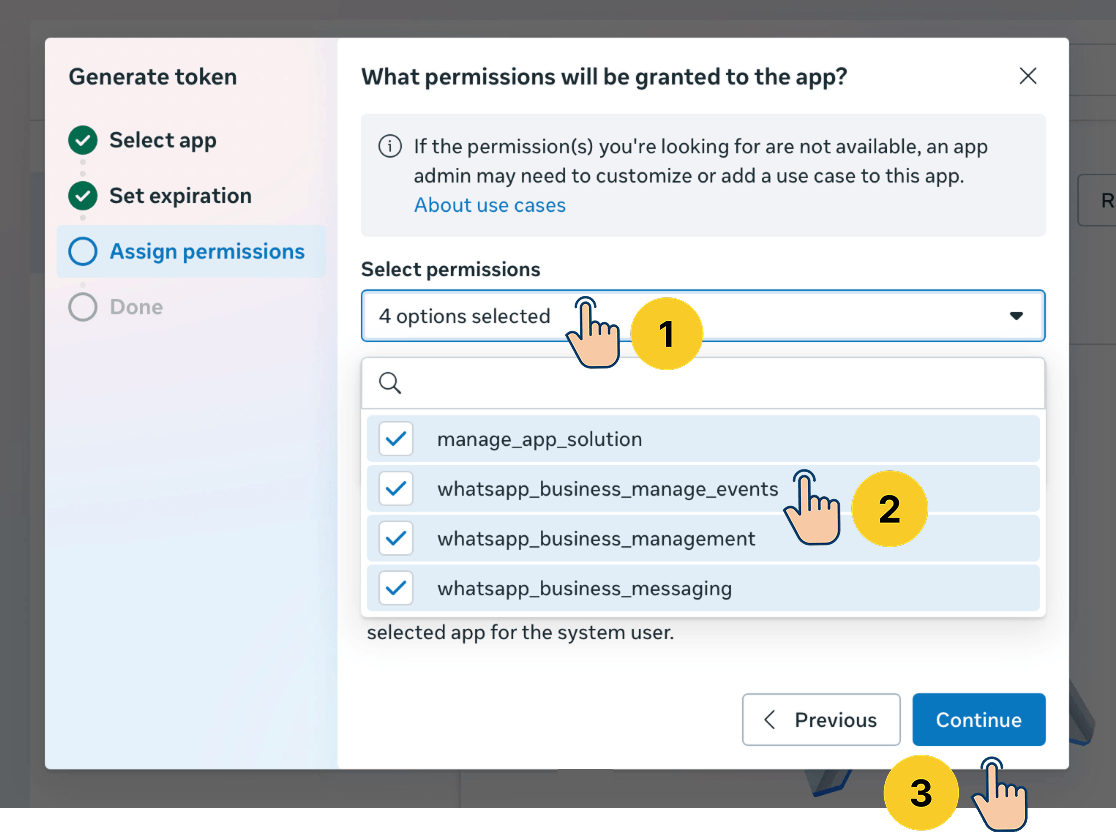
To avoid any unexpected interruptions, select the following four permissions:
manage_app_solutionwhatsapp_business_manage_events- The permission is required for listening to the "received a WhatsApp message" notification inside n8nwhatsapp_business_managementwhatsapp_business_messaging- This permission is required for sending WhatsApp messages via n8n
So, select all four permissions and hit the "Continue" button to finish the token generation process.
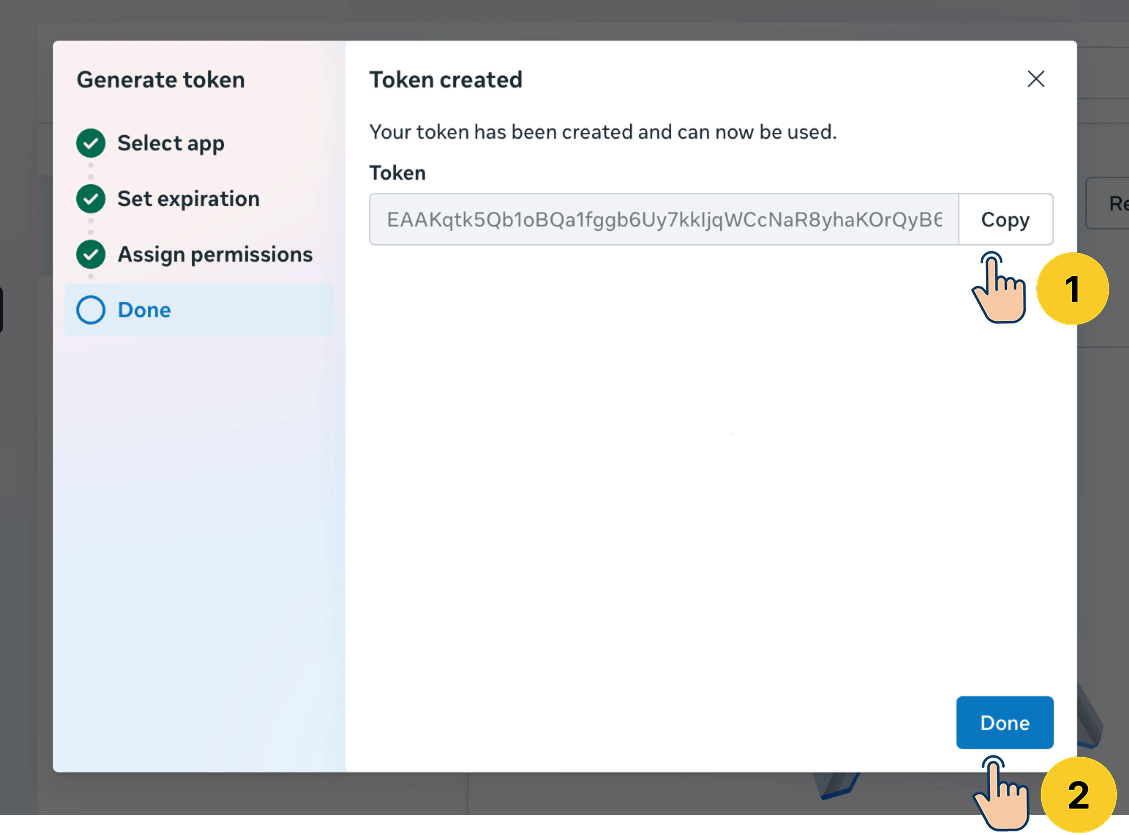
Finally, copy and save this access token somewhere safe temporarily because we will need it in steps 6 and 7.
Having said that,
We still need to:
- Create a WhatsApp Business Account (WABA)
- Assign a phone number to it and verify it. This number will be used for sending or receiving messages
- Register and subscribe to the Phone number (using the system user's access token)
- Link the system user to the WhatsApp Business Account (WABA) with full permissions
- Integrate WhatsApp API with n8n using the system user's access token and App secret.
Uff...lot of work to do.
Come on, let's get to it without wasting any time.
Next...
Step 4: Create a WhatsApp business account (WABA), add a phone number to it, and verify it
When you install WhatsApp on your mobile phone:
- You need to add your phone number to it
- You then need to verify that phone number using a one-time password (OTP).
Only then you will be able to view, send, and receive messages to your mobile app.
Similarly, if you want to use the WhatsApp Cloud API for reading, sending, or receiving messages:
- You need to create a WhatsApp Business Account
- You need to add a phone number to it and verify it using OTP
So, come on, let's create a WhatsApp Business account.
Make sure you are inside the settings screen of your business portfolio:
Next, click on the "WhatsApp Accounts" link from the menu on the left:
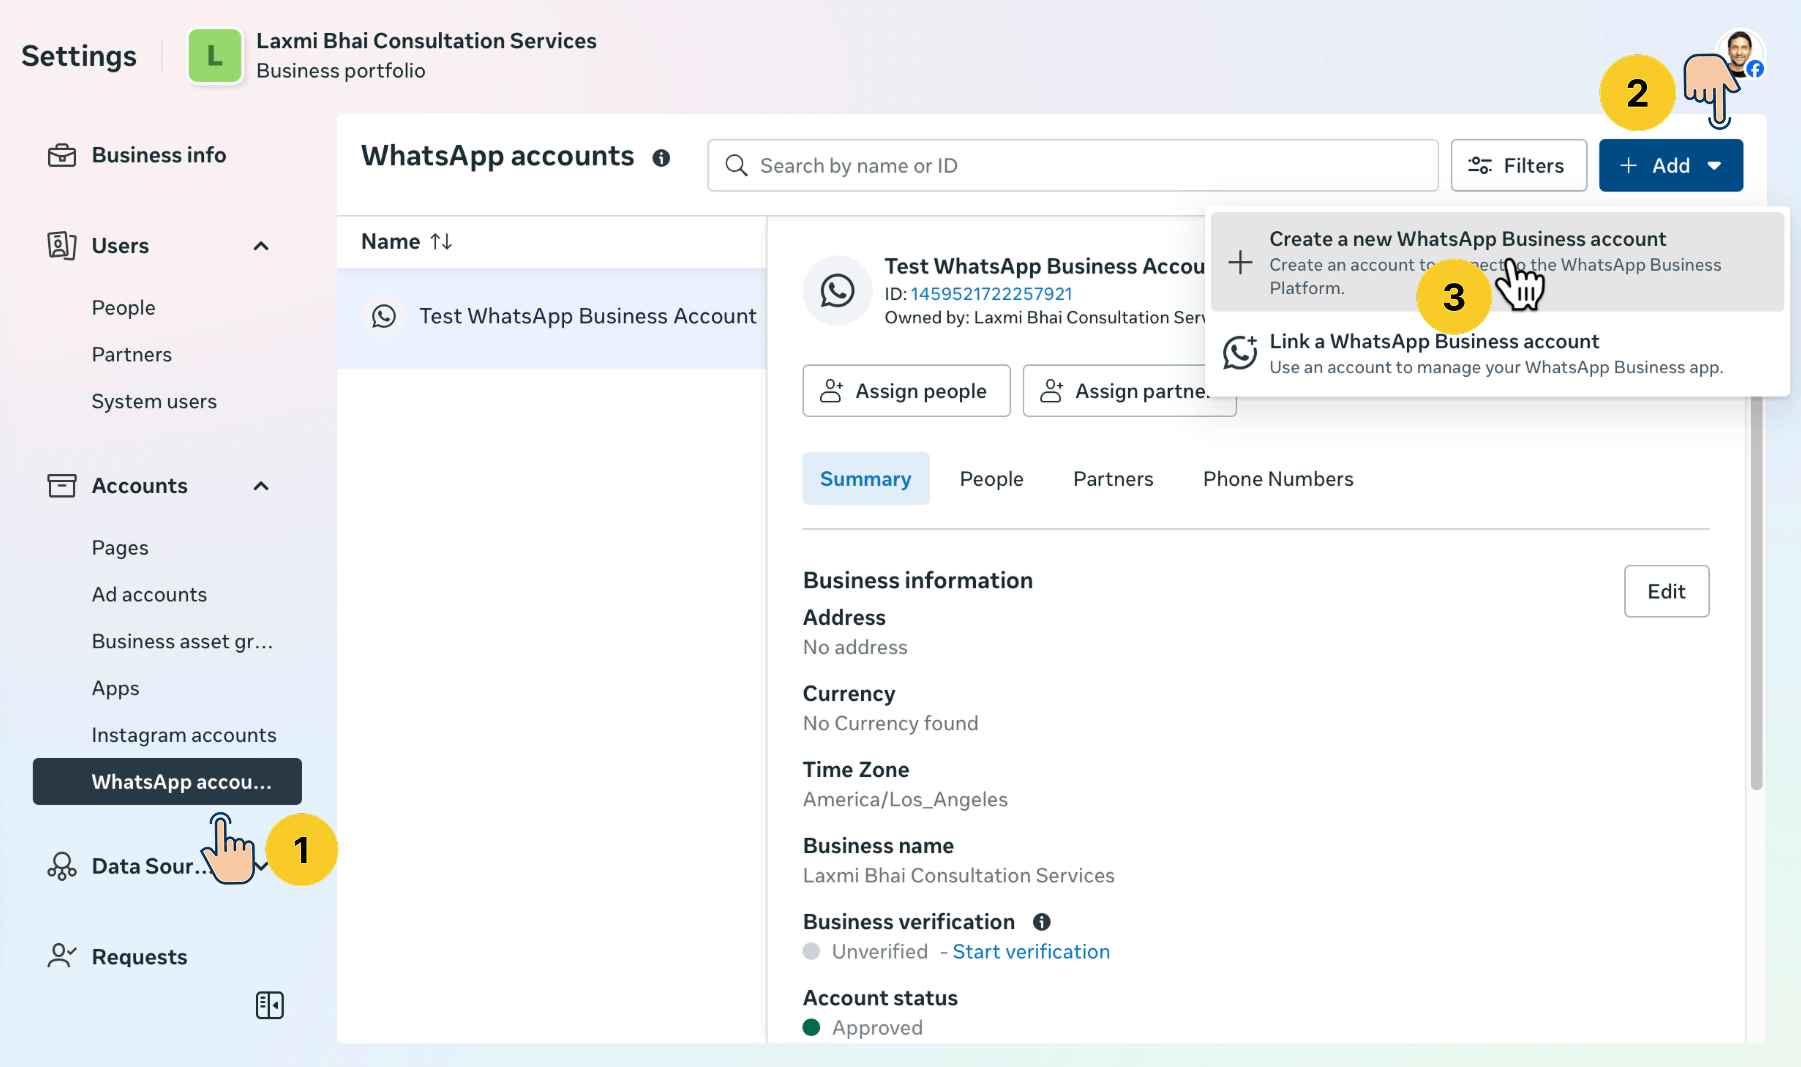
As you can see, there is already a test WhatsApp account.
But we want to create a production-ready WhatsApp account.
So, click on the "Add" button located in the top-right corner of the screen.
And from the dropdown, click on the "Create a new WhatsApp Business account" button.
From here, the rest of the process is divided into three steps:
A) Add business details
B) Add Phone number
C) Phone number verification
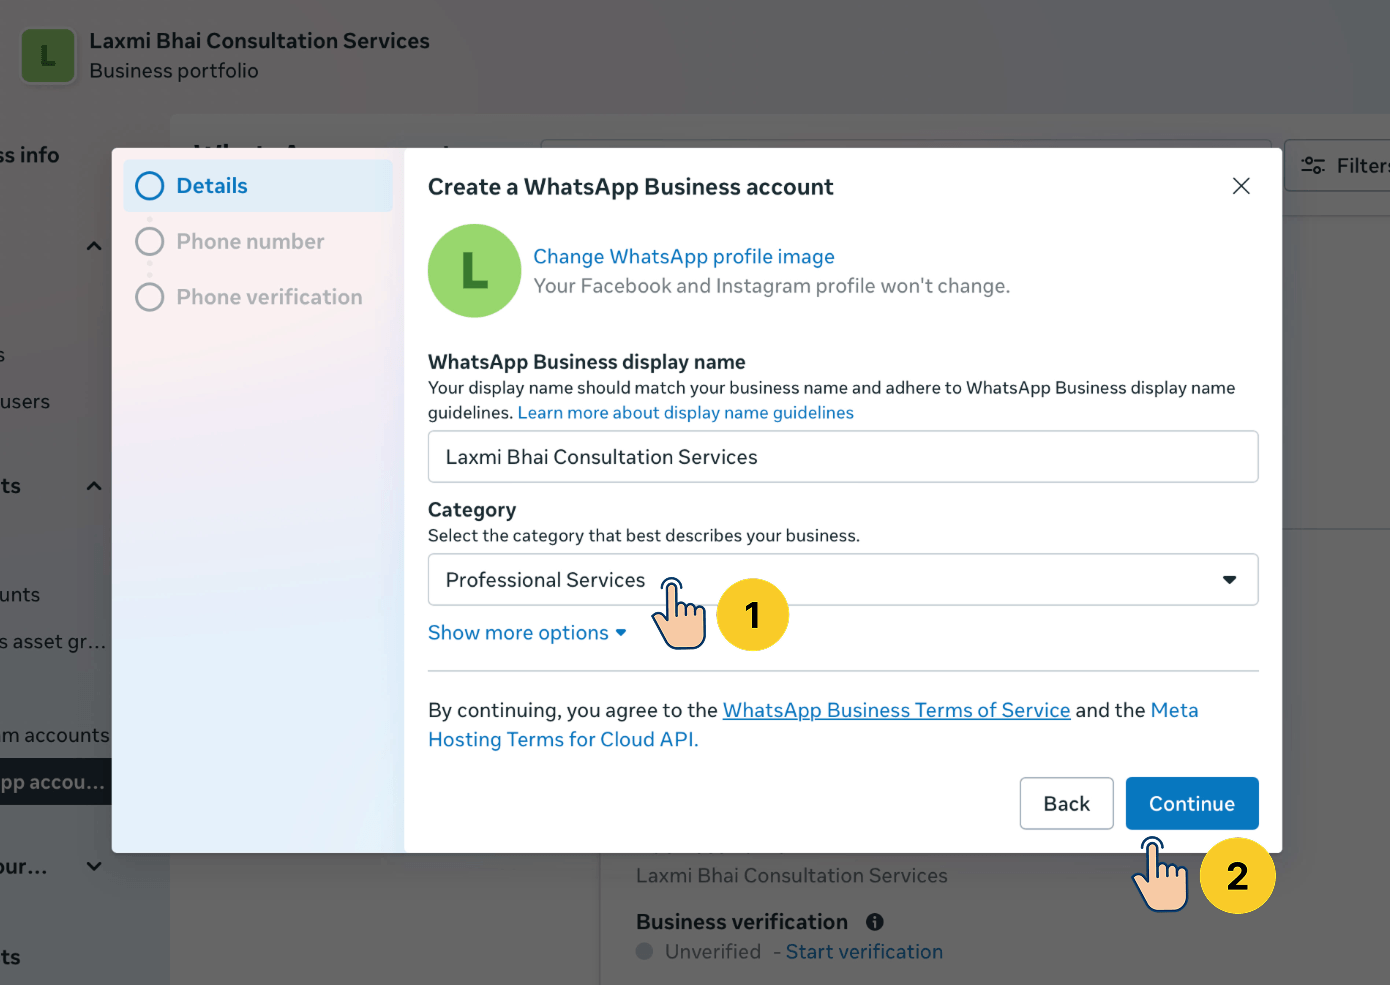
Step A: Add business details
For the display name, make sure you enter your registered business name. Otherwise, you'll face errors.
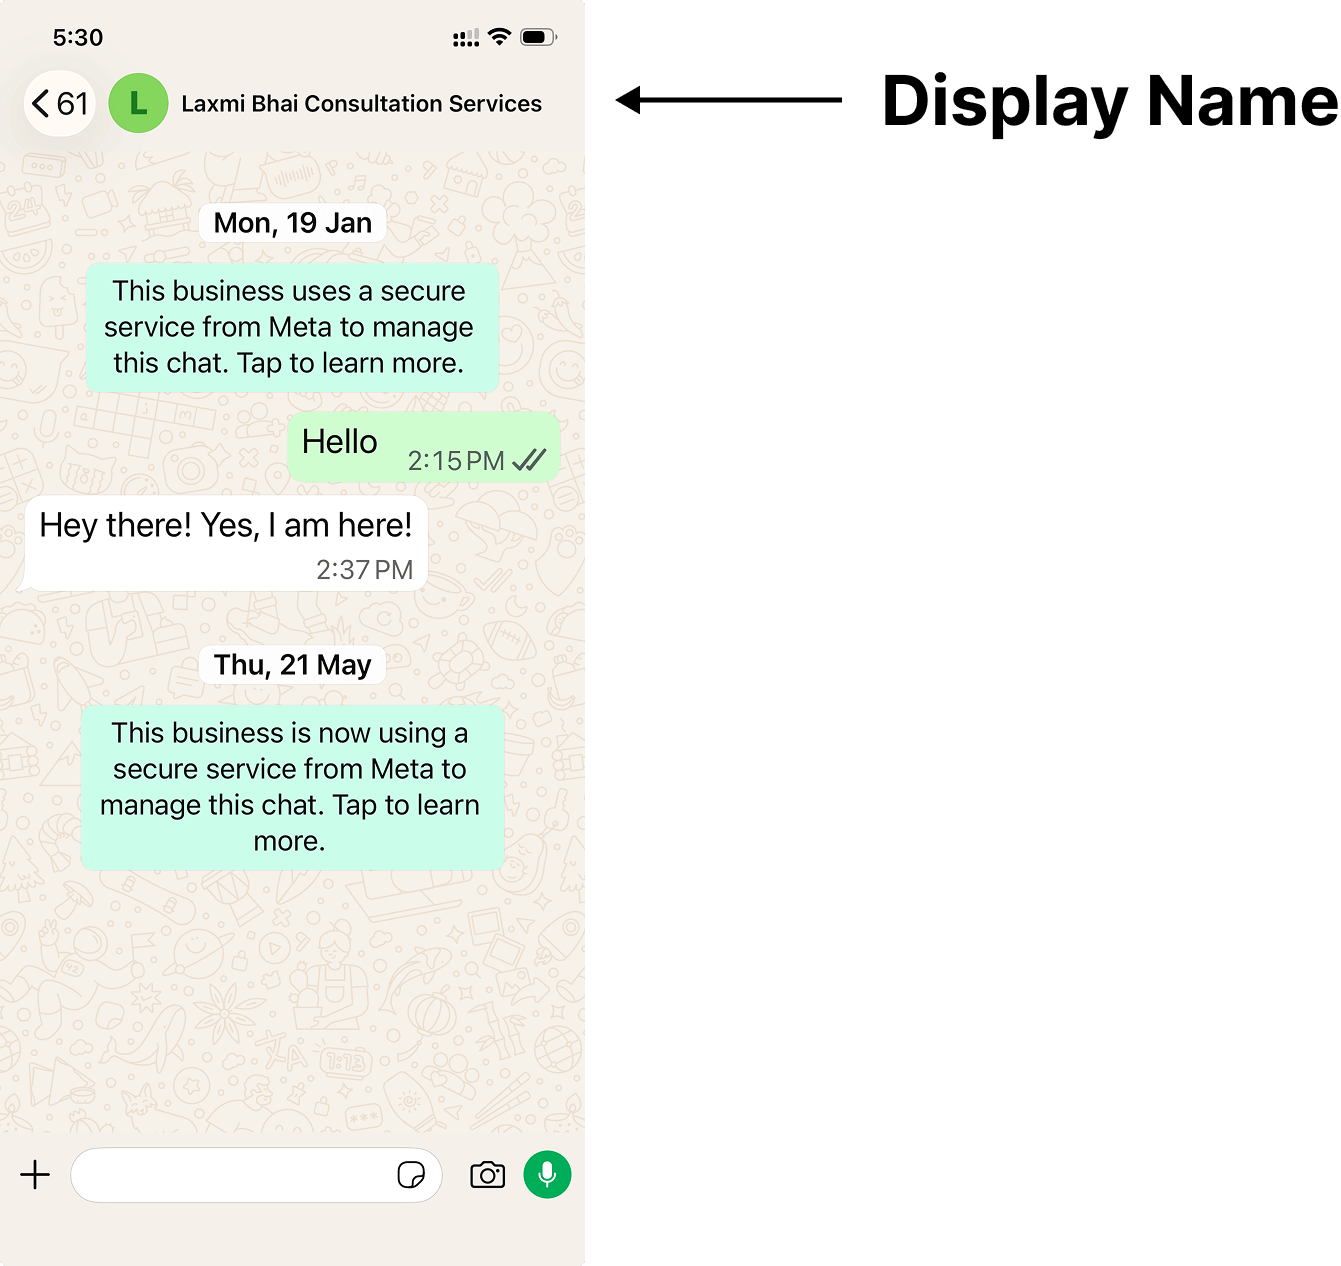
When you send a message in WhatsApp, your customers will see this display name unless they save your number using a different name.
Next, for the category, I selected "Professional Services" because I am a service provider. You should choose it appropriately, too.
Finally, click on the "Continue" button.
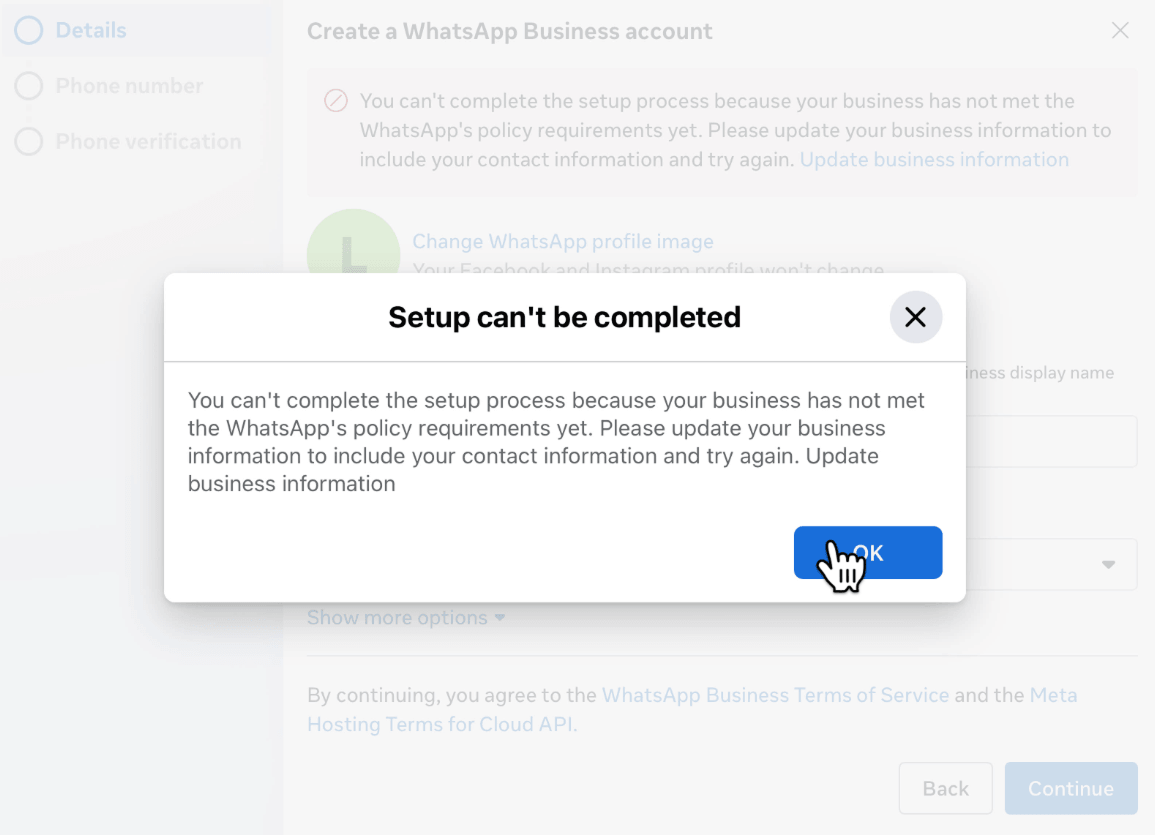
And bang!
There is an error.
But don't worry.
If you read the error details carefully, it says that we didn't provide our business and contact information.
So, providing our details should fix this error.
So, keep this tab open and create a new tab in the browser and go to your business portfolio's settings screen.
And if you notice the top-left corner, there is a button called "Business Info".
Click on it to open up the business details.
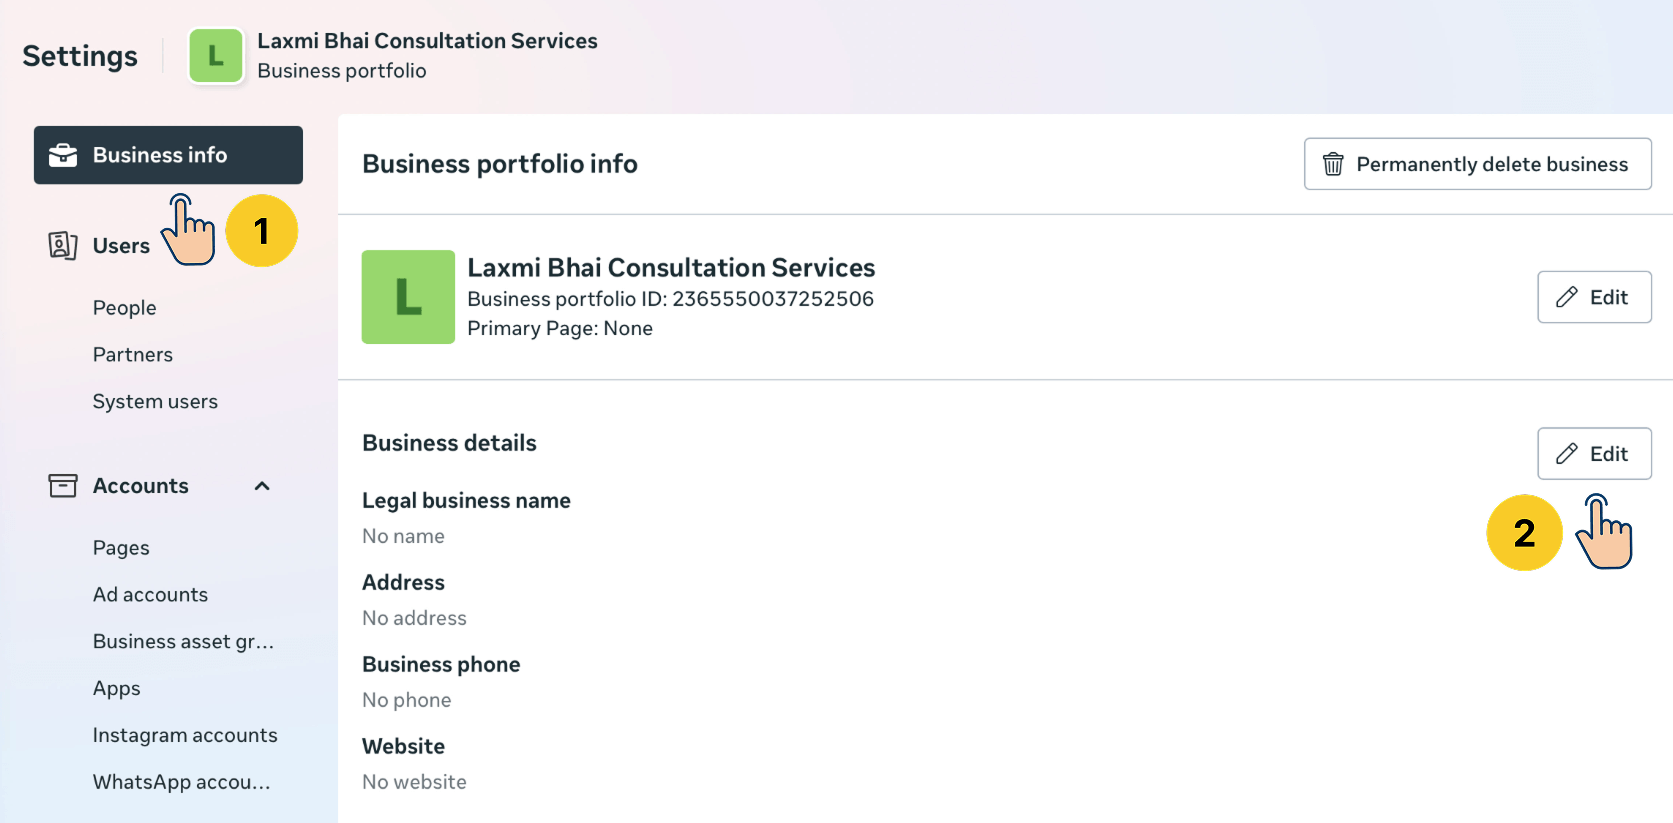
And as you can see, the business details are empty.
I did not provide the legal business name, address, and other details.
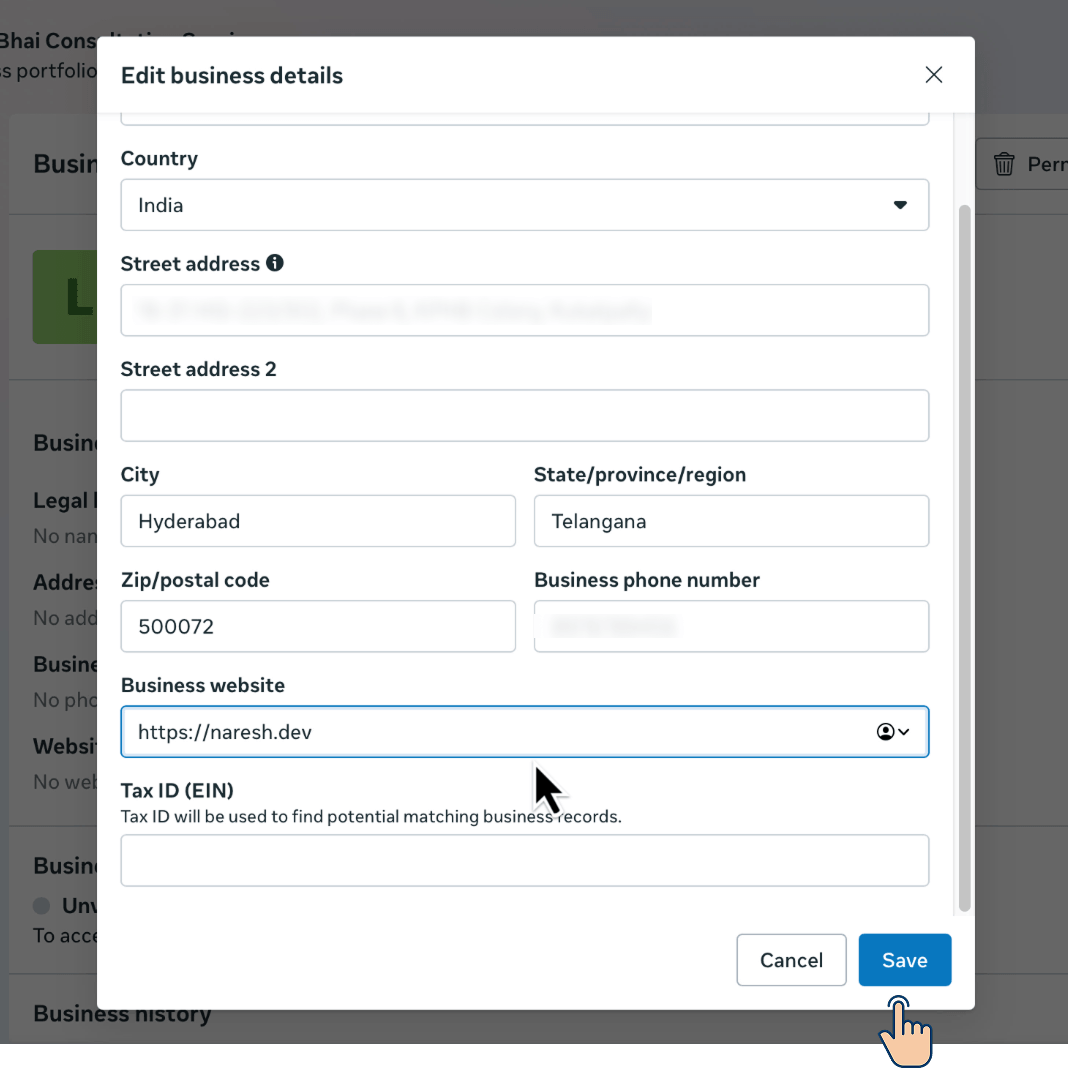
So, to fix it:
- Click on the "Edit" button inside the business details section
- Enter your business details or your client's.
- Click the "Save" button
Next, switch to the WhatsApp Business Account creation tab and submit the details again by clicking on the "Continue" button.
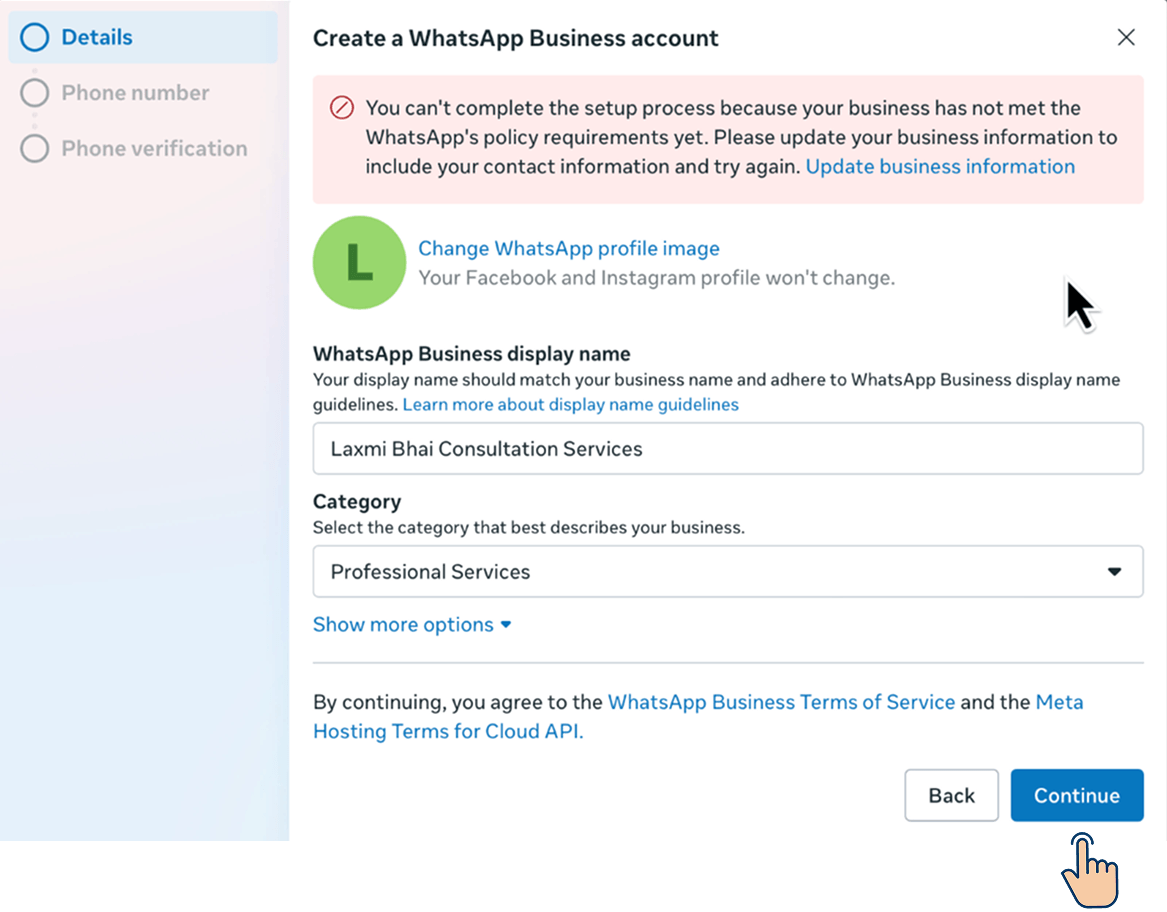
This time, the error is gone, and we were moved to the next step.
Step B: Add Phone number
First, select "Add a new number" and then enter the phone number you want to dedicate to use with WhatsApp Cloud API.
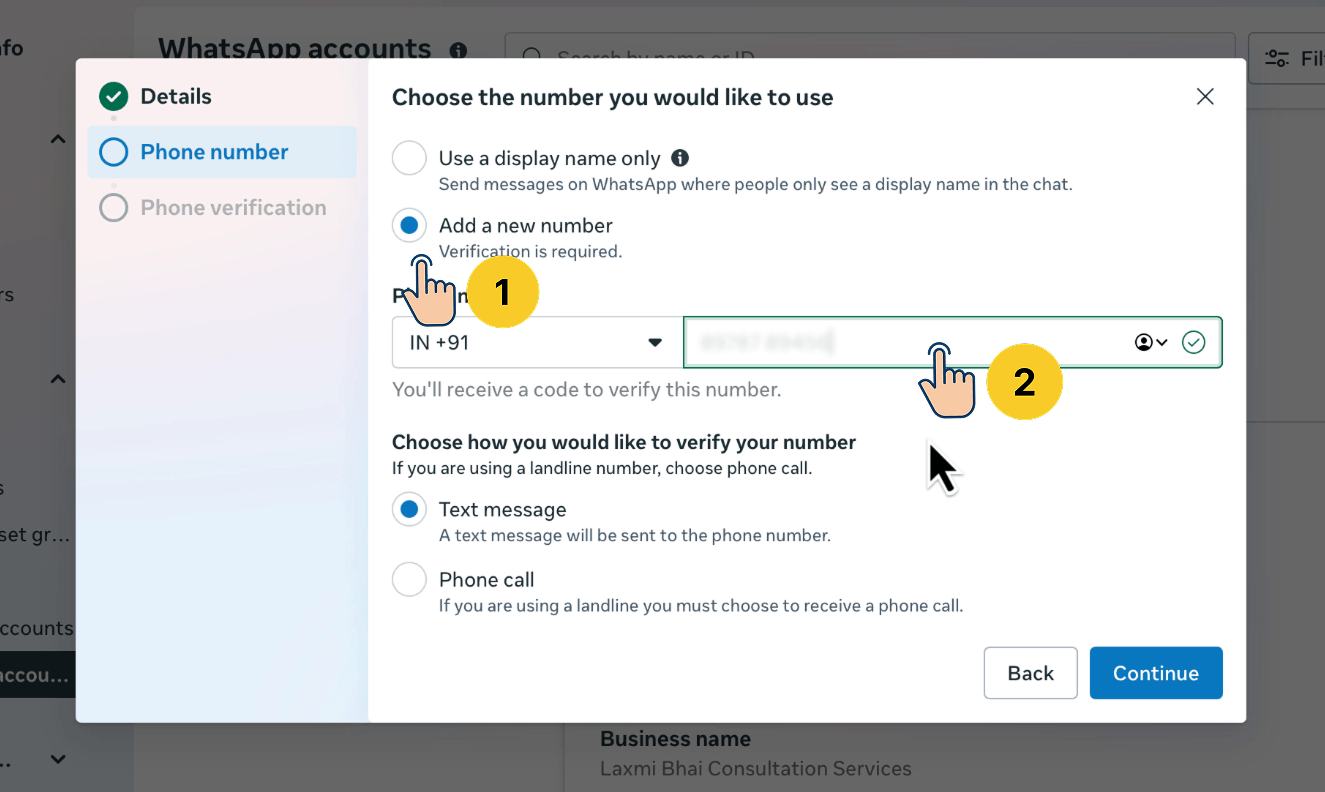
I am using the word "dedicate" because you can no longer use this phone number inside WhatsApp mobile or desktop apps.
Of course, you can release the phone number from the API to switch between the API and the mobile app.
This is not a permanent change.
Step C: Phone Number Verification
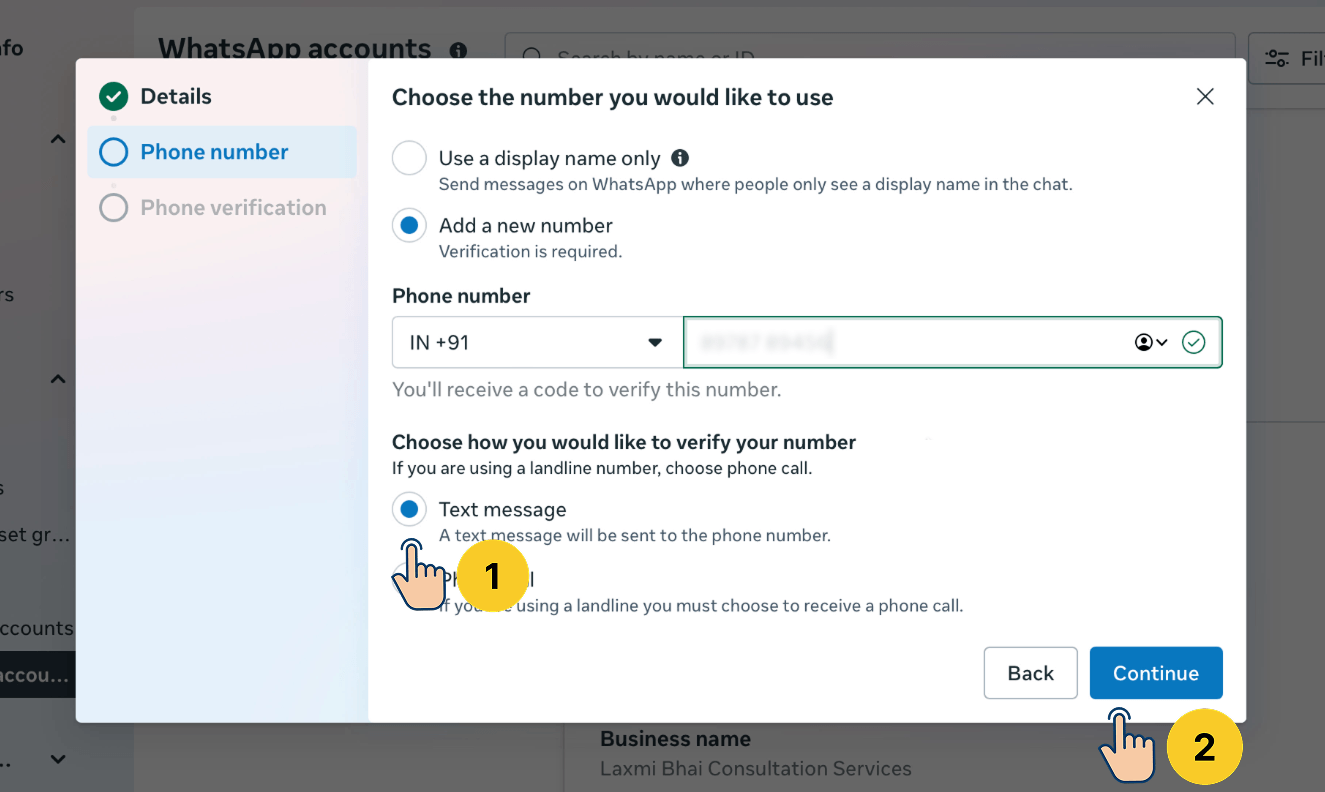
For verification, select "Text message" or "Voice call" and click the "Continue" button to receive the OTP.
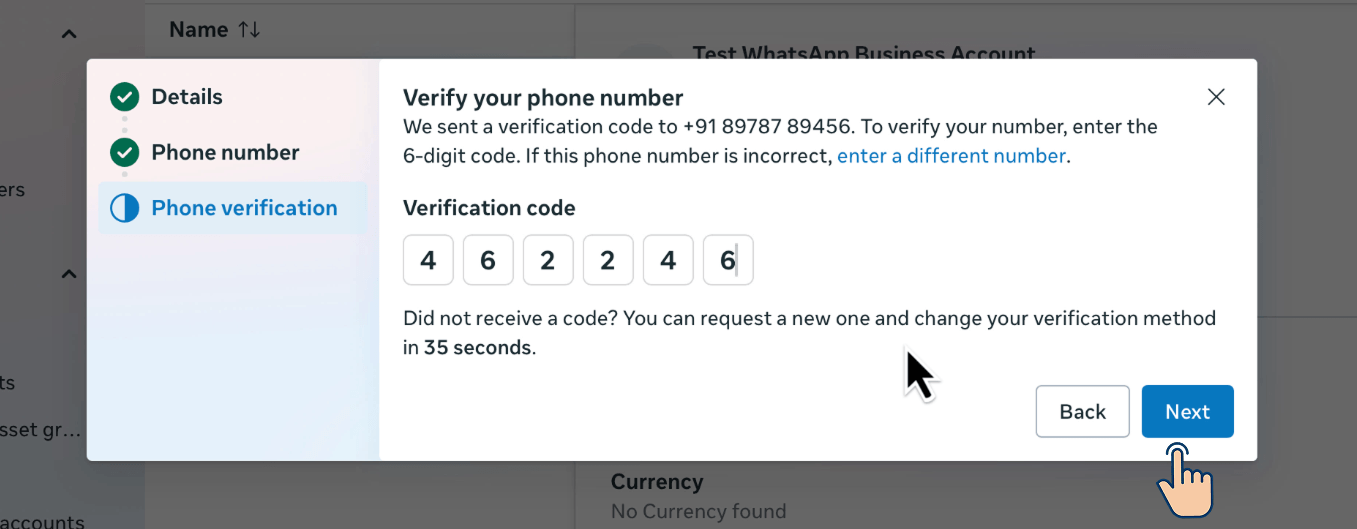
Once you receive the OTP, enter it and click the "Next" button.
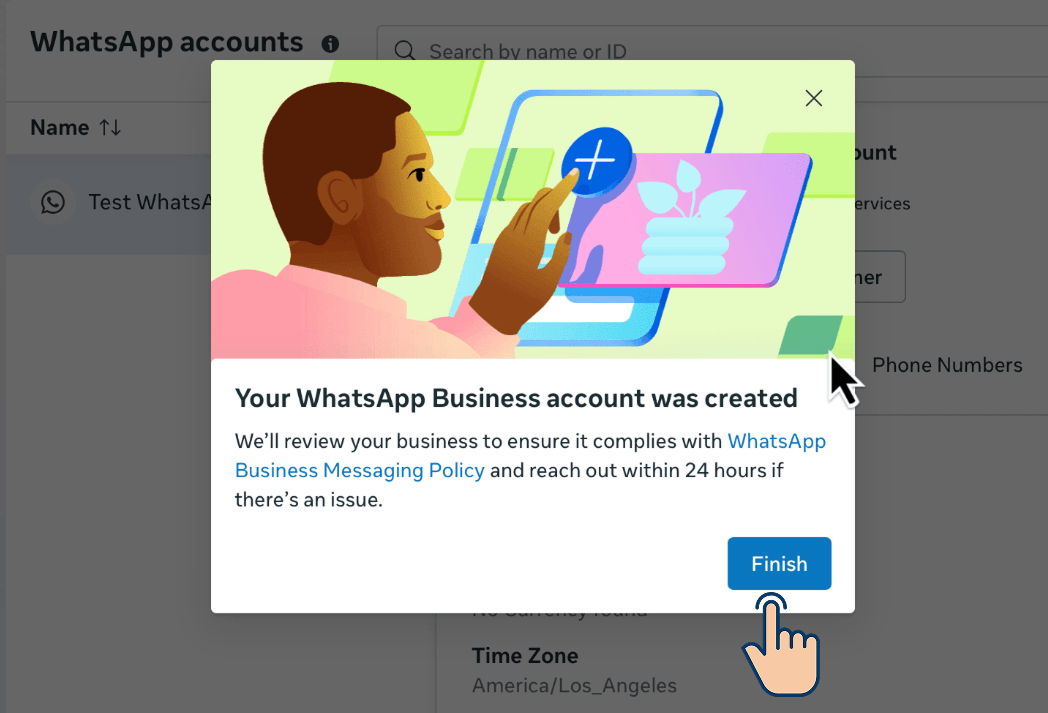
If all goes well, you'll see this success message.
Click on the "Finish" button to finish the WhatsApp Business Account (WABA) process.
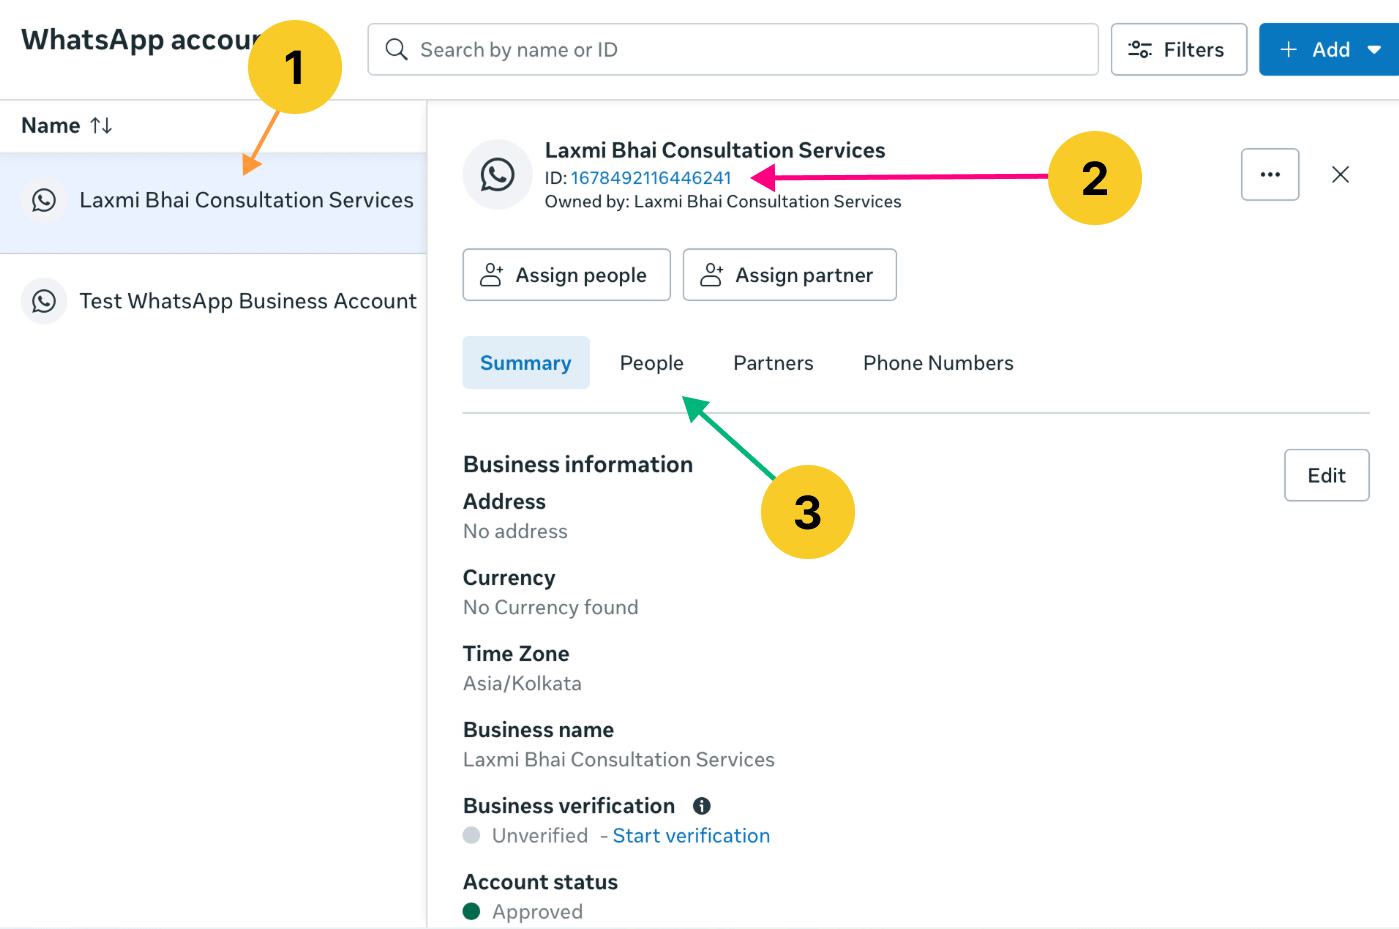
If you now notice:
- The WhatsApp account list now contains the newly created account (orange arrow).
- Our WABA has a dedicated ID (pink arrow). Save this somewhere because we will use it in steps 6 and 7.
- Keep an eye on the "People" tab because we will work inside it next.
That's it!
That's all it takes to create a WhatsApp Business Account.
Next...
Step 5: Assign the system user to the WhatsApp business account (WABA)
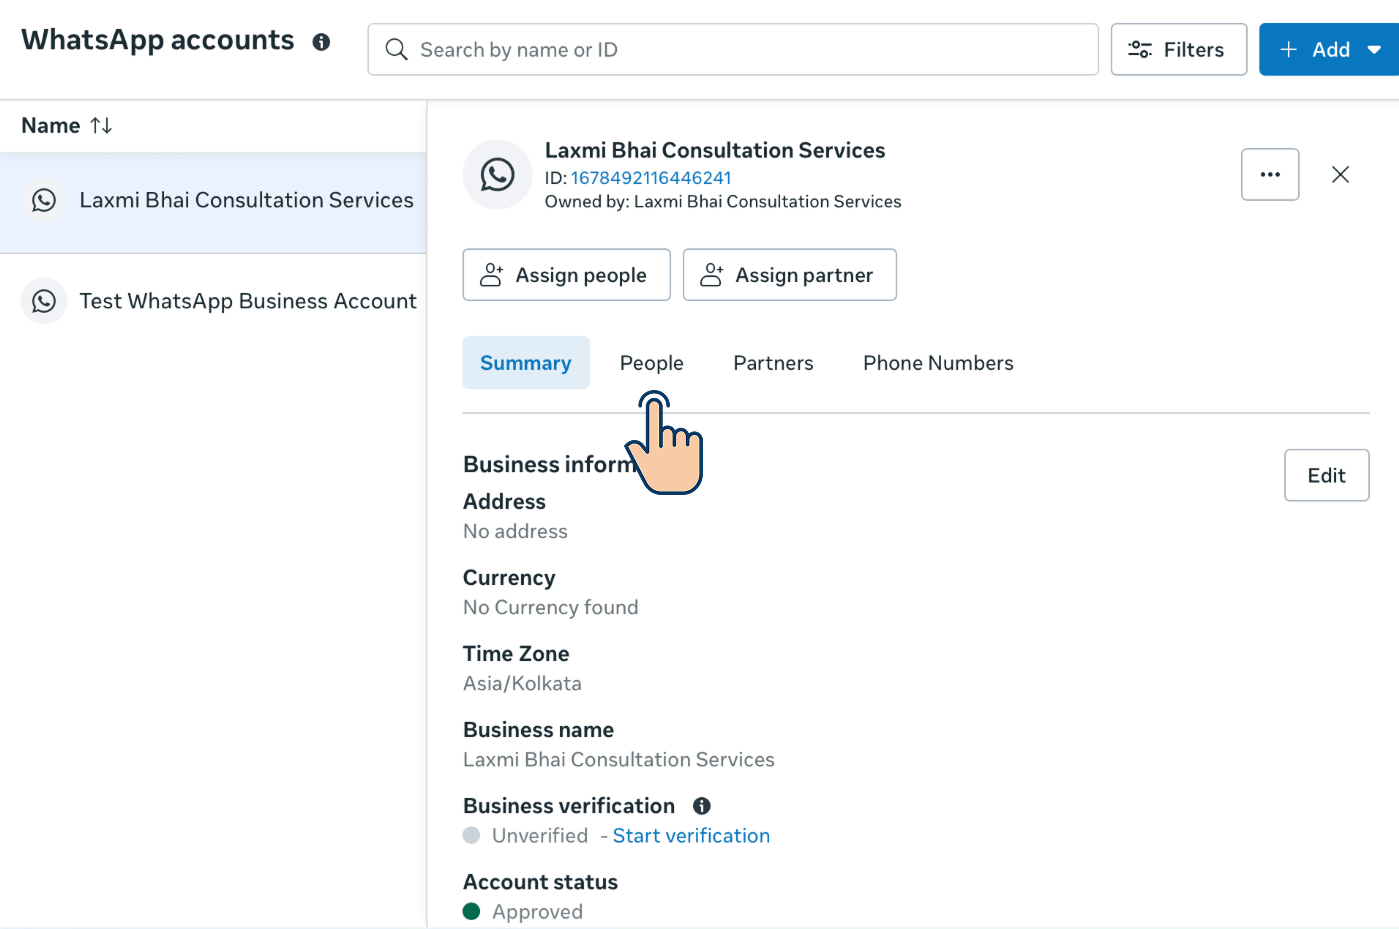
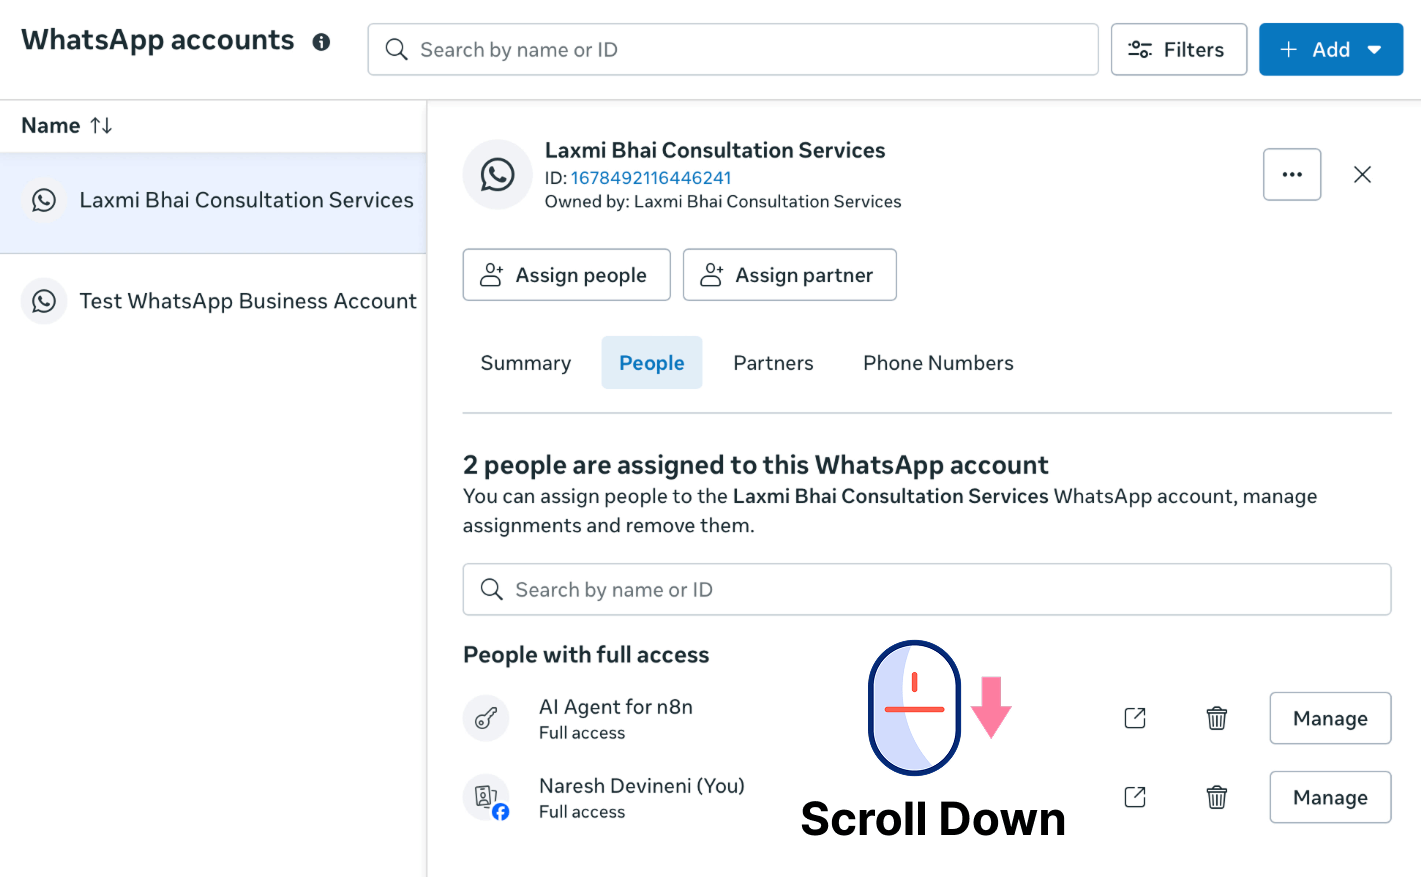
Inside the newly created WABA, click on the "People" tab.
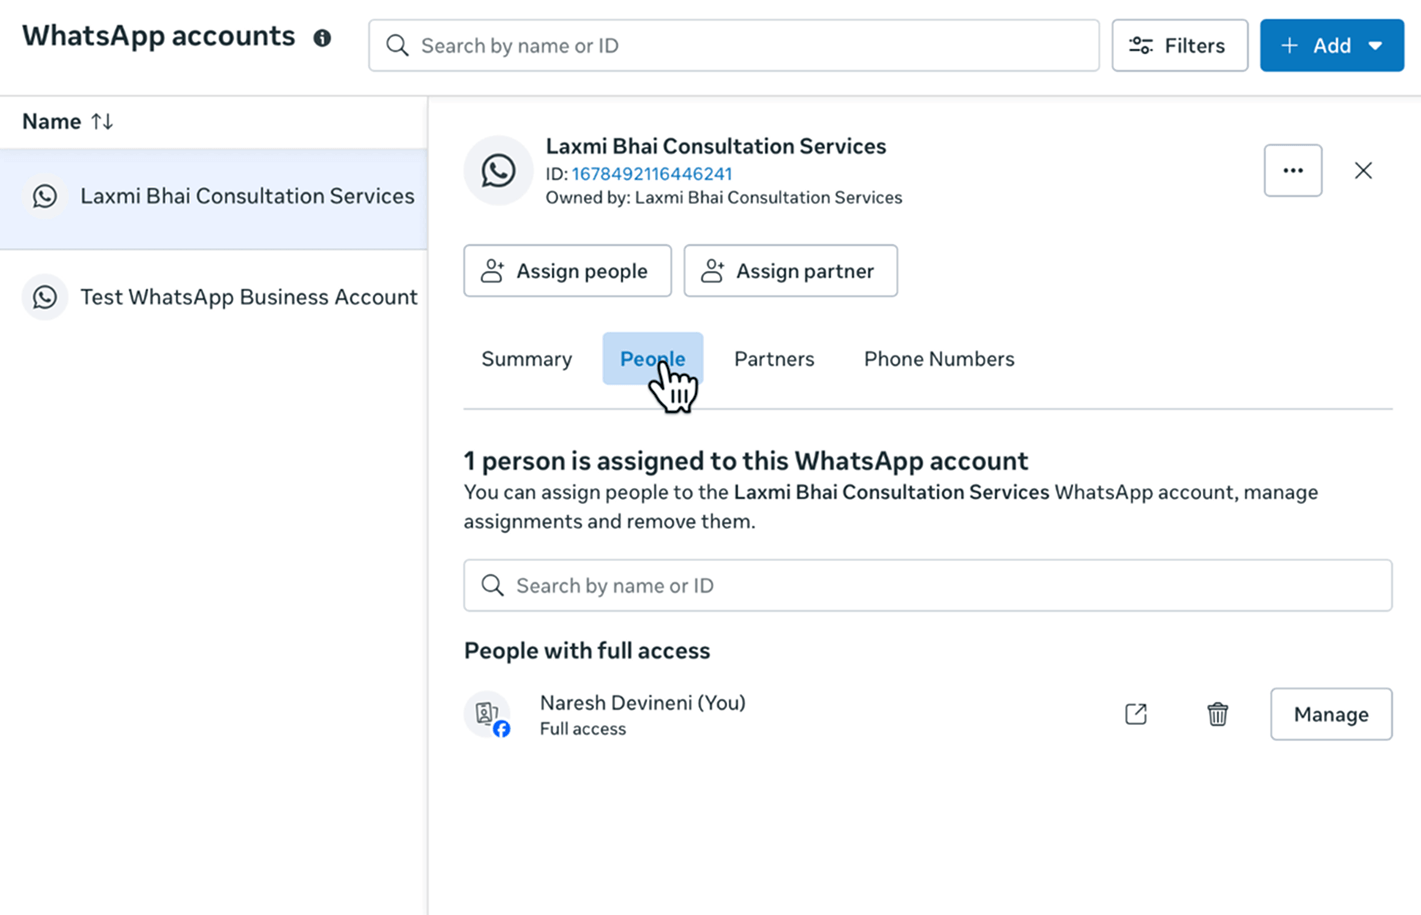
If you notice, Meta assigned my personal Facebook account to it.
Because I created a system user with the "Admin" role, I thought that system user would get automatically assigned too.
But that is not the case. I should never fully trust Meta API docs 🪂
Never mind.
Let's assign the system user manually.
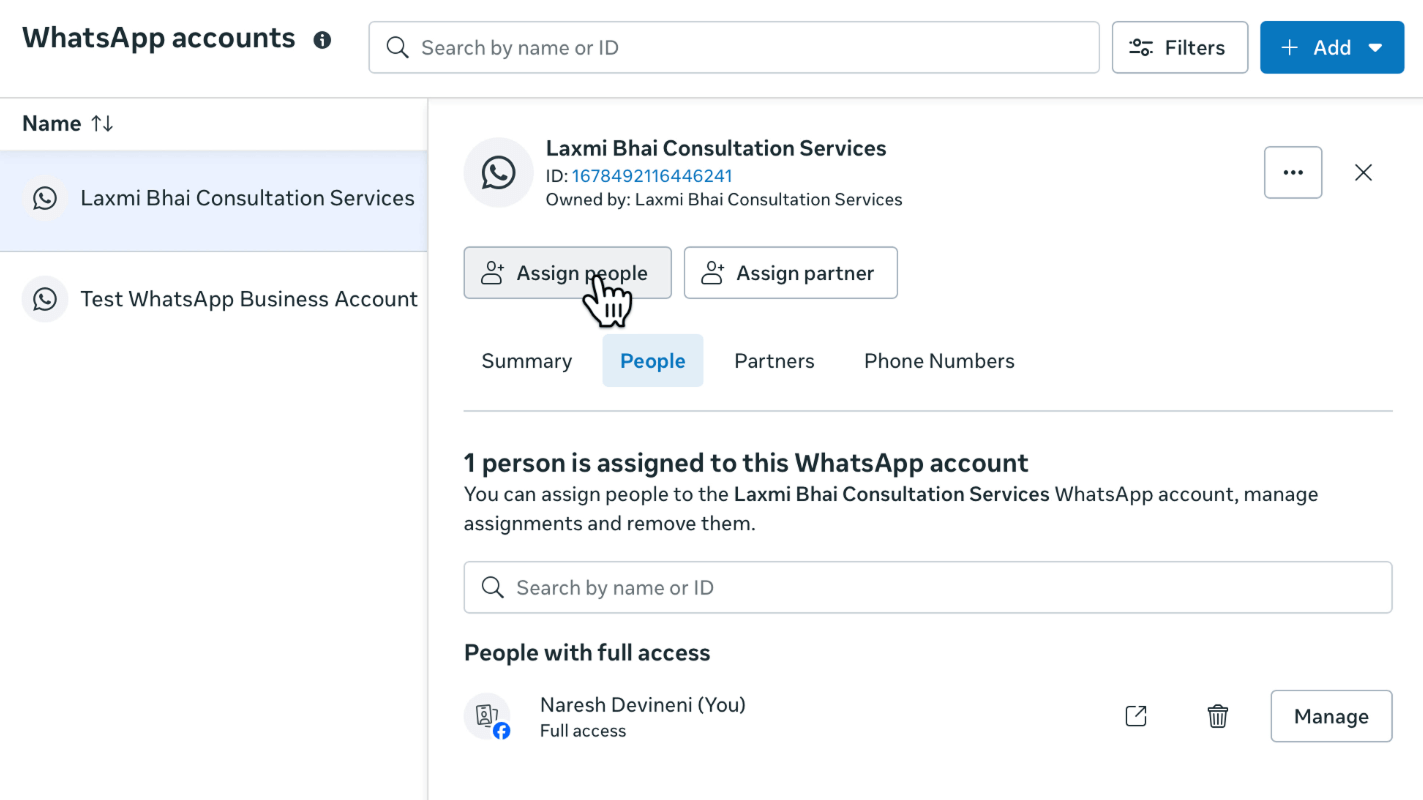
First, click on the "Assign People" button located directly on top of the "People" tab.
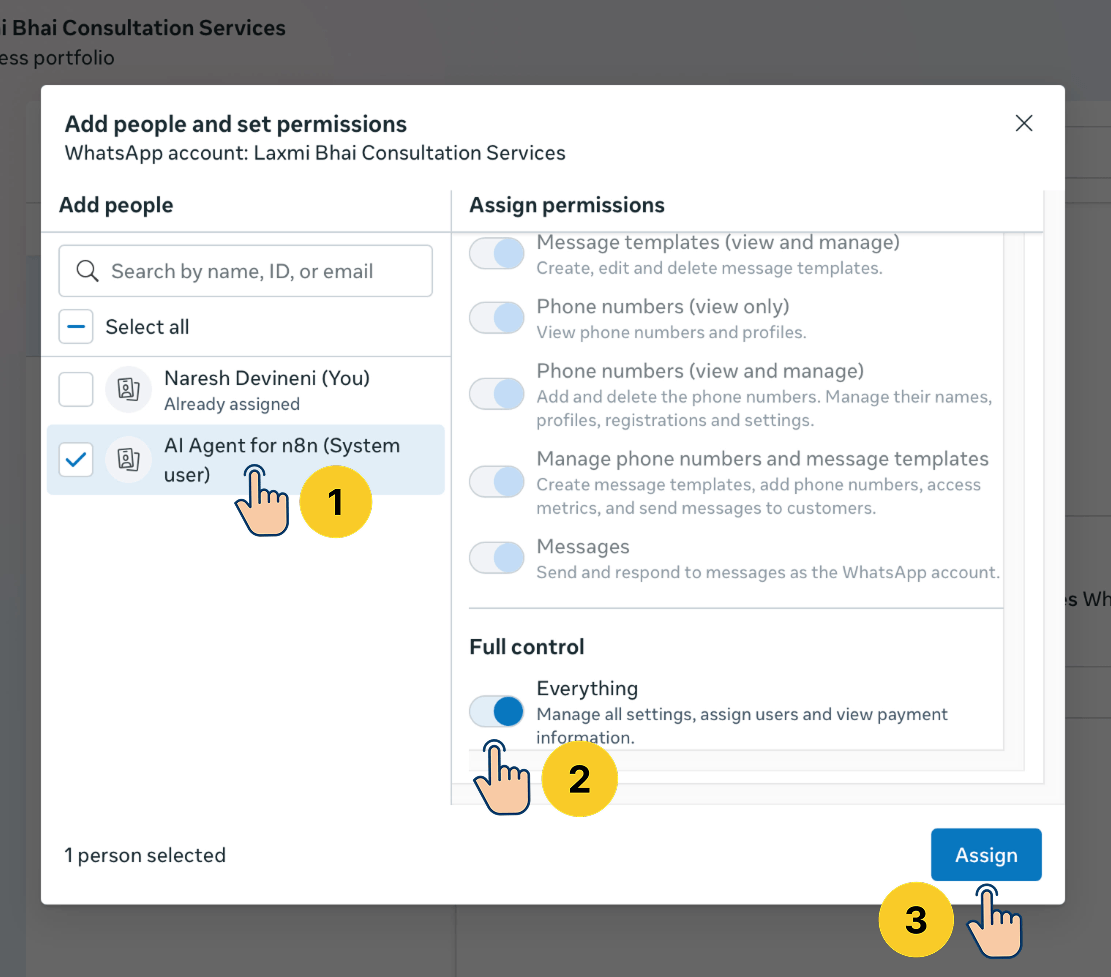
Next:
- Select the system user you recently created
- Assign full control of the WABA to it
- Click on the "Assign" button
If all goes well, you should see this success message.
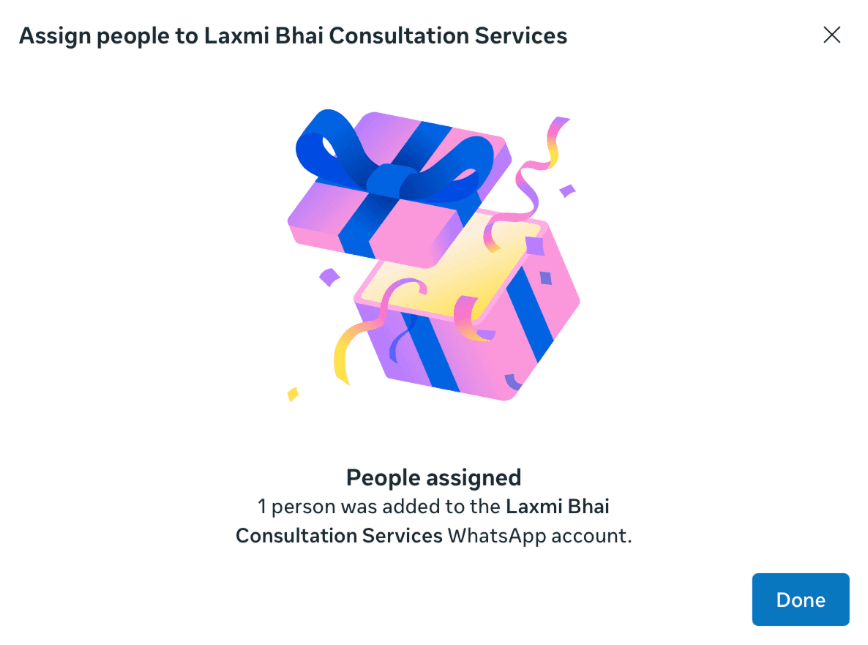
That's all it takes to assign a system user and phone number to WABA.
Having said that, we have one small problem to fix. It has to do with the connection status of the phone number we just assigned to our WABA.
First, let's check the status of the Phone number.
To do that, make sure you are inside the newly created WABA.
And scroll down until you find the "WhatsApp Manager" button.
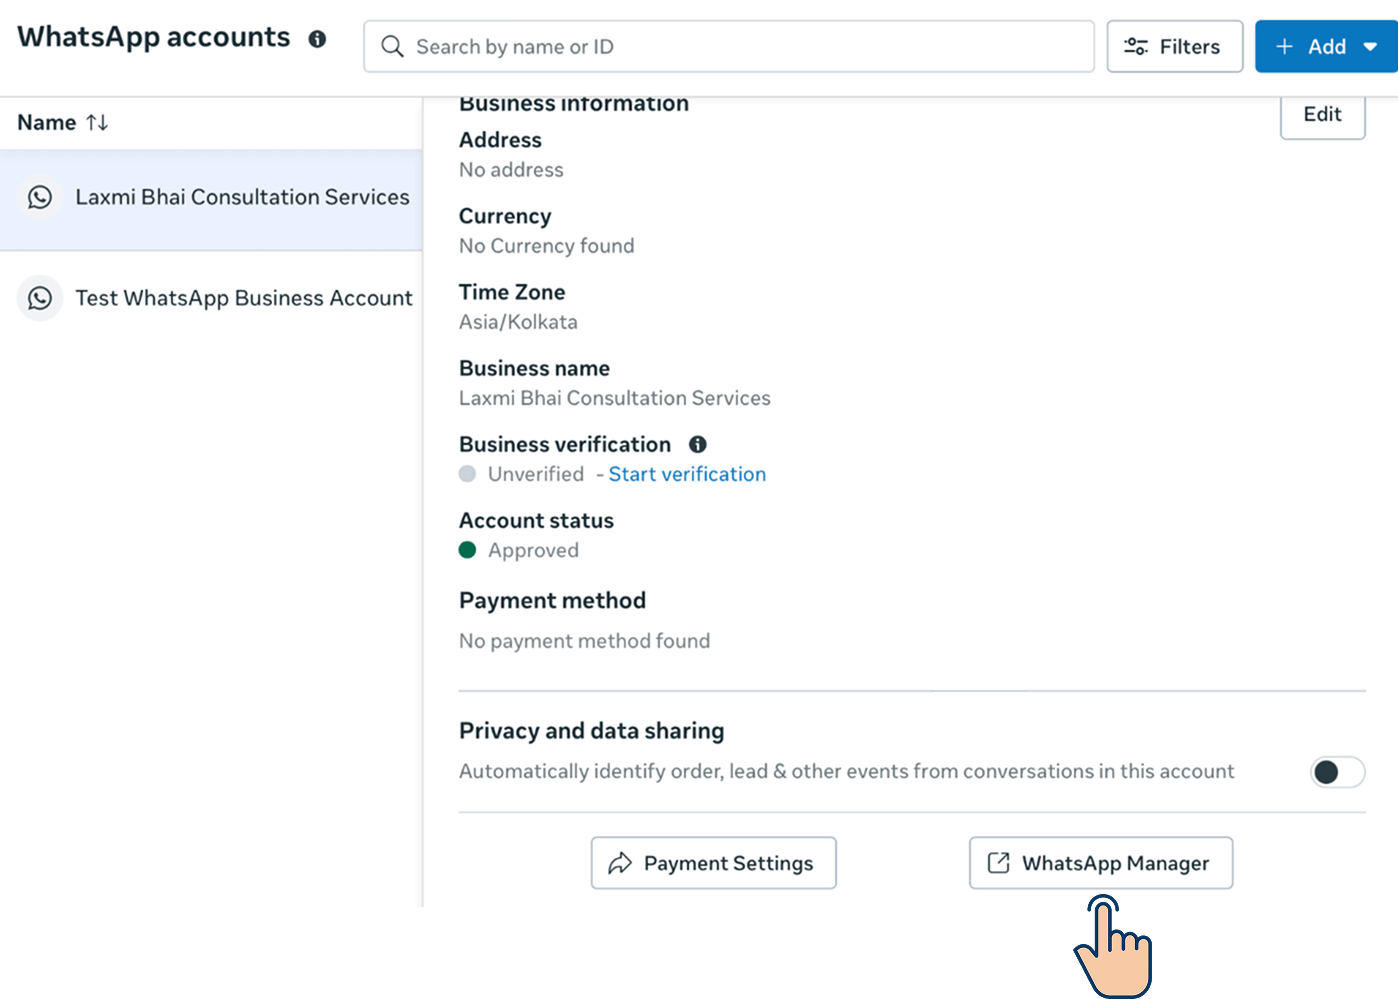
Click on it, and it will take us to the "Phone numbers" screen.
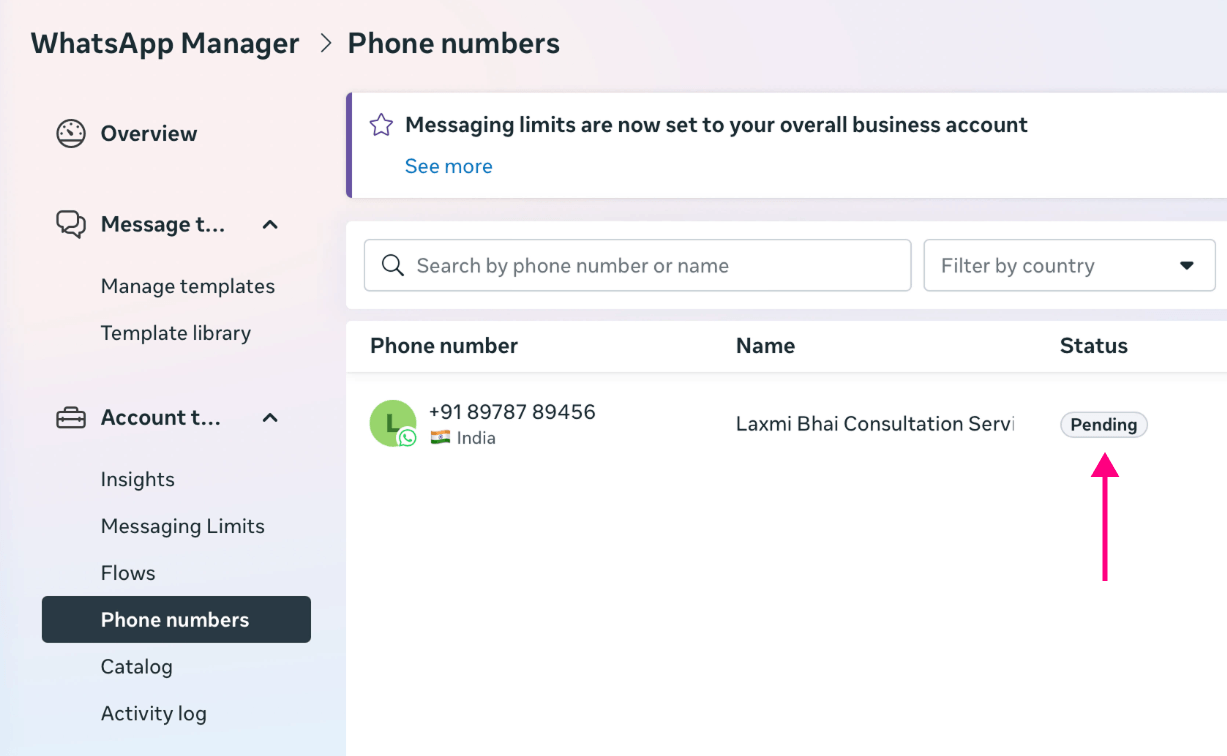
And if you observe, the phone number we added to our WABA still has the Pending status.
It is pending because we didn't register the phone number with the WhatsApp Cloud API.
After the registration, the status should change to Connected.
"But we verified the phone number, right?"
Verification of the phone number is not enough. We should register it too.
You can't send messages unless the status changes from Pending to Connected.
So, let's see how to do it...
But before that, I want you to save the ID of the Phone number we just added in a safe place to use in Step 6.
So, click on the Phone number:
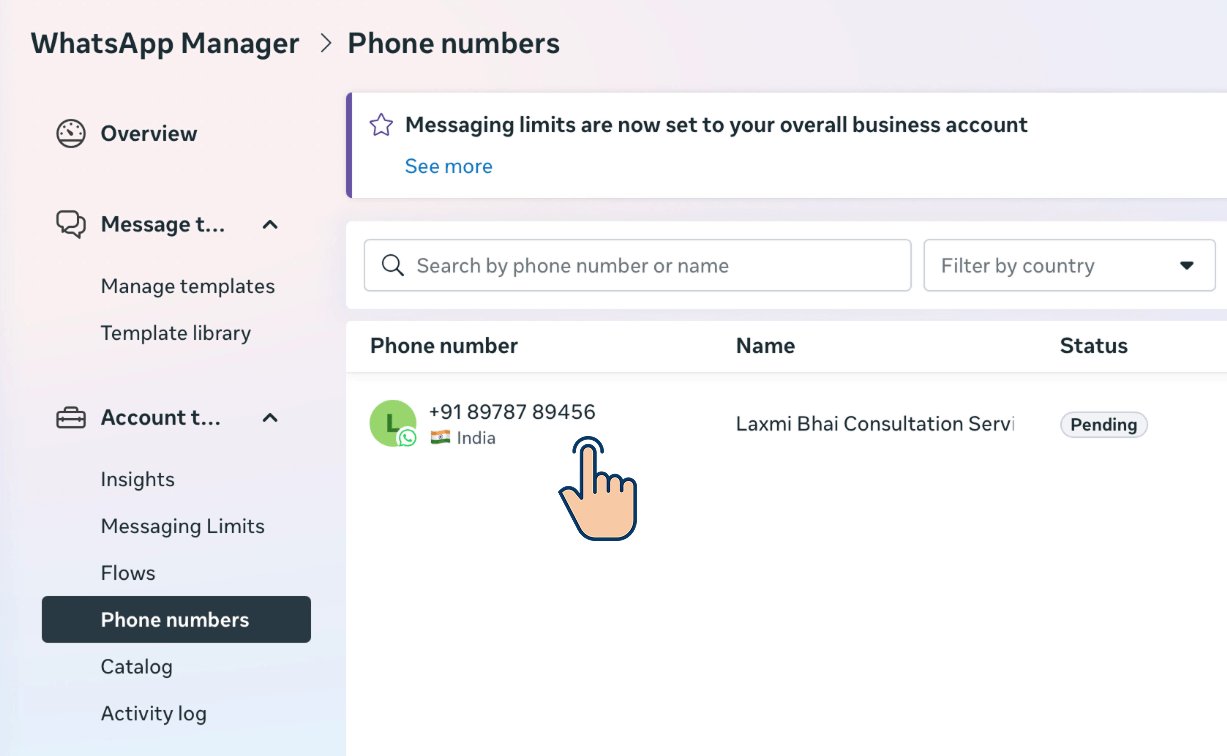
This will open up the configuration screen of the Phone number, and it contains the Phone number ID:
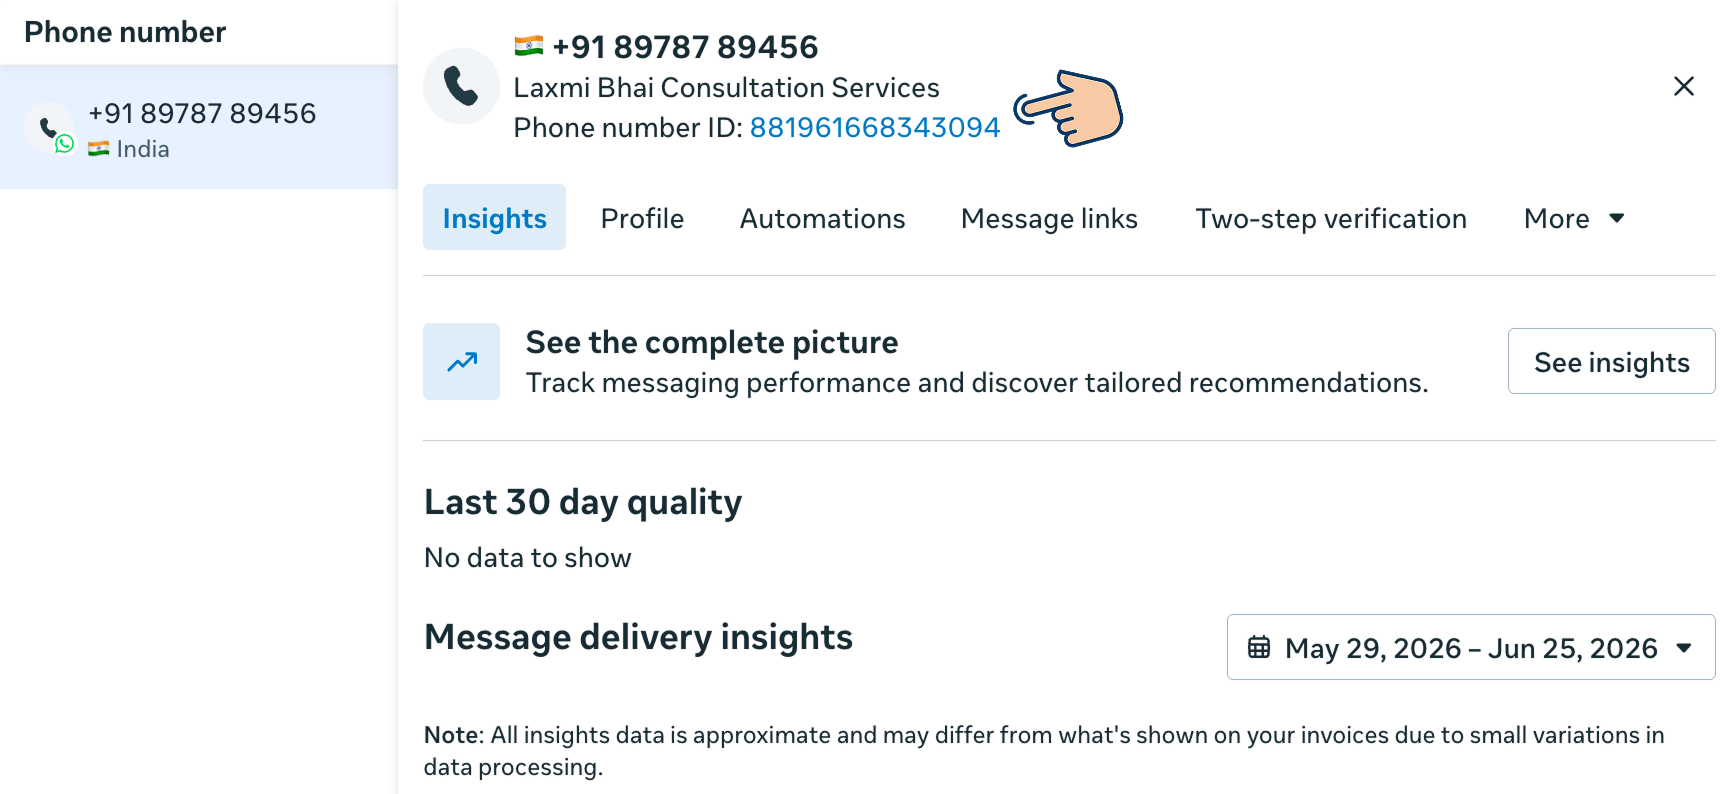
Click the phone number ID to save it somewhere safe, and we will use it in the next step.
Step 6: Register the Phone number and subscribe to our WhatsApp Business Account (WABA)
We are almost there.
Setting up the WhatsApp Cloud API involves two more steps that Meta barely documents:
- Registering your phone number: This activates your number to send messages out through the API. If you don't register, you can not send messages through your n8n automation.
- Subscribing to our WhatsApp Business Account (WABA): This tells Meta where to deliver incoming messages. If we don't subscribe, customers can message your number all day, and your n8n automation will never hear about it.
In other words, registration handles messages leaving your business, and subscription handles messages arriving at your business.
A real conversation flows in both directions, right?
So, we need to perform both steps.
"How do we do this? I don't see any buttons".
Unfortunately, there are no buttons inside Meta for this.
To register or subscribe, we have to send HTTP requests via Postman or cURL (Client URL).
"HTTP What?"
Oh, I almost forgot.
HTTP stands for Hypertext Transfer Protocol, and it is the backbone of the internet.
I have written a detailed lesson that covers "just enough" explanation of HTTP to get the job done.
 Naresh Devineni
Go through it before you move forward.
"Wait! Wait! I don't know how to code or use a terminal. Can we send these HTTP requests using a web browser?"
Haha! Don't worry.
This is where the Postman website comes in.
Using Postman to send WhatsApp Cloud API requests
Postman is a free tool for sending HTTP requests by hand.
Postman gives us an easy-to-use interface for sending HTTP requests for free.
No coding. No Terminal.
Actually, they also published a ready-made Postman collection for the WhatsApp Cloud API, so most requests are already set up.
So, you just fill in your own values.
It is easier than you think.
So, first, go to the Postman website and sign up for a free account:
https://www.postman.com/Next, open up the WhatsApp Cloud API collection on Postman:
https://www.postman.com/meta/whatsapp-business-platformNow, if you notice the sidebar on the left side of the screen:
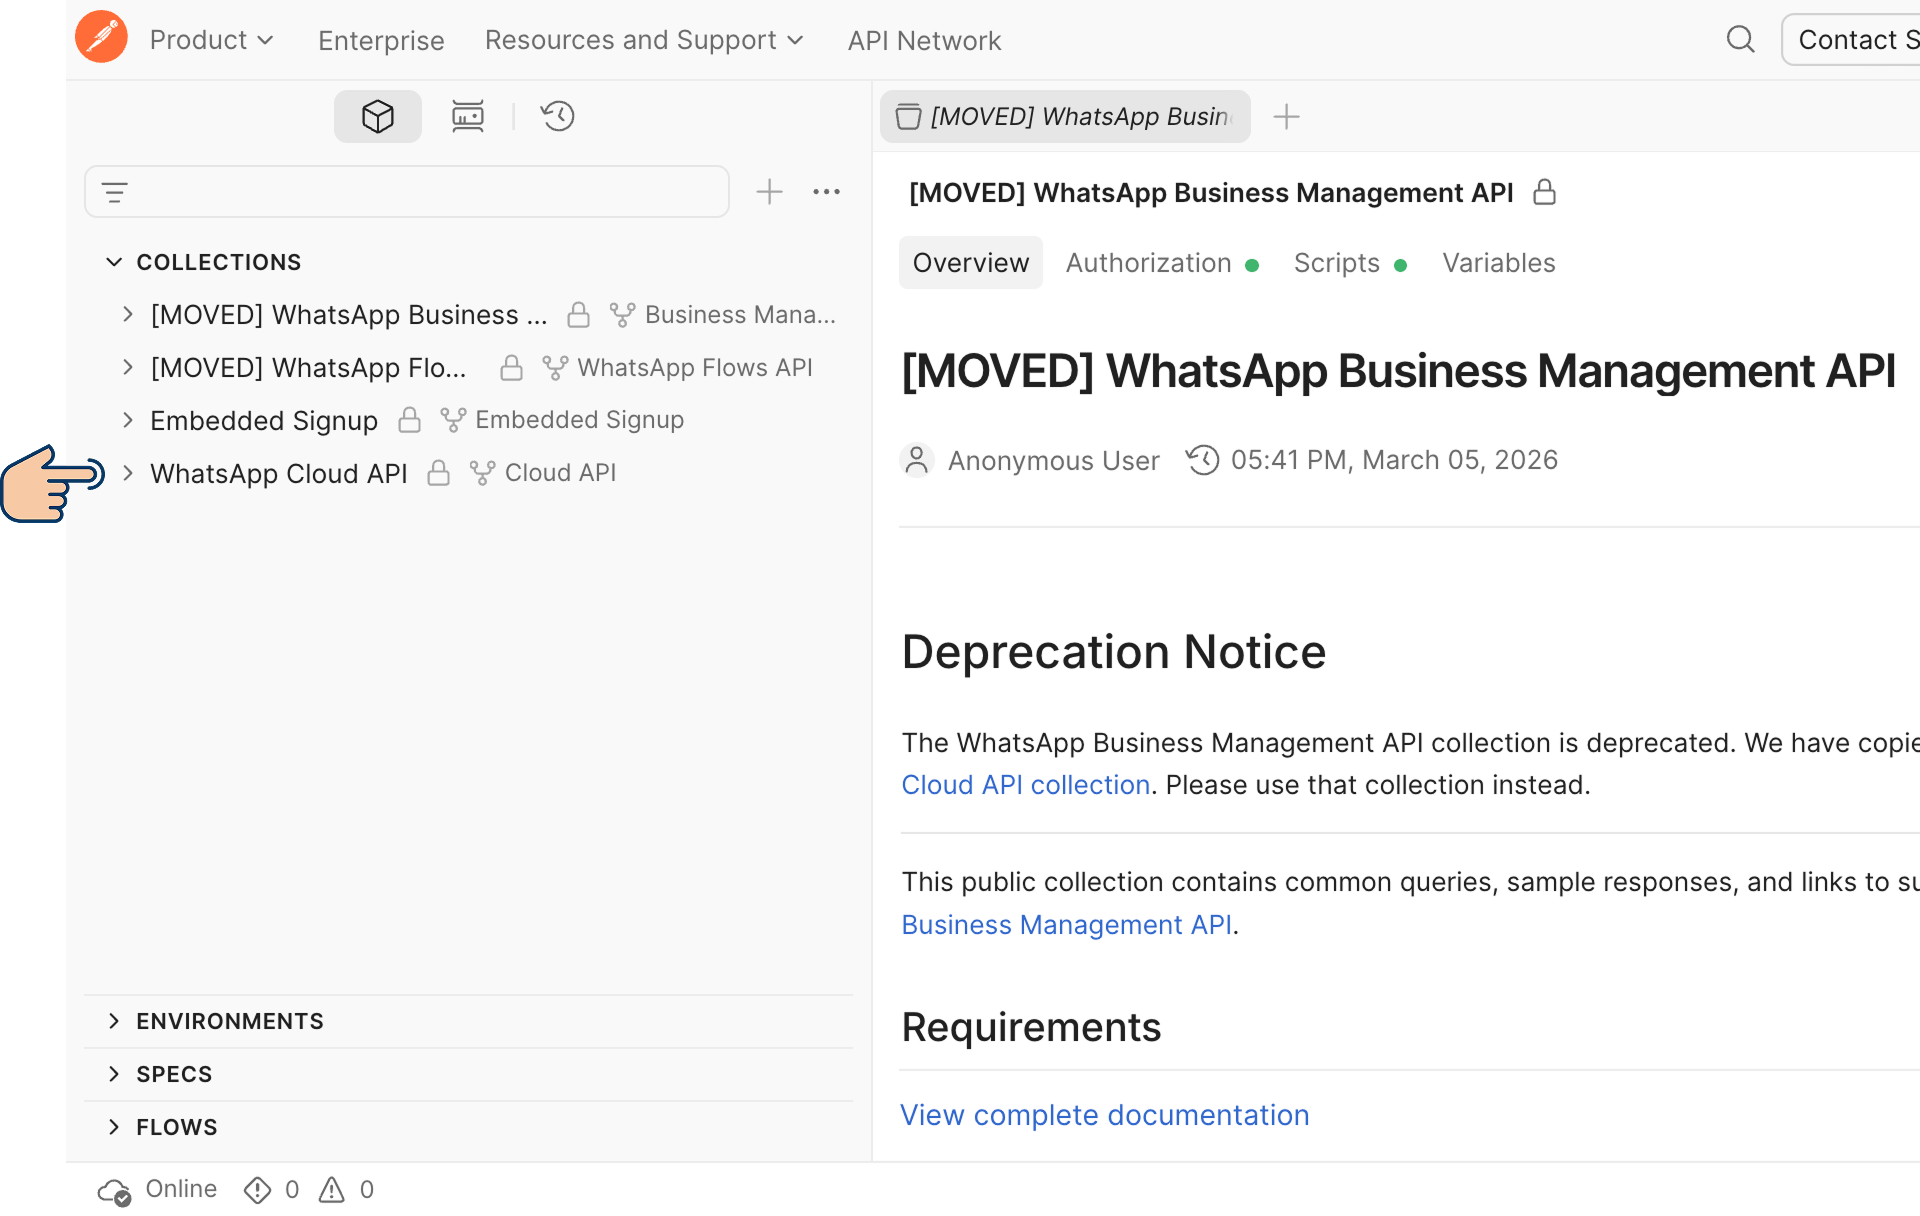
Inside the sidebar, open up the "WhatsApp Cloud API" folder:
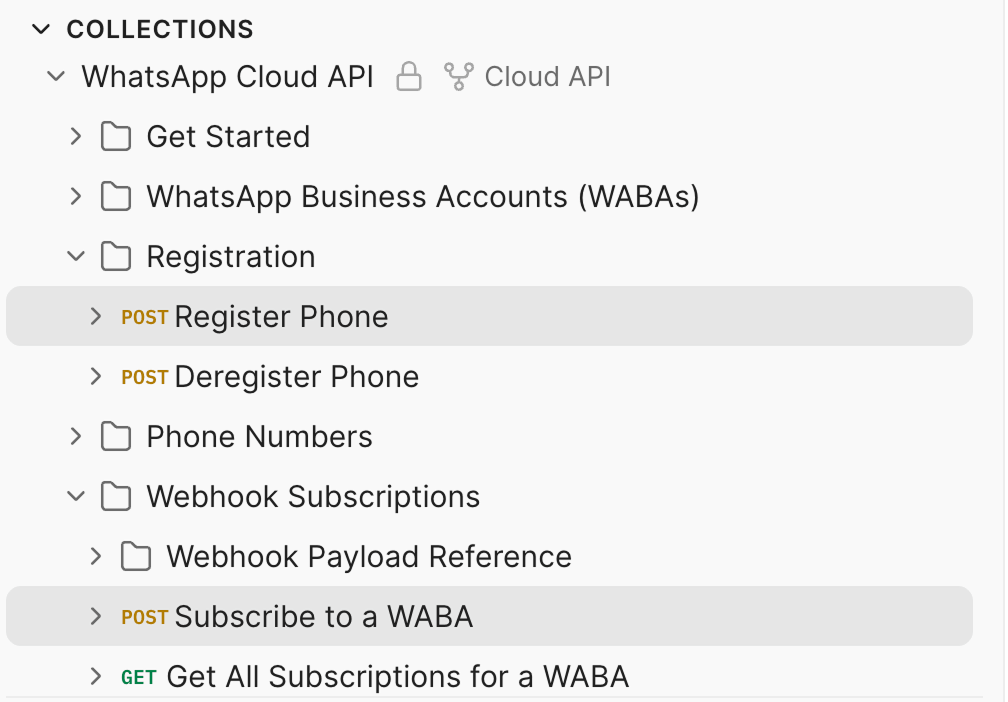
If you notice, there are two sub-folders called Registration and Webhook Subscriptions.
For our two pending steps, we will work inside each of these folders.
Gather the details
Performing the above steps will require the following details:
- System user access token - You saved this during Step 3.
- WhatsApp Business Account ID - You saved this during Step 4.
- Phone number ID - You saved this at the end of step 5.
- Security Code - We will generate this in a moment
If you didn't save them, refer to the above steps and gather them.
Step 6.0: Set up the security pin via two-step verification
We can set up the PIN by making an HTTP request to the WhatsApp Cloud API.
We need to use the POST method because we are sending a PIN as data to the WhatsApp Cloud API.
We should also send the following details as part of the HTTP request:
- User-Access Token - This will tell the WhatsApp API that we are authorized to make this request. We will send this one as the
authorizationheader. - Version number - The version of the WhatsApp Cloud API. At the time of writing this lesson, Postman is using version
18of WhatsApp Cloud API. - ID of the Phone Number that we added to our WABA.
Also, as part of the process, we need to provide a security pin in the body of the HTTP request:
{
    "pin": "738748"
}
This pin will tighten the security for your WABA number.
For example, if you add a new phone number or want to deregister an existing one, you should enter the same security PIN again.
If you don't, the request will not be processed.
It is just like a PIN for your ATM card.
But instead of guarding your money, it protects your WABA account from misuse.
Also, don't worry about forming this HTTP request by hand because we can use the Postman UI to get the job done.
So, inside the Postman WhatsApp Cloud API collection page:
- Open up
Phone Numbersfolder - And then click on
Set Two-Step Verification Code
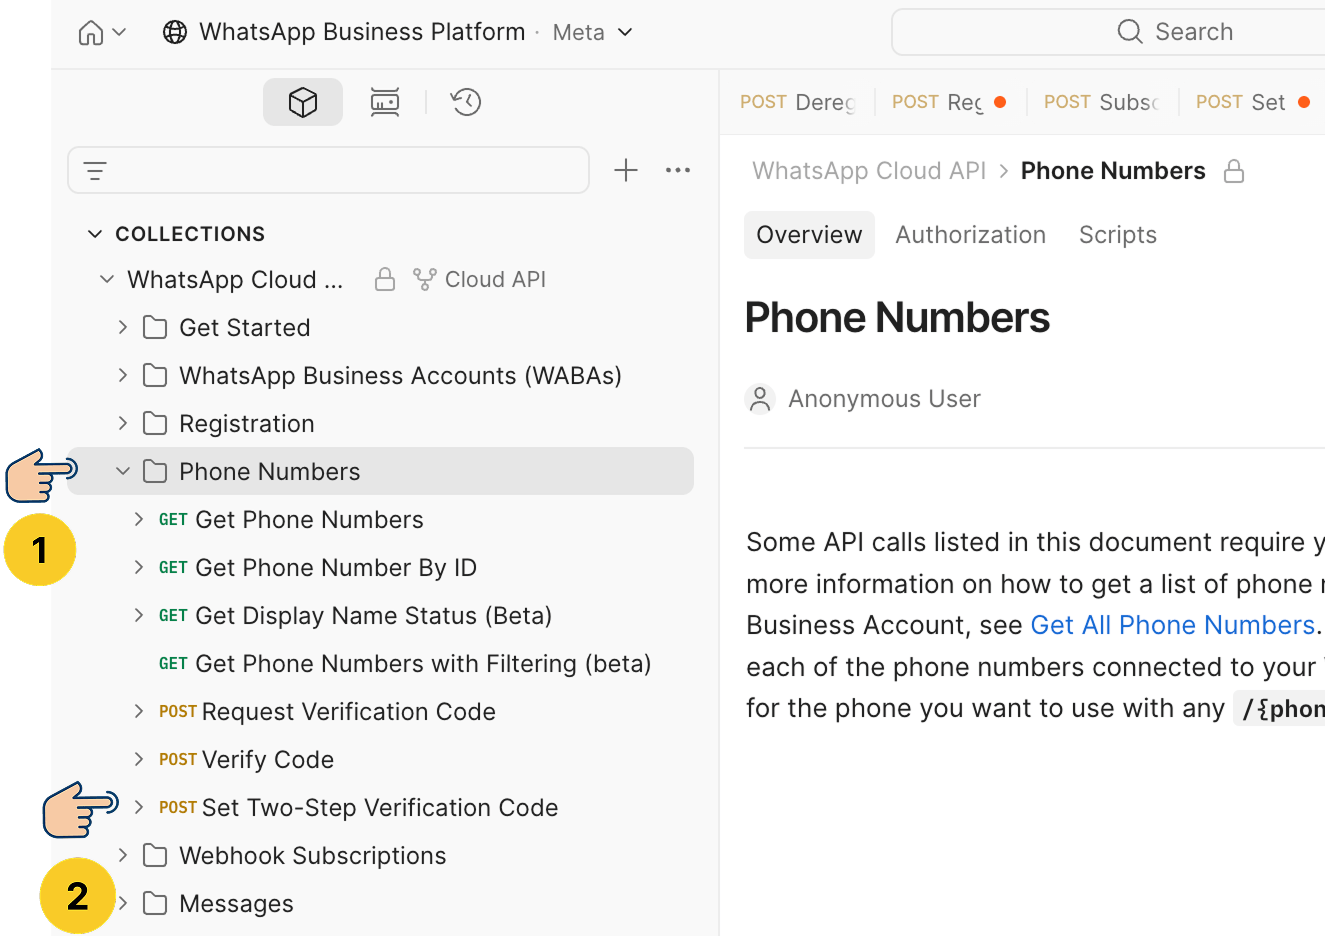
Or you can open up this link:
https://www.postman.com/meta/whatsapp-business-platform/request/5j8rbxr/set-two-step-verification-codeNext, inside the request configuration section (center part of the dashboard), click on the "Body" tab and enter a 6-digit pin:
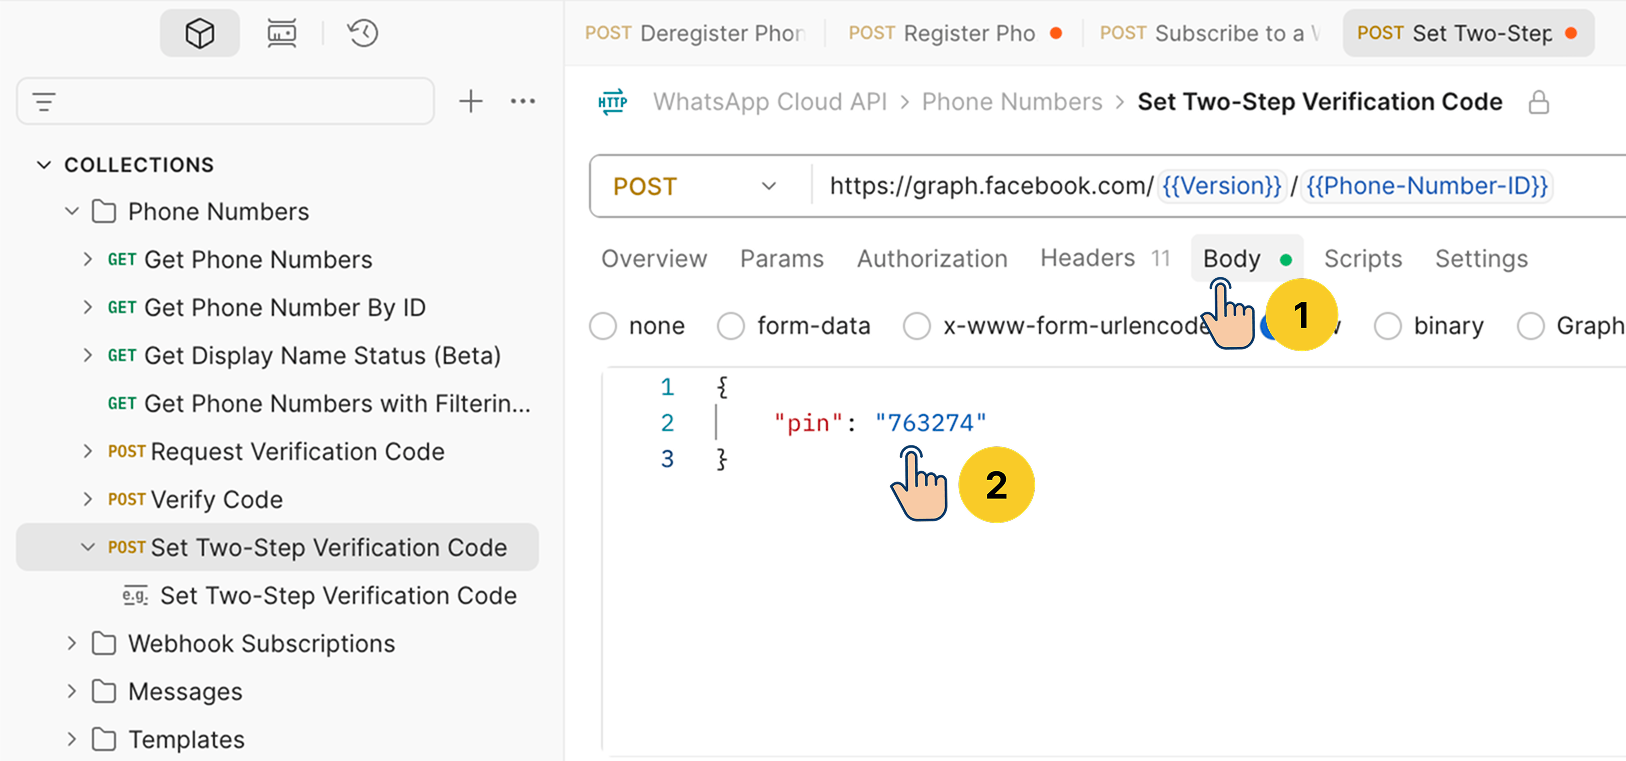
Please remember the PIN that you entered because you will use it in the future.
PIN should be easy for you to remember, but it must be hard for others to guess.
Next, we need to provide User-Access Token, Version, and Phone Number ID to Postman before we send the request.
And if you notice the HTTP request configuration section of Postman, it is using self-descriptive variable names for three of them:
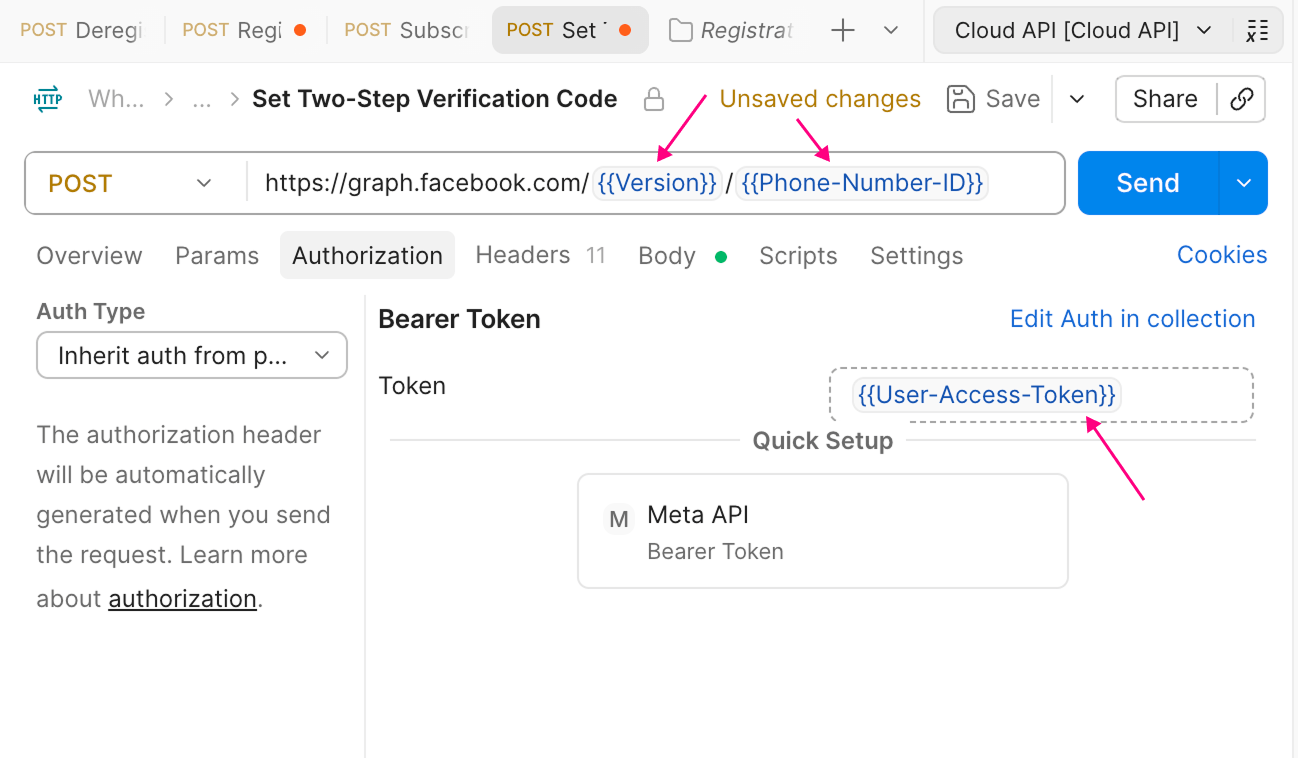
Variables like {{Phone-Number-ID}} are being used because these values change for every WABA account (except the version number).
"So, how do we replace these placeholders with actual values?"
Simple.
If you notice the top-right corner of the screen, there is a button for setting up variables:
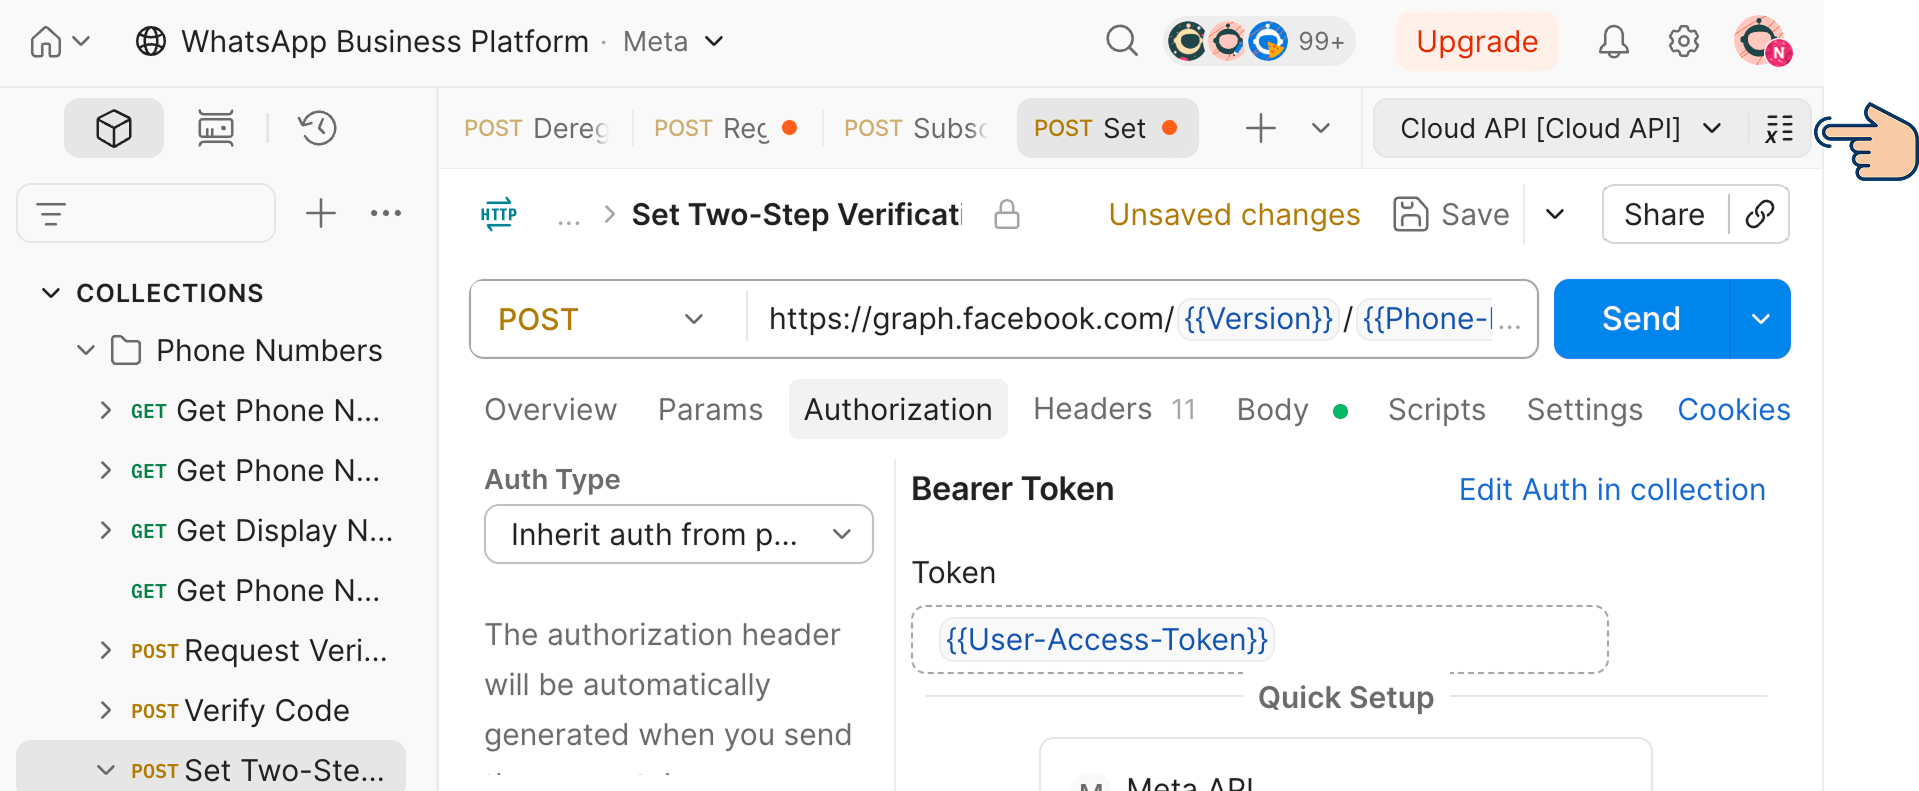
Click on it to open up a sidebar where you can enter values for the variables of the request:
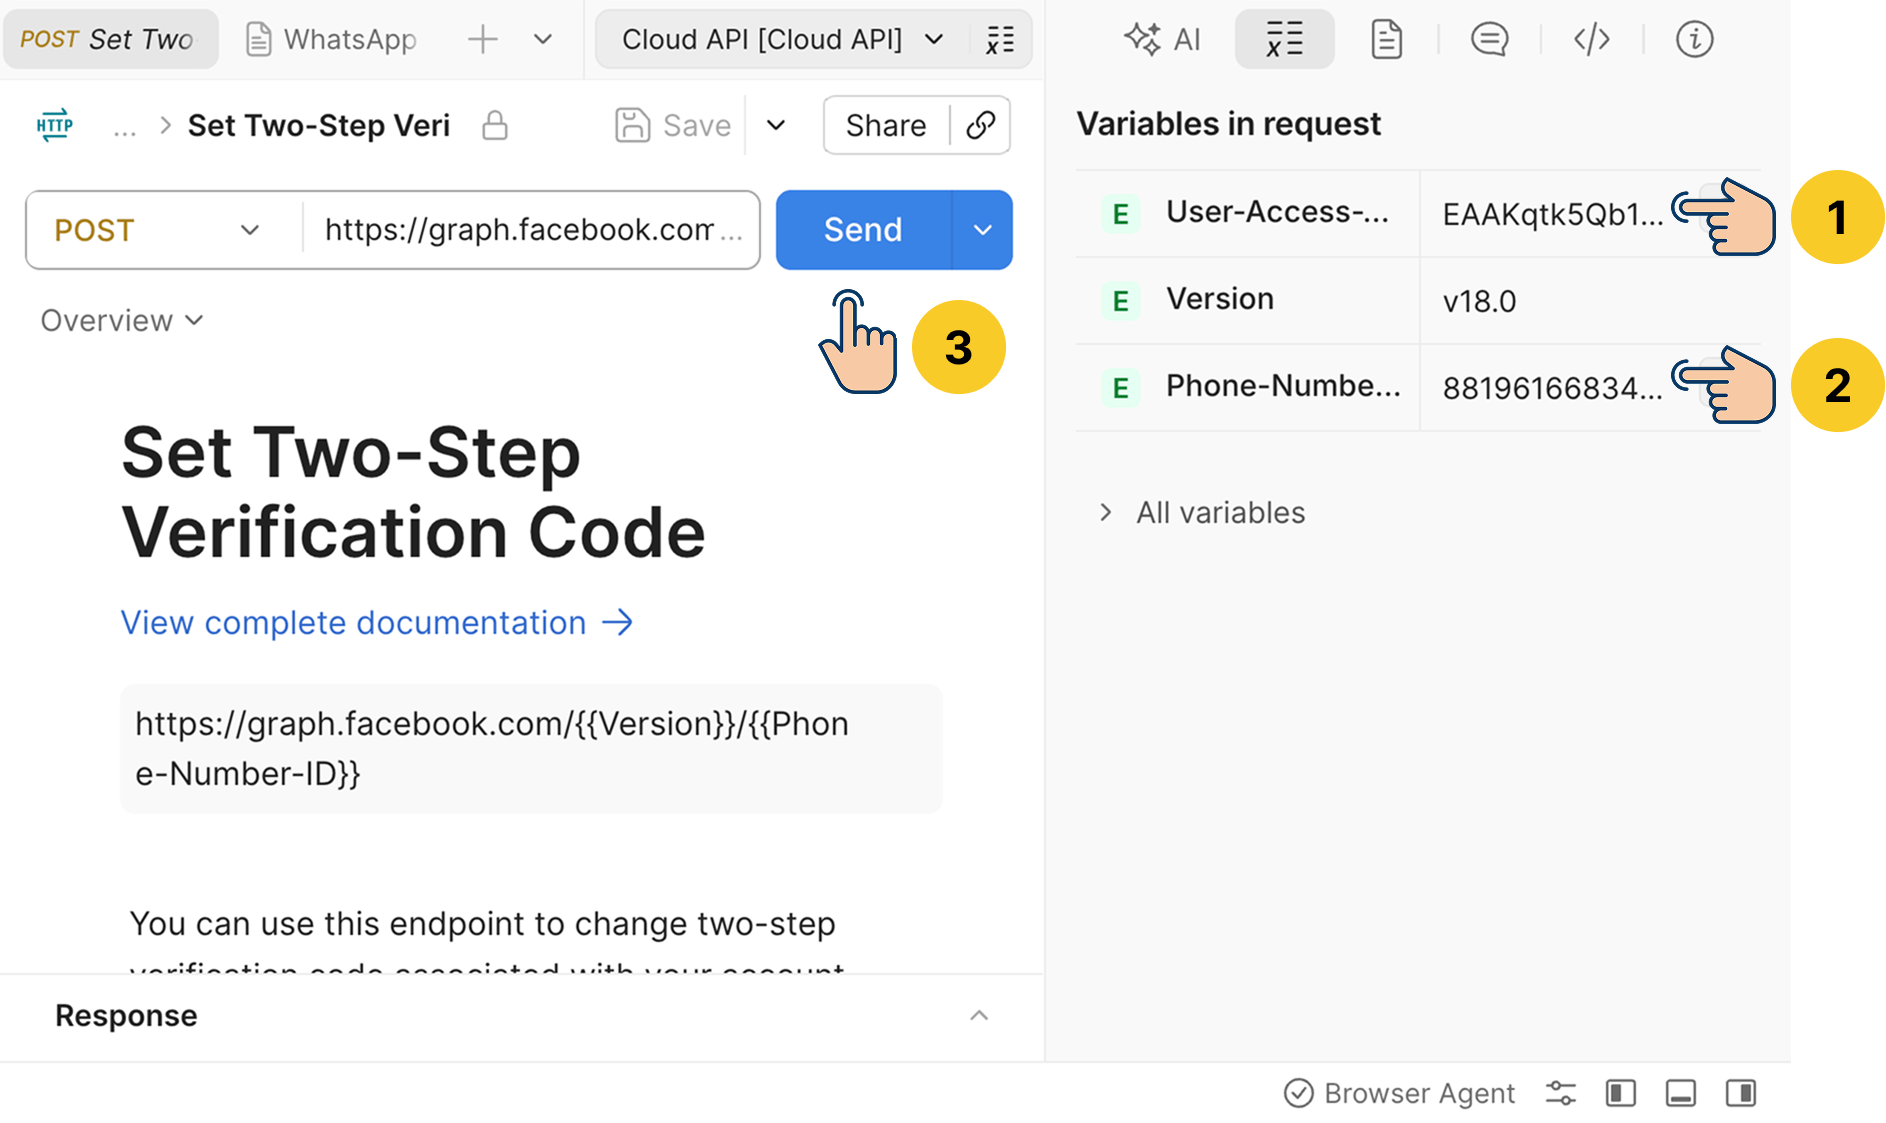
Next, for the User-Access Token, enter the access token of your system user
Then, enter the ID of the Phone Number you added to WABA
Finally, click on the "Send" button to set the security PIN for your Phone number.
If all goes well, you should see a success: true message after the request is complete:
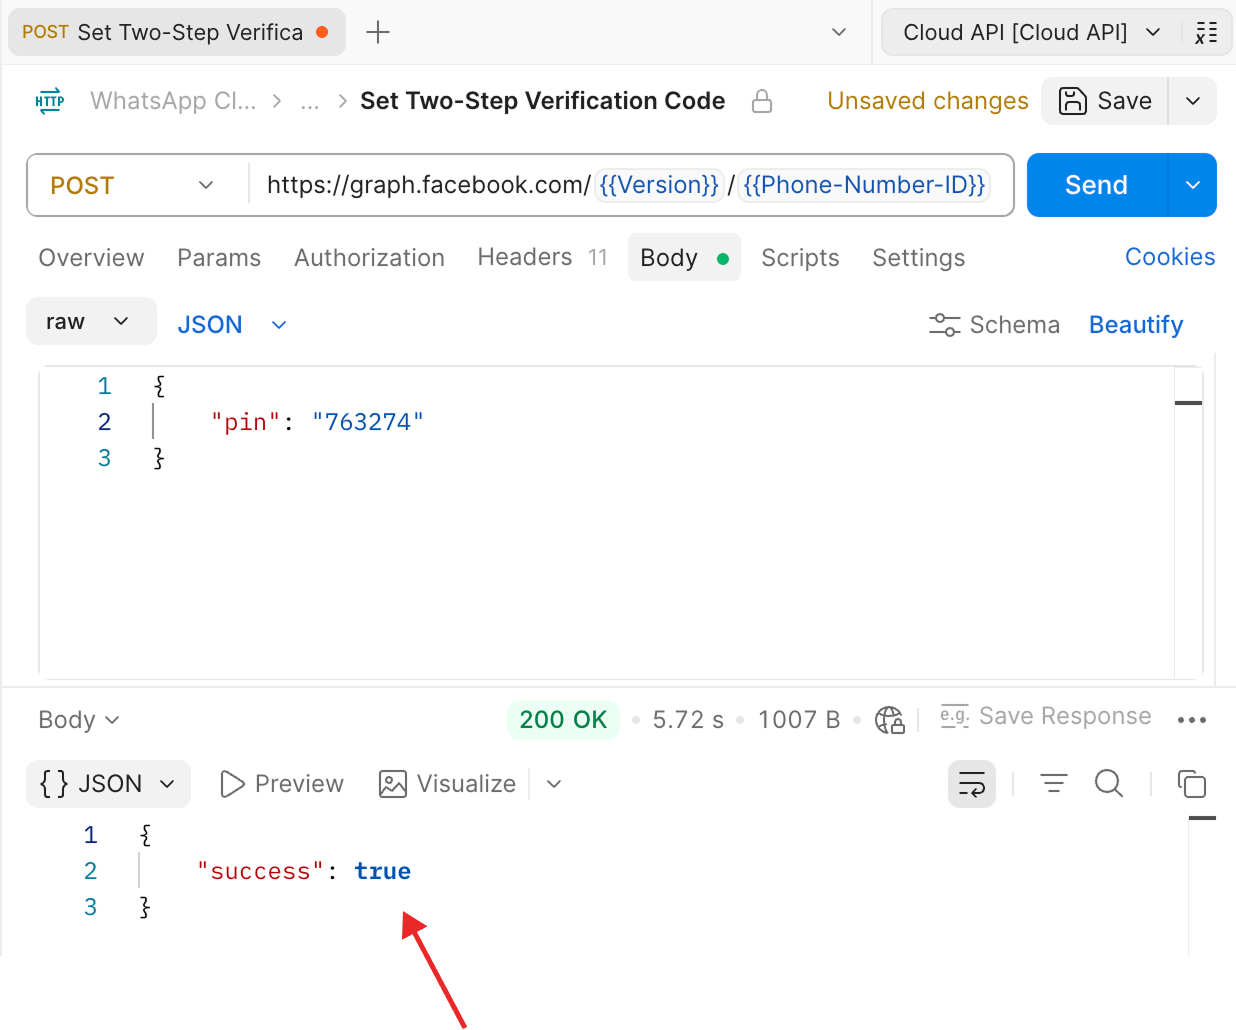
But if it failed for any reason, read the error message carefully, fix it, and only then move to the next step.
And now that we have set up the security PIN, next, let's use it to register our WABA phone number.
Step 6.1: Registering your phone number with WABA
Just to recap, when you add a number to your WABA, it shows up as Pending:
So, we need to register the number by sending an HTTP request to the WhatsApp Cloud API to change this status to Connected and start sending messages.
And the HTTP request is almost the same as the request we made for setting up the PIN:
- We must use the POST method
- We need to provide
User-Access Token,Version, andPhone Number IDto Postman before we send the request. - One addition is that we should also provide the security PIN we generated in the previous step.
So, inside the Postman WhatsApp Cloud API collection page:
- Open up
Registrationfolder - And then click on
Register Phone
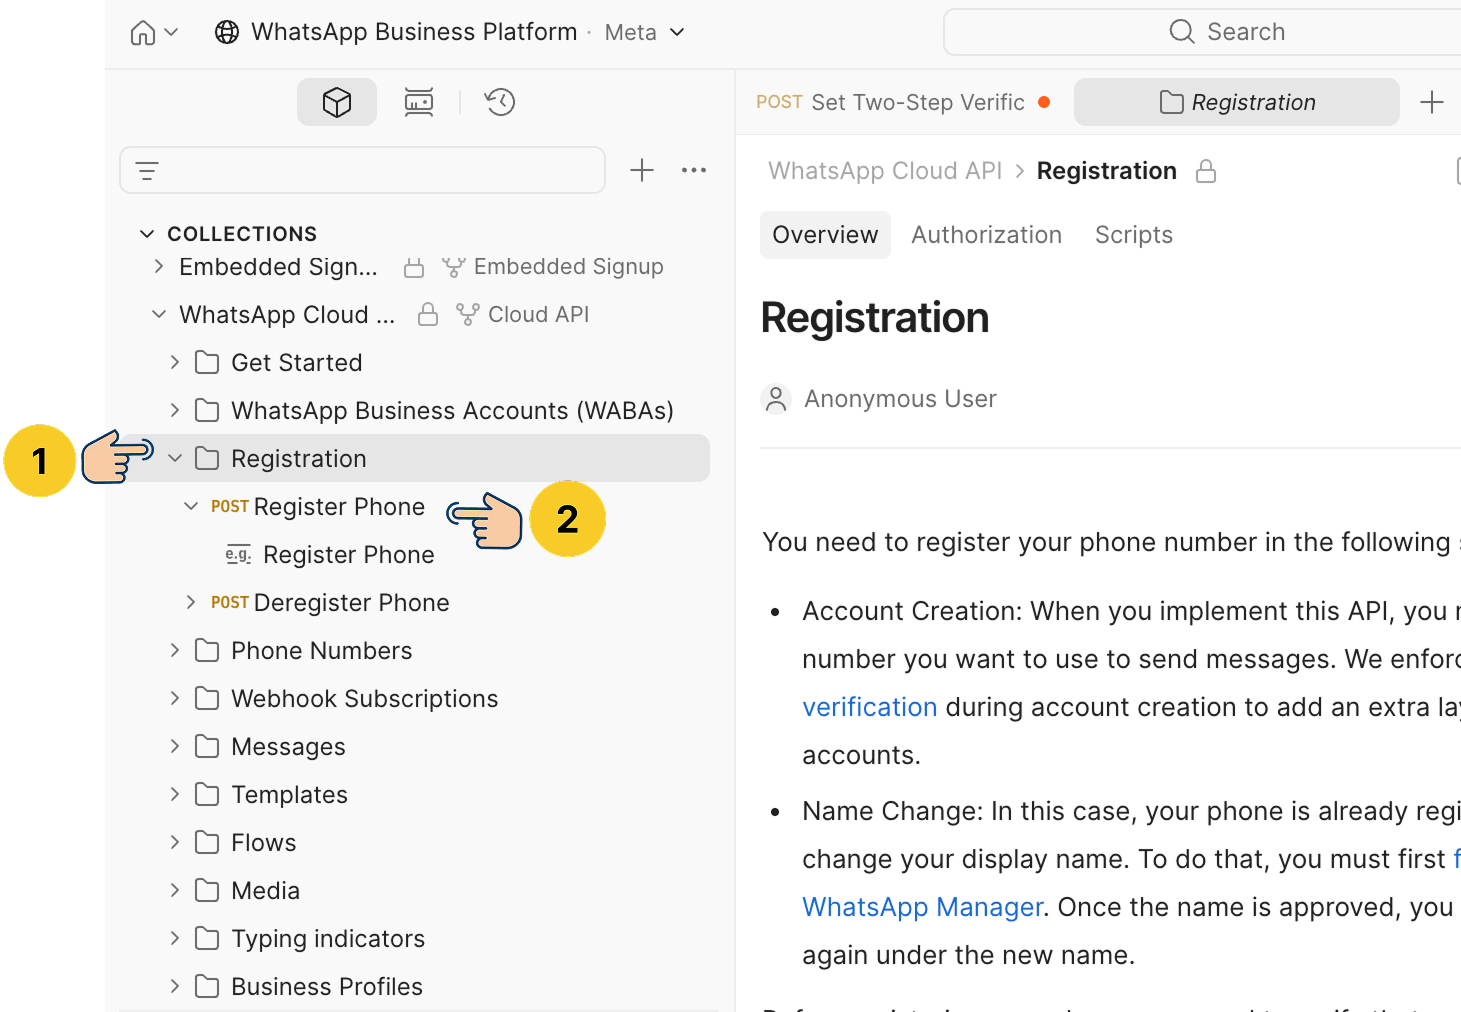
You can also open this link directly if it works for you:
https://www.postman.com/meta/whatsapp-business-platform/request/77hl2kg/register-phone?sideView=variablesNext, inside the request configuration section (center part of the dashboard), click on the "Body" tab and replace <your-6-digit-pin> with the PIN you generated during the previous step:
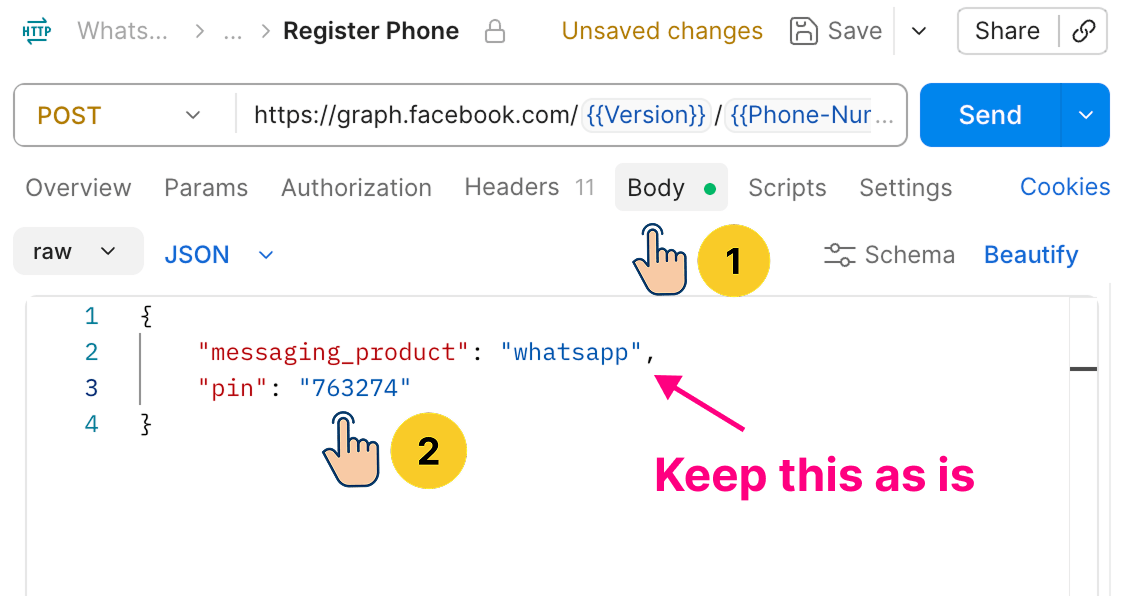
messaging_product key-value pair for us. So, leave it as is.Next, inside the "Variables" sidebar, make sure that User-Access Token, Version, and Phone Number ID are filled correctly.
Postman is smart enough to reuse the variables across all HTTP requests. But double-check the values before sending the request.
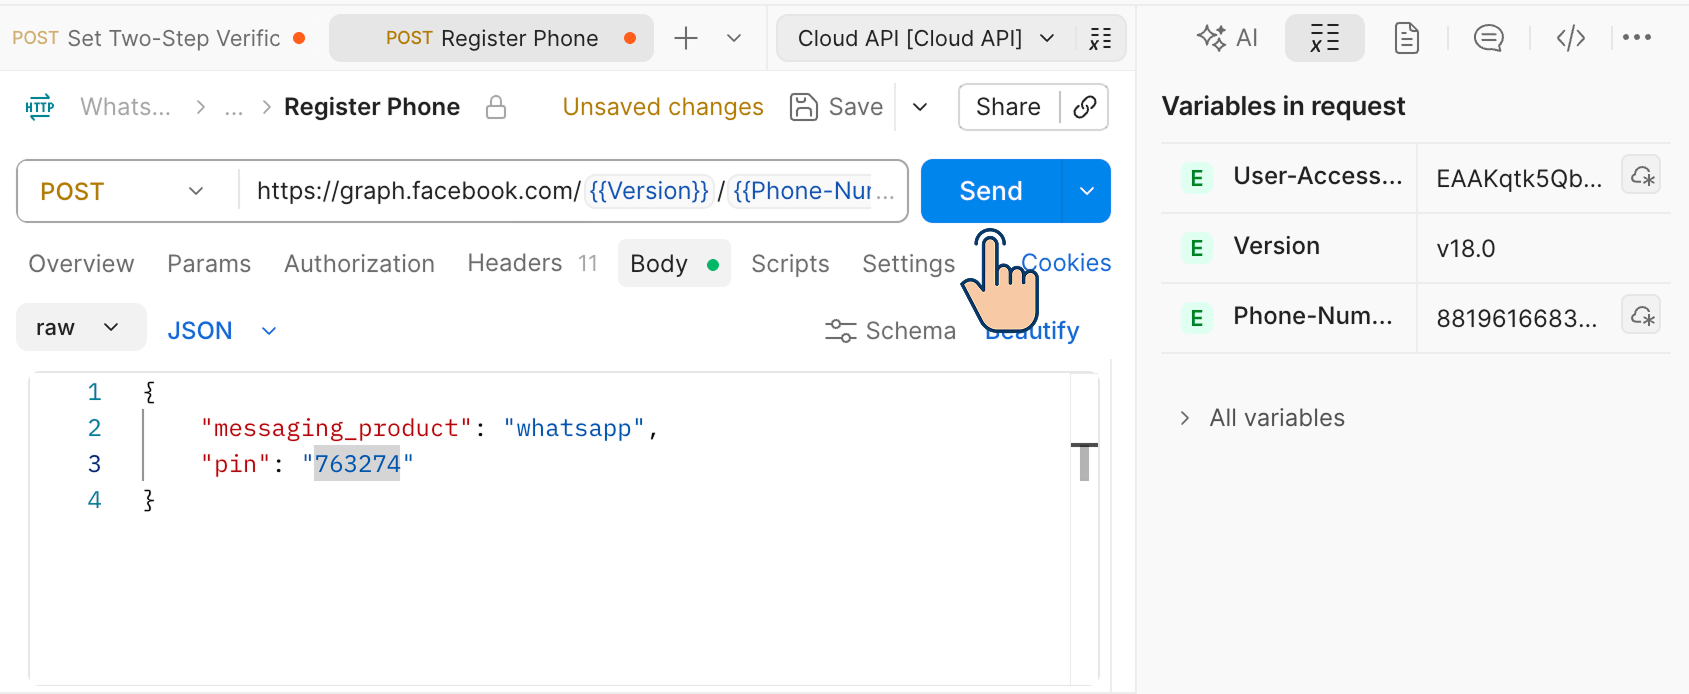
Finally, click on the "Send" button to send the registration request.
If all goes well, you should see a success: true message after the request is complete:
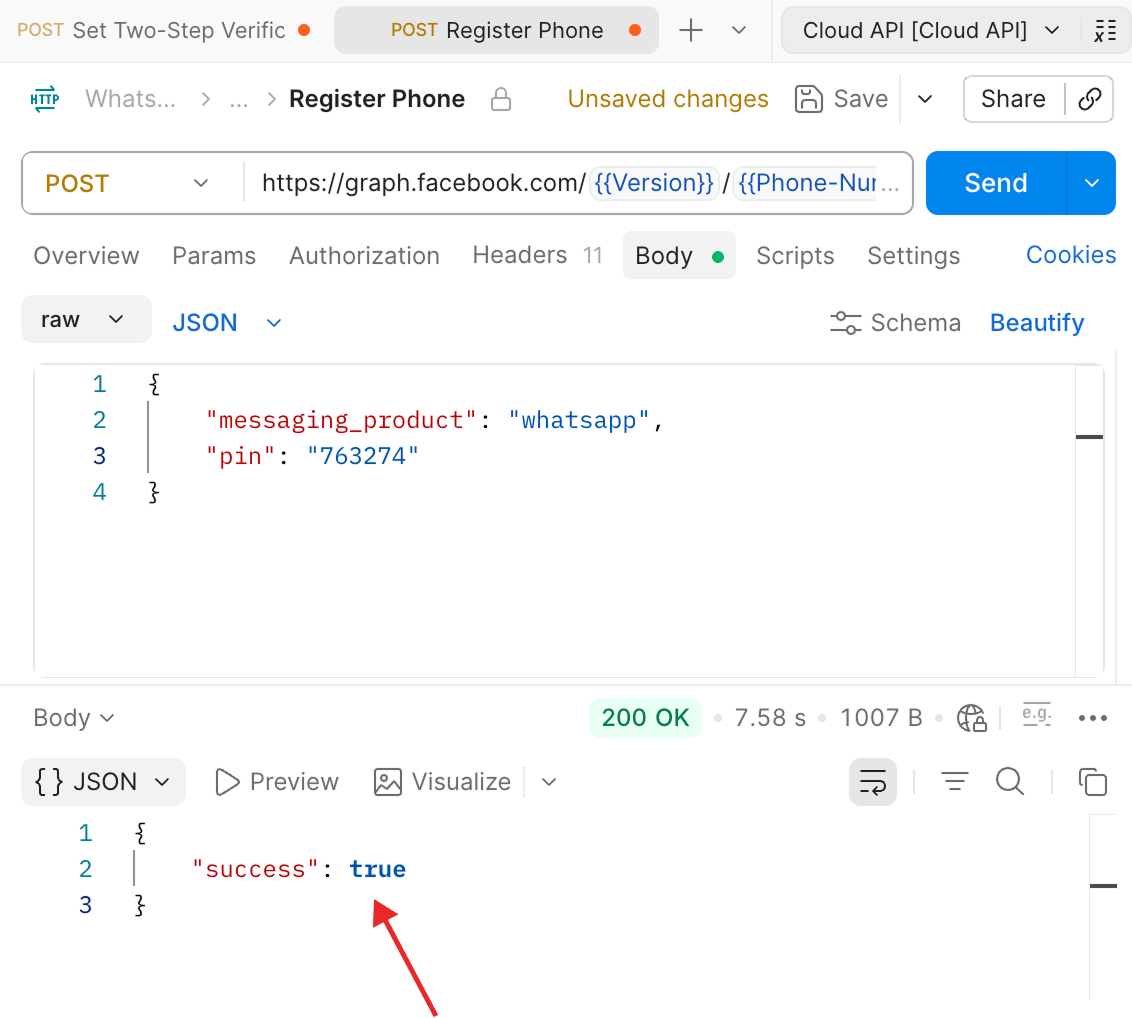
Also, if you now go back to the Phone number dashboard inside your WABA account on business.facebook.com, you should see the status of the Phone number as Connected instead of Pending:
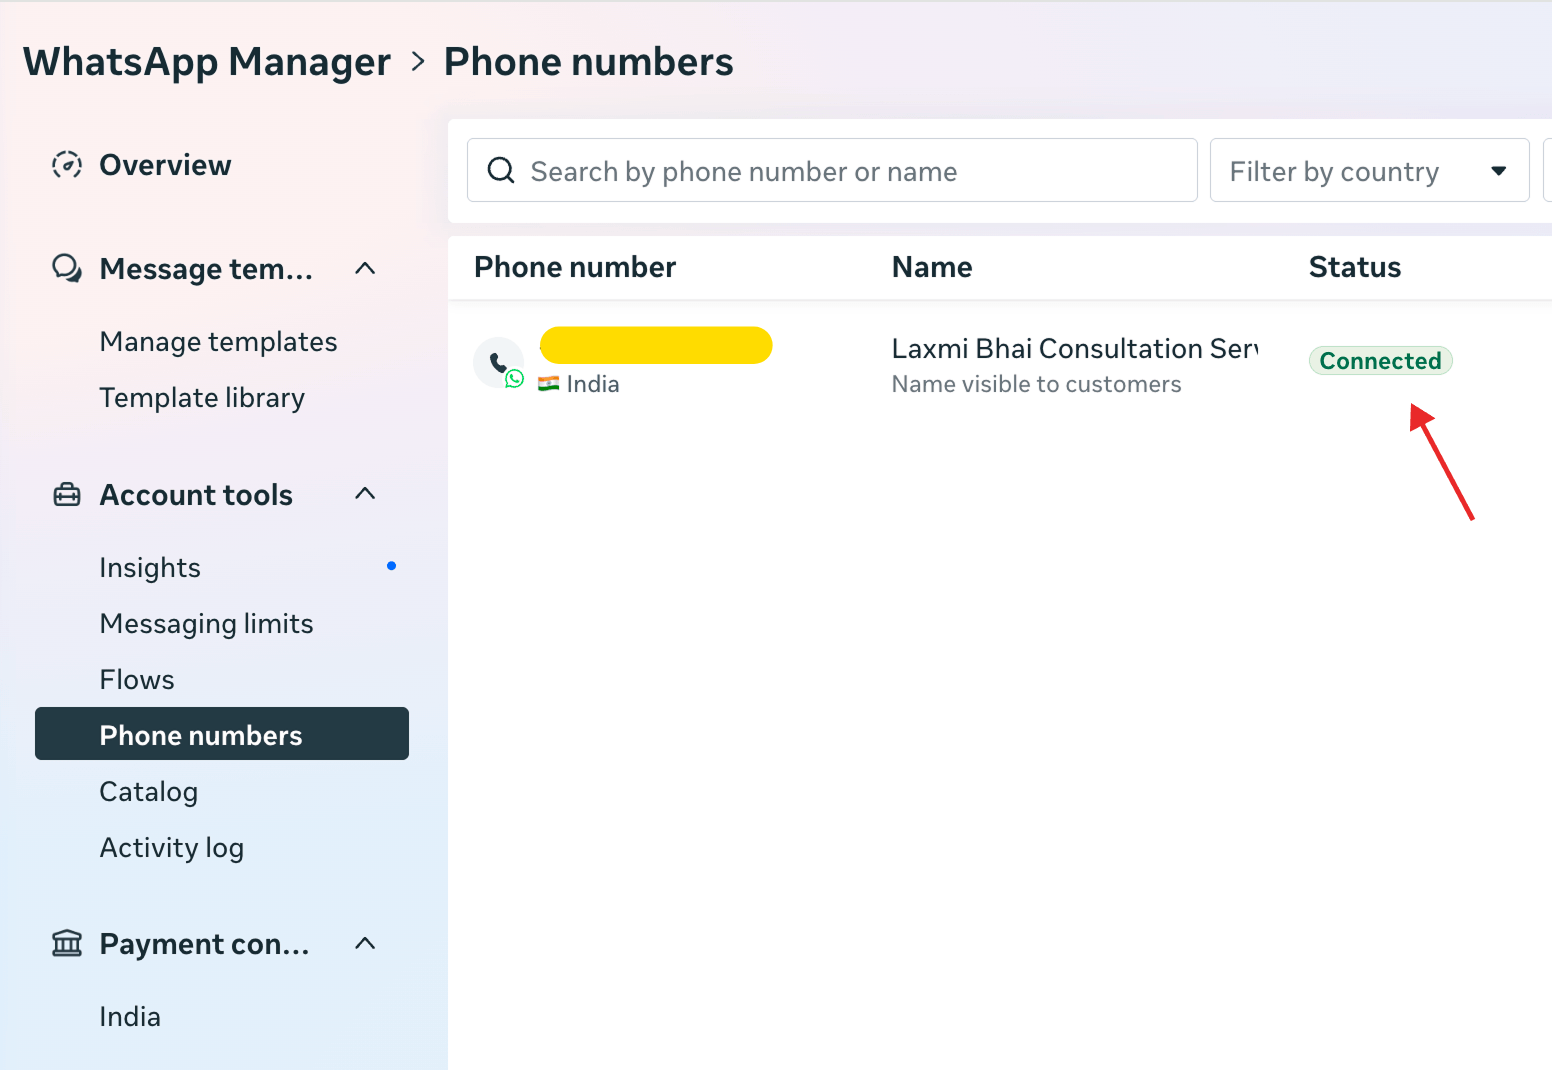
And there we go!
My phone number is now successfully connected.
"Yayyyyyyyyyyy!"
Oh Yeah :)
Anyway, although we can now send messages via the WhatsApp Cloud API, we still need to subscribe to WABA webhooks to be able to receive messages via the API.
So...
Step 6.2: Subscribing to our WhatsApp Business Account (WABA)
We need to subscribe to our WABA by sending an HTTP request to the WhatsApp Cloud API.
And the HTTP request is almost the same as the request we made for registering our Phone number:
- We must use the POST method
- We need to provide
User-Access Token,VersionandWABA-IDto Postman before we send the request.
If you notice the Postman dashboard, there are three small changes when compared to the previous request, though:
- We don't need to send any details. So, we don't need to configure
Bodyfor this HTTP request. - And because we are not sending a
Bodywith the request, we don't need to send aContent-Typeheader. - Finally, because we are subscribing to our WABA, we need to provide our
WABA-ID. We don't need to provide our Phone Number ID.
So, inside the Postman WhatsApp Cloud API collection page:
- Open up
Webhook Subscriptionsfolder - And then click on
Subscribe to a WABA
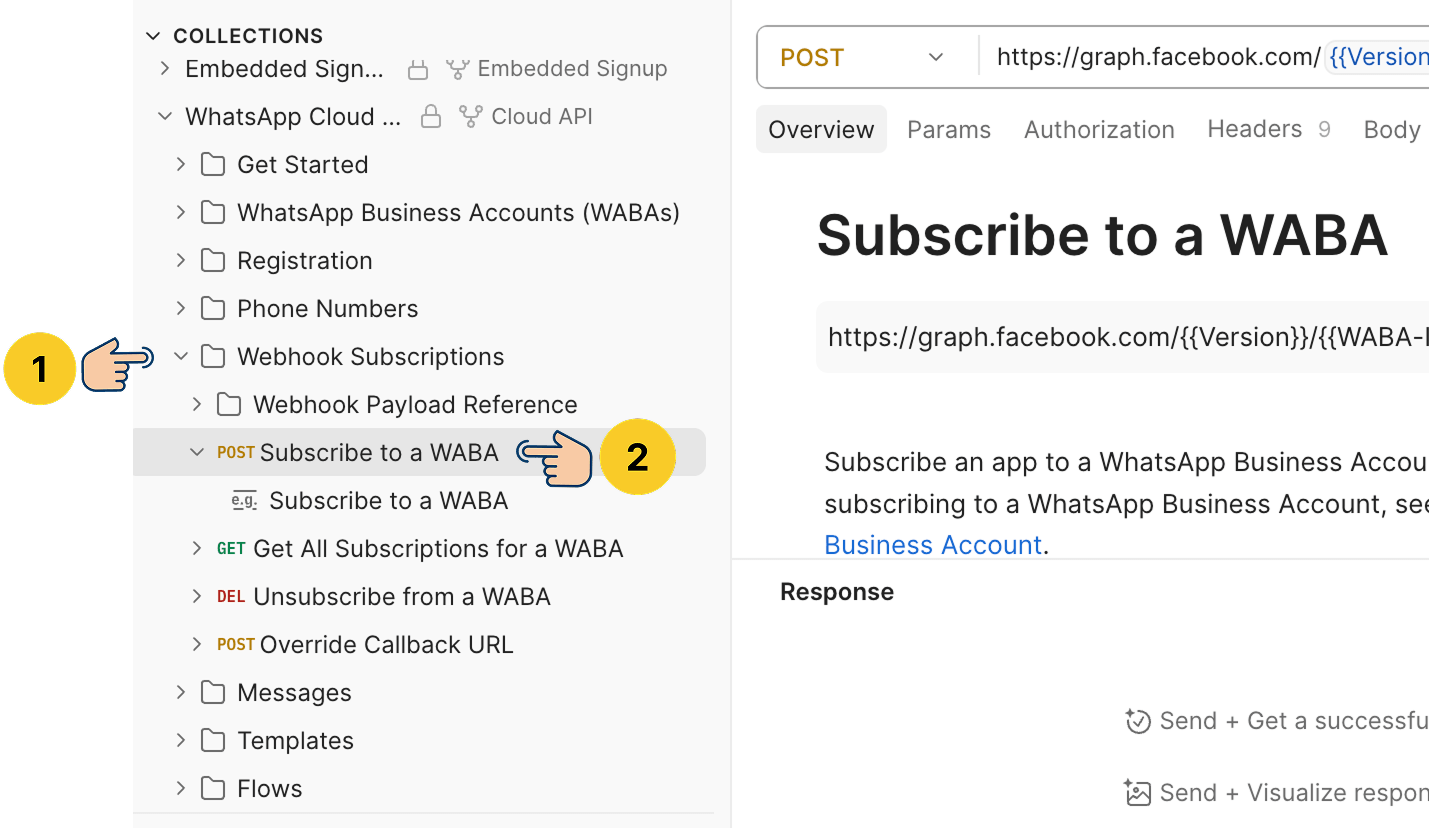
You can also open this link directly if it works for you:
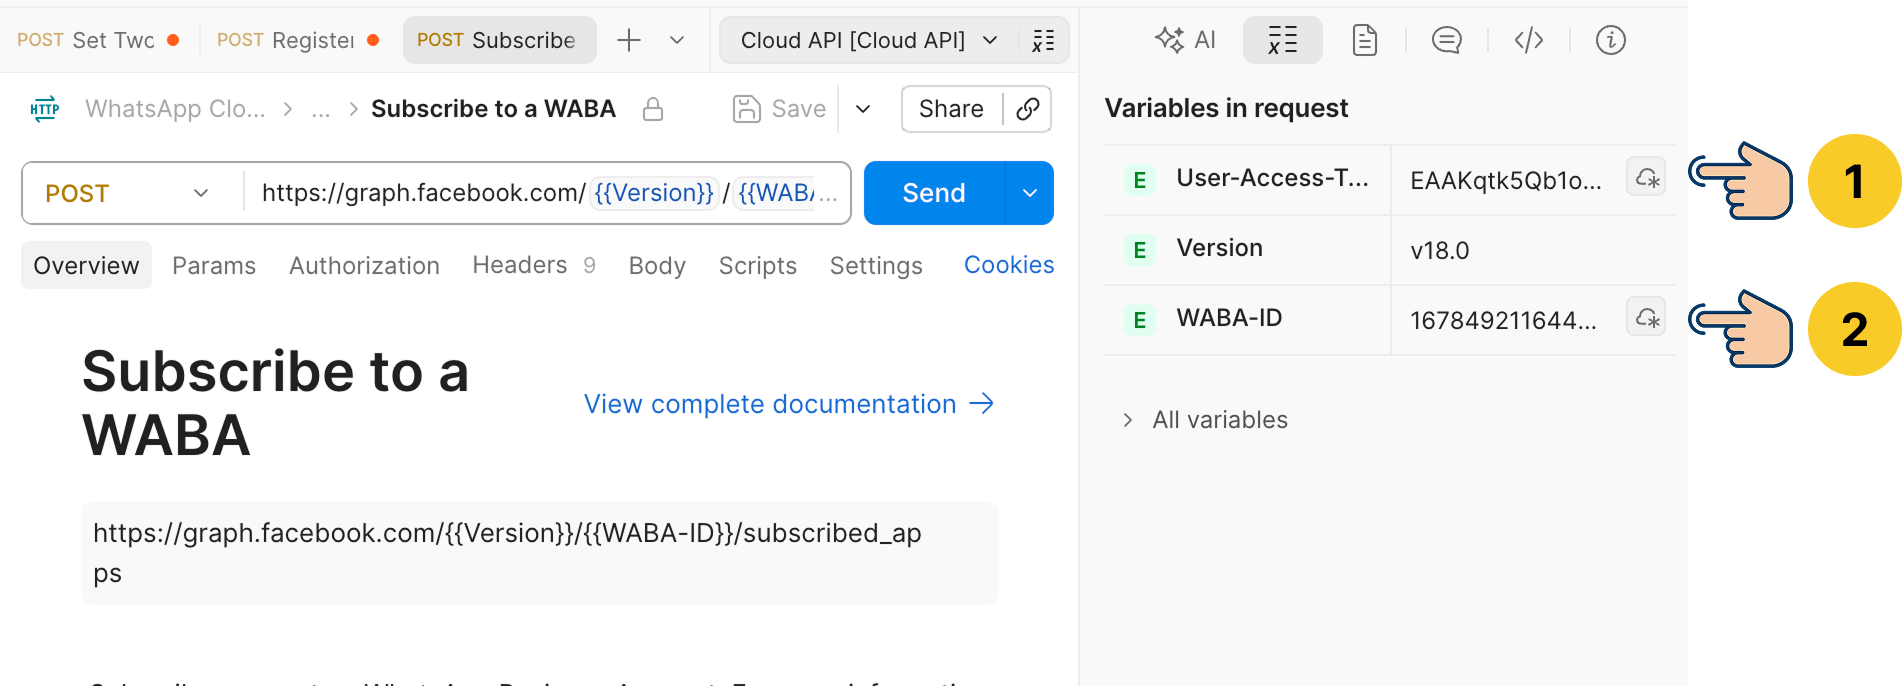
https://www.postman.com/meta/whatsapp-business-platform/request/26gui66/subscribe-to-a-waba?sideView=variables&tab=overviewNext, inside the "Variables" sidebar, make sure that User-Access Token, Version, and WABA-ID are filled correctly:
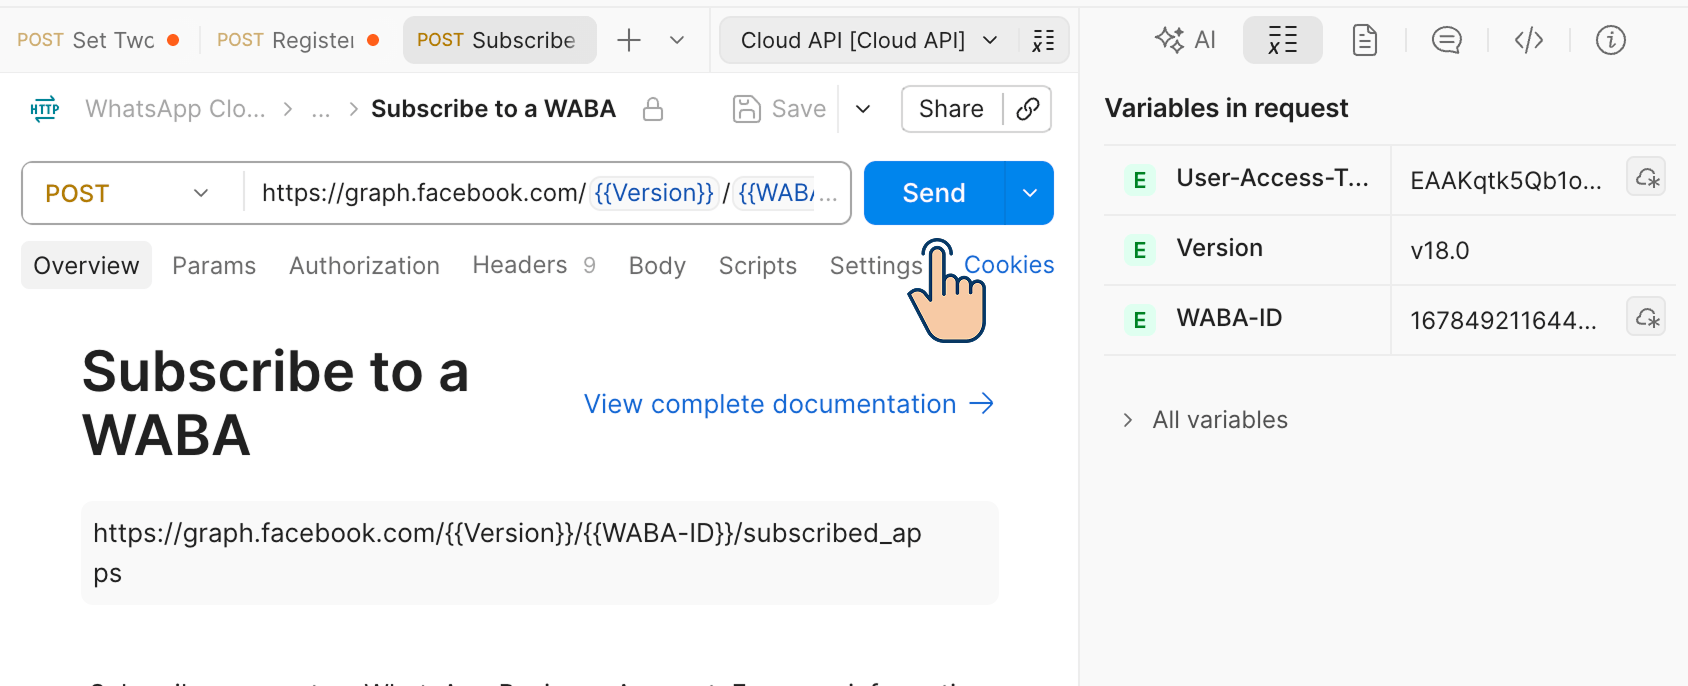
Finally, click on the "Send" button to send the subscription request.
If all goes well, you should see a success: true message after the request is complete:
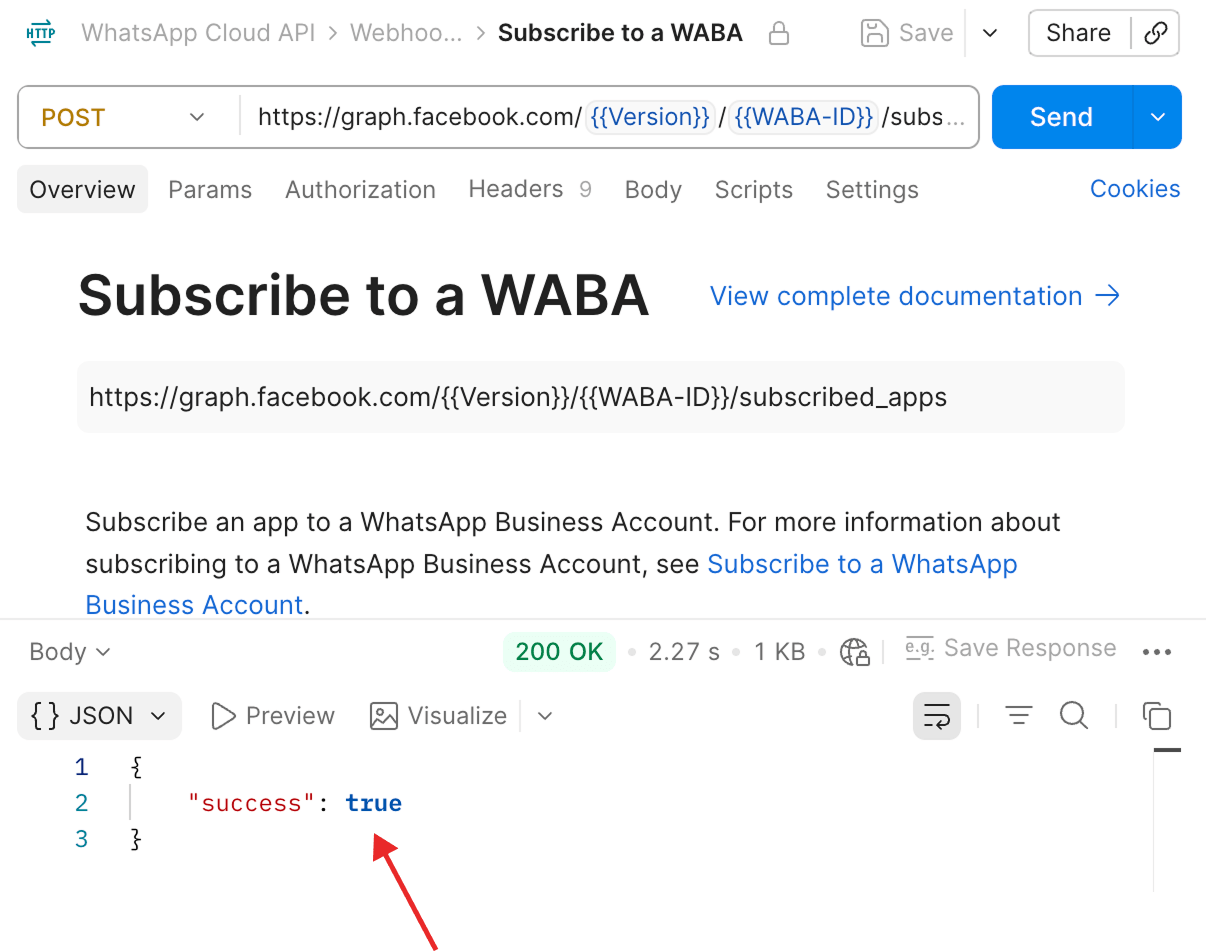
And that's all.
We have now set up our WhatsApp Cloud API access correctly.
So, we should now be able to receive and send messages by integrating n8n with WhatsApp Cloud API.
Come on, let's put our API access to the test via n8n.
Step 7: Integrate n8n with WhatsApp Cloud API
If you don't have n8n installed or if you're totally new to n8n, I have written an in-depth beginners' guide to n8n:
 Naresh Devineni
Go through it.
For the rest of this article, I will assume that you are comfortable using n8n.
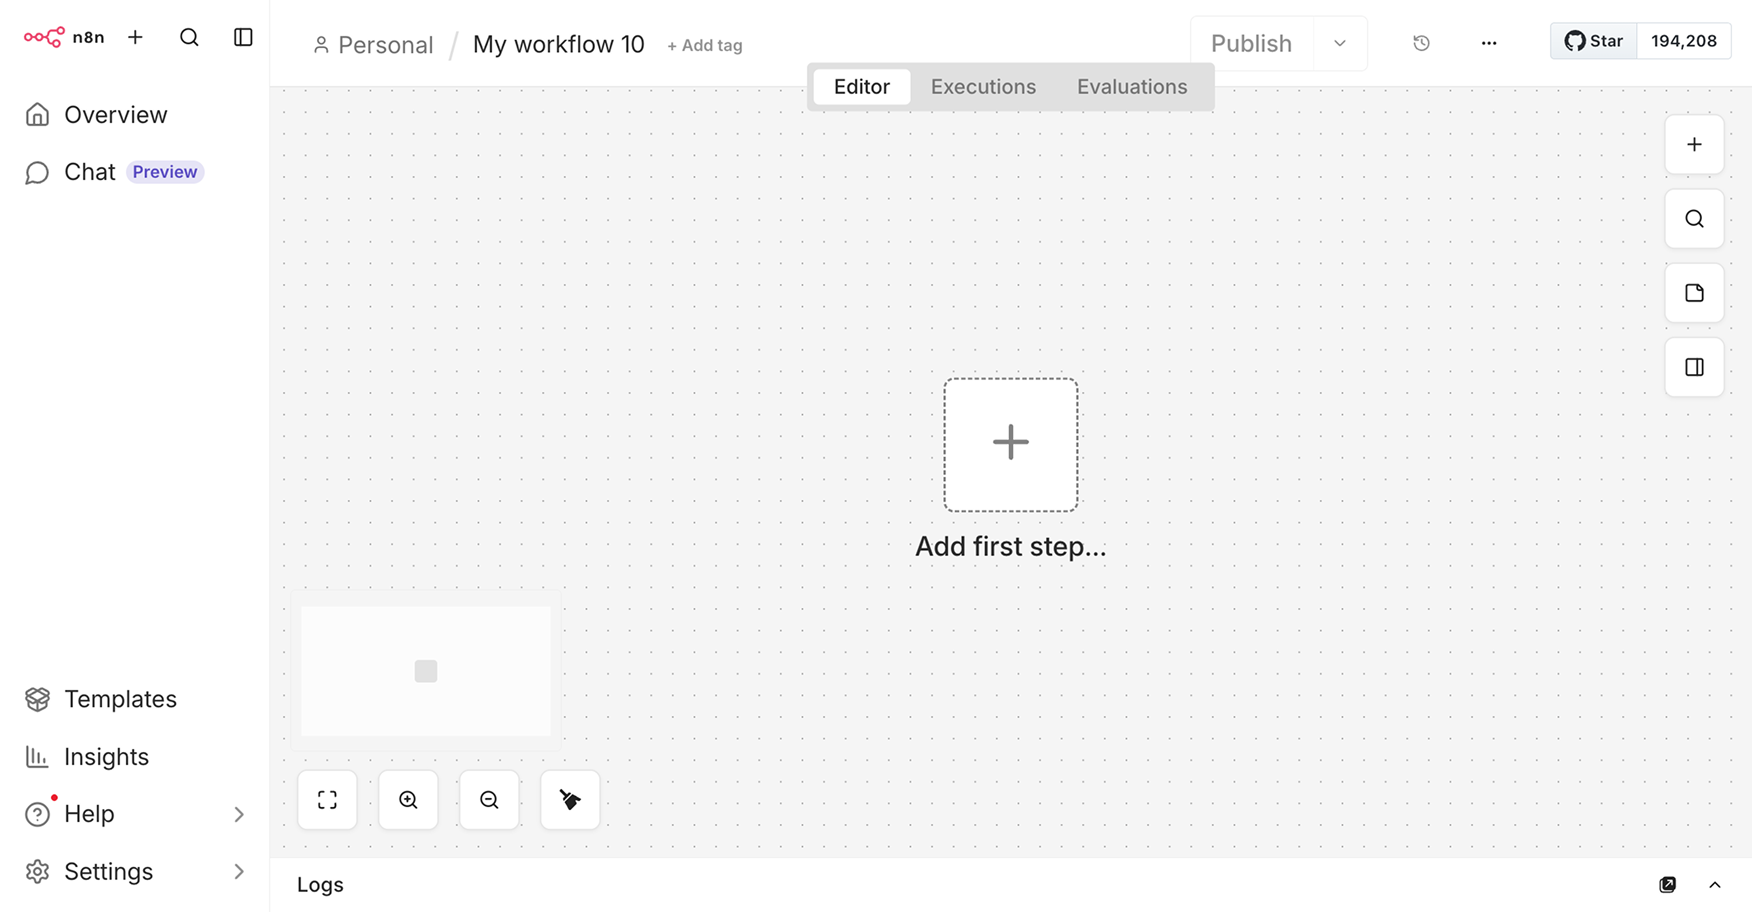
Let's create a new workflow inside n8n:
Now, we should test whether we can receive and send messages using the WhatsApp Cloud API.
First, let's test if we can receive messages to process inside n8n.
To do that, we need to add the "On messages" WhatsApp Trigger to the workflow.
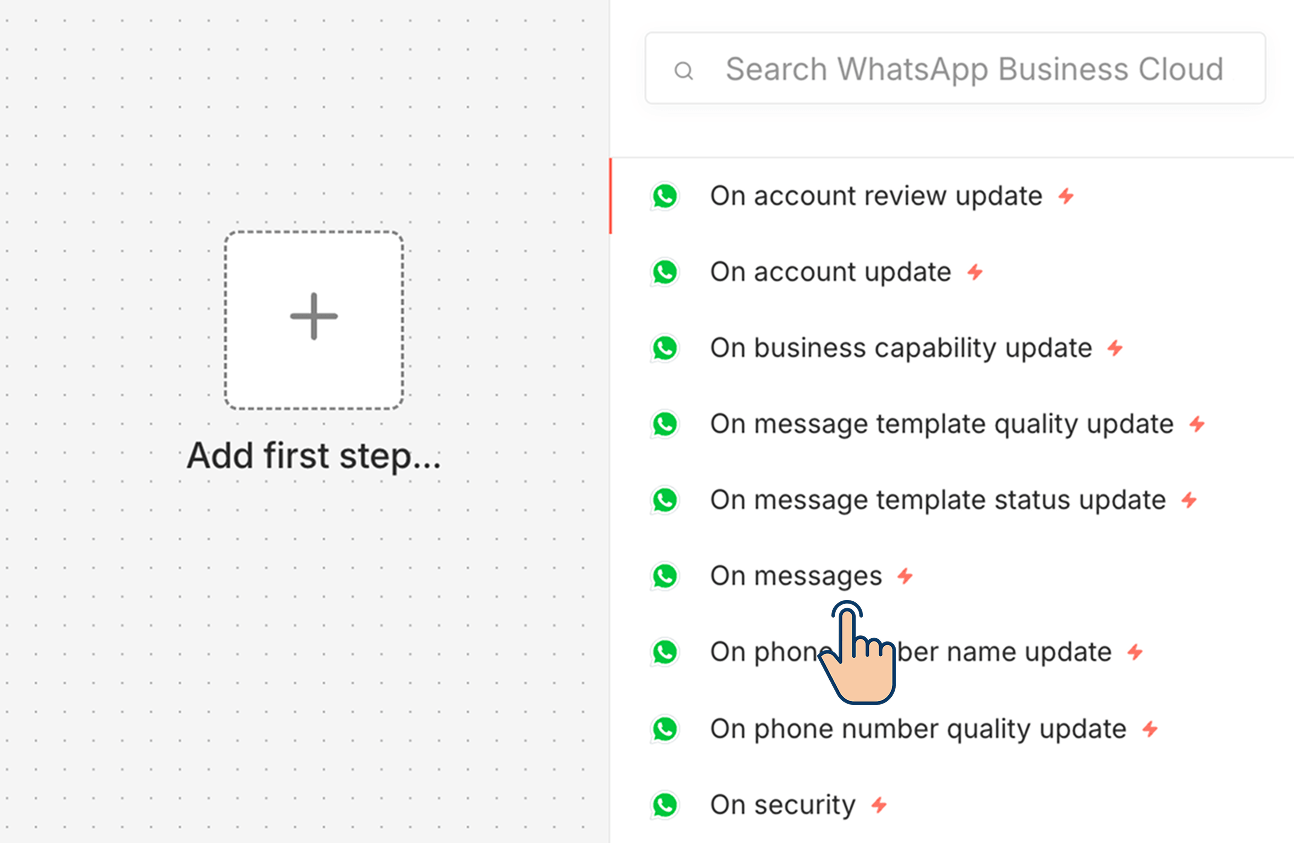
The "On messages" node will trigger every time we receive a message to our WhatsApp Business Account phone number.
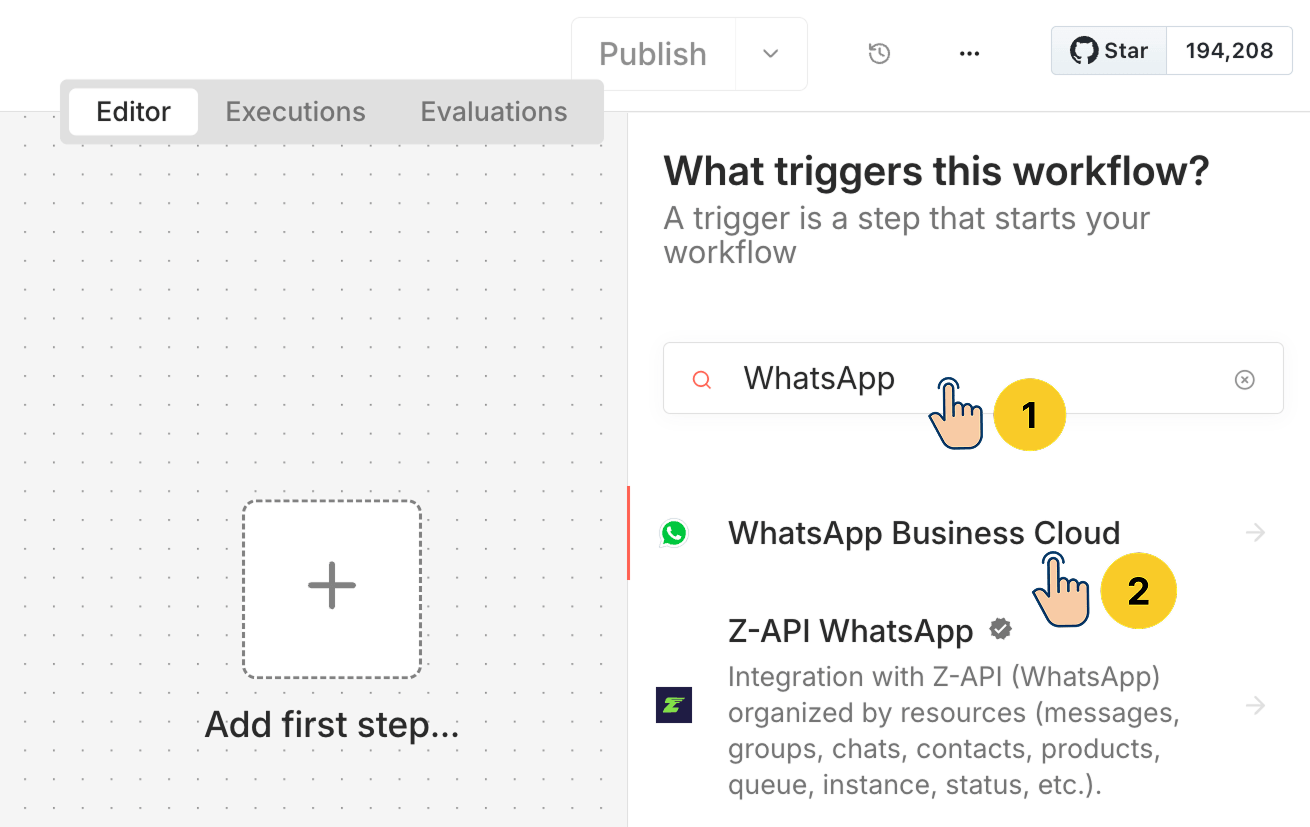
So:
- Click on the "Add first step" node
- Search for "WhatsApp"
- Click on the "WhatsApp Business Cloud"
Next, look for the "On messages" node and click on it to add it to the workflow.
As soon as you click on it, the settings of the node will open up:
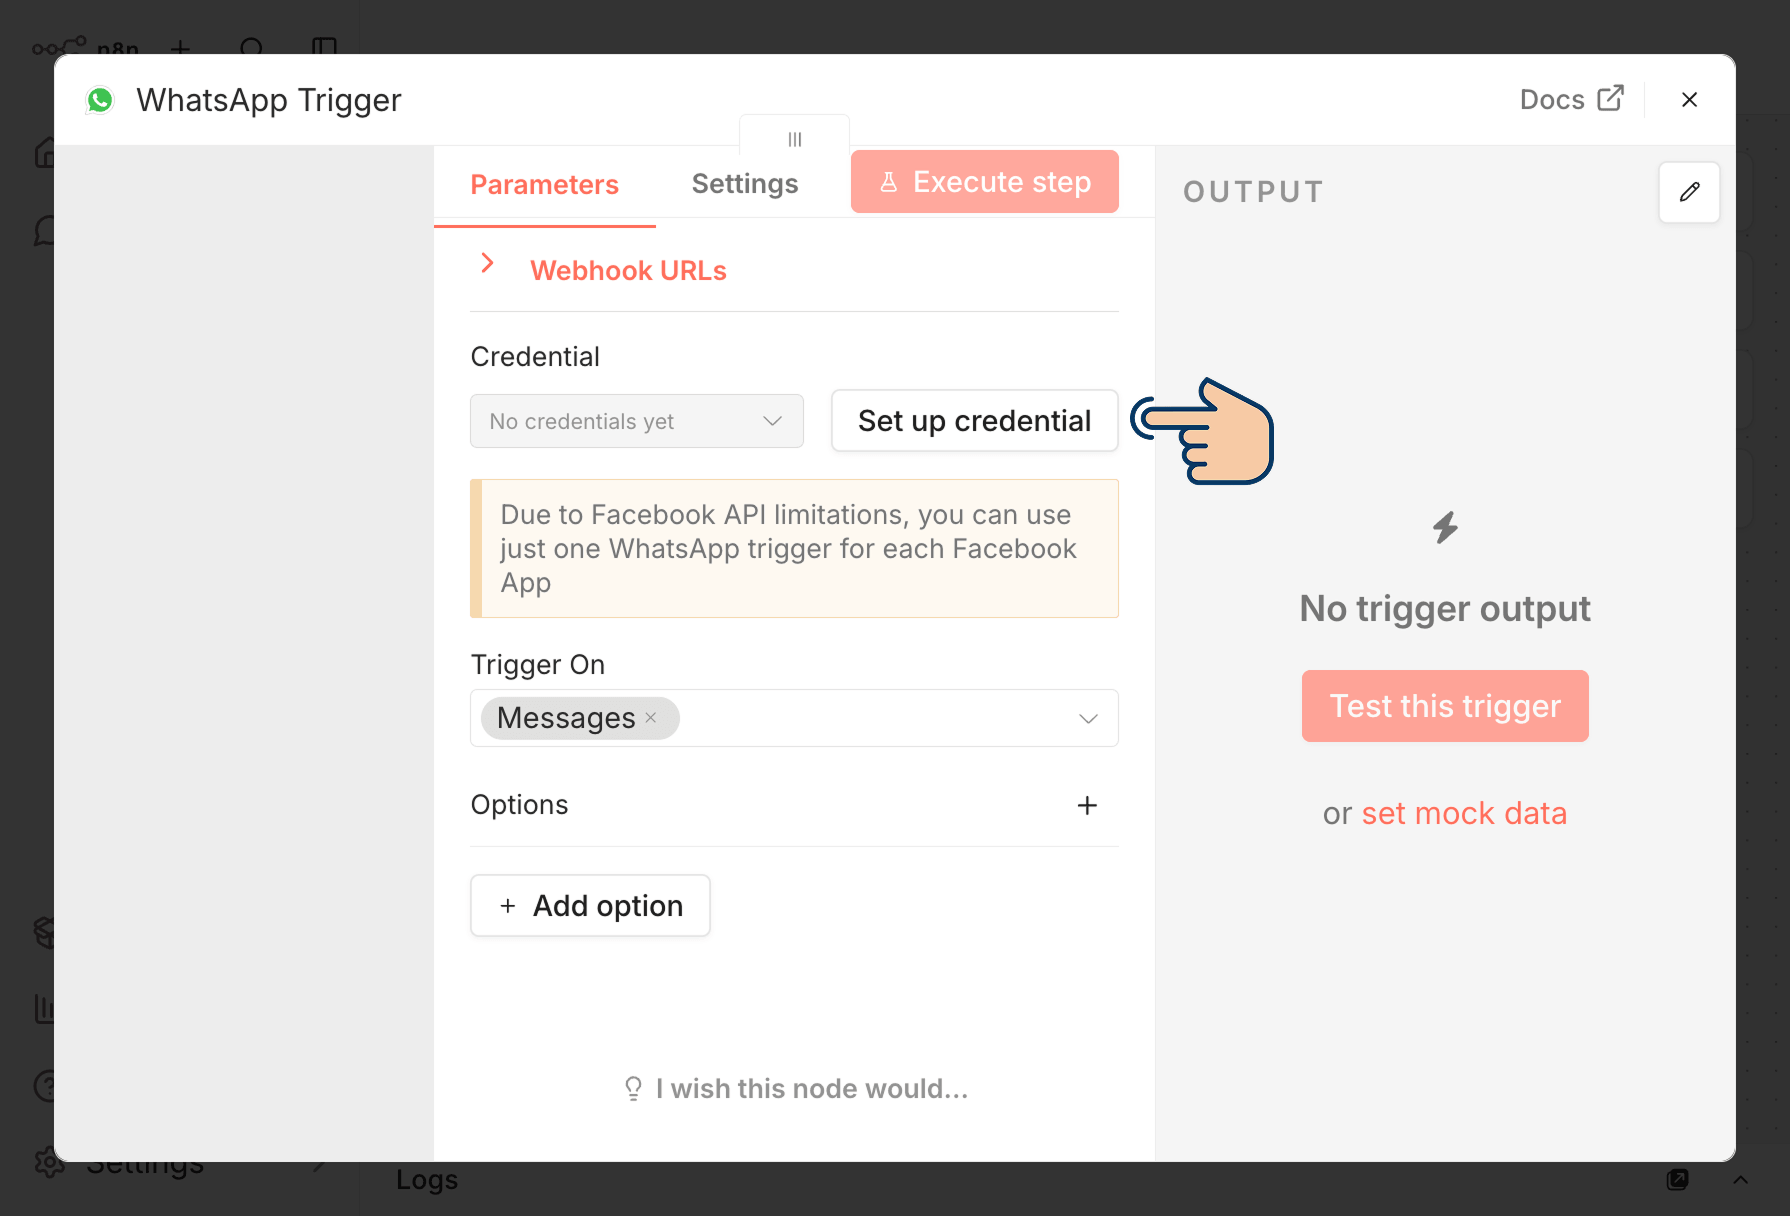
And as you can see, we need to set up the credentials of our WhatsApp Cloud API.
So, click on the "Set up credential" button.
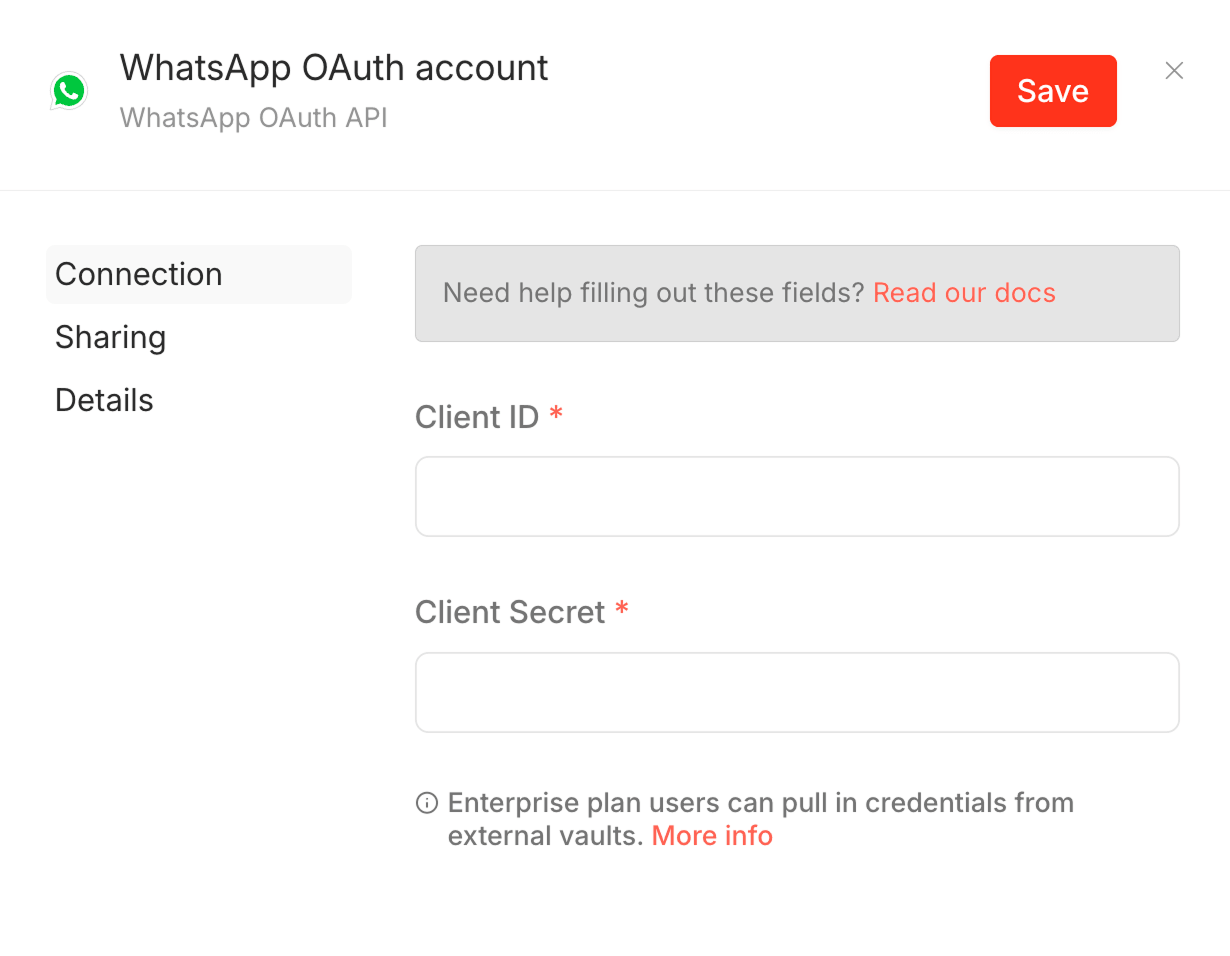
Now, we need to provide the "Client ID" and "Client Secret".
If you remember, we created an app on the Meta Developer platform during the first two steps of the lesson:
And when we created this app, Meta generated an ID and a secret code for this app.
To access them, go to the My Apps page on the Meta Developers site:
https://developers.facebook.com/apps/Next, open up the app you created during the lesson:
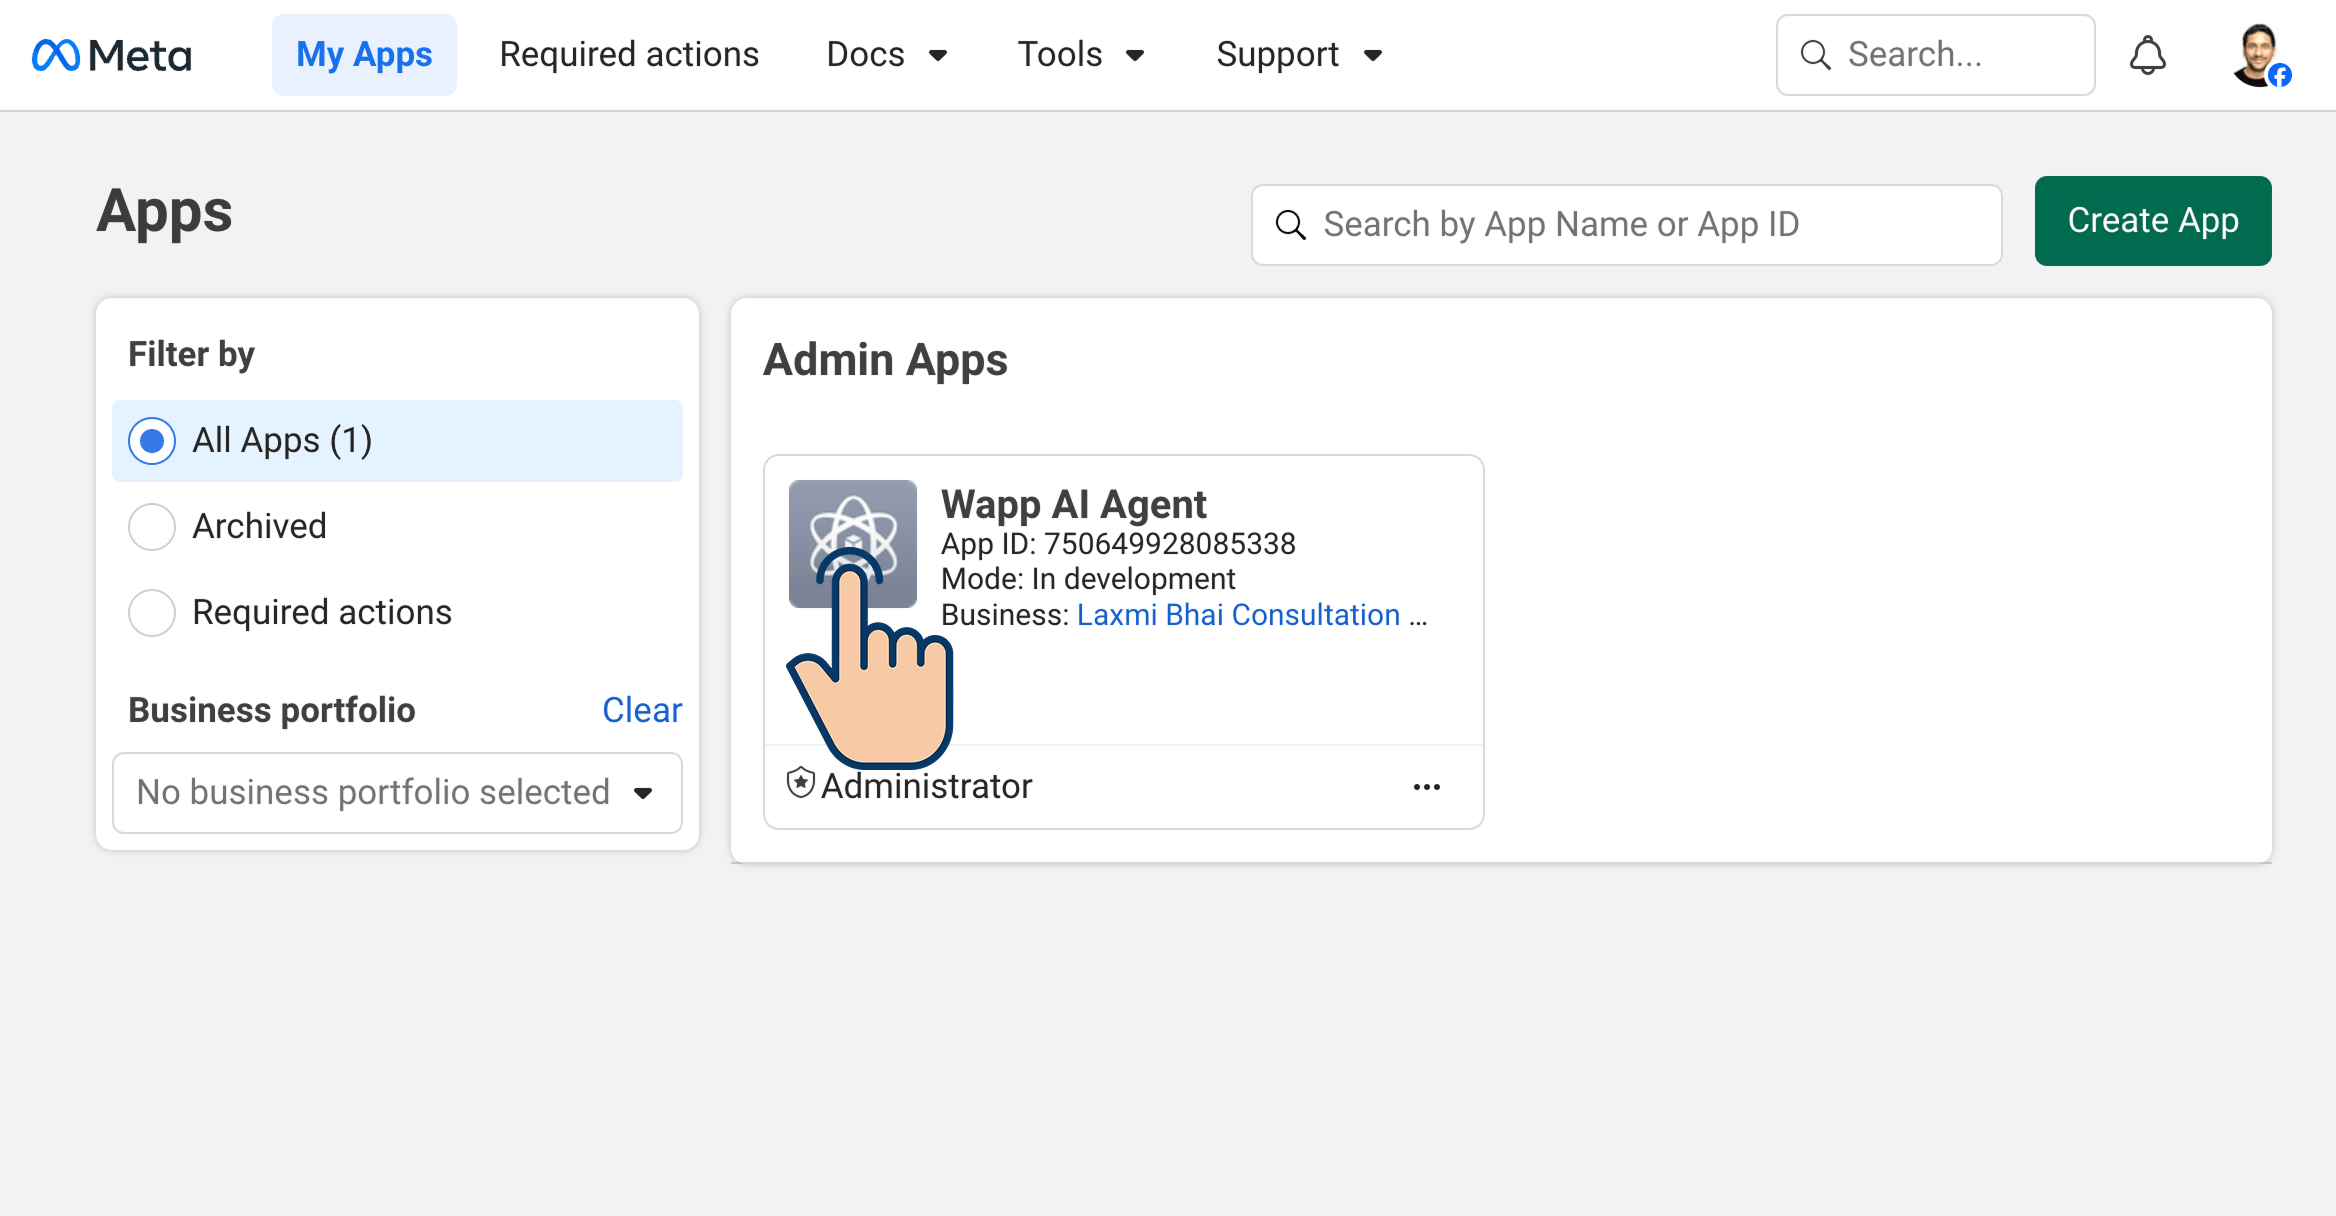
Now, from the left sidebar, click on the "App settings" and then click on "Basic":
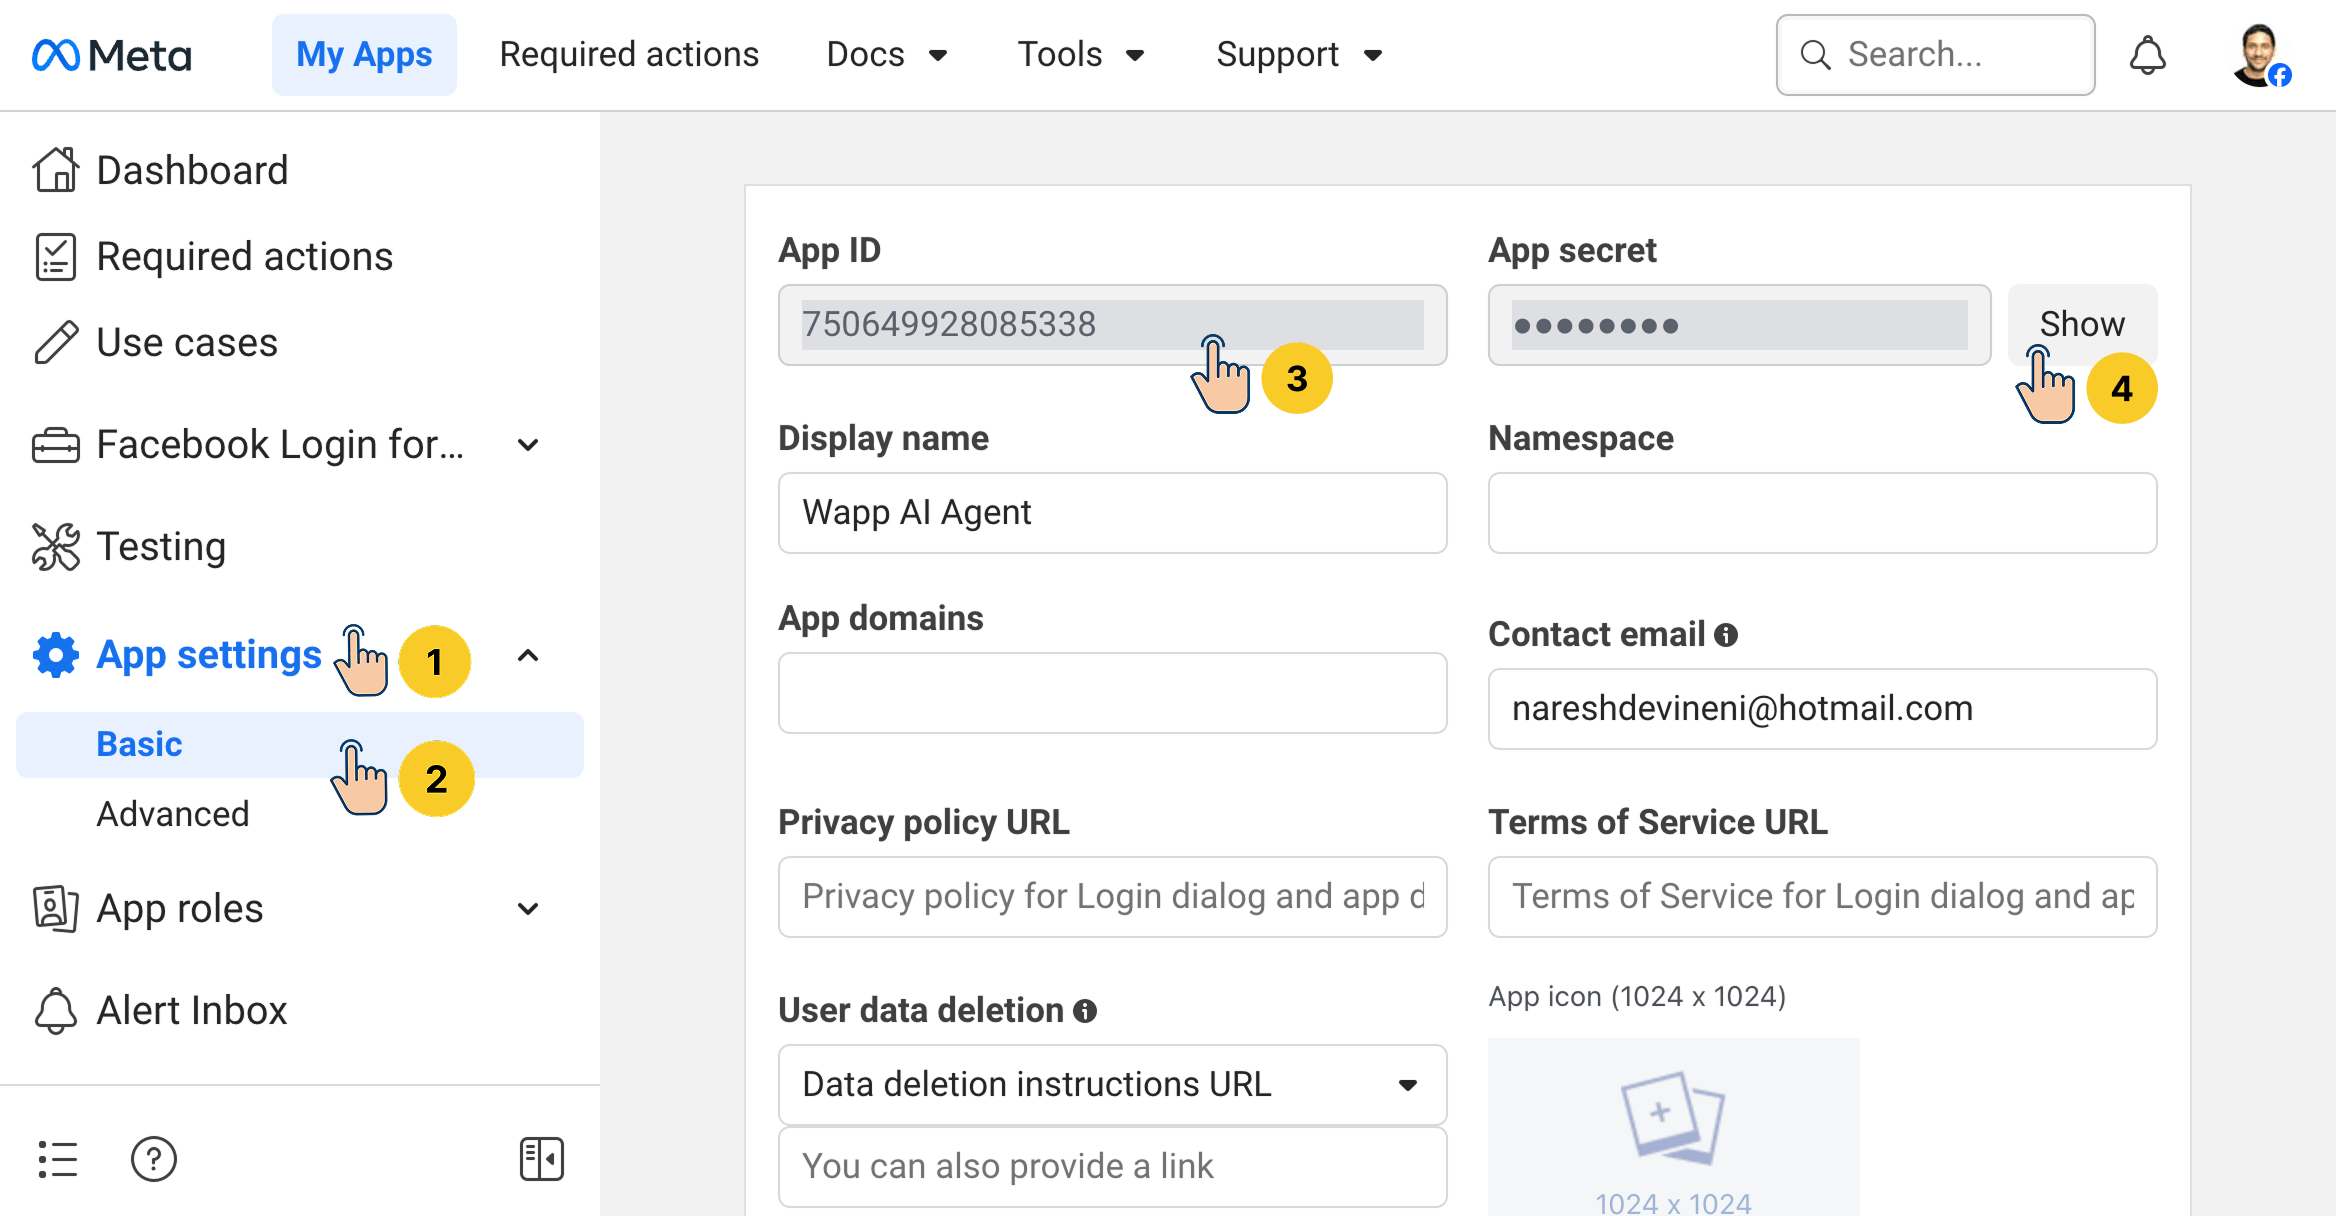
And voila!
You can now see the App ID and its secret.
For WhatsApp Credentials inside n8n, we now need to provide the App ID and Secret to the Client ID and Client Secret fields, respectively:
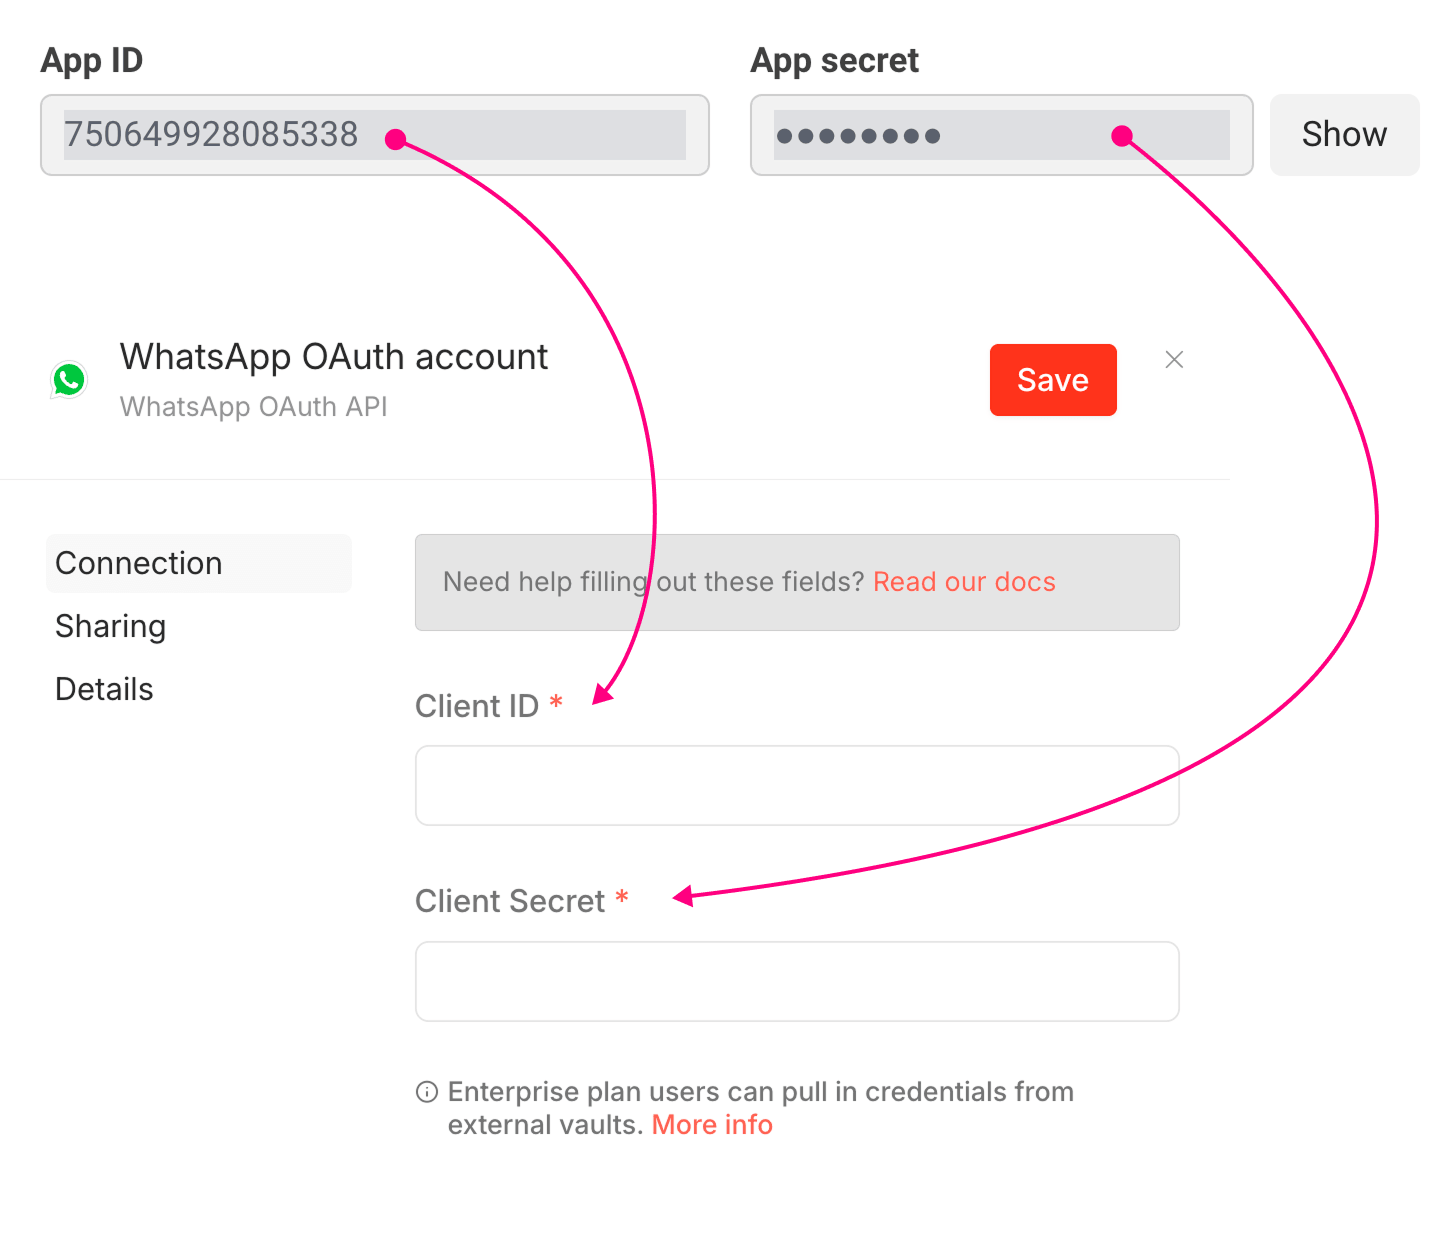
That's All.
Once you are done, click the "Save" button to save the credentials and test them.
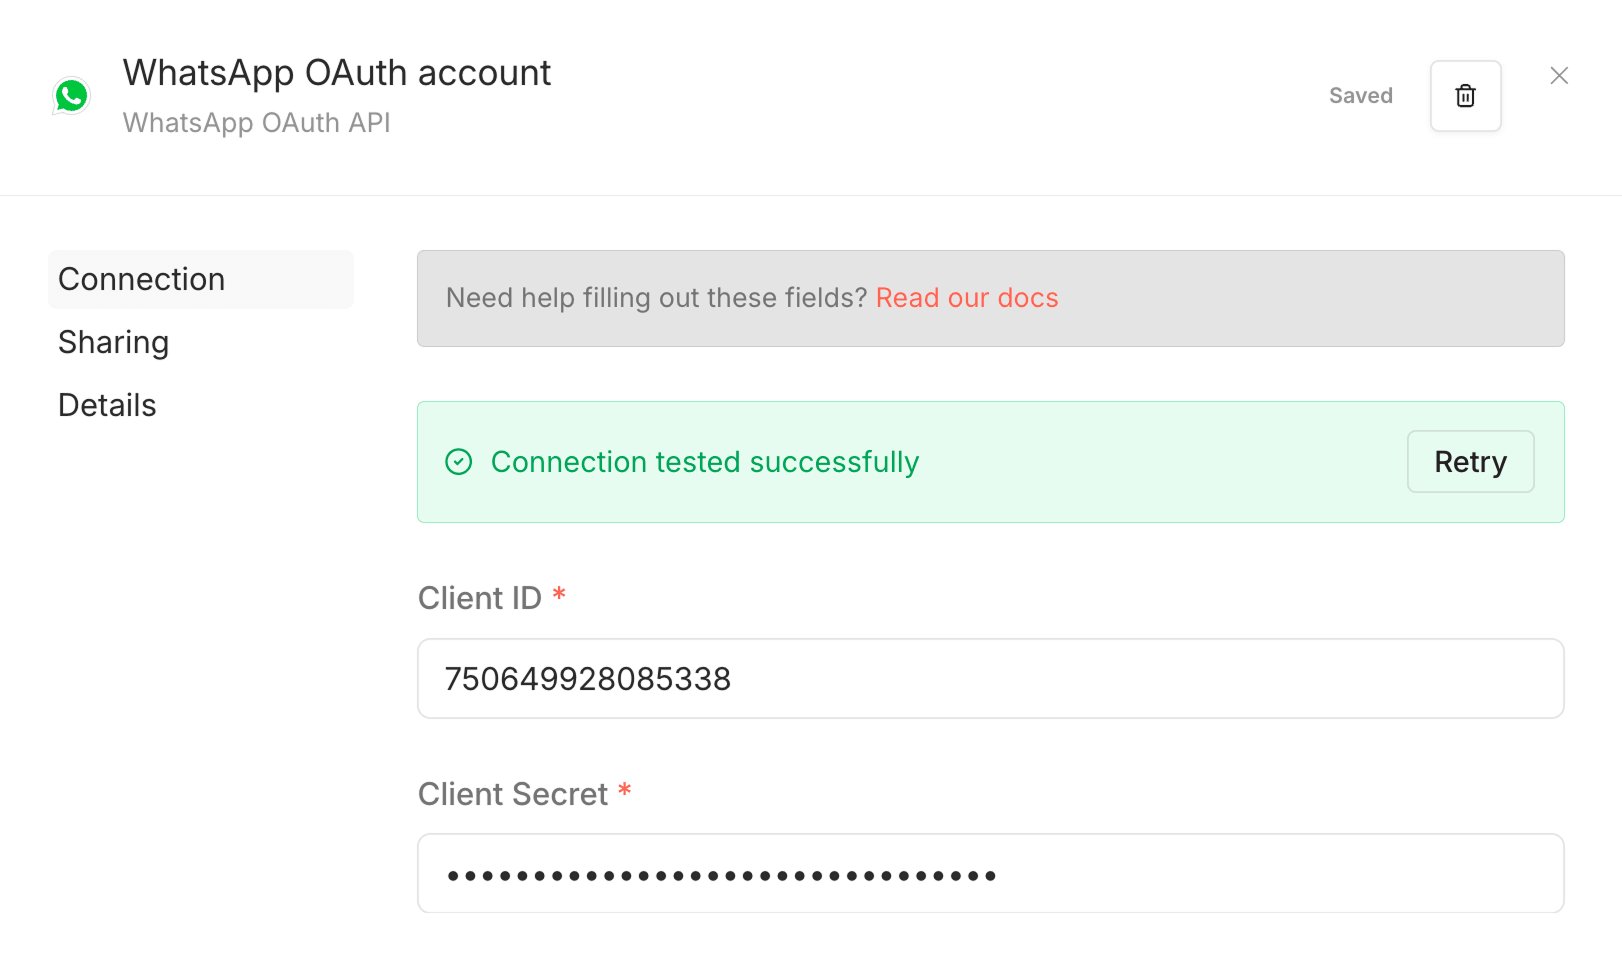
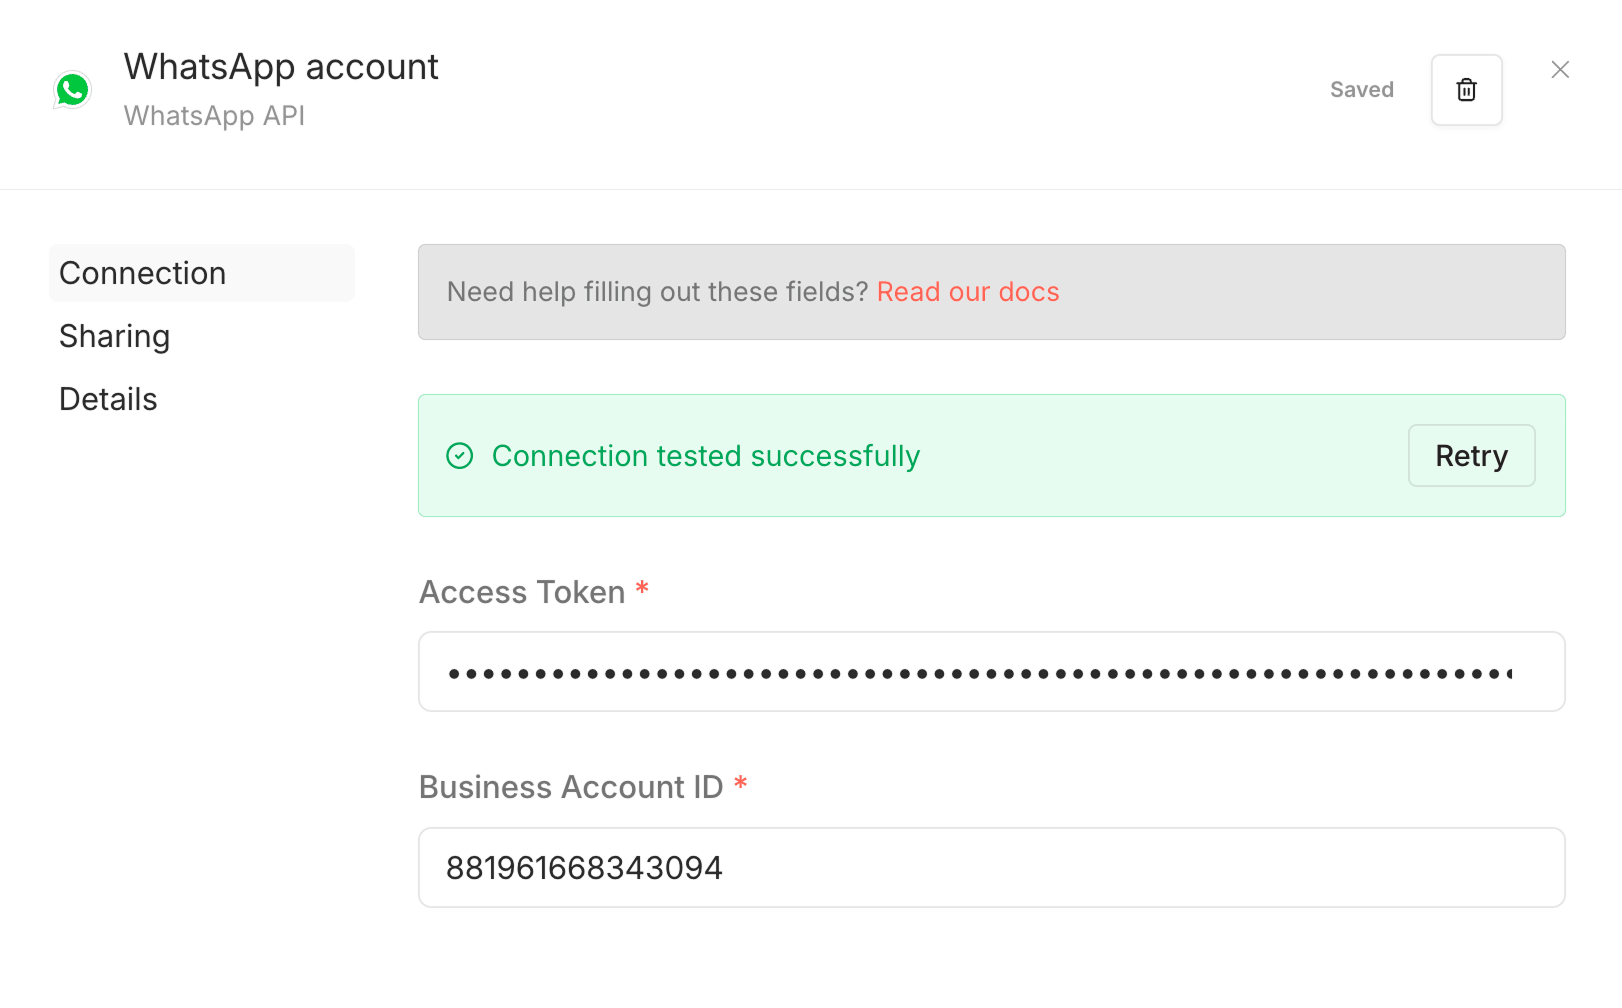
If all goes well, you should see the "Connection tested successfully" message.
But let's also test it from our side.
First, close the credentials pop-up inside n8n and then click on the "Execute step" button:
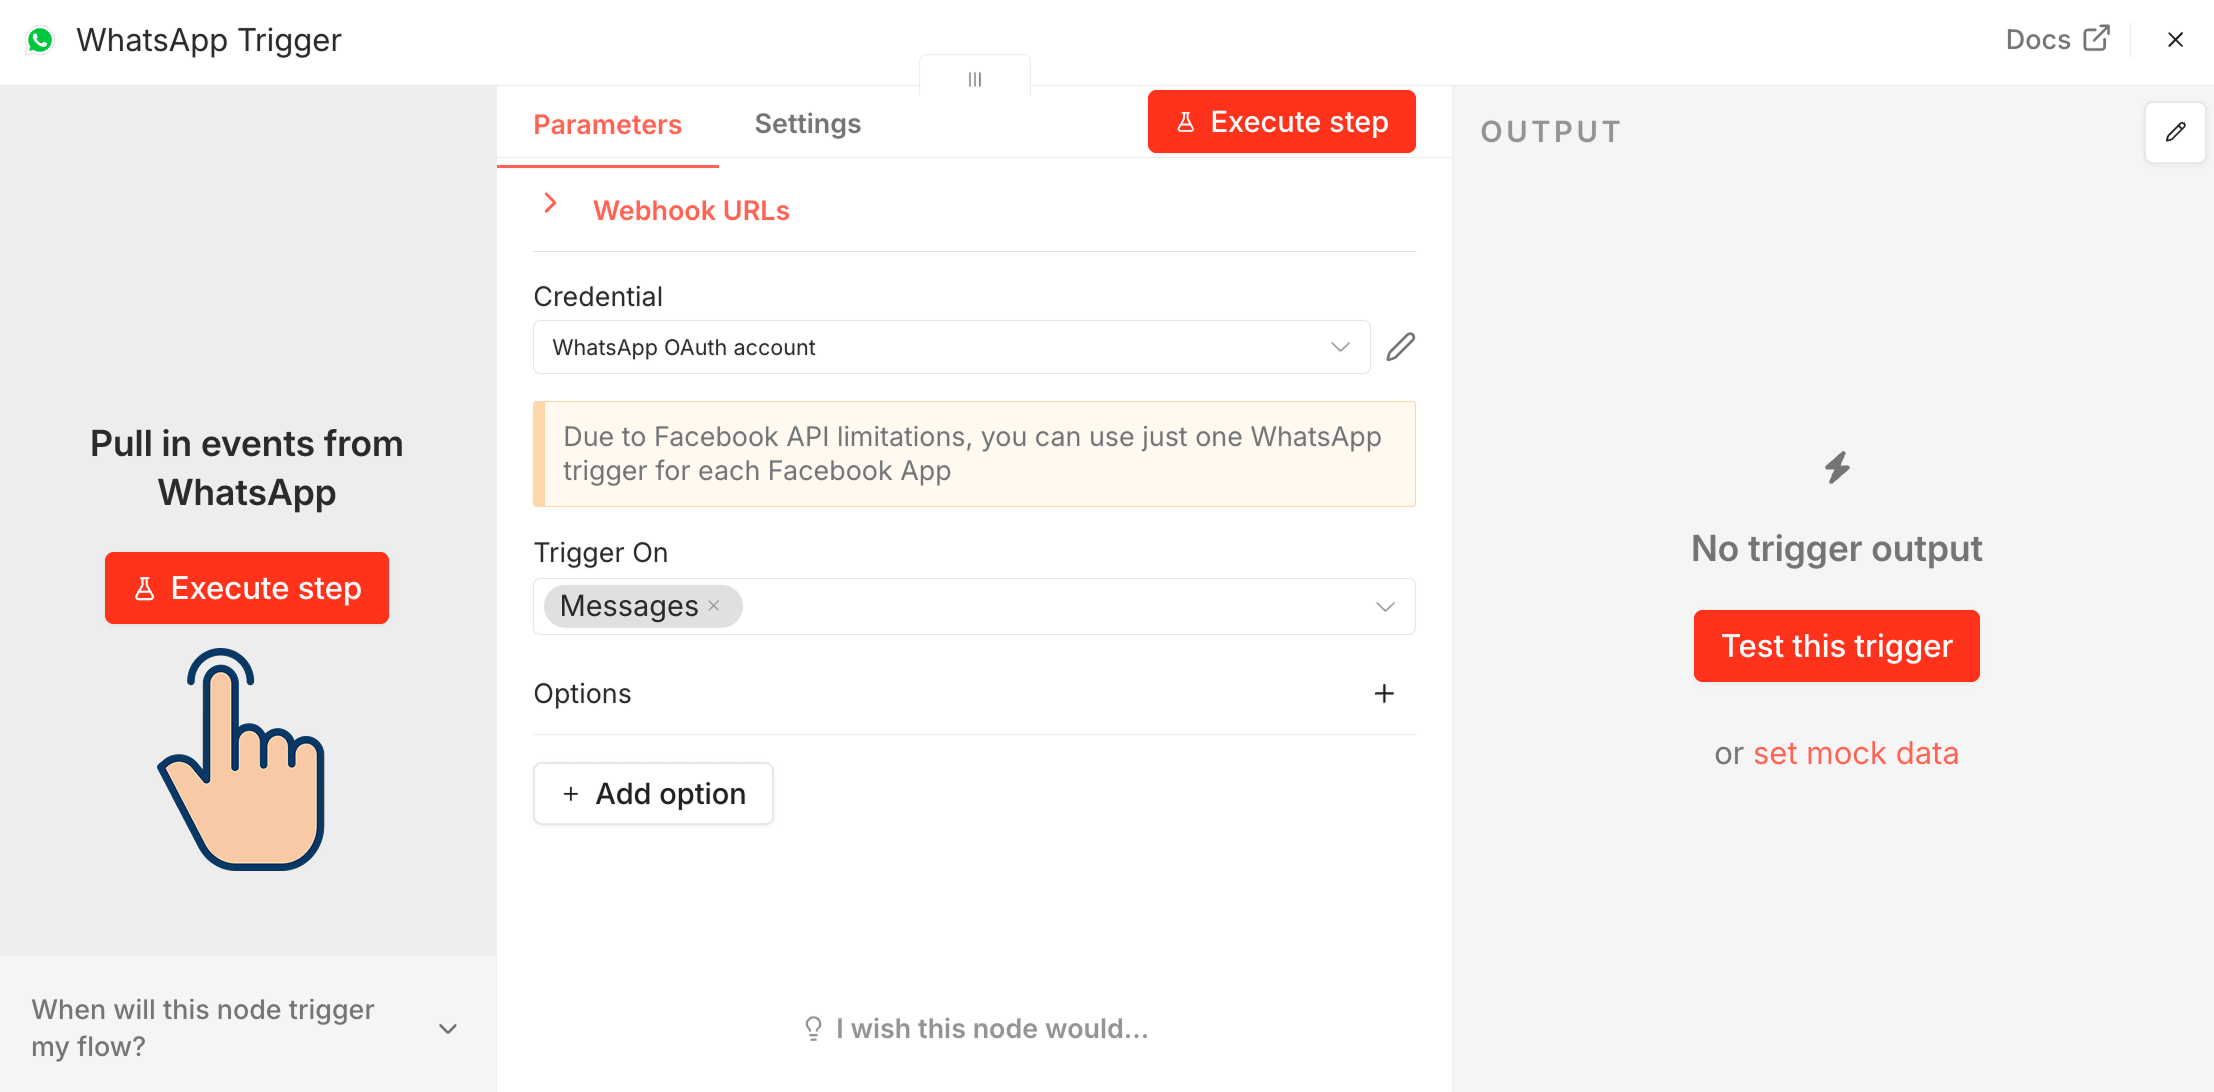
This will now make our n8n Workflow wait for someone to send a message to our WhatsApp Business Account number:
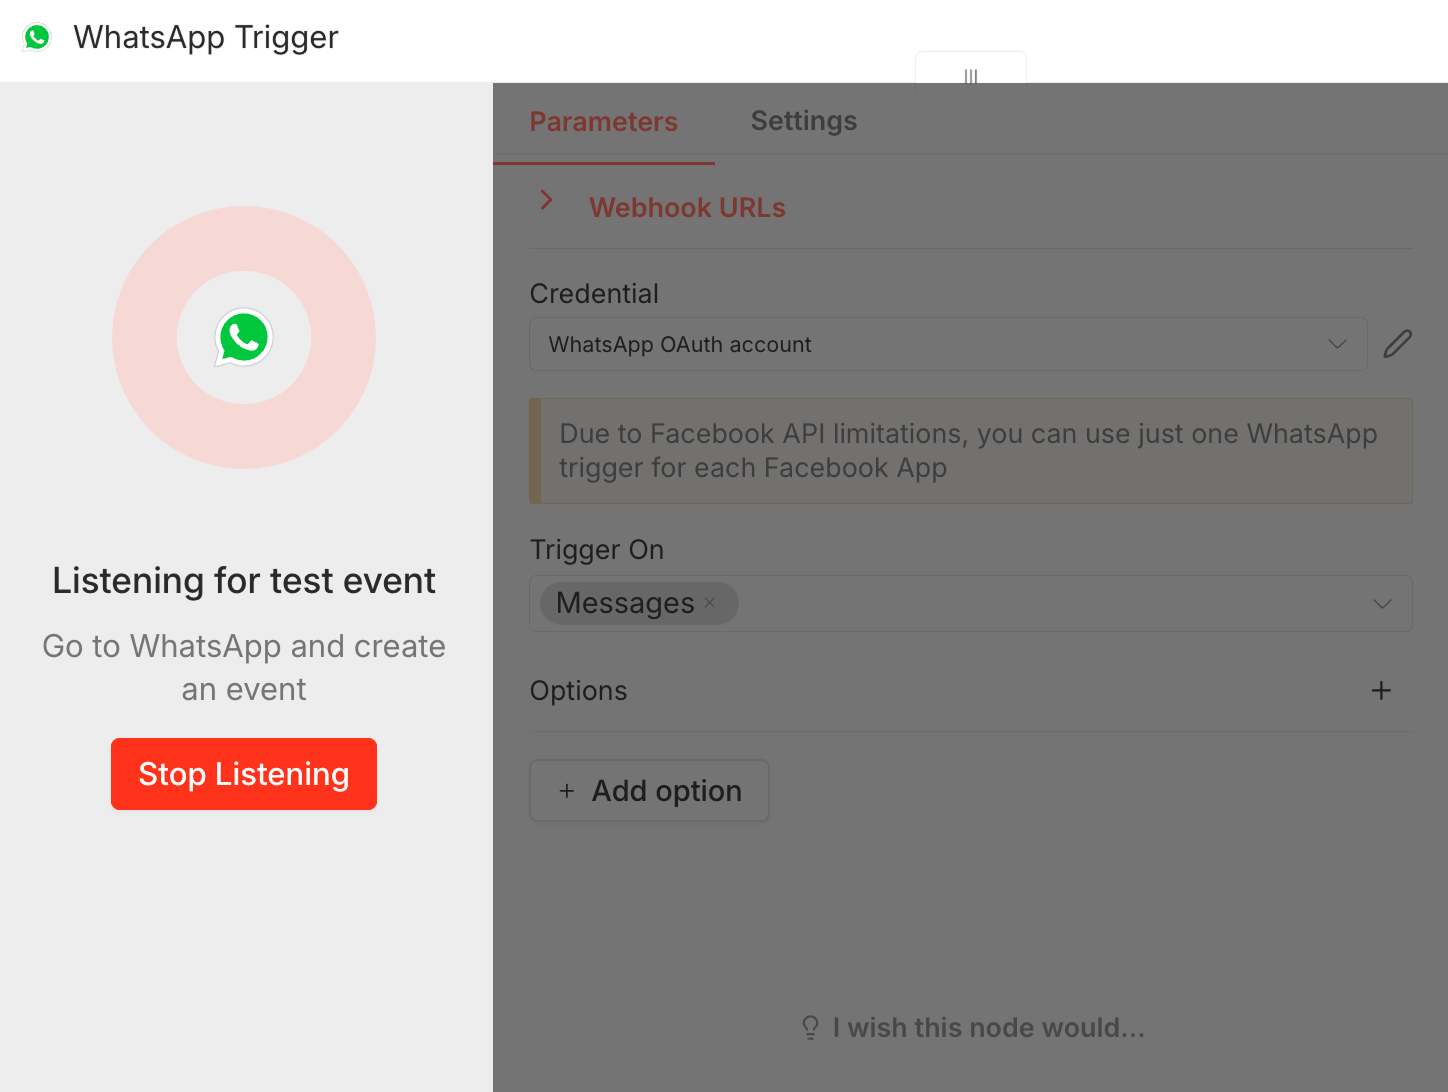
I will now send a message to my WABA number:
Super cool!
n8n received the message that I sent to my WABA number.
You can now process the message and reply using n8n's AI Agent and automate customer support.
And, now that we are receiving messages via WhatsApp Cloud API to n8n, let's also test sending a message.
To do that, close the WhatsApp Trigger node's settings and click the "Add node" button:
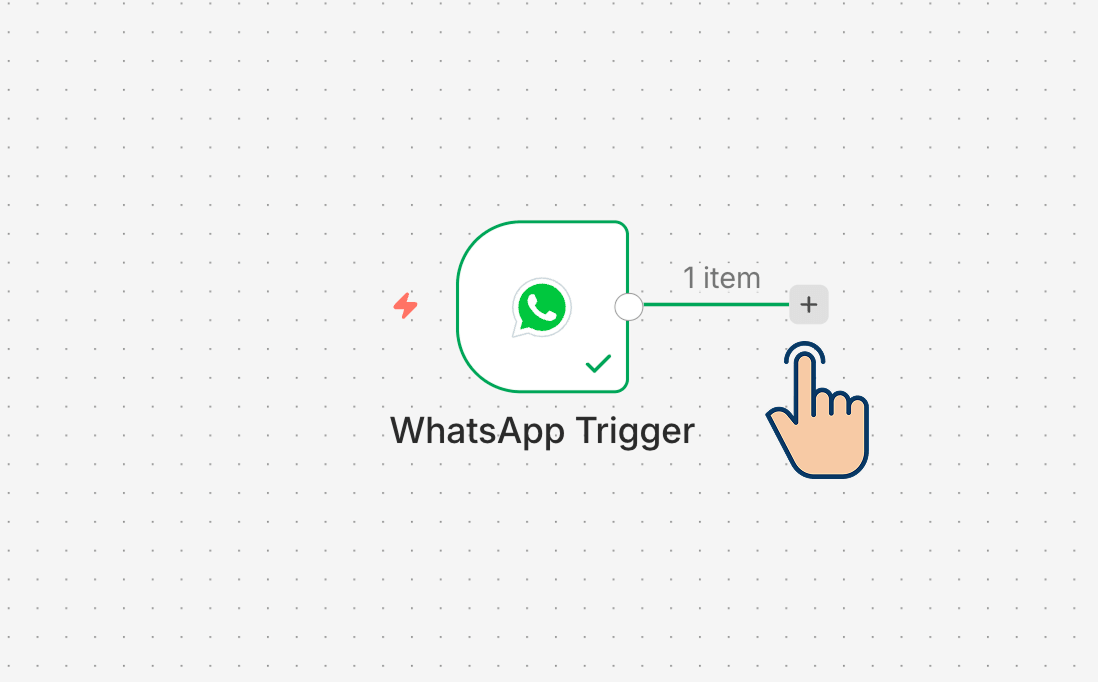
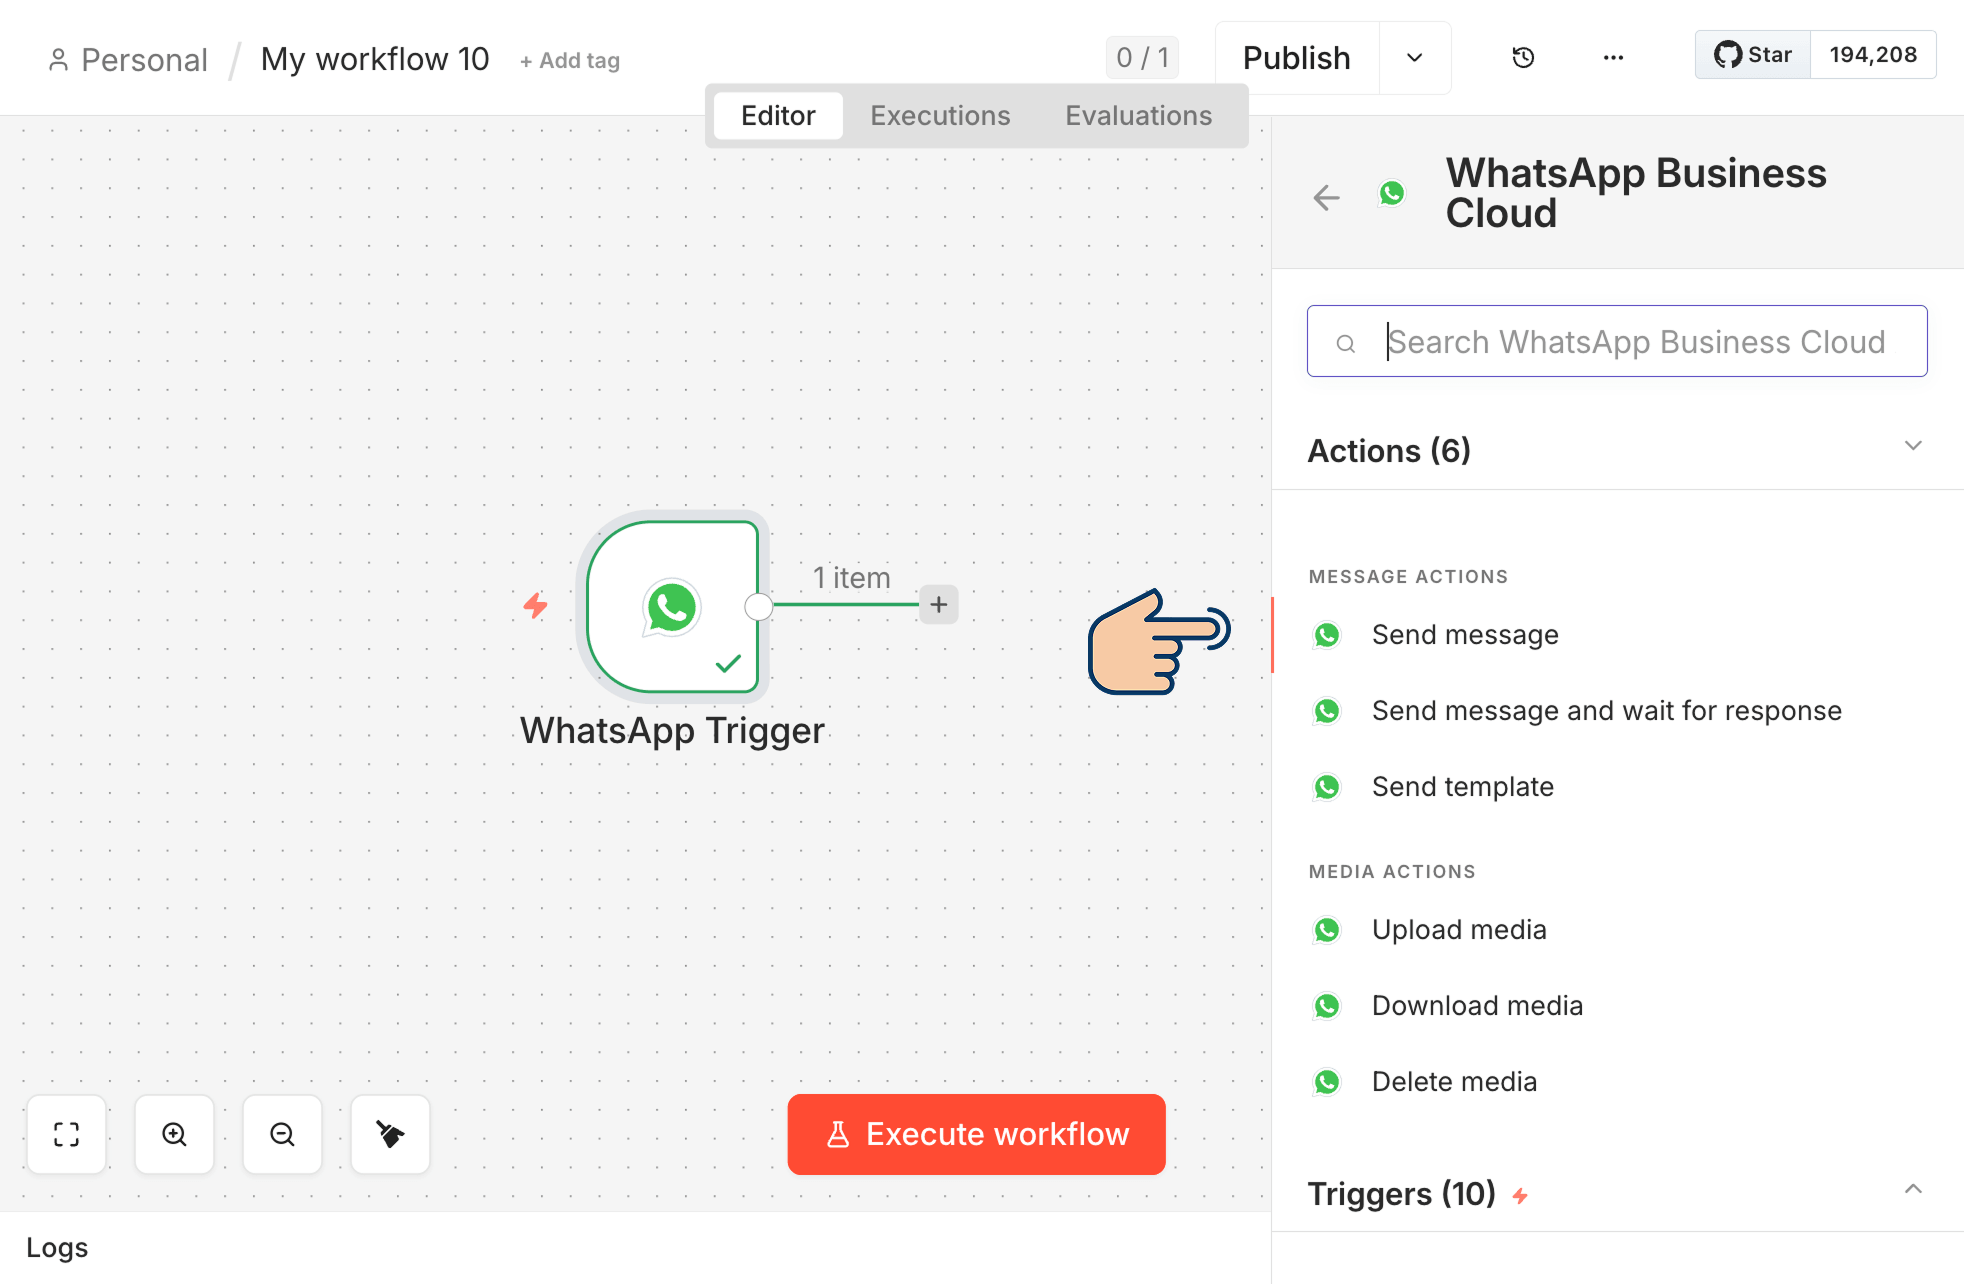
Next, search for WhatsApp again and add the "Send message" node to our workflow:
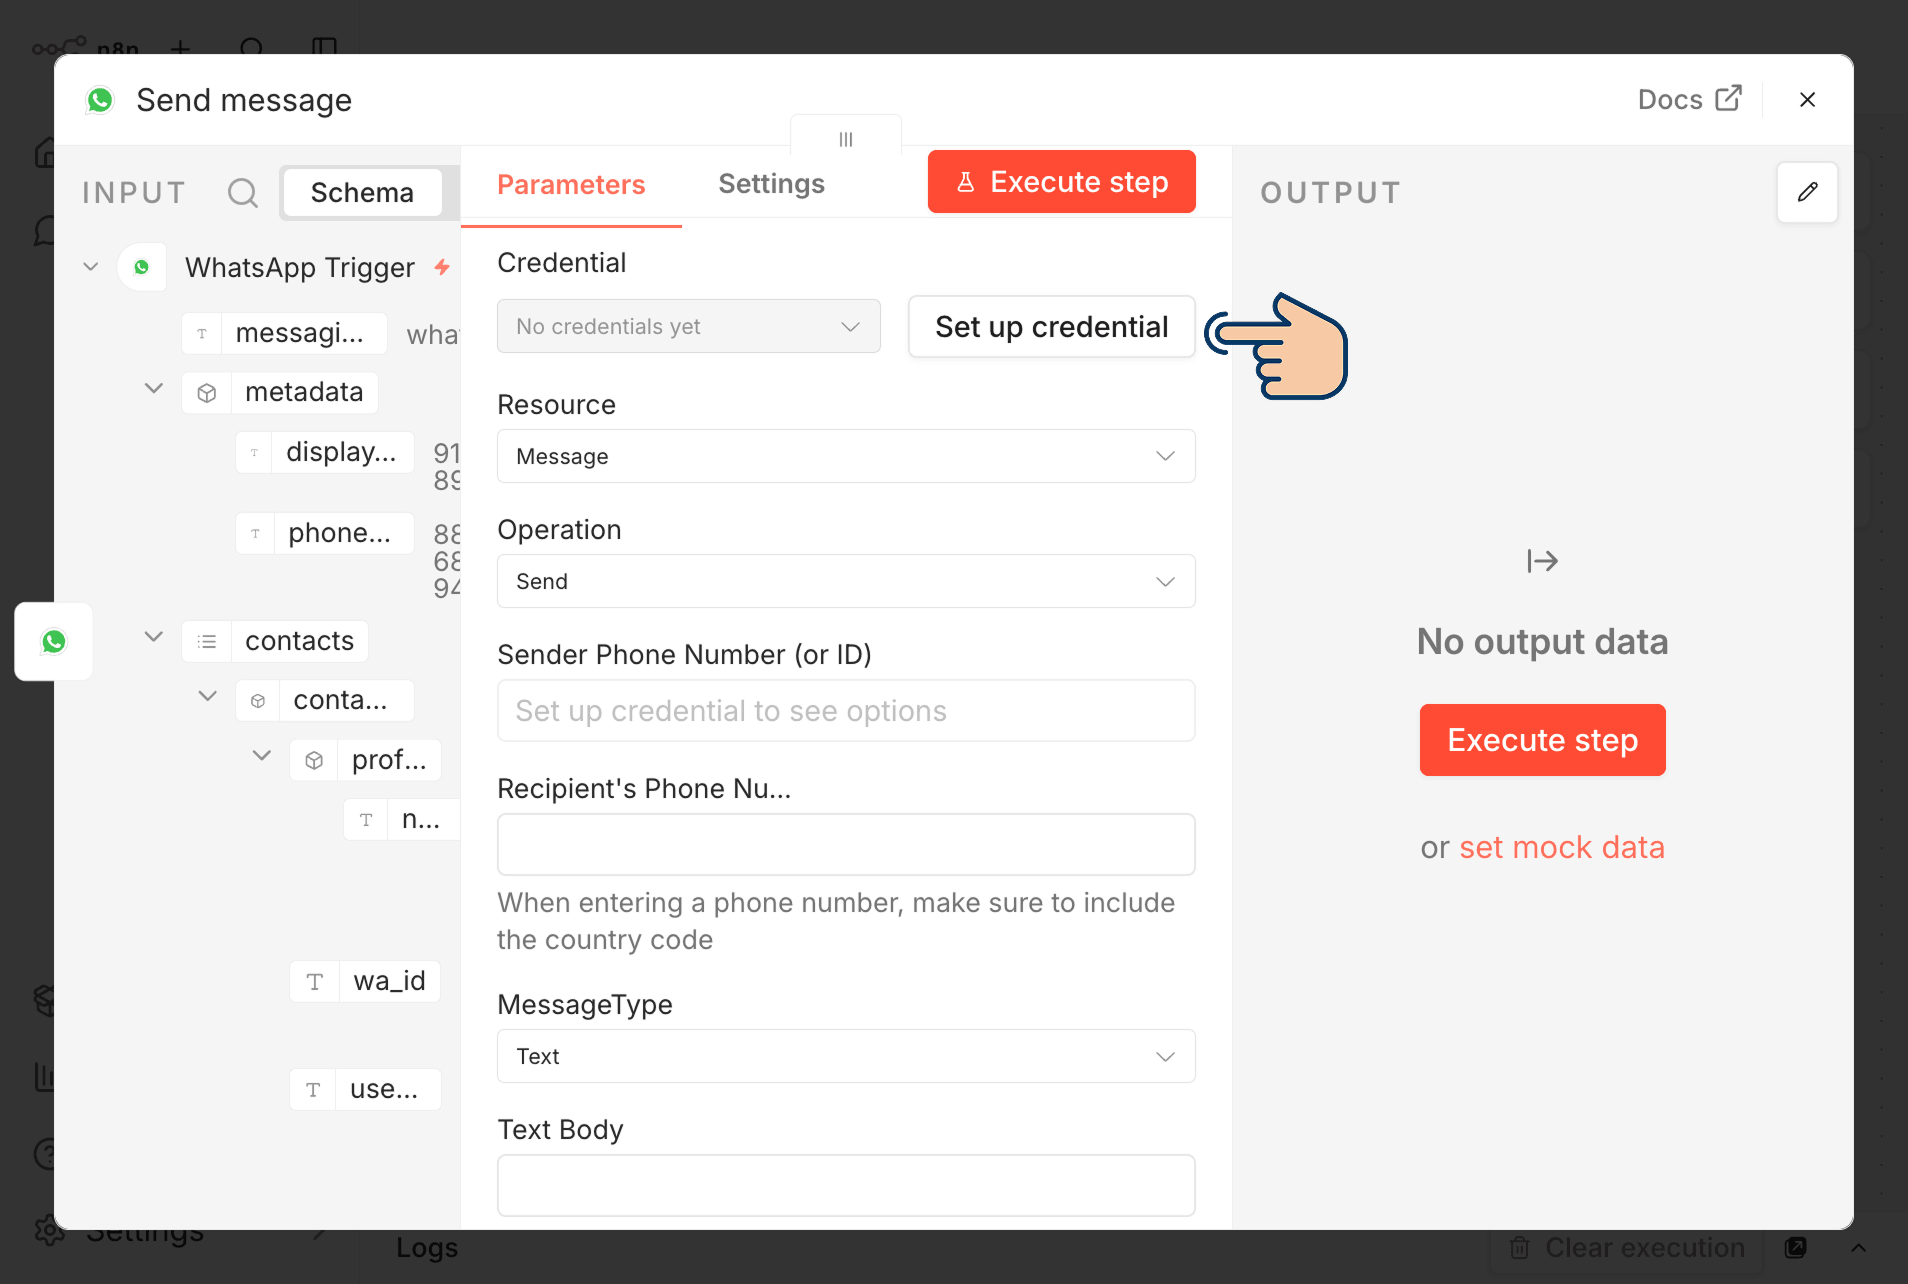
If you notice, we need to set up credentials for the "Send message" node, too.
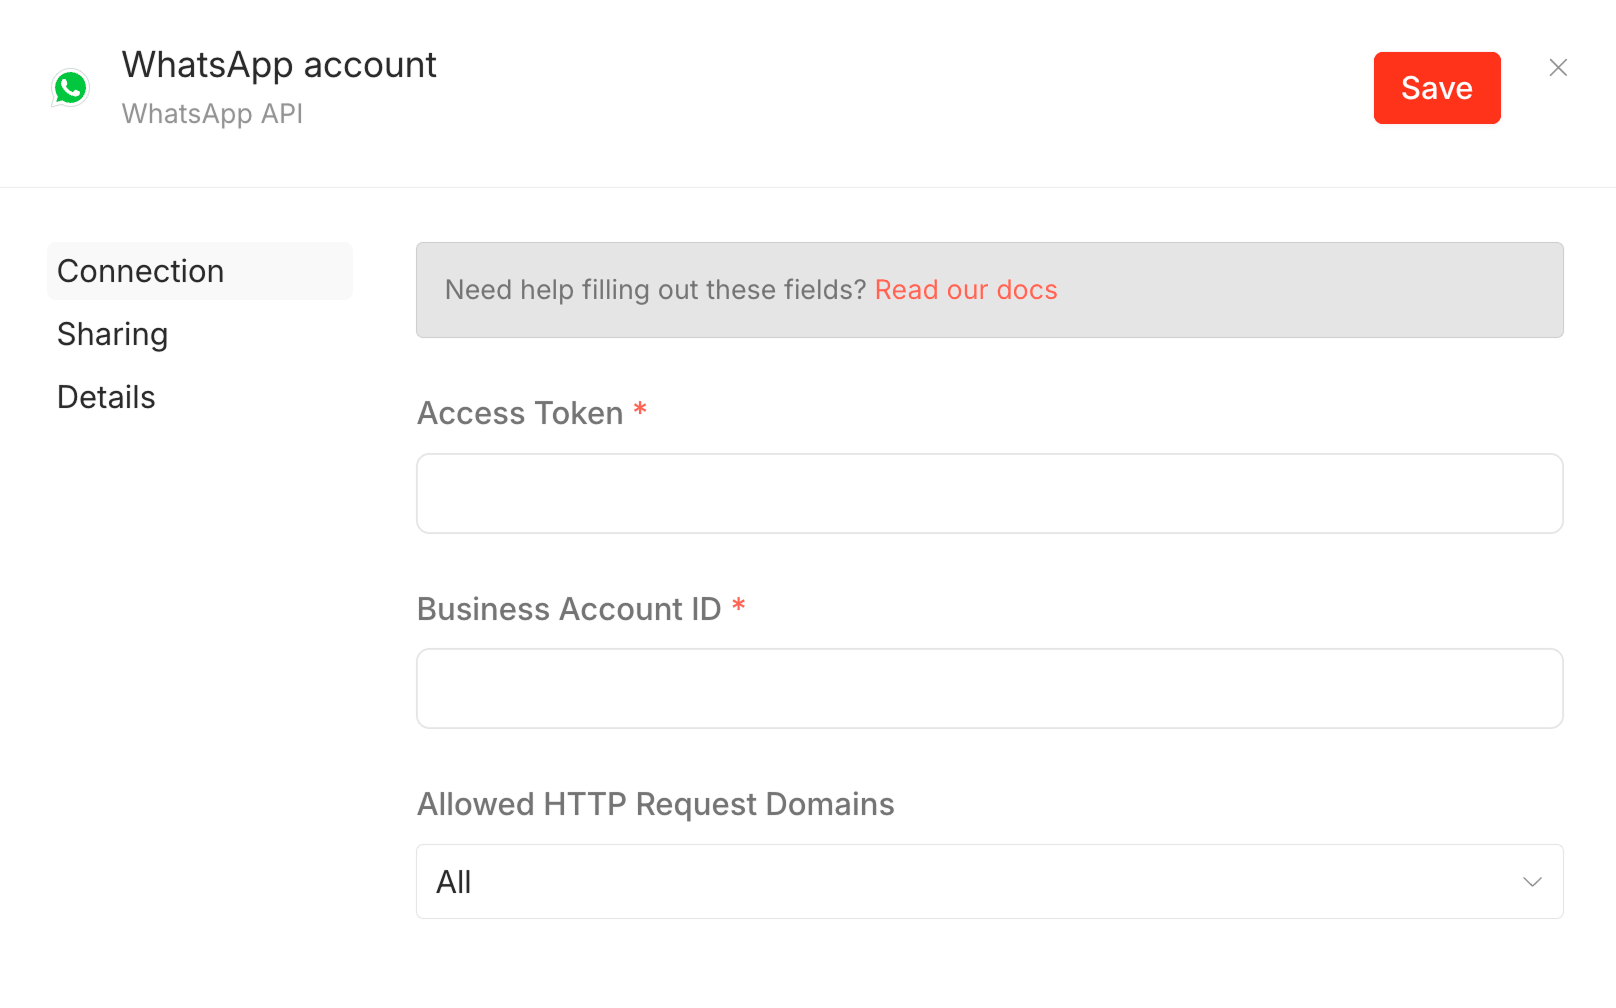
For sending the message, instead of the App ID and the secret, we need to provide the WABA ID and the system user's access token as the credentials.
The reason is that the two nodes are doing two completely different jobs.
The "On messages" trigger is listening.
Its only concern is confirming that the incoming notifications belong to your app.
So it authenticates at the app level, using the App ID and Secret, which are the two values that identify the app itself.
The "Send message" node is acting on your behalf.
It needs to prove two separate things:
- Who is sending this message
- And which WhatsApp account they're allowed to send from
That's why it needs the system user's access token (the identity — the authorized robot account we created in Step 3) along with the WABA ID (the specific WhatsApp account that the account is permitted to touch).
So, in one line:
- The App ID + Secret answers "which app is this?"
- While the access token + WABA ID answers "who is sending, and which WhatsApp account are they allowed to use?"
Two different questions, so two different sets of credentials.
And you can get them inside business.facebook.com.
If you remember, we gathered and provided the same credentials during Step 6.2 above, where we subscribed to our WhatsApp Business Account (WABA) using Postman:
Add them inside the "Send message" node credentials inside n8n and test the connection once again:
Now, close the credentials box so that we can configure the "Send message" node and send a test message.
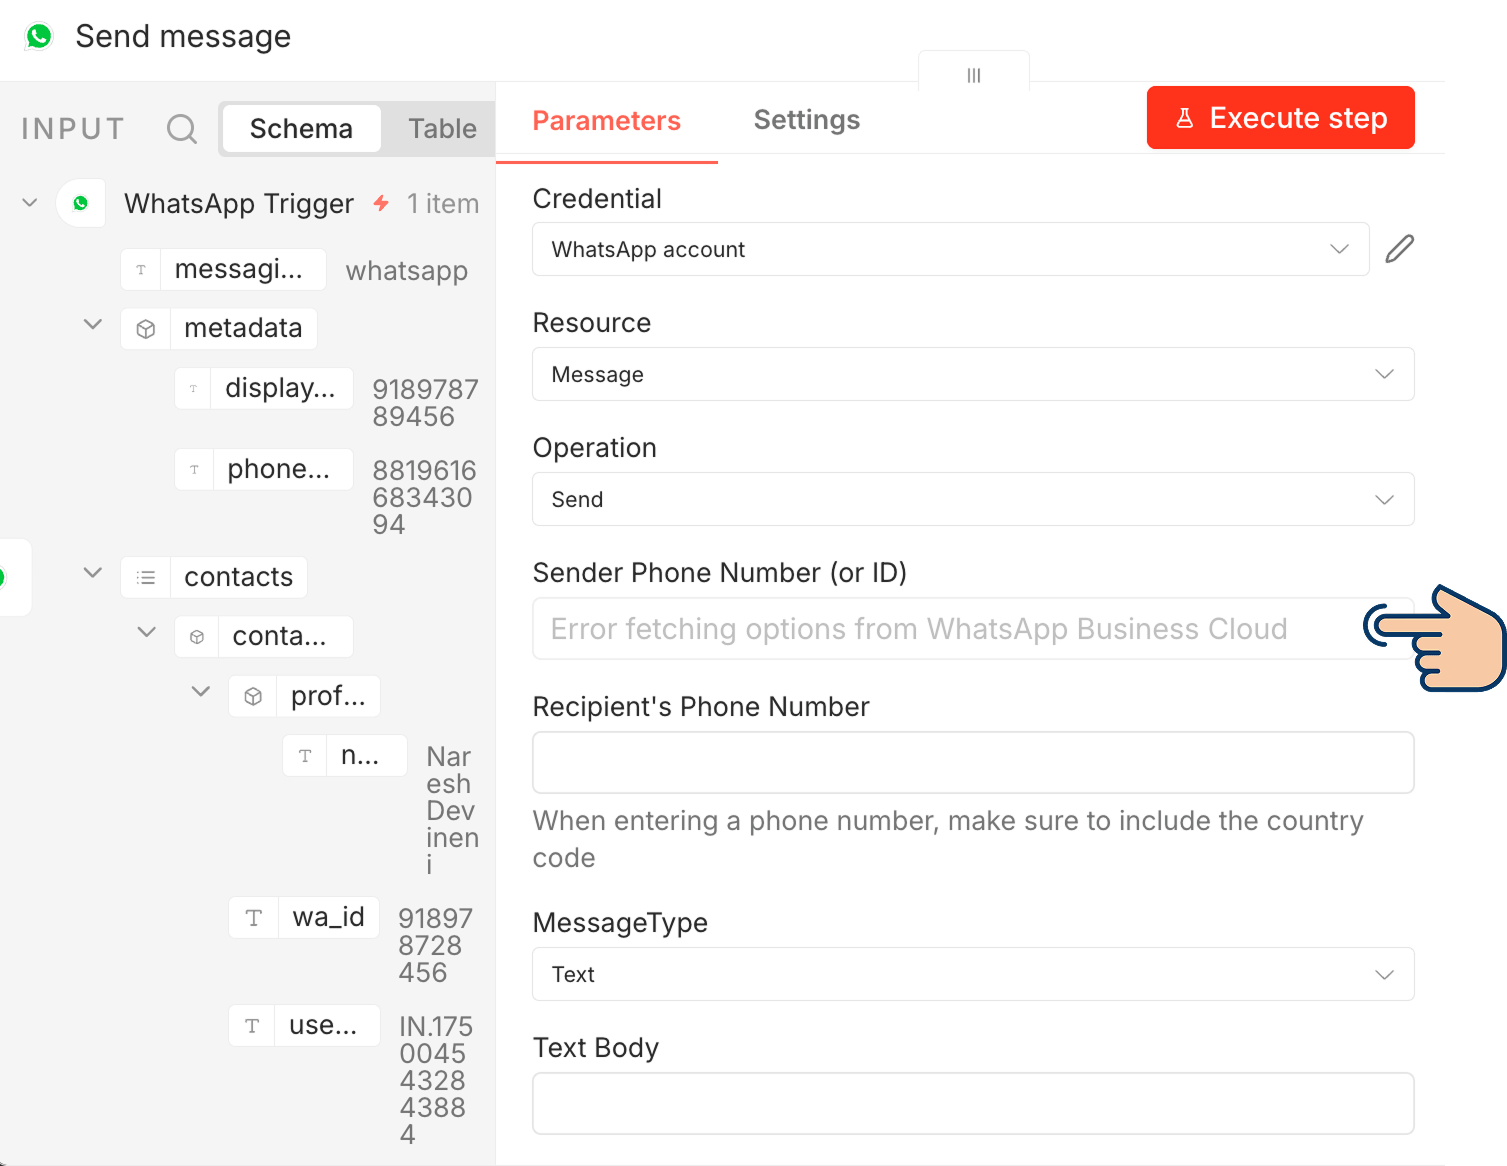
And bang! There is an error!
To send a message, we need a sender's phone number (our WABA number), which n8n automatically pulls from our WABA based on the credentials we provided.
But n8n says:
Error fetching options from WhatsApp Business CloudAnd it is my mistake.
Instead of providing the WABA ID, I provided my Phone Number ID.
So, n8n couldn't find the phone number that I added to my WABA account.
And many of us make this mistake for many reasons.
If you encounter this message, make sure you are providing the correct WABA ID to n8n.
I realized and corrected my mistake, and the error is now gone for me:
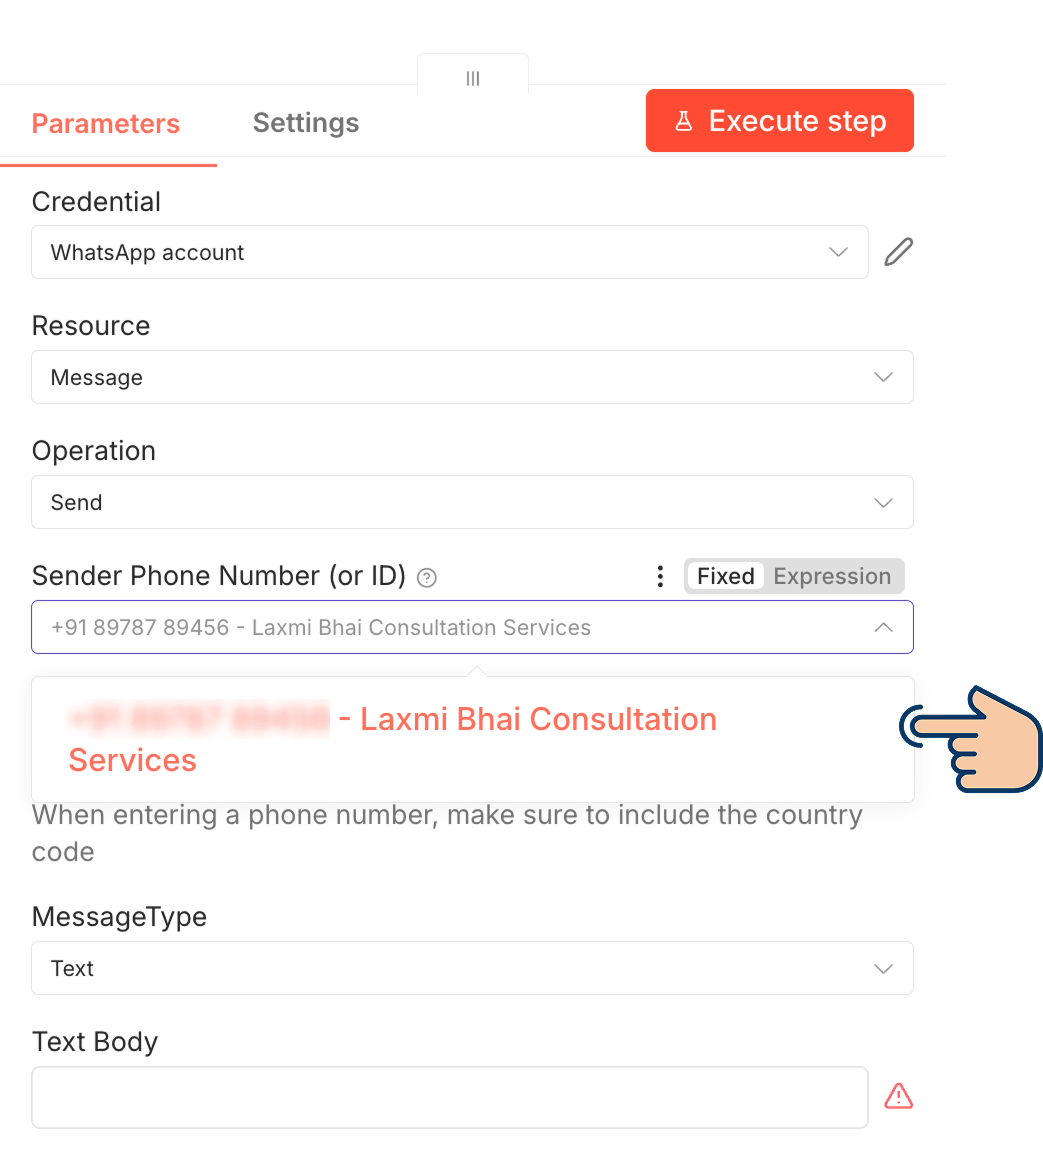
I added only one phone number to my WABA, and n8n pulled it successfully.
And I will select it as the sender's phone number.
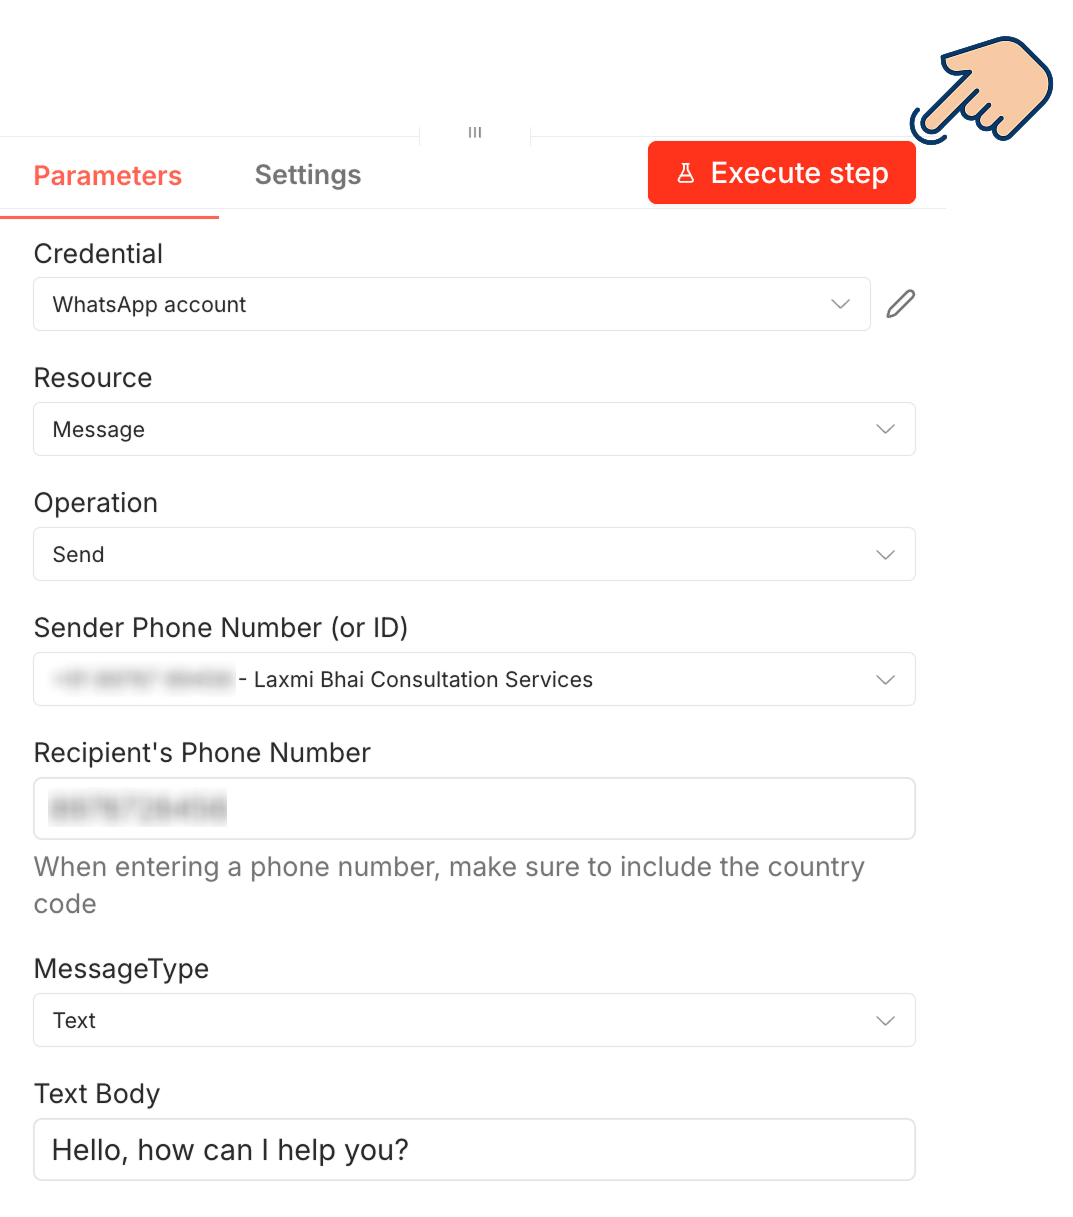
Also, if you observe the "Send message" settings, there are seven options we need to configure:
- Credential - We configured it just now with WABA ID and access token.
- Resource - It must be set to "Message", and n8n set it up for us by default. So, no changes here.
- Operation - It must be set to "Send", and n8n set it up for us by default. So, no changes here, too.
- Sender Phone Number - We must select the Phone Number that we added to our WABA. We just did it after fixing the error.
- Recipient's Phone Number - Enter the number of a person to whom you want to send the test message. You can also provide it dynamically from a previous node inside n8n.
- Message Type - We can send all kinds of messages, including images, audio, and video. But for now, we want to send a text message, and n8n selected it for us by default. So, no changes here, too.
- Text body - Because I selected "Text" for the message type, I need to provide a text that will be sent to the recipient.
Here is my finished setup:
Finally, to send the test message, click on the "Execute Step".
Done!
It works <3
We are now done with integrating the WhatsApp Cloud API with n8n.
You can now create any kind of automation with WhatsApp.
Having said that, we still have to perform two more steps to be truly limitless:
- Verify our business details inside Meta's business portfolio - If we don't do this, Meta will put a limitation on how many messages we can send to our customers
- Add a payment method - If we don't add this, we can not send self-initiated outreach or marketing messages
"Brooooooooooo!"
Haha, I am sorry.
I understand this process is exhaustive. But once you do it a couple of times, you can finish all this setup in less than 15 minutes 😏
So, next and the last step...
Step 8: Verify your business
Setting up the API is the easy part.
But business verification is where most people get stuck forever.
Meta is very strict in this regard.
They care about their users so much that they can't risk losing them at any cost.
So, they only let legitimate businesses send messages to their users.
So, if you're missing a document or two about your business, or if your business details look suspicious, or if Meta feels you are sending spammy messages to your customers, your WABA account will get suspended without any remorse.
This is why you need to be very careful, honest, and attentive during the business verification process.
With that said, let's start the process.
Step 8.1: Verify your business
Open up the settings of your business portfolio on:
https://business.facebook.comNext, if you open up the "Business Info" page, you'll see that your business is currently unverified:
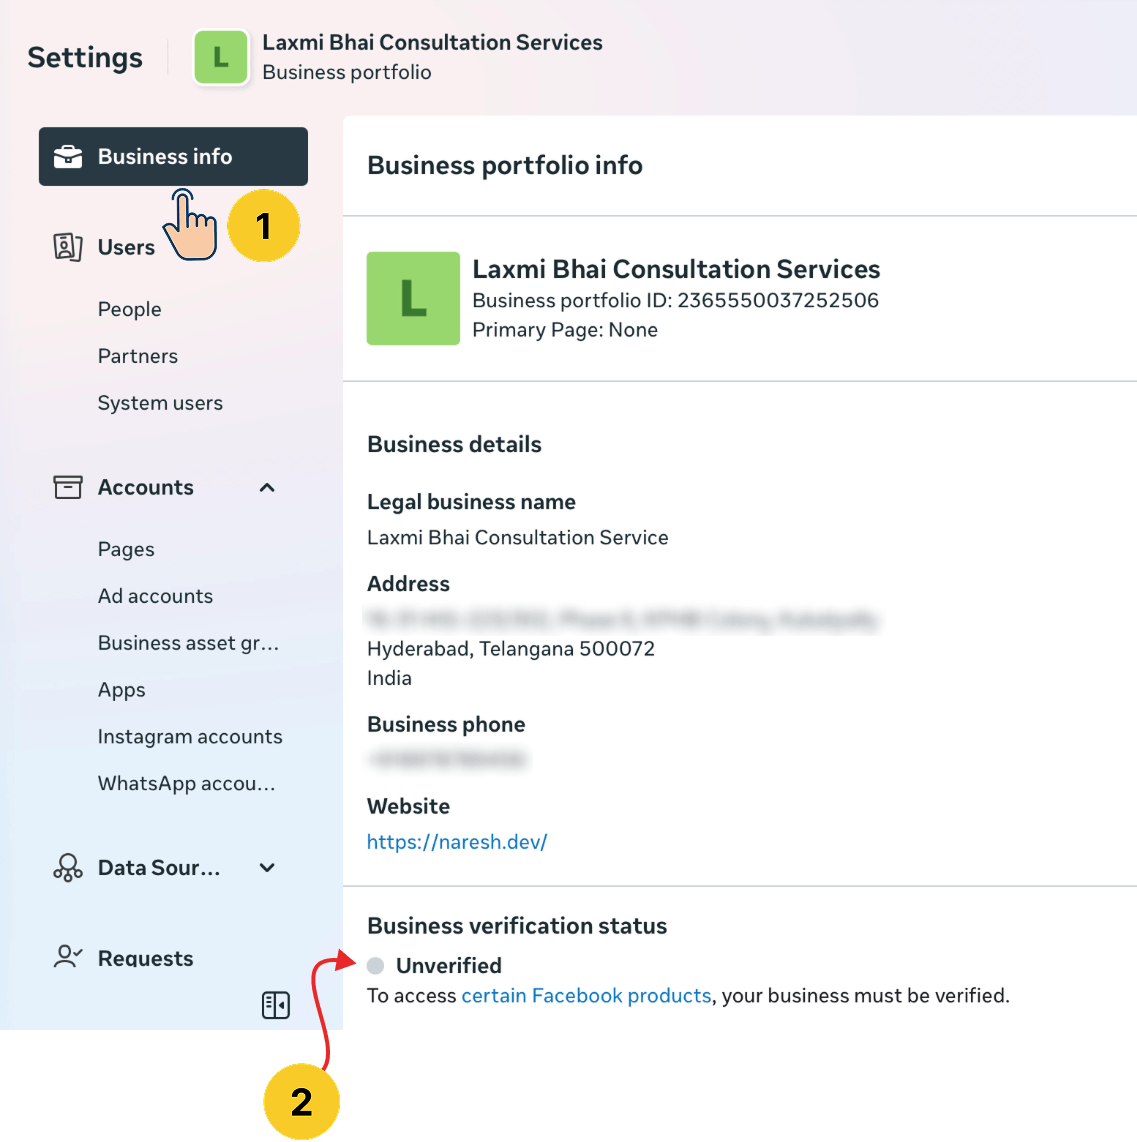
And to start the verification process:
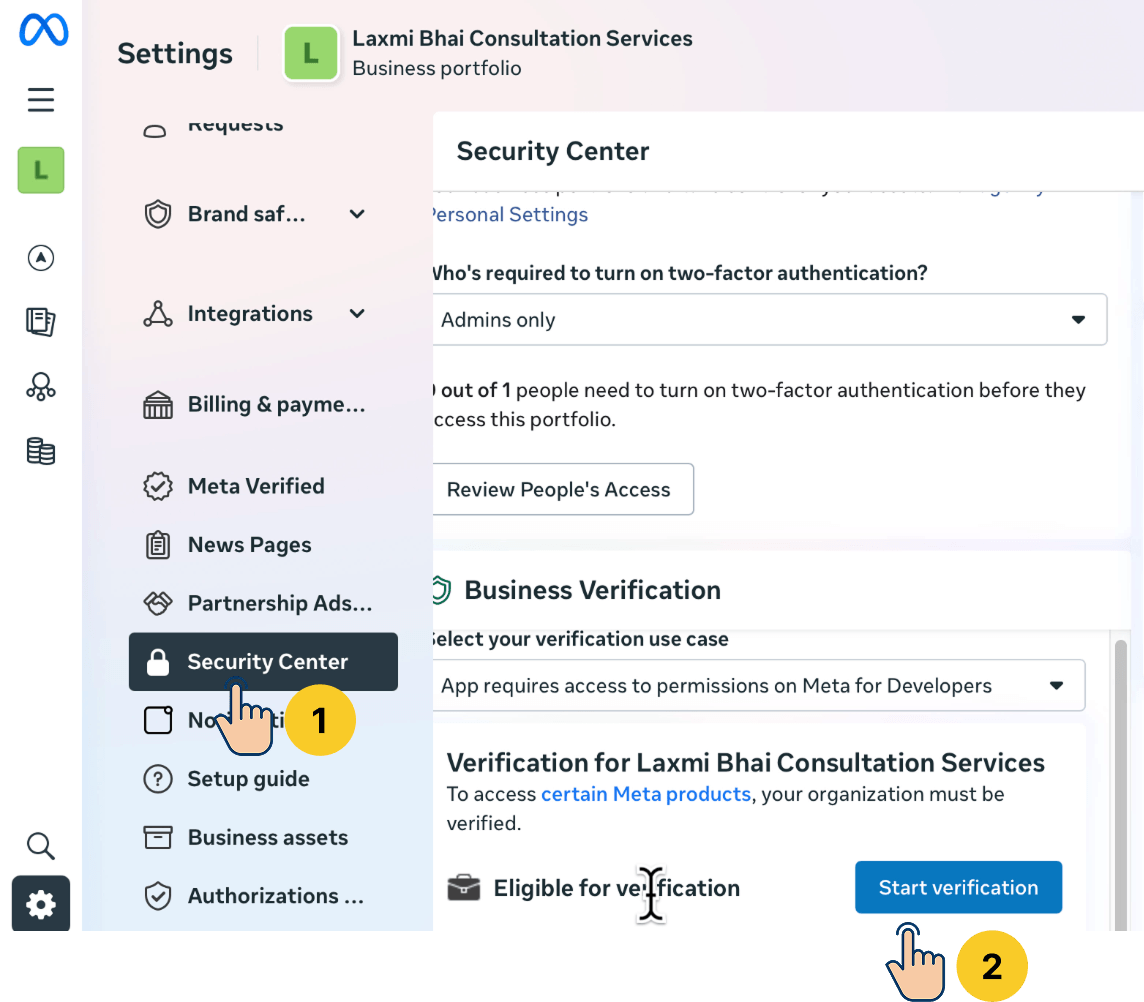
- Find and click on the "Security Center" button from the left sidebar menu. This link is located towards the bottom 25% of the current page.
- And then click on the "Start verification" button
This will bring a pop-up that says what's involved:
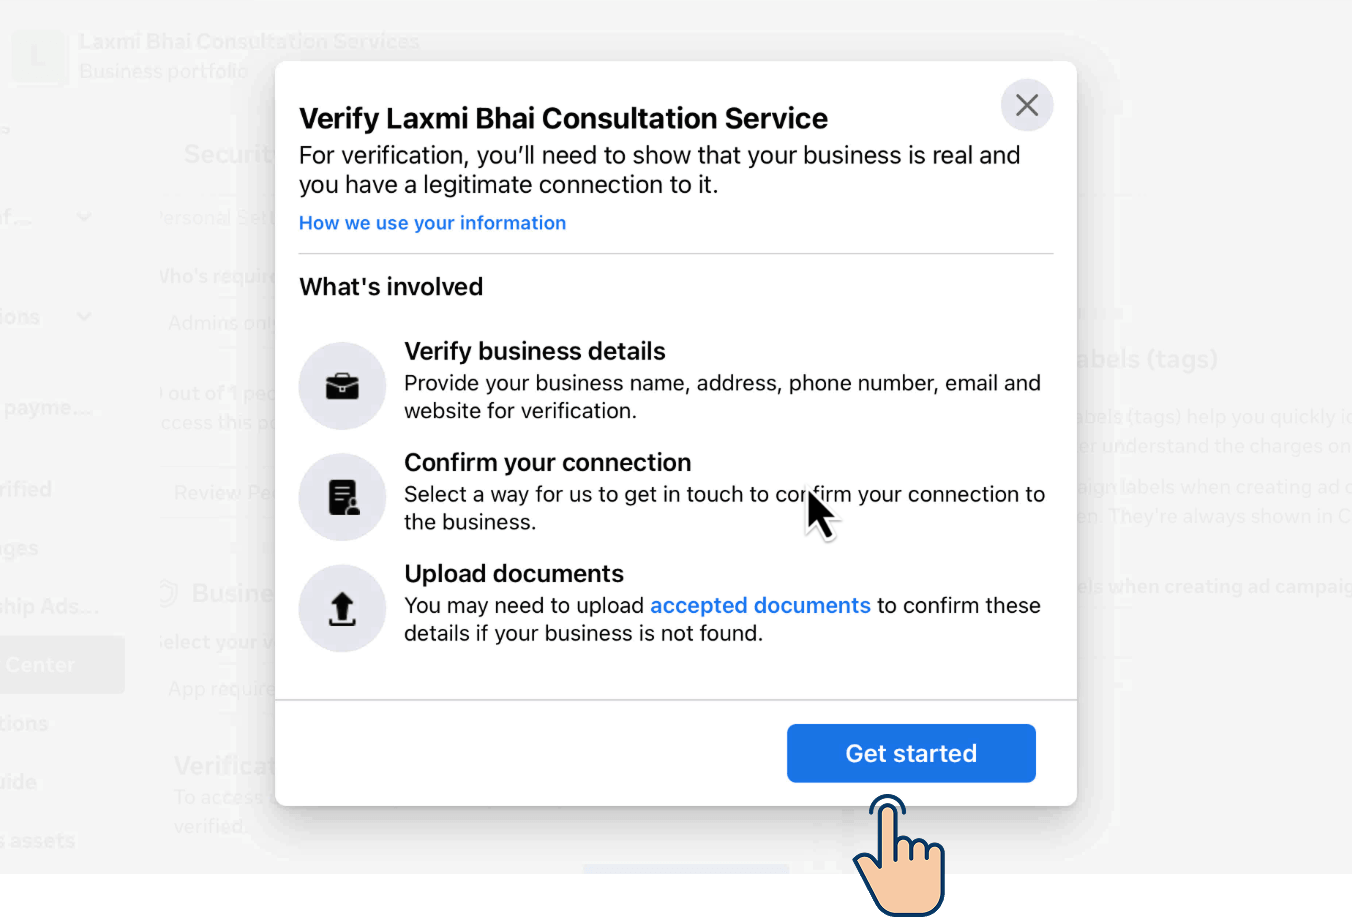
Read it carefully, and then click the "Get started" button.
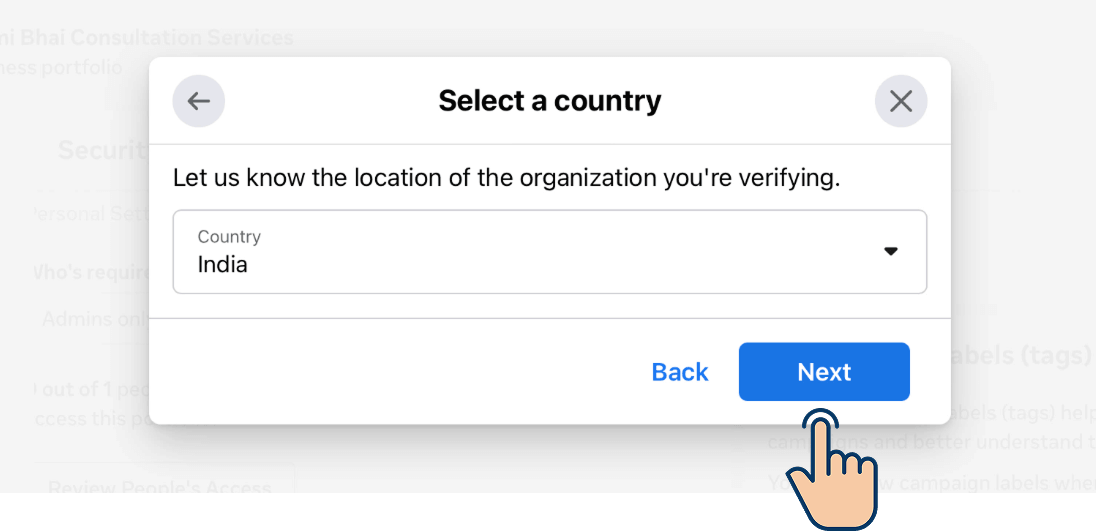
Step A: Select the country where you registered your company and click the "Next" button.
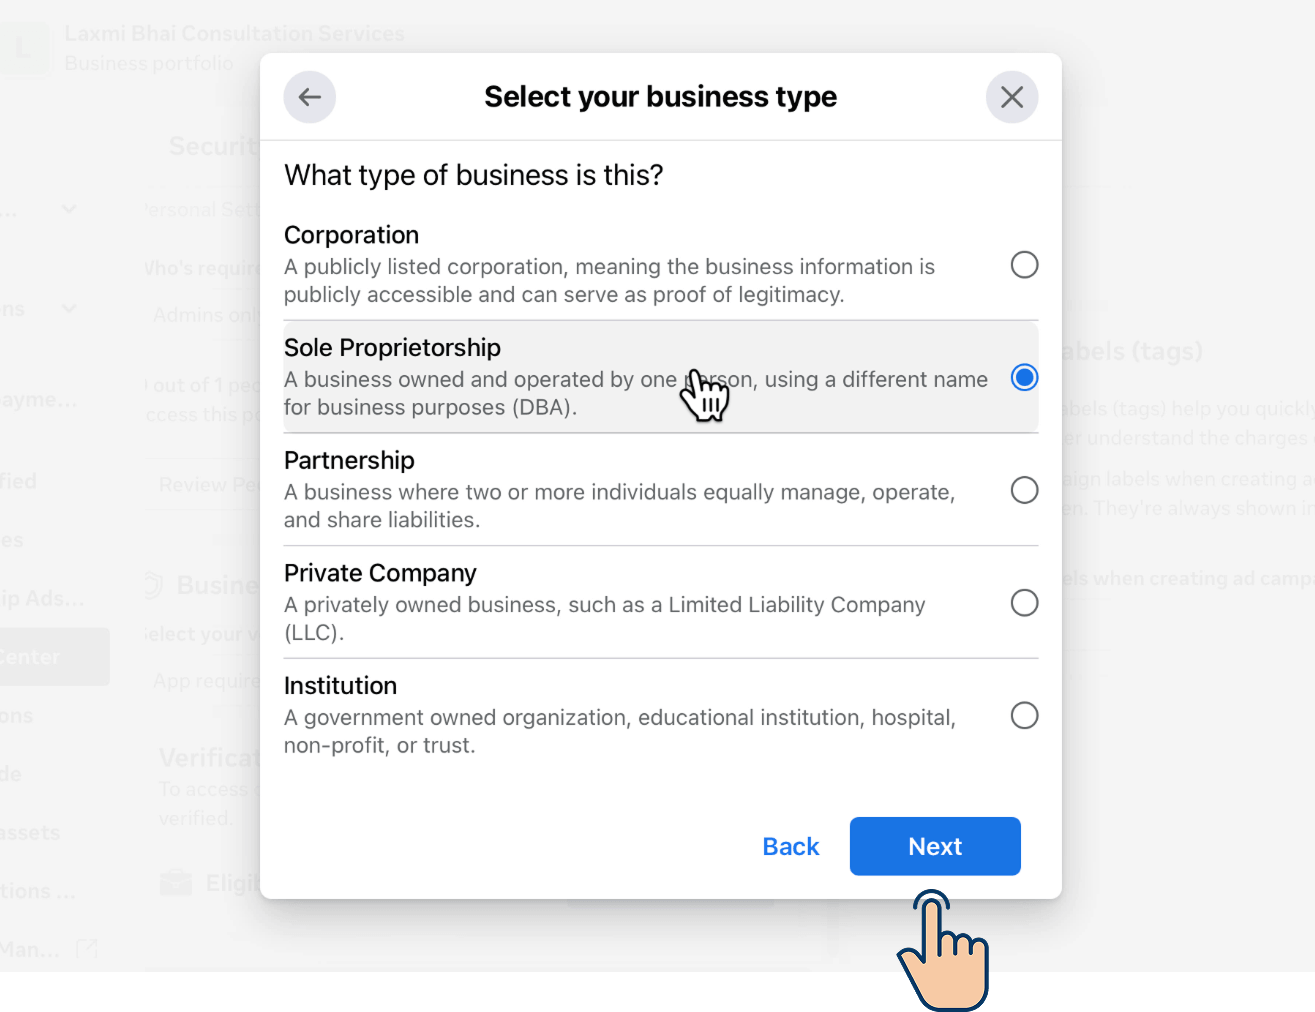
Step B: Select your business type and click the "Next" button. Mine is a sole proprietorship.
It is hard to pronounce. LOL.
Step C: Is your business officially registered or not?
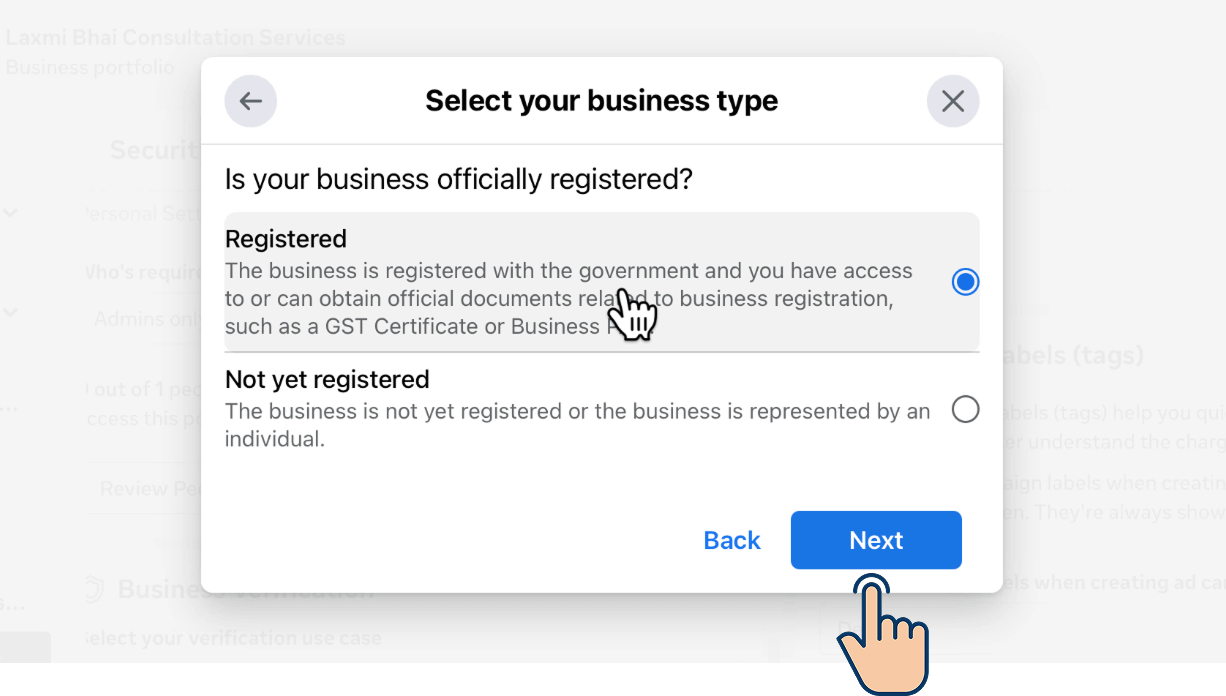
Mine is a registered business. I verified mine many times and never faced any problems after selecting "Registered".
I never had to select "Not yet registered". So, I apologize to say that I don't know what happens if you go that route.
Step D: Provide business registration details such as Tax ID or Business Registration number.
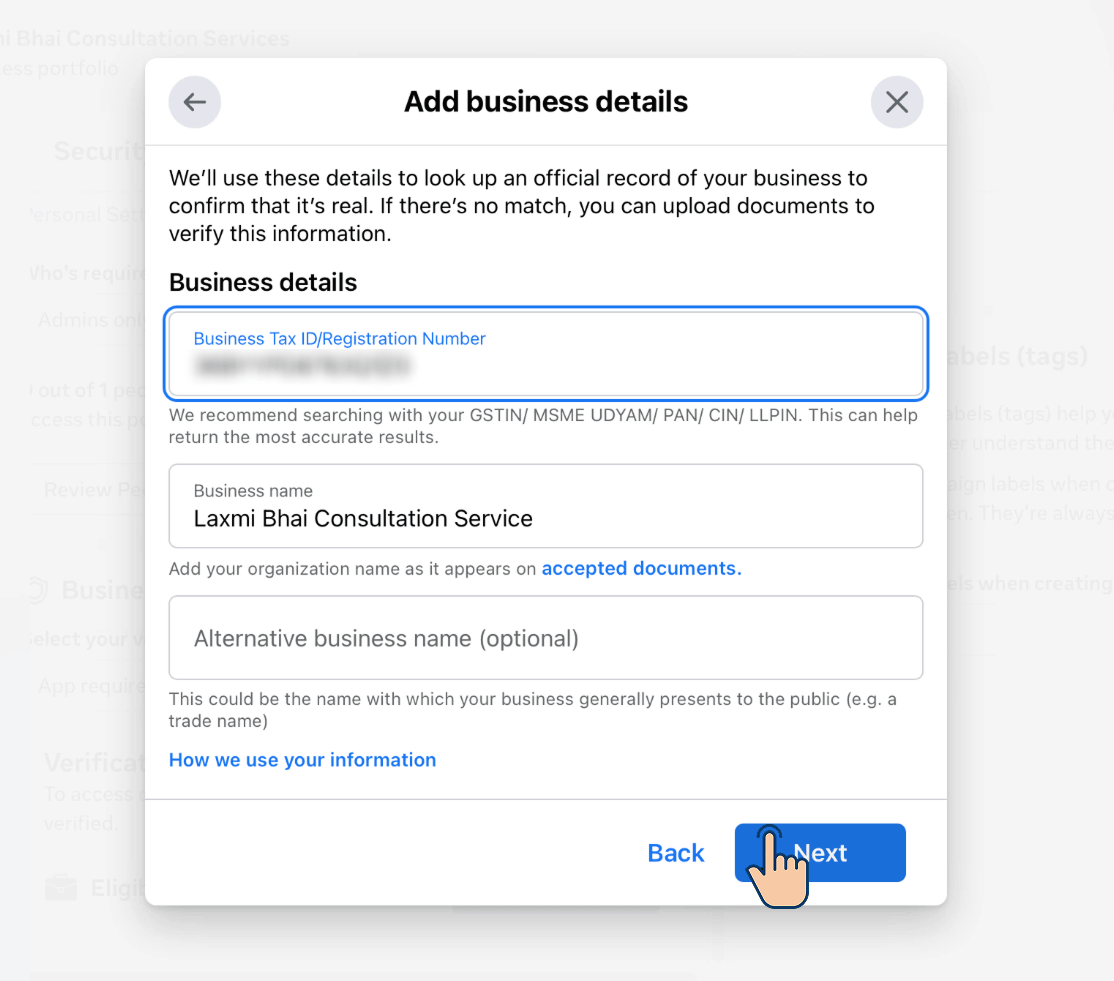
I am living in India, so I provided my GST number as the Tax ID.
Depending on your country, provide the correct details here.
Steps E and F are about providing your business location address and contact information:
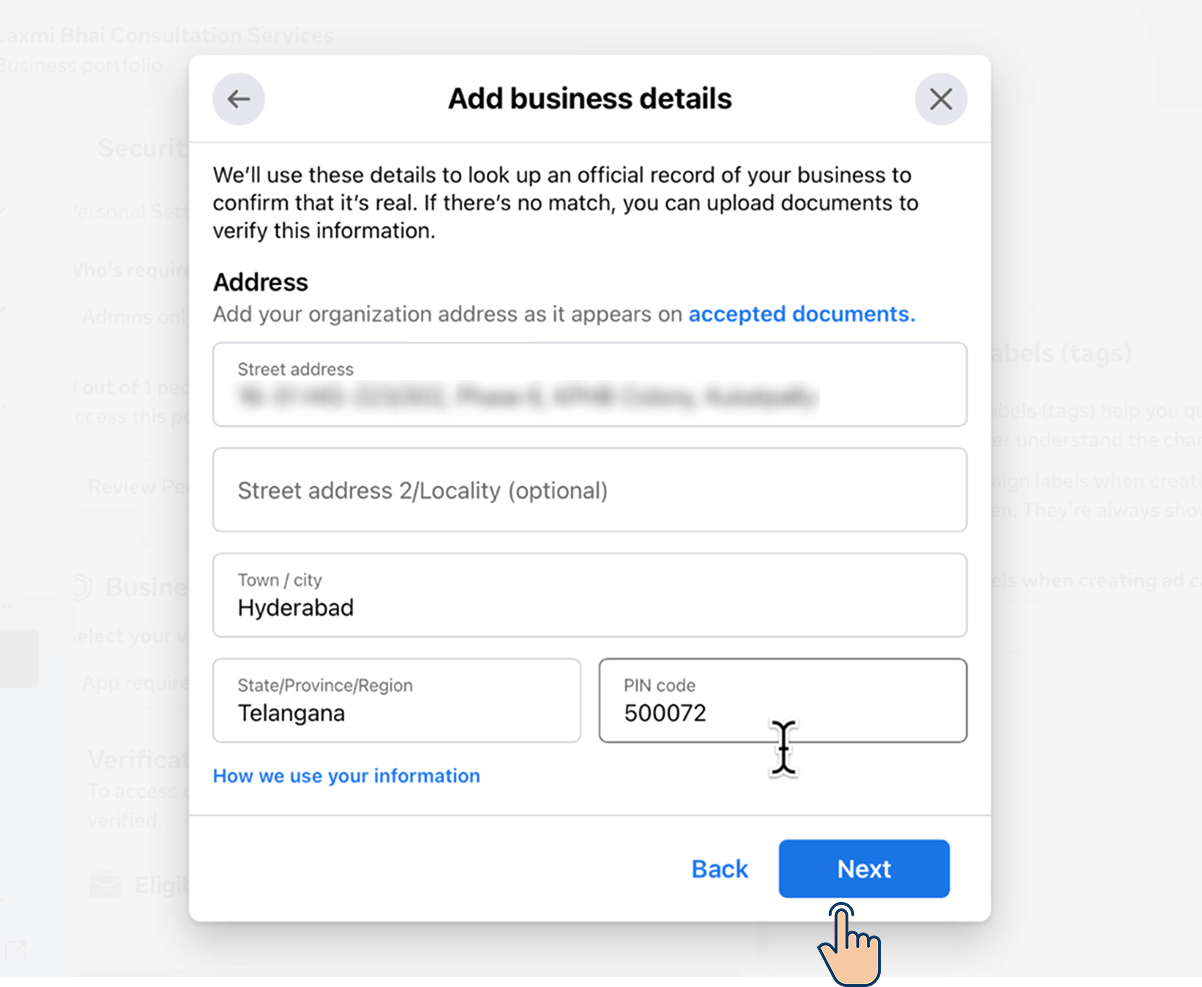
You must provide the company address as it appears on documents that are used for address or business proof.
Next, you need to provide contact information for your business.
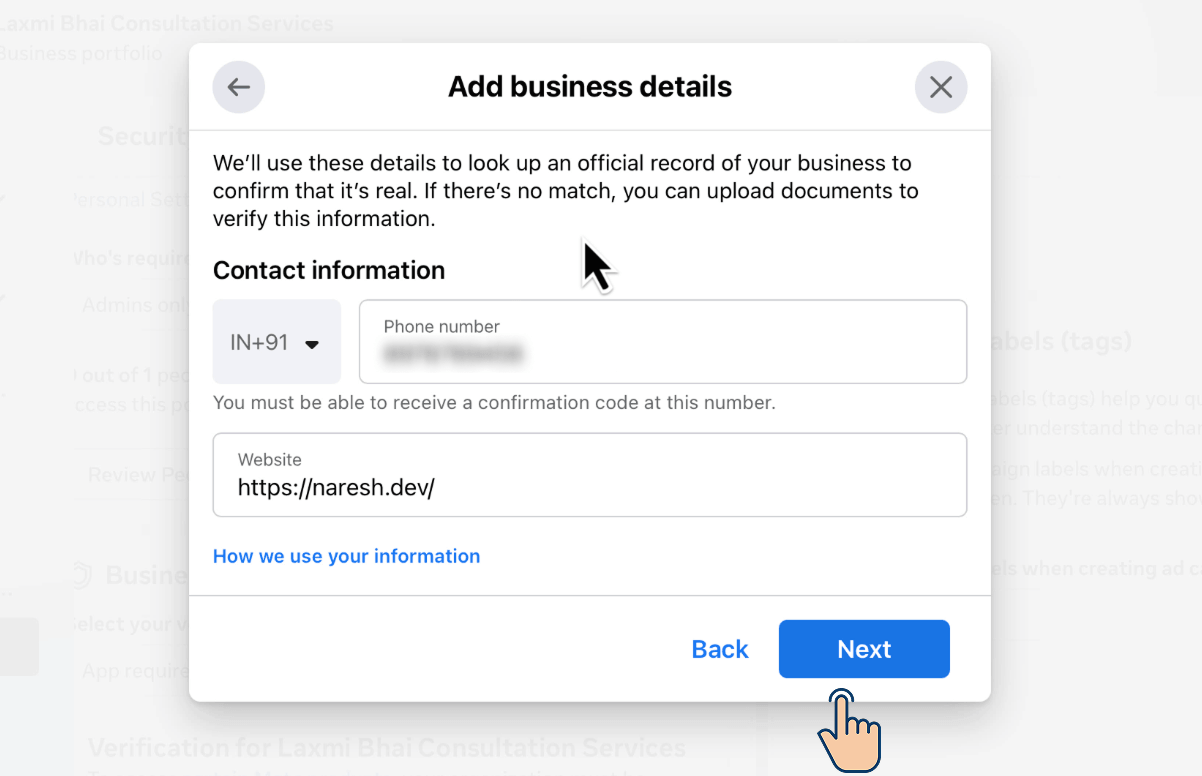
Step G: Meta searches for public records of your business
Based on the details we provided so far, Meta will check if a real business exists.
If you provided accurate information, Meta will find your business listing inside the public records.
It found mine:
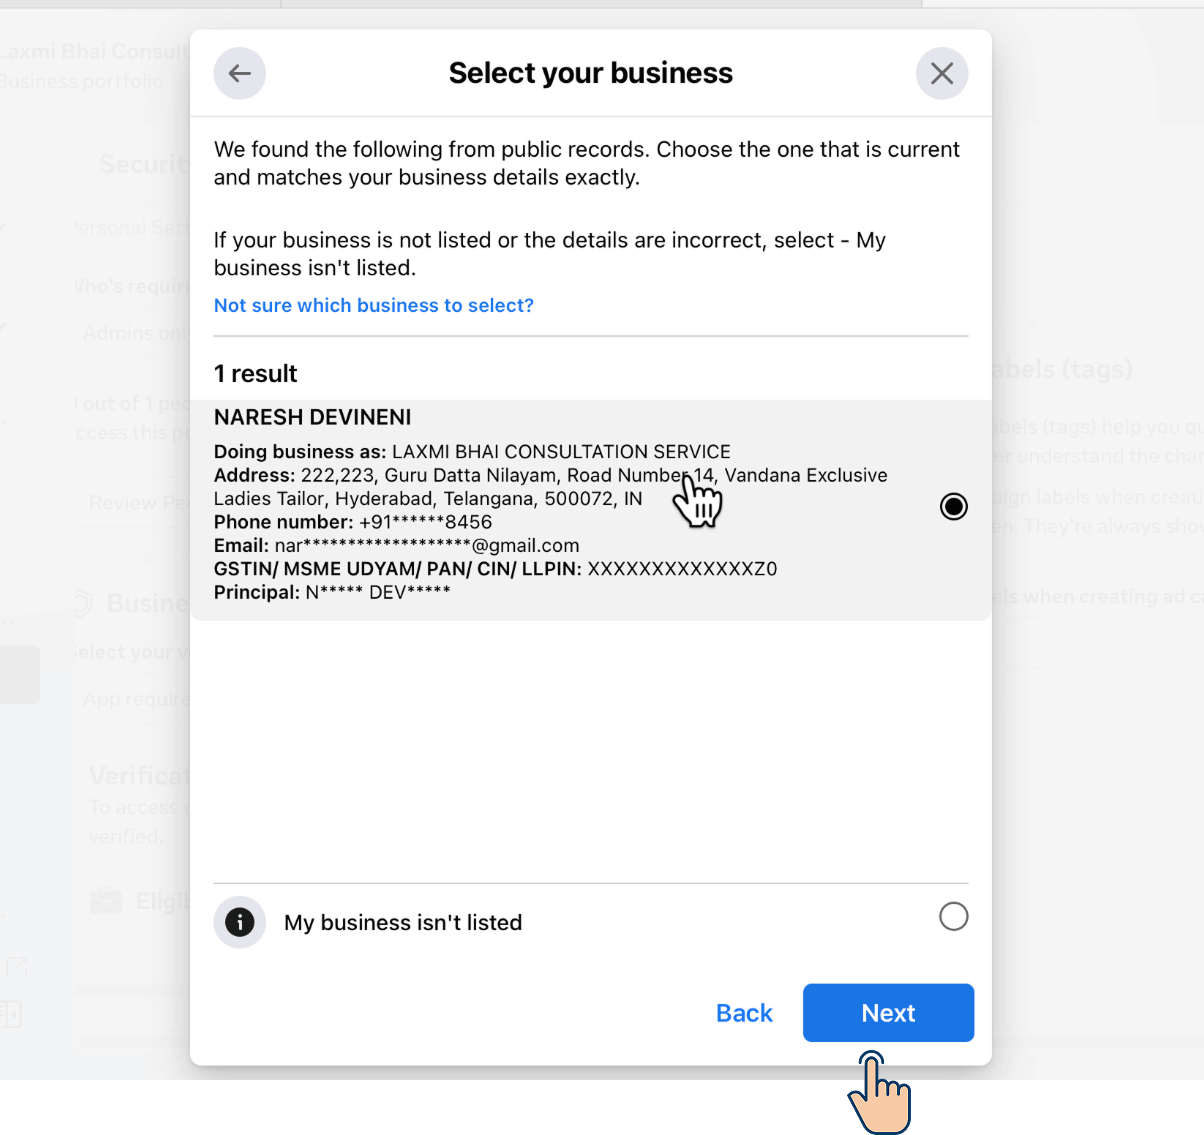
Also, if you notice, the listing contains the contact details of my business, and these details match closely with the details I entered during steps E and F.
I can also verify that I have access to the phone number and email address that I provided during the verification process.
This improves my odds of getting my business verification approved from Meta.
Some businesses get stuck because their address and contact information are not verifiable.
They no longer use the same phone number or email, but they don't update their documents with the new number or email.
If you are in that zone, Meta will make things a lot difficult for you.
Anyway, for now, I am not in that zone 🕶️
So, I will select my business listing and hit the "Next" button.
Step H: Review the details you provided so far
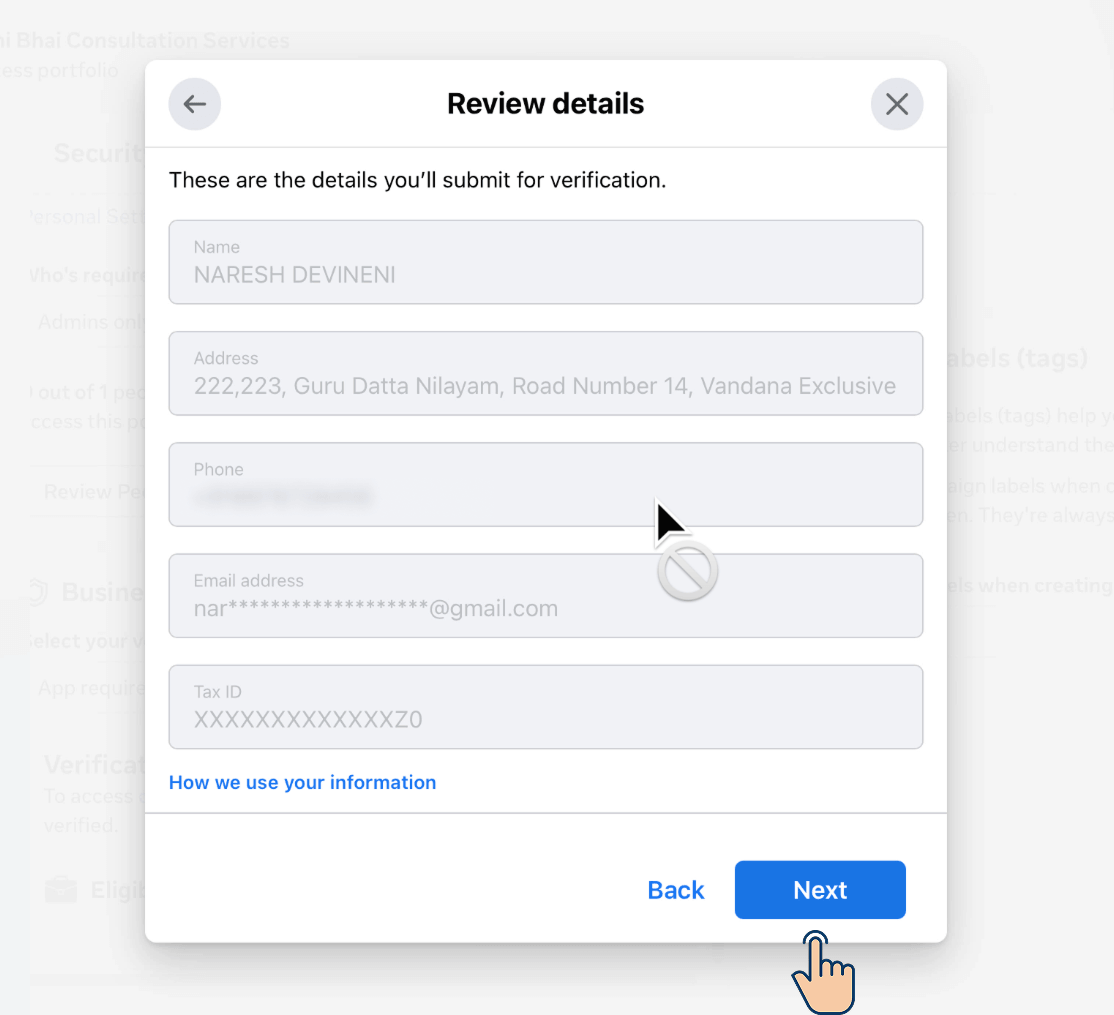
Especially, review the Phone number and Email because you'll receive a confirmation code to them in the next step.
If there is any misinformation, now is the time to fix.
Step I: Confirm your connection to your business by getting OTPs to your phone and email
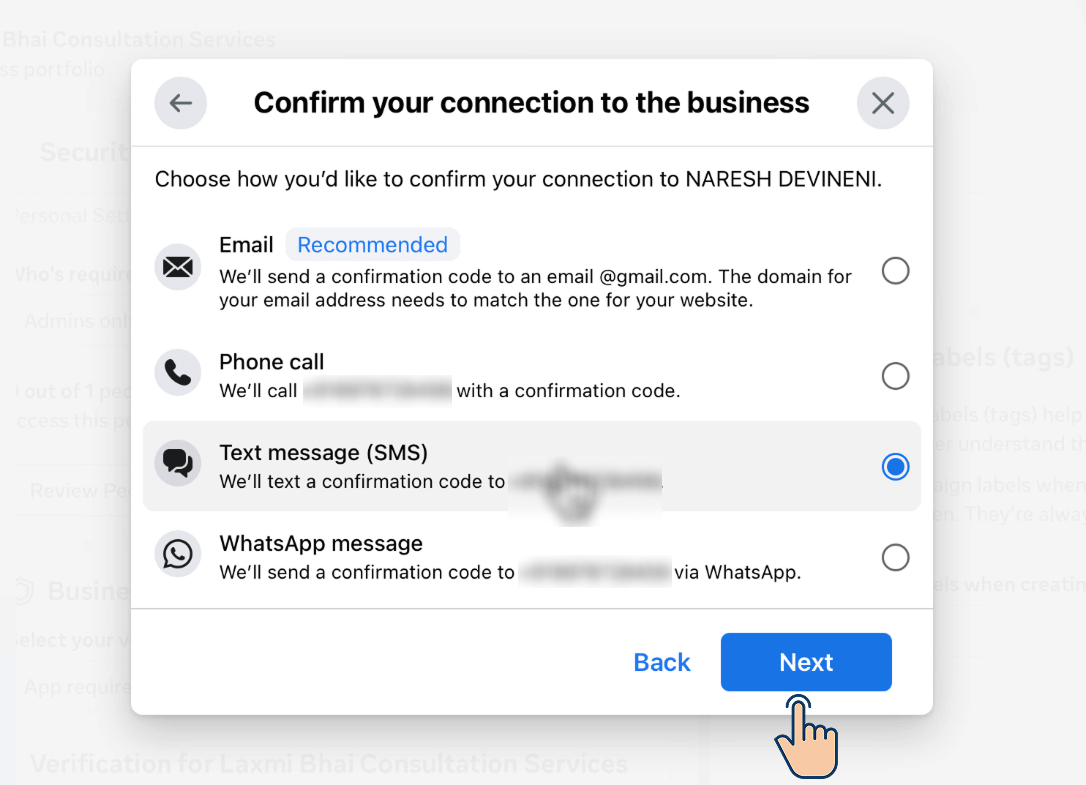
Meta will send a confirmation code to at least two services.
I went with SMS and email to receive confirmation codes, and gave confirmation to Meta that I have access to them:
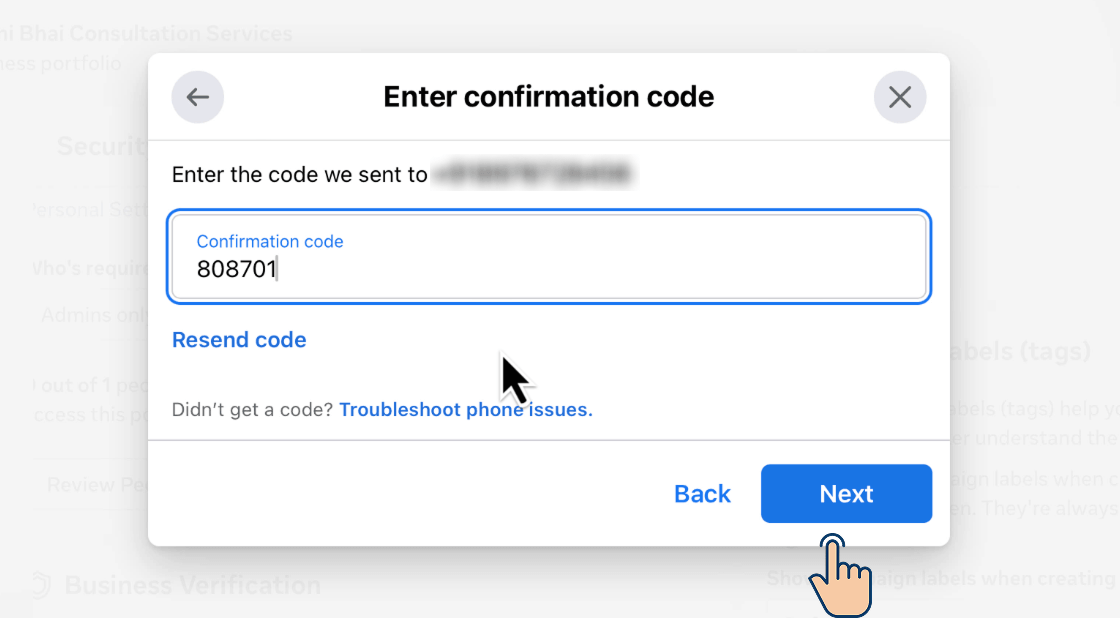
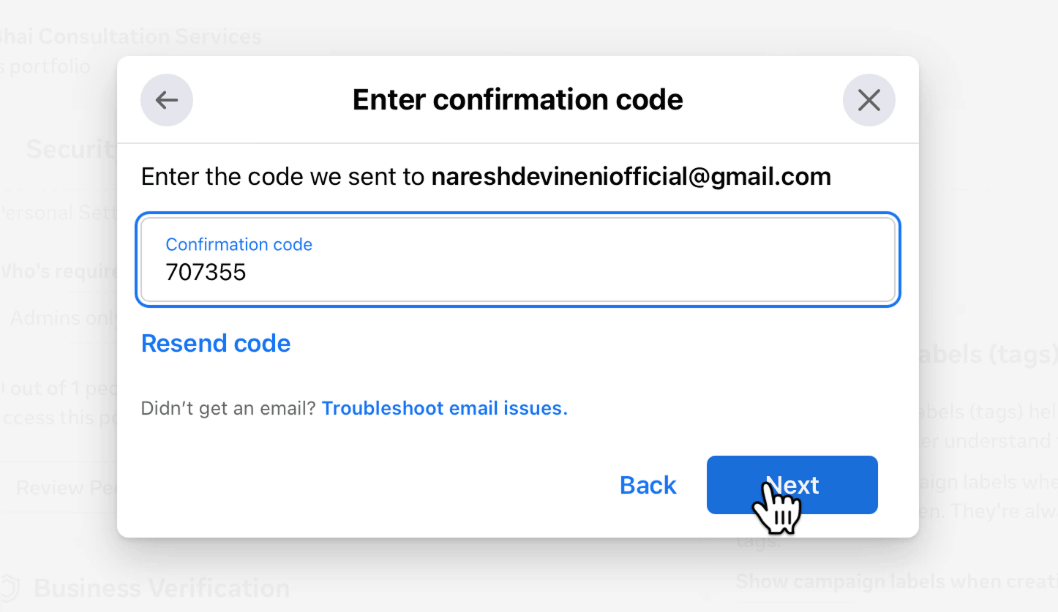
And with this step, I submitted my information and waited for Meta to approve my business verification.
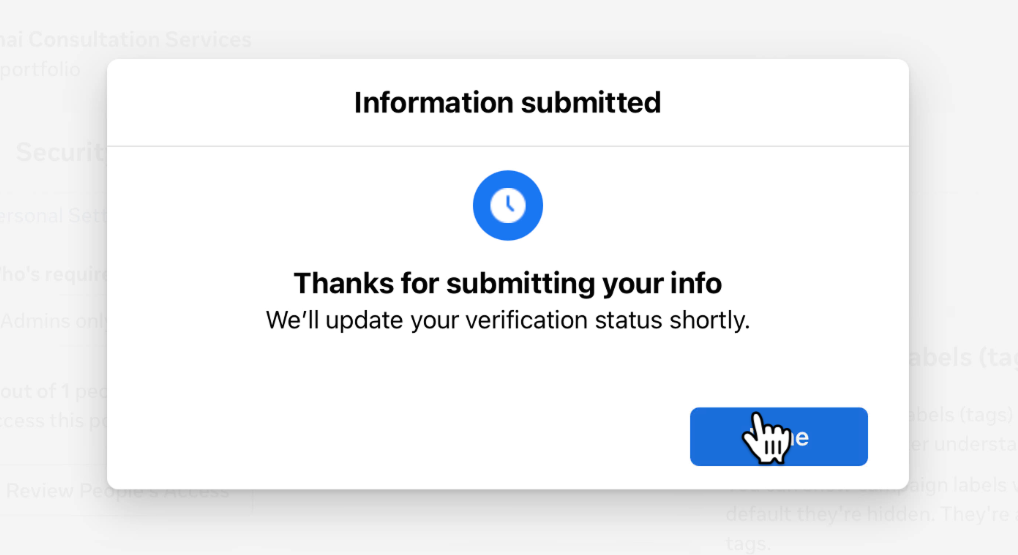
You can check the status of the verification inside the "Security Center" page of your business portfolio:
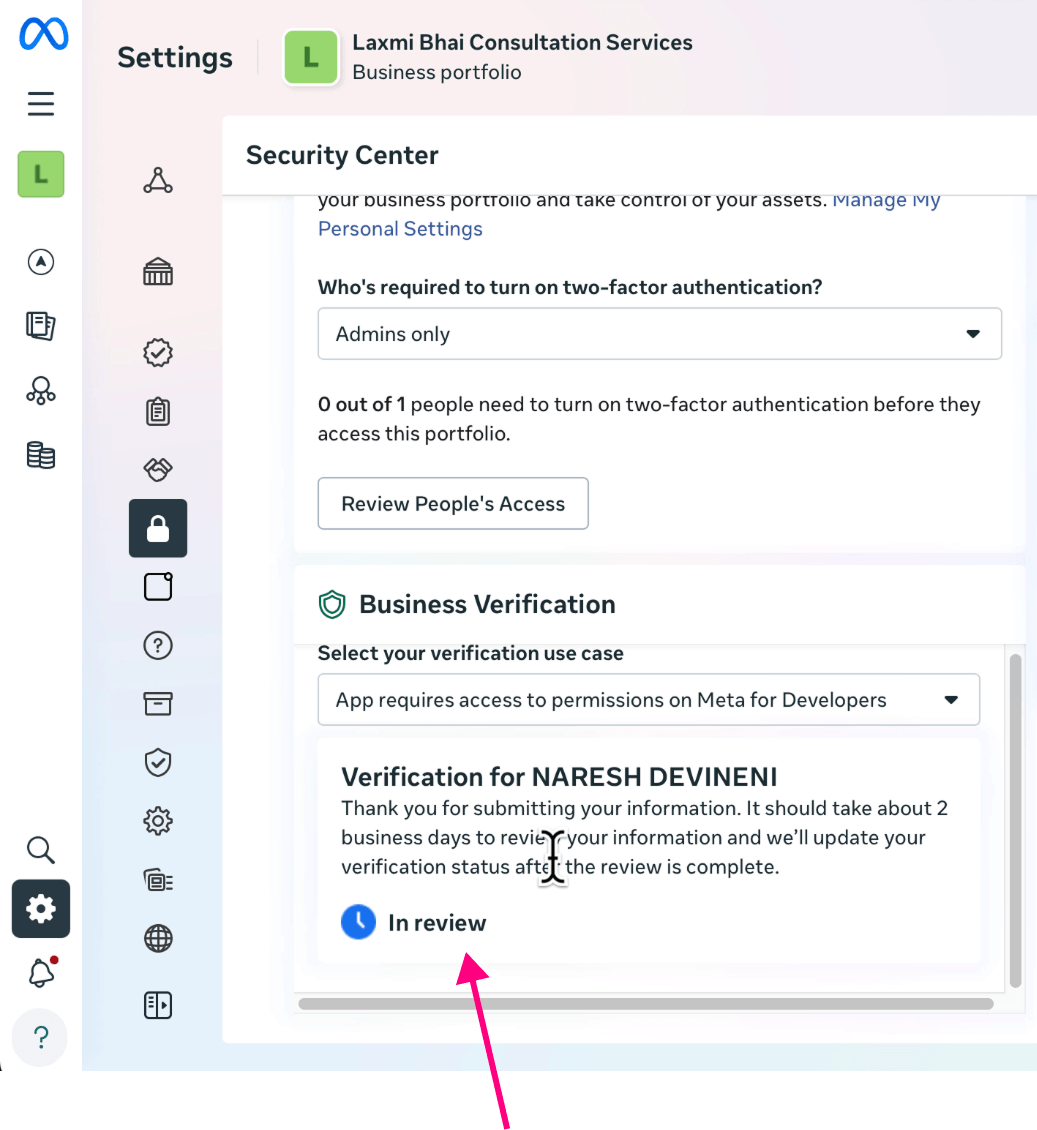
If you notice, there is a "Business Verification" box, and it currently says "In review".
I kept refreshing this page. My anxiety was through the roof 😵💫
Finally, Meta approved my business verification in less than 15 minutes:
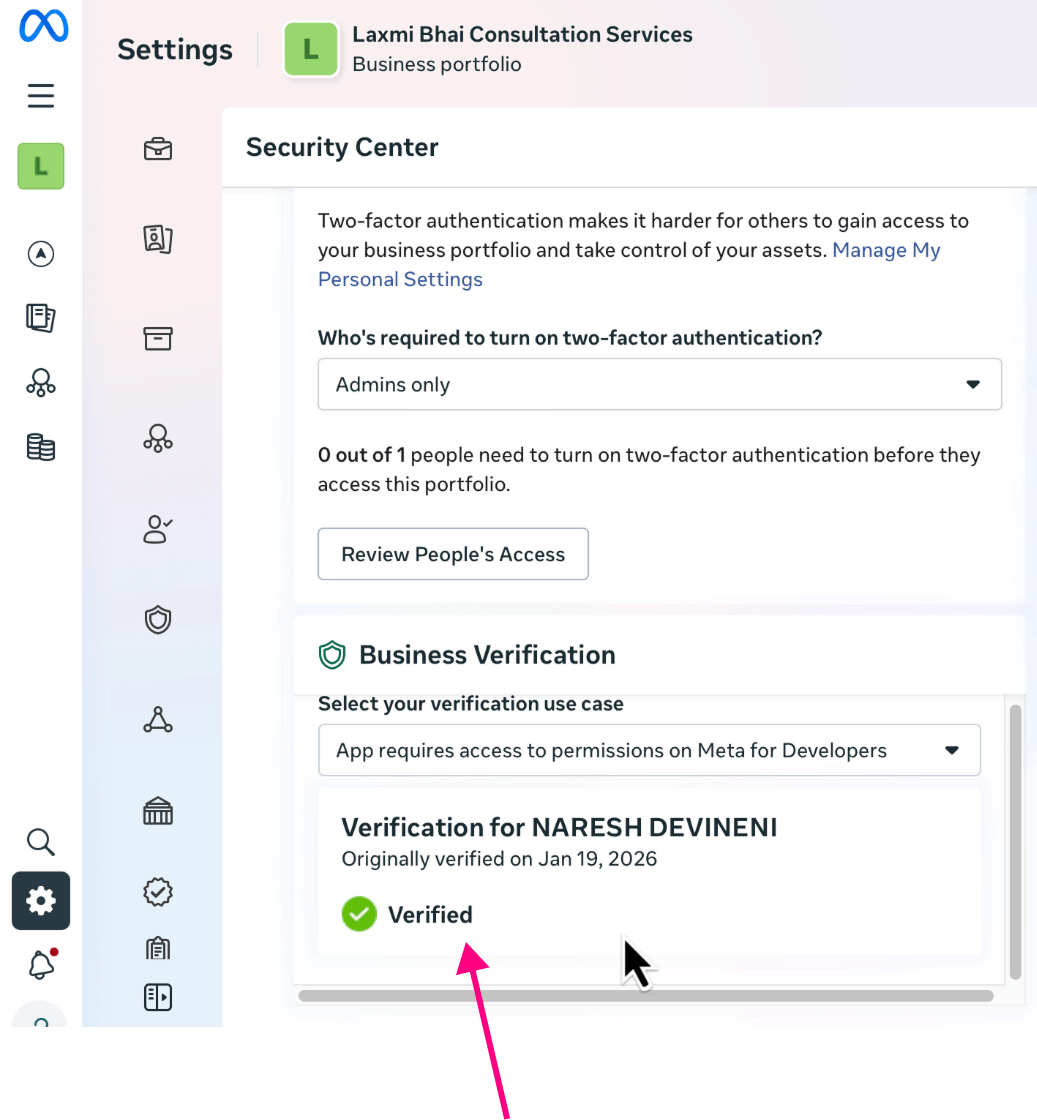
And that's all it takes to verify your business with Meta.
For some of us, it is easy because our business details are accurate and verifiable.
For some of us, it is much trickier and can easily get stuck for days.
And because Meta doesn't provide detailed feedback, there is not much we can do if we get stuck anyway.
So, I just hope you succeed on the first attempt. If not, fix your documents and details.
"Hmmmm. Are we done yet? This tutorial feels like it is going forever!"
Haha! Sorry about that.
We just need to perform one last step to be truly done with the API setup and integration with n8n.
And that is...
Step 9: Add a payment method to your WhatsApp Business Account (WABA)
We need to add a payment method because WhatsApp charges you money when you initiate messages to your customers.
You will not be charged for receiving messages. You'll not be charged to respond to a customer's query if you can reply within the next 24-hours after the message is received.
But you will get charged:
- If you initiate the conversation
- If you failed to respond to the customer's query within 24-hours
- If you send promotional messages
Before we go on, it's worth understanding why that 24-hour rule exists, because at first it looks random.
But once it clicks, the whole pricing model makes sense.
Here is the thing: WhatsApp doesn't charge you per message. It charges you per conversation.
When a customer messages you first, that opens what WhatsApp calls a 24-hour customer service window.
Inside that window, every reply you send back is free.
This is because the customer started the conversation and effectively signaled "yes, I want to hear from this business."
WhatsApp has no reason to charge you for a conversation the user invited.
But the moment that the 24-hour customer service window closes or the moment you are the one starting the conversation instead of the customer, WhatsApp treats it as a new, business-initiated conversation.
And that's the kind it charges for.
You can read more about it here:
 diannegillespie
The pricing also depends on the type of message, the customer's country, etc.
For example, if you are sending marketing outreach messages for customers in North America, each delivered message costs you $0.0250.
And many business owners are okay with this pricing because it is affordable for them.
Anyway, the bottom line is:
- WhatsApp Cloud API is not free, depending on the type of messages you are sending to your customers.
- And you need to add a payment method to avoid failures when sending messages.
So, let's quickly see how to add a payment method and get done with this tutorial for good 🪂
We need to add the payment method at the WhatsApp Business Account (WABA) level.
So, first, open up the settings of your business portfolio:
Next, from the left sidebar menu, click on "WhatsApp accounts" and then make sure your WABA is selected.
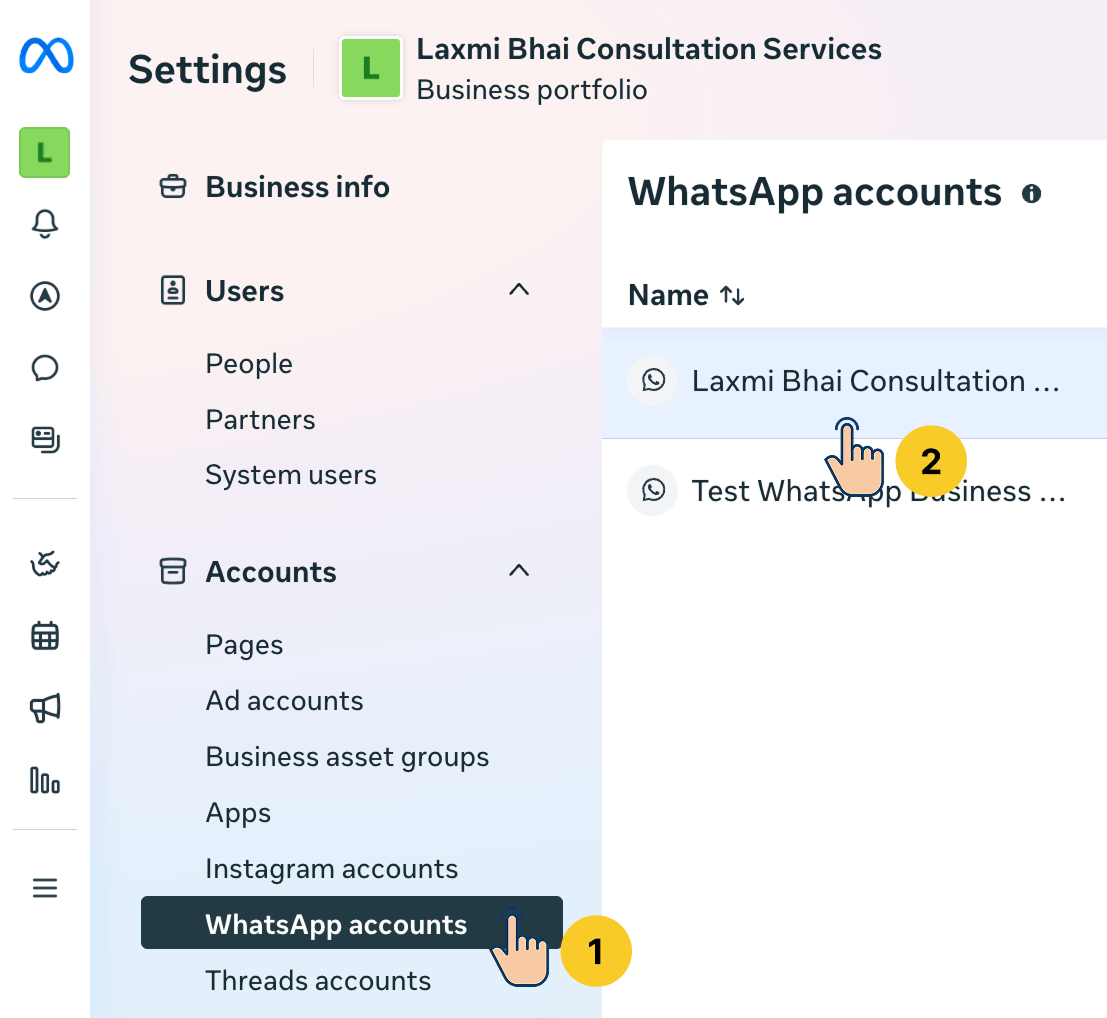
Now, inside your WABA info section, if you scroll down a bit, you'll find a section for "Payment method," and it is currently empty.
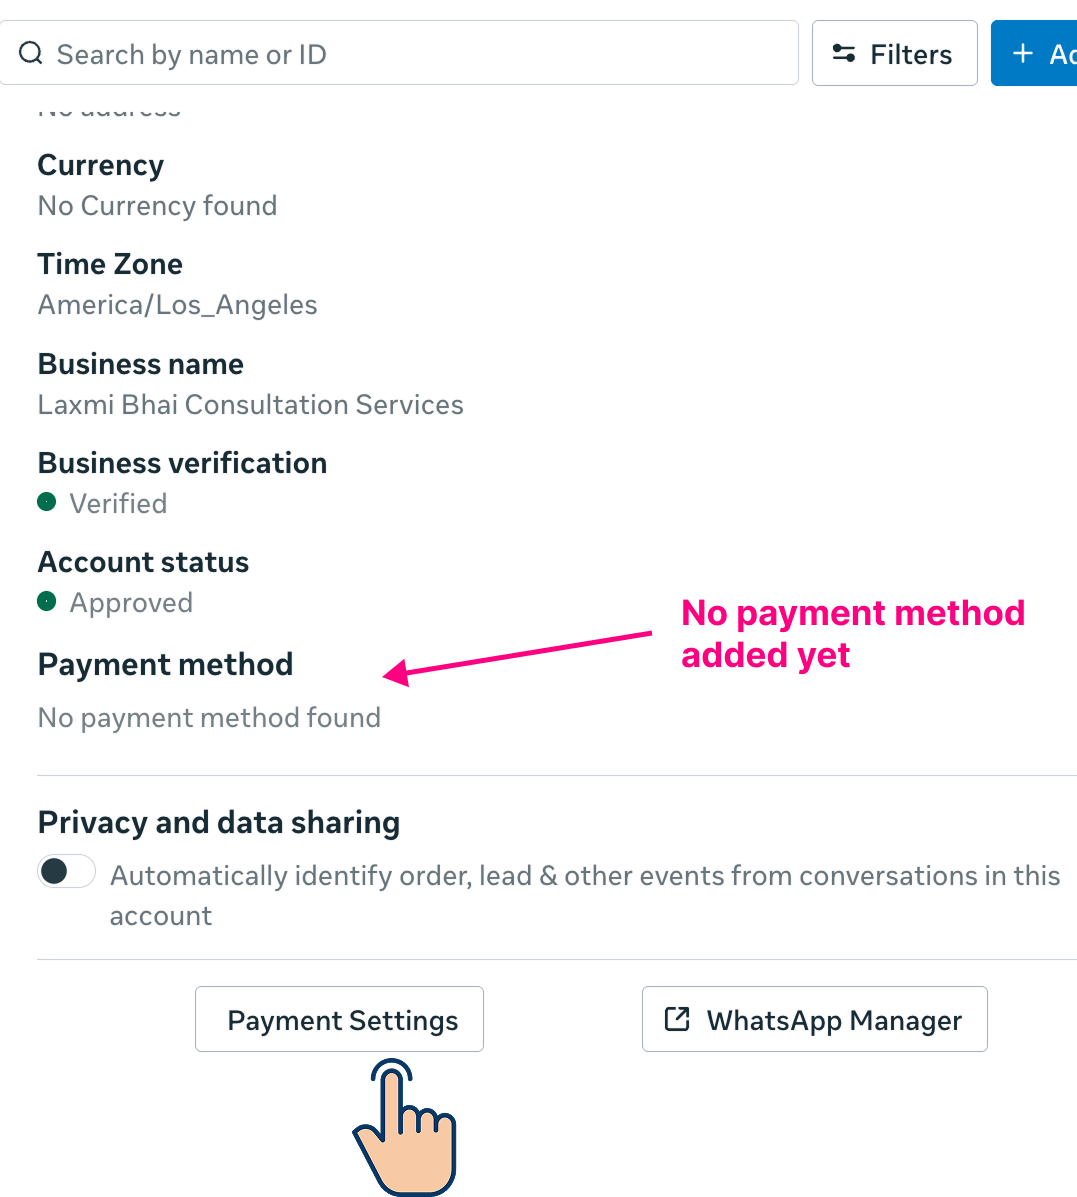
To fix it, click on the "Payment Settings" button, and you'll then be taken to the "Billing & payments" screen of your WABA account:
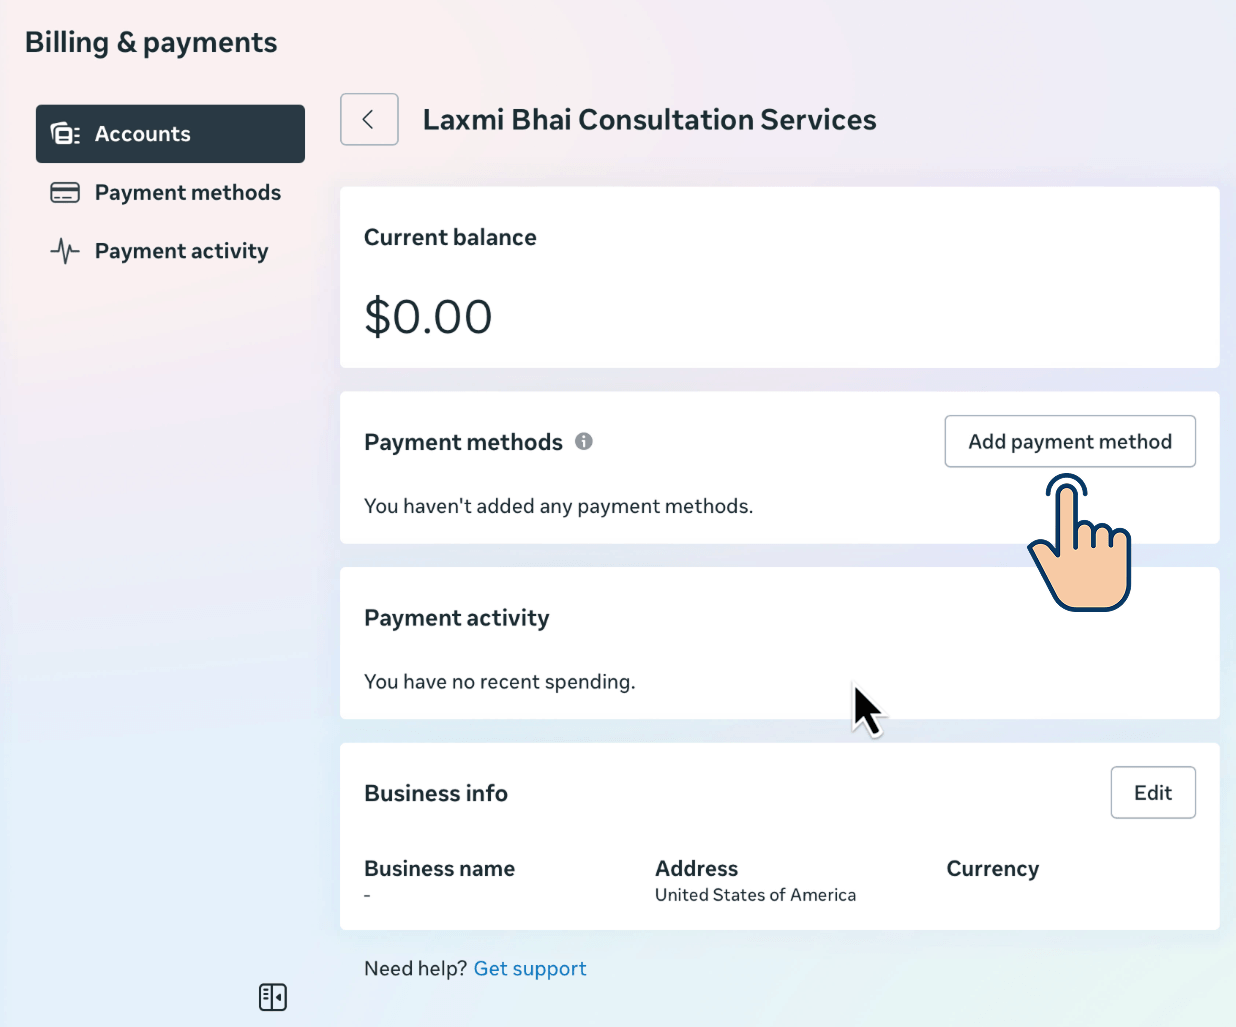
Finally, click on the "Add payment method" button to add your card details.
That's all.
And once you add the payment method, it might not immediately reflect on your WABA account.
For me, it took days. It could be a buggy dashboard.
But here is how it looks after my payment method was added:
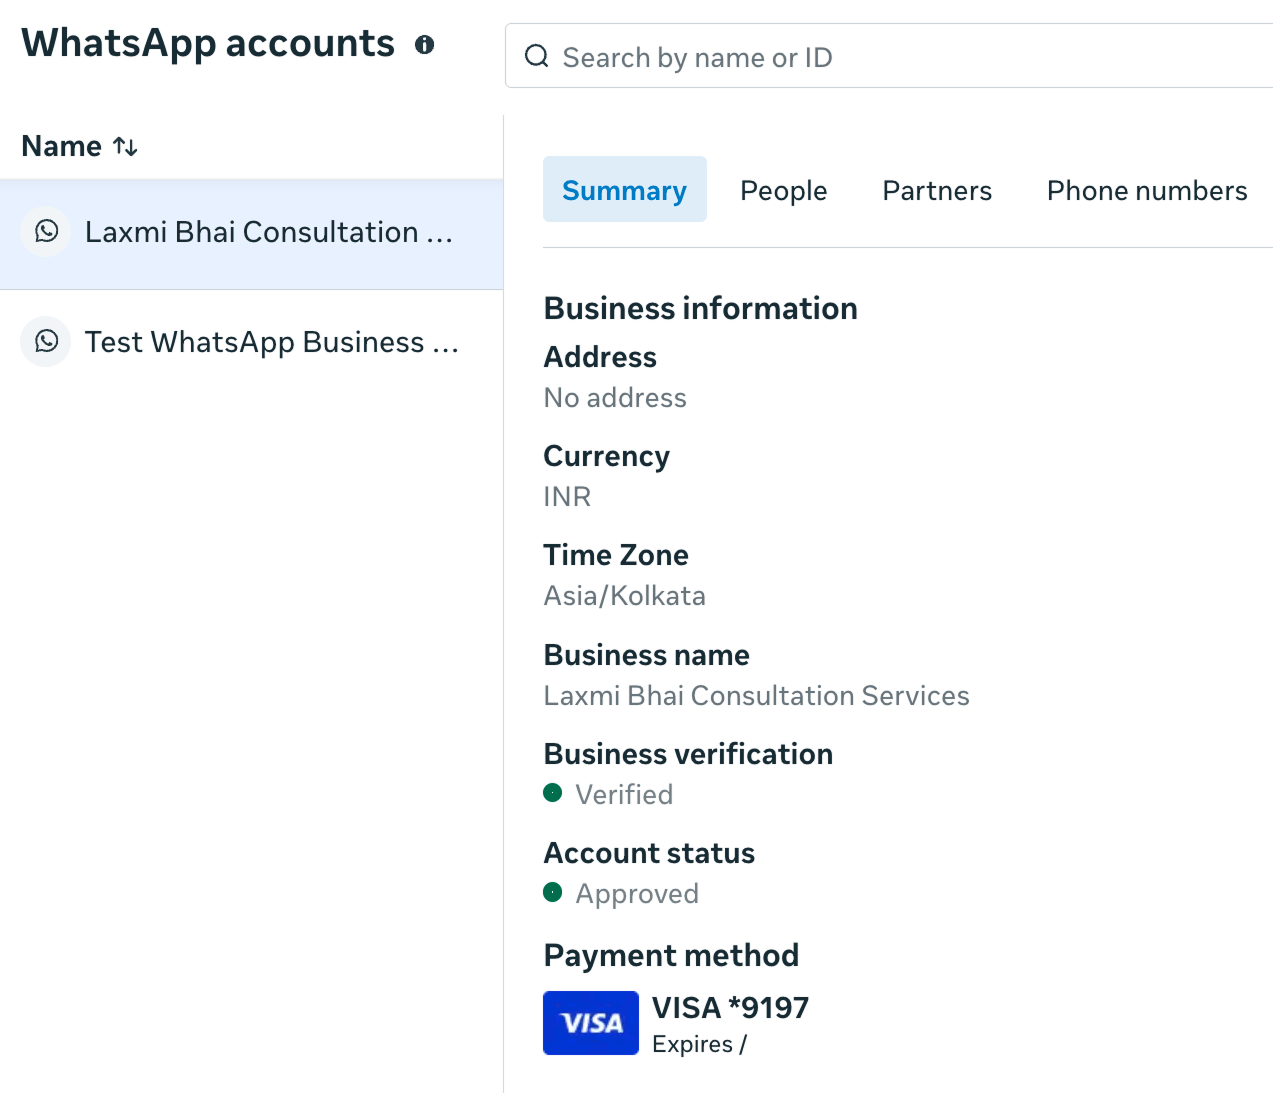
Add greens. It is a treat to watch them.
That's all it takes to add a payment method.
The Conclusion
We are now done with all the steps for successfully integrating WhatsApp Cloud API with n8n.
I know it has been an exhaustive journey for you.
But now that you have reached here, you can now automate your WhatsApp messaging however you want by being reasonable and not spammy.
Also, to use the Meta platform to access the WhatsApp Cloud API, you need to be a verified business owner who can tick all the boxes.
Sometimes, your access gets rejected even when you have everything in place, or your account can get suspended even if you are doing everything right.
So, many of us get stuck forever if we are purely depending on the Meta platform.
And this is where third-party services like Twilio or software like GoHighLevel, ManyChat come in.
These third-party services are trusted partners of the WhatsApp Cloud API, and they allow us to bypass the strict verification process of Meta.
Many people use these third-party services for this very reason.
So, in the next lesson, I will teach you how to perform the same n8n-WhatsApp integration using Twilio.
Having said that, I recommend you try accessing WhatsApp Cloud API through Meta's official site first.
Only if that doesn't work, explore other techniques.
This eliminates dependency on third-party services when possible.
Anyway, take care and happy automation :)